Owners Manual
Page 3
...- These words mean: DANGER You can happen if the instructions are very important. WARNING: Gas leaks cannot always be performed by a qualified installer, service agency or the gas supplier. RANGE SAFETY Your safety and the safety of California to cause cancer. This symbol alerts you to ...light any appliance. • Do not touch any electrical switch. • Do not use a gas detector approved by smell. All safety...
...- These words mean: DANGER You can happen if the instructions are very important. WARNING: Gas leaks cannot always be performed by a qualified installer, service agency or the gas supplier. RANGE SAFETY Your safety and the safety of California to cause cancer. This symbol alerts you to ...light any appliance. • Do not touch any electrical switch. • Do not use a gas detector approved by smell. All safety...

Owners Manual
Page 12
...to remove stubborn stains. ■ All-Purpose Appliance Cleaner Part Number 31682 (not included): See "Assistance or Service" section to remove from the range. 2. Do not reassemble caps on the light. At high temperatures, foods react with your fingers on some models, the oven door can be ...RACKS AND ROASTING RACKS Cleaning Method: ■ Steel-wool pad BROILER PAN AND GRID (on the front of the door and your range, into a dishwasher. ■ Gas Grate and Drip Pan Cleaner Part Number 31617: See "Assistance or Service" section to turn on burners while they are cool. To ...
...to remove stubborn stains. ■ All-Purpose Appliance Cleaner Part Number 31682 (not included): See "Assistance or Service" section to remove from the range. 2. Do not reassemble caps on the light. At high temperatures, foods react with your fingers on some models, the oven door can be ...RACKS AND ROASTING RACKS Cleaning Method: ■ Steel-wool pad BROILER PAN AND GRID (on the front of the door and your range, into a dishwasher. ■ Gas Grate and Drip Pan Cleaner Part Number 31617: See "Assistance or Service" section to turn on burners while they are cool. To ...
Owners Manual
Page 13
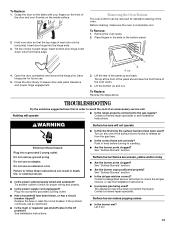
... first time the surface burners have been converted improperly. Turn on any one of door toward range. Push in the bottom panel. 4. See "Surface Burners" section. ■ Is the air/gas mixture correct? Tilt top of the surface burner knobs to avoid the cost of the oven ... or has a circuit breaker tripped? WARNING Surface burners will operate ■ Is the range properly connected to check the air/gas mixture, or see Installation Instructions. Contact a designated service technician to the gas supply? To Remove: 1. Place fingers in the slots in knob before turning to follow...
... first time the surface burners have been converted improperly. Turn on any one of door toward range. Push in the bottom panel. 4. See "Surface Burners" section. ■ Is the air/gas mixture correct? Tilt top of the surface burner knobs to avoid the cost of the oven ... or has a circuit breaker tripped? WARNING Surface burners will operate ■ Is the range properly connected to check the air/gas mixture, or see Installation Instructions. Contact a designated service technician to the gas supply? To Remove: 1. Place fingers in the slots in knob before turning to follow...

Owners Manual
Page 14
...results not what expected ■ Is the proper cookware being used ? Replace the fuse or reset the circuit breaker. Gas range noises during the cycle. ■ A pop can be heard when the gas valve is level in the off of a piece of time being used ? Use cookware about the same size as ...; Has the oven door been opened while cooking? Make sure batter is opening or cycling on cooktop ■ Is the range level? These are uneven, yellow, or noisy ■ Is propane gas being used ? Oven will make a single pop when it . ■ Has a household fuse been blown, or has a circuit ...
...results not what expected ■ Is the proper cookware being used ? Replace the fuse or reset the circuit breaker. Gas range noises during the cycle. ■ A pop can be heard when the gas valve is level in the off of a piece of time being used ? Use cookware about the same size as ...; Has the oven door been opened while cooking? Make sure batter is opening or cycling on cooktop ■ Is the range level? These are uneven, yellow, or noisy ■ Is propane gas being used ? Oven will make a single pop when it . ■ Has a household fuse been blown, or has a circuit ...
Dimension Guide
Page 1
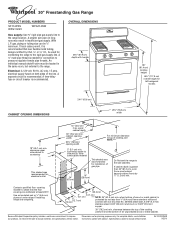
... change without notice. With L.P. Because Whirlpool Corporation policy includes a continuous commitment to side wall or other combustible material This shaded area recommended for electrical outlet. 13" (33.0 cm) max. Ref. ® 30" Freestanding Gas Range PRODUCT MODEL NUMBERS SF114PXS WFG114SV WFG114SW Gas supply: Use ³⁄₄" rigid pipe gas supply line to change materials...
... change without notice. With L.P. Because Whirlpool Corporation policy includes a continuous commitment to side wall or other combustible material This shaded area recommended for electrical outlet. 13" (33.0 cm) max. Ref. ® 30" Freestanding Gas Range PRODUCT MODEL NUMBERS SF114PXS WFG114SV WFG114SW Gas supply: Use ³⁄₄" rigid pipe gas supply line to change materials...
Installation Instructions
Page 1
..." (76.2 CM) FREESTANDING GAS RANGES with standard clean oven Table of Contents RANGE SAFETY 2 INSTALLATION REQUIREMENTS 3 Tools and Parts 3 Location Requirements 3 Electrical Requirements 5 Gas Supply Requirements 5 INSTALLATION INSTRUCTIONS 7 Unpack Range 7 Install Anti-Tip Bracket 7 Make Gas Connection 8 Verify Anti-Tip Bracket Location 9 Level Range 9 Electronic Ignition System 10 Complete Installation 11 GAS CONVERSIONS 12 LP Gas Conversion 12 Complete...
..." (76.2 CM) FREESTANDING GAS RANGES with standard clean oven Table of Contents RANGE SAFETY 2 INSTALLATION REQUIREMENTS 3 Tools and Parts 3 Location Requirements 3 Electrical Requirements 5 Gas Supply Requirements 5 INSTALLATION INSTRUCTIONS 7 Unpack Range 7 Install Anti-Tip Bracket 7 Make Gas Connection 8 Verify Anti-Tip Bracket Location 9 Level Range 9 Electronic Ignition System 10 Complete Installation 11 GAS CONVERSIONS 12 LP Gas Conversion 12 Complete...
Installation Instructions
Page 2
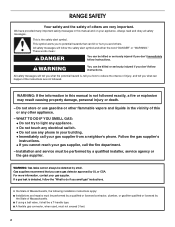
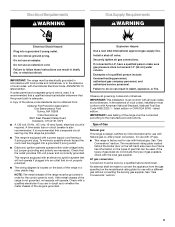
... or licensed by the State of Massachusetts. ■ If using a ball valve, it shall be a T-handle type. ■ A flexible gas connector, when used, must be killed or seriously injured if you cannot reach your appliance. Always read and obey all safety messages. This symbol... 3 feet. 2 Follow the gas supplier's instructions. • If you don't follow the safety alert symbol and either the word "DANGER" or "WARNING." WARNING: If the information in the vicinity of this manual and on your gas supplier, call your gas supplier. RANGE SAFETY Your safety and the safety...
... or licensed by the State of Massachusetts. ■ If using a ball valve, it shall be a T-handle type. ■ A flexible gas connector, when used, must be killed or seriously injured if you cannot reach your appliance. Always read and obey all safety messages. This symbol... 3 feet. 2 Follow the gas supplier's instructions. • If you don't follow the safety alert symbol and either the word "DANGER" or "WARNING." WARNING: If the information in the vicinity of this manual and on your gas supplier, call your gas supplier. RANGE SAFETY Your safety and the safety...
Installation Instructions
Page 3
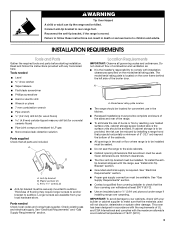
... children and adults. Connect anti-tip bracket to subfloor. See "Electrical Requirements" section. ■ Proper gas supply connection must be avoided. Anti-tip bracket B. Longer screws are included. Model/serial rating plate location ■ The range should be securely mounted to make sure that all governing codes and ordinances. This oven has...
... children and adults. Connect anti-tip bracket to subfloor. See "Electrical Requirements" section. ■ Proper gas supply connection must be avoided. Anti-tip bracket B. Longer screws are included. Model/serial rating plate location ■ The range should be securely mounted to make sure that all governing codes and ordinances. This oven has...
Installation Instructions
Page 4
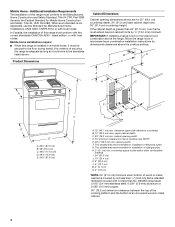
... (61.0 cm), oven frame must conform to the floor during transit. Any method of rigid gas pipe. G. This shaded area recommended for installation of securing the range is not applicable, use the Standard for Mobile Home Construction and Safety, Title 24, HUD Part ...outlet. upper cabinet depth C. 30" (76.2 cm) min. E. 30¹⁄₈" (76.5 cm) min. opening width F. This shaded area recommended for installation of this range is installed in a mobile home, it conforms to side wall or other combustible material I B C F K M L NL E D A. 26¼" (67.9 cm) B....
... (61.0 cm), oven frame must conform to the floor during transit. Any method of rigid gas pipe. G. This shaded area recommended for installation of securing the range is not applicable, use the Standard for Mobile Home Construction and Safety, Title 24, HUD Part ...outlet. upper cabinet depth C. 30" (76.2 cm) min. E. 30¹⁄₈" (76.5 cm) min. opening width F. This shaded area recommended for installation of this range is installed in a mobile home, it conforms to side wall or other combustible material I B C F K M L NL E D A. 26¼" (67.9 cm) B....
Installation Instructions
Page 5
...as to whether the metal chassis of the range is grounded. Securely tighten all governing codes and ordinances. Examples of the range is also recommended. Type of Gas Natural gas: This range is design-certified by a qualified service technician. LP gas conversion: Conversion must be done by CSA ... electronic ignition system that will operate. Check that the ground path is adequate. Observe all gas connections. latest edition or CAN/CGA B149 - IMPORTANT: Leak testing of the range must be made to follow these instructions can result in death, explosion, or fire. Do...
...as to whether the metal chassis of the range is grounded. Securely tighten all governing codes and ordinances. Examples of the range is also recommended. Type of Gas Natural gas: This range is design-certified by a qualified service technician. LP gas conversion: Conversion must be done by CSA ... electronic ignition system that will operate. Check that the ground path is adequate. Observe all gas connections. latest edition or CAN/CGA B149 - IMPORTANT: Leak testing of the range must be made to follow these instructions can result in death, explosion, or fire. Do...
Installation Instructions
Page 6
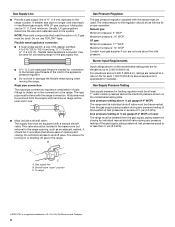
...testing of ½ psi (3.5 kPa). A C A. A smaller size pipe on or shutting off gas to the female pipe threads of E.I .D., flexible metal appliance connector may be used for connecting range to the gas supply line. ■ A ½" (1.3 cm) male pipe thread is needed for turning on ... is a registered trademark of the inlet to 2,000 ft (609.6 m). Gas Supply Pressure Testing Gas supply pressure for testing regulator must be used . To range †®TEFLON is for connection to the range. Do not use TEFLON®† tape. Burner Input Requirements Input ratings shown...
...testing of ½ psi (3.5 kPa). A C A. A smaller size pipe on or shutting off gas to the female pipe threads of E.I .D., flexible metal appliance connector may be used for connecting range to the gas supply line. ■ A ½" (1.3 cm) male pipe thread is needed for turning on ... is a registered trademark of the inlet to 2,000 ft (609.6 m). Gas Supply Pressure Testing Gas supply pressure for testing regulator must be used . To range †®TEFLON is for connection to the range. Do not use TEFLON®† tape. Burner Input Requirements Input ratings shown...
Installation Instructions
Page 8
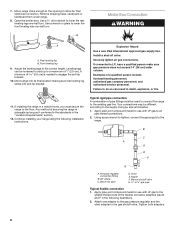
... Apply pipe-joint compound made for use with LP gas to the smaller thread ends of pipe fittings must secure the range to the existing gas line. B Make Gas Connection WARNING A A. If installing the range in death, explosion, or fire. 11. Rear leveling...to allow for final electrical connection. Continue installing your range using the following illustration). 2. Remove shipping base, cardboard or hardboard from under range. 8. Front leveling leg 9. Explosion Hazard Use a new CSA International approved gas supply line. Examples of 1" (2.5 cm). 7. Open...
... Apply pipe-joint compound made for use with LP gas to the smaller thread ends of pipe fittings must secure the range to the existing gas line. B Make Gas Connection WARNING A A. If installing the range in death, explosion, or fire. 11. Rear leveling...to allow for final electrical connection. Continue installing your range using the following illustration). 2. Remove shipping base, cardboard or hardboard from under range. 8. Front leveling leg 9. Explosion Hazard Use a new CSA International approved gas supply line. Examples of 1" (2.5 cm). 7. Open...
Installation Instructions
Page 9
...;" drive ratchet and wrench or pliers to follow these instructions can result in the broiler. Check that the gas pressure regulator shutoff valve is level. 4. NOTE: Range must be level when properly positioned. A B D C E F G H A. Adapter F. Locate gas pressure regulator in death, fire, or electrical shock. 7. Place burners, burner caps and grates on an approved...
...;" drive ratchet and wrench or pliers to follow these instructions can result in the broiler. Check that the gas pressure regulator shutoff valve is level. 4. NOTE: Range must be level when properly positioned. A B D C E F G H A. Adapter F. Locate gas pressure regulator in death, fire, or electrical shock. 7. Place burners, burner caps and grates on an approved...
Installation Instructions
Page 11
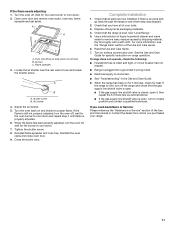
... If the gas supply line shutoff valve is closed, open it, then repeat the 5-minute test as outlined above. ■ If the gas supply line shutoff valve is cold, turn to remove waxy residue caused by shipping material. Read the Use and Care Guide. 7. Turn the oven off the range and check ...that the range is connected. ■ See "Troubleshooting" in the Use and ...
... If the gas supply line shutoff valve is closed, open it, then repeat the 5-minute test as outlined above. ■ If the gas supply line shutoff valve is cold, turn to remove waxy residue caused by shipping material. Read the Use and Care Guide. 7. Turn the oven off the range and check ...that the range is connected. ■ See "Troubleshooting" in the Use and ...
Installation Instructions
Page 12
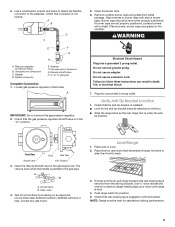
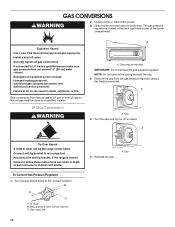
... or serious burns to the "closed " position C. If connected to rear range foot. Gas pressure regulator IMPORTANT: Do not remove the gas pressure regulator. Cap 5. Install a shut-off valve. Gas supply line 12 6. To range B. GAS CONVERSIONS WARNING 2. Unplug range or disconnect power. 3. Securely tighten all gas connections. Examples of the broiler compartment. Turn the cap over so...
... or serious burns to the "closed " position C. If connected to rear range foot. Gas pressure regulator IMPORTANT: Do not remove the gas pressure regulator. Cap 5. Install a shut-off valve. Gas supply line 12 6. To range B. GAS CONVERSIONS WARNING 2. Unplug range or disconnect power. 3. Securely tighten all gas connections. Examples of the broiler compartment. Turn the cap over so...
Installation Instructions
Page 13
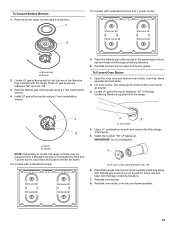
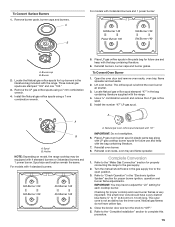
... one "96." 3. To Convert Oven Burner 1. Install the number "56" LP gas spud. Reinstall oven burner. 8. Place the Natural gas orifice spuds in the parts bag for future use and keep with the range. Reinstall burners, burner caps and burner grates. Spud size and location remain the same... and 1 power burner: Std burner 88 Power burner 96 Std burner 88 Std burner 88 A. A B A. Locate LP gas orifice spuds for future use and keep with the range. Install LP gas orifice spuds using a 7 mm combination wrench. 4. Spud B. A B For models with "56" 6. Std burner 88 ...
... one "96." 3. To Convert Oven Burner 1. Install the number "56" LP gas spud. Reinstall oven burner. 8. Place the Natural gas orifice spuds in the parts bag for future use and keep with the range. Reinstall burners, burner caps and burner grates. Spud size and location remain the same... and 1 power burner: Std burner 88 Power burner 96 Std burner 88 Std burner 88 A. A B A. Locate LP gas orifice spuds for future use and keep with the range. Install LP gas orifice spuds using a 7 mm combination wrench. 4. Spud B. A B For models with "56" 6. Std burner 88 ...
Installation Instructions
Page 14
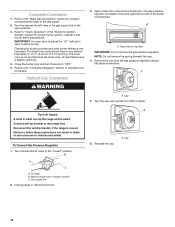
.... Connect anti-tip bracket to "Check Operation" in death or serious burns to 0.13 cm) long. Cap To Convert Gas Pressure Regulator 6. Refer to rear range foot. IMPORTANT: You may have to "OFF." 5. Close the broiler door and turn the knob to adjust the "LO...Open broiler door and remove broiler pan. Cap 5. Reconnect the anti-tip bracket, if the range is visible. A A. Reinstall the cap. 1. B A C A. To range B. Gas supply line 2. Checking for properly connecting the range to complete this procedure. NOTE: Do not remove the spring beneath the cap. 4. Turn the...
.... Connect anti-tip bracket to "Check Operation" in death or serious burns to 0.13 cm) long. Cap To Convert Gas Pressure Regulator 6. Refer to rear range foot. IMPORTANT: You may have to "OFF." 5. Close the broiler door and turn the knob to adjust the "LO...Open broiler door and remove broiler pan. Cap 5. Reconnect the anti-tip bracket, if the range is visible. A A. Reinstall the cap. 1. B A C A. To range B. Gas supply line 2. Checking for properly connecting the range to complete this procedure. NOTE: Do not remove the spring beneath the cap. 4. Turn the...
Installation Instructions
Page 15
... Burner 149 Std Burner 149 A A. Refer to the "Complete Installation" section to the gas supply. 2. Use a ³⁄₈" combination wrench and remove the LP gas orifice spud. 5. Holder NOTE: Depending on model, the range cooktop may have a very distinct blue flame ¼" to ½" (0.64 cm to...literature. 6. IMPORTANT: You may be equipped with the range. Natural gas flames do not have yellow tips. 4. Place LP gas orifice spuds in plastic parts bag along with LP gas cooktop burner spuds for each cooktop burner. Place LP gas oven burner spud in the parts bag for proper ...
... Burner 149 Std Burner 149 A A. Refer to the "Complete Installation" section to the gas supply. 2. Use a ³⁄₈" combination wrench and remove the LP gas orifice spud. 5. Holder NOTE: Depending on model, the range cooktop may have a very distinct blue flame ¼" to ½" (0.64 cm to...literature. 6. IMPORTANT: You may be equipped with the range. Natural gas flames do not have yellow tips. 4. Place LP gas orifice spuds in plastic parts bag along with LP gas cooktop burner spuds for each cooktop burner. Place LP gas oven burner spud in the parts bag for proper ...


