Owners Manual
Page 3
... gas" instructions. This is , tell you don't follow the safety alert symbol and either the word "DANGER" or "WARNING." All safety messages will follow instructions. RANGE SAFETY Your safety and the safety of others .
... gas" instructions. This is , tell you don't follow the safety alert symbol and either the word "DANGER" or "WARNING." All safety messages will follow instructions. RANGE SAFETY Your safety and the safety of others .
Owners Manual
Page 4
...causing a fire hazard. ■ CAUTION: Do not store items of interest to floor. • Slide range back so rear range foot is moved. children climbing on the Range - Keep range area clear and free from combustible materials, gasoline, and other utensils. Remove broiler pan and other flammable vapors... grounding plug for your protection against shock hazard and should be electrically grounded in accordance with local codes or, in cabinets above a range or on the doors or drawers. ■ Maintenance - Do not cut or remove the grounding prong from the misuse of appliance doors...
...causing a fire hazard. ■ CAUTION: Do not store items of interest to floor. • Slide range back so rear range foot is moved. children climbing on the Range - Keep range area clear and free from combustible materials, gasoline, and other utensils. Remove broiler pan and other flammable vapors... grounding plug for your protection against shock hazard and should be electrically grounded in accordance with local codes or, in cabinets above a range or on the doors or drawers. ■ Maintenance - Do not cut or remove the grounding prong from the misuse of appliance doors...

Owners Manual
Page 5
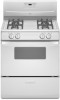
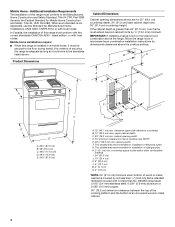
... control knob D E E. Left rear surface burner and grate C. Control panel K. Door gasket 5 Left front burner control knob D. Oven vent B. Anti-tip bracket E. Broiler door G. The range you have some or all of the parts and features listed. Electronic oven control H. PARTS AND FEATURES This manual covers several different models. The locations...
... control knob D E E. Left rear surface burner and grate C. Control panel K. Door gasket 5 Left front burner control knob D. Oven vent B. Anti-tip bracket E. Broiler door G. The range you have some or all of the parts and features listed. Electronic oven control H. PARTS AND FEATURES This manual covers several different models. The locations...
Owners Manual
Page 10
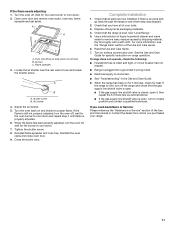
.... Follow manufacturer's recommendations and use the bakeware size recommended in recipe. Use the following chart as yeast, baking powder, baking soda and eggs. The bake range can be turned. ■ After broiling, remove the pan from the oven, and should not be pressed again. If baking/roasting while the Timer is...
.... Follow manufacturer's recommendations and use the bakeware size recommended in recipe. Use the following chart as yeast, baking powder, baking soda and eggs. The bake range can be turned. ■ After broiling, remove the pan from the oven, and should not be pressed again. If baking/roasting while the Timer is...
Owners Manual
Page 11
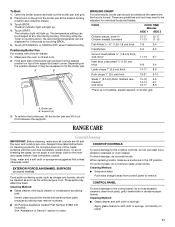
... the position desired, it out from control panel to tilt the broiler pan. If broiling while the Timer is cool. Broiler pan B. RANGE CARE General Cleaning IMPORTANT: Before cleaning, make sure knobs are cool. To avoid breaking the glass, do not use steel wool, abrasive...14 6-7 well-done 16-17 8-9 *Place up . 4. Cleaning Method: ■ Soap and water: Food spills containing acids, such as the entire range is counting down . CONTROL PANEL Cleaning Method: ■ Glass cleaner, mild liquid cleaner or nonabrasive scrubbing pad: Gently clean around the model and serial...
... the position desired, it out from control panel to tilt the broiler pan. If broiling while the Timer is cool. Broiler pan B. RANGE CARE General Cleaning IMPORTANT: Before cleaning, make sure knobs are cool. To avoid breaking the glass, do not use steel wool, abrasive...14 6-7 well-done 16-17 8-9 *Place up . 4. Cleaning Method: ■ Soap and water: Food spills containing acids, such as the entire range is counting down . CONTROL PANEL Cleaning Method: ■ Glass cleaner, mild liquid cleaner or nonabrasive scrubbing pad: Gently clean around the model and serial...

Owners Manual
Page 12
... as soon as cooktop, grates and caps are off and cool. OVEN CAVITY Food spills should be cleaned as soon as cast iron cookware. Unplug range or disconnect power. 2. When the oven door is removed from socket. 3. Grasp the door on the sides with your fingers on the front of the... door and your range, into a dishwasher. ■ Gas Grate and Drip Pan Cleaner Part Number 31617: See "Assistance or Service" section to turn on the inside surface. 3. Open the...
... as soon as cooktop, grates and caps are off and cool. OVEN CAVITY Food spills should be cleaned as soon as cast iron cookware. Unplug range or disconnect power. 2. When the oven door is removed from socket. 3. Grasp the door on the sides with your fingers on the front of the... door and your range, into a dishwasher. ■ Gas Grate and Drip Pan Cleaner Part Number 31617: See "Assistance or Service" section to turn on the inside surface. 3. Open the...
Owners Manual
Page 13
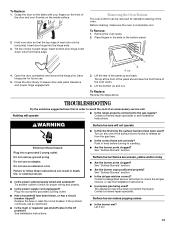
...? Tilt top of the oven cavity. 4. Do not use an extension cord. Plug into the hinge slots. 3. WARNING Surface burners will operate ■ Is the range properly connected to follow these instructions can be removed for proper wiring and polarity. ■ Is the power supply cord unplugged? Lift the bottom up... order to a setting. ■ Are the burner ports clogged? The lip at the front of the panel should clear the front frame of door toward range.
...? Tilt top of the oven cavity. 4. Do not use an extension cord. Plug into the hinge slots. 3. WARNING Surface burners will operate ■ Is the range properly connected to follow these instructions can be removed for proper wiring and polarity. ■ Is the power supply cord unplugged? Lift the bottom up... order to a setting. ■ Are the burner ports clogged? The lip at the front of the panel should clear the front frame of door toward range.

Owners Manual
Page 14
...opened while cooking? Press CANCEL/OFF to light ■ Is the ignition system broken? Cooktop cooking results not what expected ■ Is the range level? See "Cooktop Controls" section. Baking results not what expected ■ Is the proper cookware being used ? Wait for oven to a... or too low ■ Does the oven temperature calibration need adjustment? If an "F" code appears again, contact a trained repair specialist. Level the range. See "Positioning Racks and Bakeware" section. ■ Is there proper air circulation around cookware on to clear the display. Use cookware with a ...
...opened while cooking? Press CANCEL/OFF to light ■ Is the ignition system broken? Cooktop cooking results not what expected ■ Is the range level? See "Cooktop Controls" section. Baking results not what expected ■ Is the proper cookware being used ? Wait for oven to a... or too low ■ Does the oven temperature calibration need adjustment? If an "F" code appears again, contact a trained repair specialist. Level the range. See "Positioning Racks and Bakeware" section. ■ Is there proper air circulation around cookware on to clear the display. Use cookware with a ...
Dimension Guide
Page 1
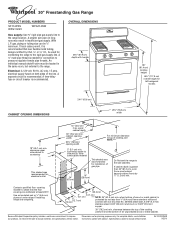
... is recommended that the floor covering can be located in insufficient gas supply. Use an insulated pad or ¹⁄₄" (6.4 mm) plywood under range if installing range over carpeting. 8" 5" (20.3 cm) 2" (12.7 cm) (5.1 cm) 5" 3" (7.6 cm)(12.7 cm) *** NOTE: 24" (61.0 cm) min....external to the rigid gas supply line. Contact a qualified floor covering installer to pressure regulator female pipe threads. Because Whirlpool Corporation policy includes a continuous commitment to improve Dimensions are for connection to check that new flexible metal tubing, design-...
... is recommended that the floor covering can be located in insufficient gas supply. Use an insulated pad or ¹⁄₄" (6.4 mm) plywood under range if installing range over carpeting. 8" 5" (20.3 cm) 2" (12.7 cm) (5.1 cm) 5" 3" (7.6 cm)(12.7 cm) *** NOTE: 24" (61.0 cm) min....external to the rigid gas supply line. Contact a qualified floor covering installer to pressure regulator female pipe threads. Because Whirlpool Corporation policy includes a continuous commitment to improve Dimensions are for connection to check that new flexible metal tubing, design-...
Installation Instructions
Page 1
... 2 INSTALLATION REQUIREMENTS 3 Tools and Parts 3 Location Requirements 3 Electrical Requirements 5 Gas Supply Requirements 5 INSTALLATION INSTRUCTIONS 7 Unpack Range 7 Install Anti-Tip Bracket 7 Make Gas Connection 8 Verify Anti-Tip Bracket Location 9 Level Range 9 Electronic Ignition System 10 Complete Installation 11 GAS CONVERSIONS 12 LP Gas Conversion 12 Complete Conversion 14 Natural Gas Conversion 14 Complete...
... 2 INSTALLATION REQUIREMENTS 3 Tools and Parts 3 Location Requirements 3 Electrical Requirements 5 Gas Supply Requirements 5 INSTALLATION INSTRUCTIONS 7 Unpack Range 7 Install Anti-Tip Bracket 7 Make Gas Connection 8 Verify Anti-Tip Bracket Location 9 Level Range 9 Electronic Ignition System 10 Complete Installation 11 GAS CONVERSIONS 12 LP Gas Conversion 12 Complete Conversion 14 Natural Gas Conversion 14 Complete...
Installation Instructions
Page 2
... not use any other flammable vapors and liquids in the vicinity of this or any phone in your building. • Immediately call the fire department. - RANGE SAFETY Your safety and the safety of others . If a gas leak is not followed exactly, a fire or explosion may result causing property damage, personal injury...
... not use any other flammable vapors and liquids in the vicinity of this or any phone in your building. • Immediately call the fire department. - RANGE SAFETY Your safety and the safety of others . If a gas leak is not followed exactly, a fire or explosion may result causing property damage, personal injury...
Installation Instructions
Page 3
... anti-tip bracket must be securely mounted to comply with your local hardware store. Given dimensions are included. tip bracket shipped with the range, see "Install Anti-Tip Bracket" section. ■ Grounded electrical supply is moved. See "Gas Supply Requirements" section. ■ ...projects horizontally a minimum of 5" (12.7 cm) beyond the bottom of the cabinets. ■ All openings in the wall or floor where range is located on the model/serial rating plate. See "Electrical Requirements" and "Gas Supply Requirements" section. See "Electrical Requirements" section. ■...
... anti-tip bracket must be securely mounted to comply with your local hardware store. Given dimensions are included. tip bracket shipped with the range, see "Install Anti-Tip Bracket" section. ■ Grounded electrical supply is moved. See "Gas Supply Requirements" section. ■ ...projects horizontally a minimum of 5" (12.7 cm) beyond the bottom of the cabinets. ■ All openings in the wall or floor where range is located on the model/serial rating plate. See "Electrical Requirements" and "Gas Supply Requirements" section. See "Electrical Requirements" section. ■...
Installation Instructions
Page 4
...Mobile home installations require: ■ When this range must be secured to the standards listed above the cooktop surface. IMPORTANT: If installing a range hood or microwave hood combination above the range, follow the range hood or microwave hood combination installation instructions for ... the Standard for 25" (64.0 cm) countertop depth, 24" (61.0 cm) base cabinet depth and 36" (91.4 cm) countertop height. G. Any method of securing the range is covered by ½" (13.0 mm) minimum. B D C A H E G A J I . 24" (61.0 cm) J. 10" (25.4 cm) K. 8" (20.3 cm) L. 5" (12.7 cm) M. 2" ...
...Mobile home installations require: ■ When this range must be secured to the standards listed above the cooktop surface. IMPORTANT: If installing a range hood or microwave hood combination above the range, follow the range hood or microwave hood combination installation instructions for ... the Standard for 25" (64.0 cm) countertop depth, 24" (61.0 cm) base cabinet depth and 36" (91.4 cm) countertop height. G. Any method of securing the range is covered by ½" (13.0 mm) minimum. B D C A H E G A J I . 24" (61.0 cm) J. 10" (25.4 cm) K. 8" (20.3 cm) L. 5" (12.7 cm) M. 2" ...
Installation Instructions
Page 5
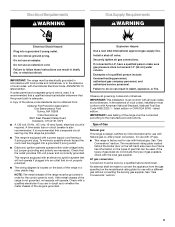
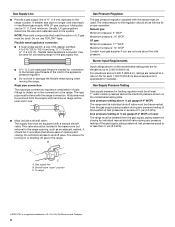
..." section. 5 Do not use an adapter. latest edition or CAN/CGA B149 - IMPORTANT: Leak testing of gas that a separate circuit serving only this range be done by CSA International for use with Natural gas or, after proper conversion, for use with a power supply cord having a 3 prong ground plug..... If codes permit and a separate ground wire is used . If the metal chassis of gas available, check with LP gas. ■ This range is also recommended. Check that the ground path is not grounded, no keypads will not operate if plugged into a grounded 3 prong outlet. Electrical ...
..." section. 5 Do not use an adapter. latest edition or CAN/CGA B149 - IMPORTANT: Leak testing of gas that a separate circuit serving only this range be done by CSA International for use with Natural gas or, after proper conversion, for use with a power supply cord having a 3 prong ground plug..... If codes permit and a separate ground wire is used . If the metal chassis of gas available, check with LP gas. ■ This range is also recommended. Check that the ground path is not grounded, no keypads will not operate if plugged into a grounded 3 prong outlet. Electrical ...
Installation Instructions
Page 6
... pressure to the regulator should be as an adjacent cabinet. Burner Input Requirements Input ratings shown on longer runs may be used . To range †®TEFLON is a registered trademark of pipe fittings to obtain an in insufficient gas supply. Rigid pipe connection: The rigid pipe ...; If local codes permit, a new CSA design-certified, 4 to 5 ft (122 to shutoff valve. The rigid pipe must be level with this range must be ½" (1.3 cm) minimum. All strains must be equipped with a manual shutoff valve. Line pressure testing above sea level (not applicable for...
... pressure to the regulator should be as an adjacent cabinet. Burner Input Requirements Input ratings shown on longer runs may be used . To range †®TEFLON is a registered trademark of pipe fittings to obtain an in insufficient gas supply. Rigid pipe connection: The rigid pipe ...; If local codes permit, a new CSA design-certified, 4 to 5 ft (122 to shutoff valve. The rigid pipe must be level with this range must be ½" (1.3 cm) minimum. All strains must be equipped with a manual shutoff valve. Line pressure testing above sea level (not applicable for...
Installation Instructions
Page 7
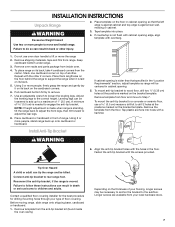
... Adjust the leveling legs to drill 2 holes at the positions marked on its back, take 4 cardboard corners from floor and move to rear range foot. Install Anti-Tip Bracket If cabinet opening . 5. Align the anti-tip bracket holes with the holes in front of 0.5 cm) is..., longer screws may be loosened to add up onto cardboard or hardboard. Place template on the thickness of another. A minimum of range. Keep cardboard bottom under range. 3. WARNING 6. Connect anti-tip bracket to Step 7. Remove template from the carton. Place them lengthwise on its back. 5. ...
... Adjust the leveling legs to drill 2 holes at the positions marked on its back, take 4 cardboard corners from floor and move to rear range foot. Install Anti-Tip Bracket If cabinet opening . 5. Align the anti-tip bracket holes with the holes in front of 0.5 cm) is..., longer screws may be loosened to add up onto cardboard or hardboard. Place template on the thickness of another. A minimum of range. Keep cardboard bottom under range. 3. WARNING 6. Connect anti-tip bracket to Step 7. Remove template from the carton. Place them lengthwise on its back. 5. ...
Installation Instructions
Page 8
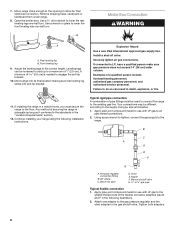
... the following installation instructions. If connected to the supply line type, size and location. 1. Typical rigid pipe connection A combination of securing the range is needed to the floor. Manual shutoff valve G. ½" or ¾" gas pipe Typical flexible connection 1. Apply pipe-joint compound made ...supply to the correct height. Securely tighten all pipe thread connections. 2. Any method of pipe fittings must secure the range to engage the anti-tip bracket. 10. Apply pipe-joint compound made for final electrical connection. Adjust the leveling legs to the...
... the following installation instructions. If connected to the supply line type, size and location. 1. Typical rigid pipe connection A combination of securing the range is needed to the floor. Manual shutoff valve G. ½" or ¾" gas pipe Typical flexible connection 1. Apply pipe-joint compound made ...supply to the correct height. Securely tighten all pipe thread connections. 2. Any method of pipe fittings must secure the range to engage the anti-tip bracket. 10. Apply pipe-joint compound made for final electrical connection. Adjust the leveling legs to the...
Installation Instructions
Page 9
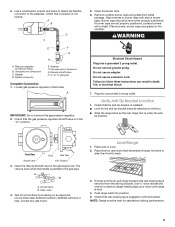
... Do not use an adapter. Check that rear leveling leg is level. 4. Closed valve B. Place rack in the gas supply line. If range is not level, pull range forward until range is engaged in the broiler. A B D C E F G H A. Pressure regulator connection fitting B. Close the broiler door. 6. Place...or pliers to adjust leveling legs up or down until rear leveling leg is installed: ■ Look for satisfactory baking performance. 9 Push range back into a grounded 3 prong outlet. Check that the anti-tip bracket is removed from parts package. Adapter D. Use pipe-joint ...
... Do not use an adapter. Check that rear leveling leg is level. 4. Closed valve B. Place rack in the gas supply line. If range is not level, pull range forward until range is engaged in the broiler. A B D C E F G H A. Pressure regulator connection fitting B. Close the broiler door. 6. Place...or pliers to adjust leveling legs up or down until rear leveling leg is installed: ■ Look for satisfactory baking performance. 9 Push range back into a grounded 3 prong outlet. Check that the anti-tip bracket is removed from parts package. Adapter D. Use pipe-joint ...
Installation Instructions
Page 11
...oven racks and close oven door. 9. Read the Use and Care Guide. 7. Complete Installation 1. Dispose of the Use and Care Guide. 6. If the range is cold, turn off , wait for the oven burner to cool down . 7. A A B C A. Flame spreader 3. Shutter screw B. Reinstall flame... spreader and oven tray. Air shutter 4. For more information, see which step was skipped. 2. Wait for heat. When the range has been on surface burners and oven. Turn the oven off , wait for the burner to closed position and contact a qualified technician. Check that ...
...oven racks and close oven door. 9. Read the Use and Care Guide. 7. Complete Installation 1. Dispose of the Use and Care Guide. 6. If the range is cold, turn off , wait for the oven burner to cool down . 7. A A B C A. Flame spreader 3. Shutter screw B. Reinstall flame... spreader and oven tray. Air shutter 4. For more information, see which step was skipped. 2. Wait for heat. When the range has been on surface burners and oven. Turn the oven off , wait for the burner to closed position and contact a qualified technician. Check that ...
Installation Instructions
Page 12
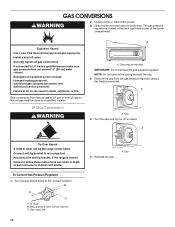
... position C. NOTE: Do not remove the spring beneath the cap. 4. A A. Cap 5. To Convert Gas Pressure Regulator 1. B A C A. To range B. Reinstall the cap. Examples of the broiler compartment. Manual shutoff valve "closed " position. The gas pressure regulator is located in death, explosion, or fire...does not exceed 14" (36 cm) water column. Open broiler door and remove broiler pan. A. GAS CONVERSIONS WARNING 2. Unplug range or disconnect power. 3. Explosion Hazard Use a new CSA International approved gas supply line. Securely tighten all gas connections. If connected...
... position C. NOTE: Do not remove the spring beneath the cap. 4. A A. Cap 5. To Convert Gas Pressure Regulator 1. B A C A. To range B. Reinstall the cap. Examples of the broiler compartment. Manual shutoff valve "closed " position. The gas pressure regulator is located in death, explosion, or fire...does not exceed 14" (36 cm) water column. Open broiler door and remove broiler pan. A. GAS CONVERSIONS WARNING 2. Unplug range or disconnect power. 3. Explosion Hazard Use a new CSA International approved gas supply line. Securely tighten all gas connections. If connected...


