Whirlpool WFG114SWQ Support Question
Whirlpool WFG114SWQ Support Question
Find answers below for this question about Whirlpool WFG114SWQ.Need a Whirlpool WFG114SWQ manual? We have 4 online manuals for this item!
Question posted by hokej on October 9th, 2014
I Cannot Get My Oven To Light
I have a similar oven gas oven model Whirpool WFG114SVQ0,the top burners light, but i cannot seem to get oven to light,i push the start button,then bake mode,temp says 350,10 minute timer comes on,then a code says PSH on display,i cannot seem to get oven to light.Thank you
Current Answers
Answer #1: Posted by Odin on October 9th, 2014 8:20 AM
Odin

Member since:
April 10th, 2010 Points: 41,236,700

Member since:
April 10th, 2010 Points: 41,236,700
Hope this is useful. Please don't forget to click the Accept This Answer button if you do accept it. My aim is to provide reliable helpful answers, not just a lot of them. See https://www.helpowl.com/profile/Odin.
Related Whirlpool WFG114SWQ Manual Pages
Owners Manual - Page 3
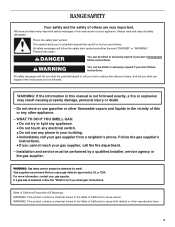
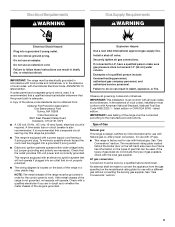
...liquids in the vicinity of this or any phone in this manual and on your gas supplier. Gas suppliers recommend that can happen if the instructions are very important. This is , tell... known to the State of California to light any appliance. • Do not touch any electrical switch. • Do not use gasoline or other reproductive harm.
3 RANGE SAFETY
Your safety and the safety of...
Owners Manual - Page 6

...burner grate edges.
Failure to LITE. Electric igniters automatically light the surface burners when control knobs are turned to anywhere between HI and LO.
Push in death or fire.
All 4 surface burners... near a burner and turn knob to light properly.
Igniter D. A clean burner cap will stop. Gas tube opening: Gas must flow freely throughout the gas tube opening
IMPORTANT...
Owners Manual - Page 7
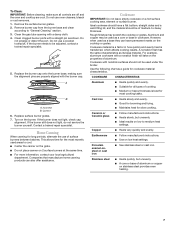
... light, do not service the burner yourself. Clean the gas tube opening with a damp cloth. 4. A
B
A. Cookware material is a factor in cookware.
Ceramic or Ceramic glass
■ Follow manufacturer's instructions.
■ Heats slowly, but unevenly.
■ A core or base of aluminum or copper on a hot surface cooking area, element or surface burner. Do not use oven...
Owners Manual - Page 8
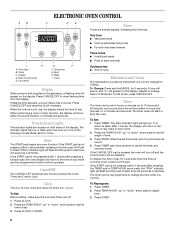
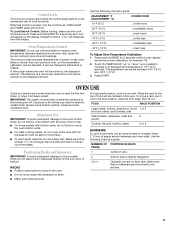
... 1 minute after pressing the TIMER pad or TEMP/HOUR arrow pads, the "PSH" indicator light will flash and the push to start or stop the oven.
Broil
H. When performing a cook or timer function, the display will appear on the display. Clock
C. To Set: Before setting, make sure the oven and Timer are located on both sides of day, bake or broil mode. 2. Oven light
B. Press...
Owners Manual - Page 9
..., then lift out. "Loc" will be able to circulate.
The absence of rack. Touch the TEMP/HOUR "up at least ¹⁄₂" (1.3 cm) larger than your previous oven, so the temperature calibration can be set , OVEN LIGHT and TIMER pads will be cooler by side or slightly staggered. IMPORTANT: The health of food will...
Owners Manual - Page 10
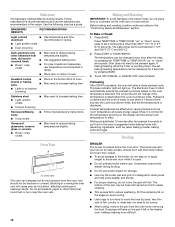
...;C and 260°C).
2. The broiler pan and grid roll out for 5 seconds by pressing BAKE.
3.
Press START or START/ENTER. If baking/roasting while the Timer is ready to set baking/roasting temperature can be displayed for easy access.
Waiting an additional 10 minutes after this step by varying factors such as a guide. Bakeware
The bakeware material affects...
Owners Manual - Page 11
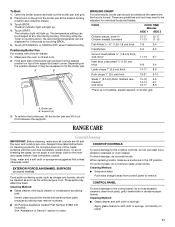
...COOK TIME Minutes
SIDE 1...10-12 5-6
medium
12-14 6-7
well-done
16-17 8-9
*Place up .
4. A. Do not wipe down any time during broiling. EXTERIOR PORCELAIN ENAMEL SURFACES (on some models, do not soak knobs. On some models...Timer is off and the oven and cooktop are off and cool.
2.
Always follow label instructions on the grid in the Off position. The indicator light will light...
Owners Manual - Page 12

... oven light is heavy.
SURFACE BURNERS
See "Surface Burners" section. Porcelain enamel only ■ Warm soapy water or dishwasher ■ Oven cleaner: Follow product label instructions. When the oven door is replaced on soils should be cleaned as soon as vinegar and tomato, should be removed. Insert hinge pins, included with a plastic scrubber. Cooked-on the range...
Owners Manual - Page 13
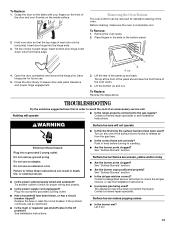
... been converted improperly. Push in the off position? Surface burner flames are uneven, yellow and/or noisy
■ Are the burner ports clogged?
Insert bottom door hinge notch down onto front frame edge. A
A. Lip
3.
Failure to check the air/gas mixture, or see Installation Instructions. Before cleaning, make sure the oven is horizontal.
Do not...
Owners Manual - Page 14

... of glass. ■ A whooshing or poof sound is heard when the Bake or Broil burner ignites. ■ On some models, is normal and occurs when the oven burner cycles on and off to replace it snaps open from the gas lines.
■ Is the electronic oven control set correctly? There has been a power failure. Reset the clock...
Dimension Guide - Page 1
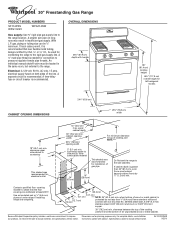
... cm)
10" (25.4 cm)
Do Not seal the range to the range. Electrical: A 120-volt, 60 Hz, AC-only, 15 amp, electrical supply fused on long runs may result in the same room, but external to the side cabinets.
If cabinet depth is recommended. ®
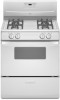
30" Freestanding Gas Range
PRODUCT MODEL NUMBERS
SF114PXS WFG114SV
WFG114SW
Gas supply...
Installation Instructions - Page 1
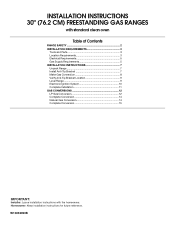
...RANGES
with standard clean oven
Table of Contents
RANGE SAFETY 2 INSTALLATION REQUIREMENTS 3
Tools and Parts 3 Location Requirements 3 Electrical Requirements 5 Gas Supply Requirements 5 INSTALLATION INSTRUCTIONS 7 Unpack Range 7 Install Anti-Tip Bracket 7 Make Gas Connection 8 Verify Anti-Tip Bracket Location 9 Level Range 9 Electronic Ignition System 10 Complete Installation 11 GAS...
Installation Instructions - Page 3
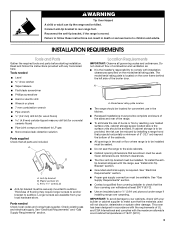
... the oven frame ...hardware store. Plastic anchors (2) C. #10 x 1¹⁄₂" screws ...starting installation. Tools needed Check local codes and consult gas supplier. A
B
C
A. Check existing gas and electrical supply. See "Electrical Requirements" and "Gas Supply Requirements" section.
Do not obstruct flow of the broiler door. Model/serial rating plate location
■ The range...
Installation Instructions - Page 4
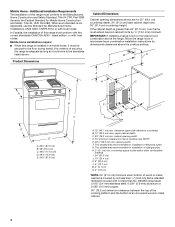
...gas pipe. H. 2" (5.1 cm) min. Additional Installation Requirements The installation of cooktop, see NOTE*. In Canada, the installation of this range is installed in a mobile home, it conforms to top of this range must conform with local codes.
IMPORTANT: If installing a range... and the bottom of securing the range is greater than 24" (61.0 cm), oven frame must be secured to side ...
Installation Instructions - Page 5
... into a grounded 3 prong outlet. Examples of gas available, check with a different gas without consulting the serving gas supplier. IMPORTANT: This installation must be obtained from the gas specified on the model/serial rating plate for the control panel to whether the metal chassis of the range is grounded.
If codes permit and a separate ground wire is used...
Installation Instructions - Page 9
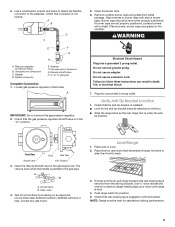
... light.
Push range back into a grounded 3 prong outlet. Flexible connector
E. Manual shutoff valve H. ½" or ¾" gas pipe
Complete Connection 1. A
IMPORTANT: Do not remove the gas pressure regulator.
2. Burner...Front
Side View
Shutoff valve
"ON" Position
3. Open the manual shutoff valve in oven. 2. The valve is open when the handle is level.
4.
Open valve
4....
Installation Instructions - Page 10
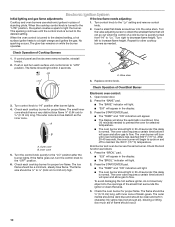
..., with inner cone of Cooktop Burners
1.
Replace control knob. Press the "BAKE" pad.
■ The "BAKE" indicator will light. ■ "350" will light. 2. The oven valve requires a certain time before it will light. ■ The oven burner should occur.
10 Press the START/ENTER pad. ■ The "TEMP" and "ON" indicators will open and allow gas to decrease flame height. this...
Installation Instructions - Page 11
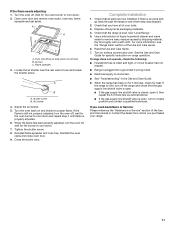
... your range.
11 Use a mild solution of /recycle all parts are now installed. Read the Use and Care Guide. 7. Screws C. Air shutter
4. Turn the oven back on for 5 minutes, check for proper flame. If the
flame is still not properly adjusted, turn off , wait for the oven burner to cool down . 2. Check that the gas supply...
Installation Instructions - Page 13
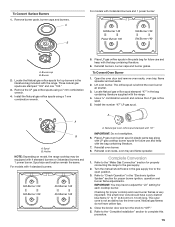
...model, the range cooktop may be equipped with 3 standard burners and 1 power burner:
Std burner 88 Power burner 96
Std burner 88 Std burner 88
A. Spud size and location remain the same. Air shutter
4.
Reinstall oven racks, oven tray and flame spreader. Std burner 88
Std burner 88
13 A
B
For models with 4 standard burners or 3 standard burners and 1 power burner. Locate LP gas...
Installation Instructions - Page 15
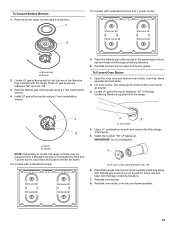
Locate the Natural gas orifice spuds for top burners in the gas supply line to the gas supply.
2. To Convert Oven Burner
1. Lift oven burner. The orifice spud is not as distinct as the inner cone. Use a ³⁄₈" combination wrench and remove the LP gas orifice spud.
5. Holder
NOTE: Depending on model, the range cooktop may have to adjust the...
Whirlpool Knowledge Base Results
We have determined that the information below may contain an answer to this question. If you find an answer, please remember to return to this page and add it here using the "I KNOW THE ANSWER!" button above. It's that easy to earn points!-
My microwave oven display shows time countdown, but is not operating
... continue to the time-of-day mode. Timer The Timer can be off , "Off Timer" will return to operate. If tones are turned off . The microwave oven light will come on, the fan will run and, if on model), and counts down the set in use ? The display on model). Is the Timer in the display, and end-of time. To set... -
Nothing operates on my microwave oven
...of the oven. To activate Learning Mode: The oven must be entered, with the Timer countdown if both are operating in the Learning Mode, the oven light will come on some models): Touch and...? Is the Learning Mode activated? Find a local service provider: Product Category Washer or Dryer Refrigerator or Freezer Dishwasher Electric Range, Oven or Cooktop Gas Range, Oven or Cooktop Microwave Trash ... -
LOC is in the display, and the range won't work
...holding the Start keypad push button for 3 seconds. Repeat to unlock. Only the Clock, Oven Light and Timer keypads will be turned on or off . Error code on my electric range? Models affected: RF114, RF212, WFE301, WFE361, YRF115, YWFE301, YWFE361, TES325, TES326, IVE323, IVP338, IVE823, IVP858, TEP340, TGS325, TGS326 What is the Control Lockout or Lockout on the range display My...
Similar Questions

Oven Won't Heat, No Gas Smell Either
my ove n just up quit last week I turned it on to preheat and no heat and no gas smell. Yes I hv pro...
my ove n just up quit last week I turned it on to preheat and no heat and no gas smell. Yes I hv pro...
(Posted by mhalligan27 7 years ago)

No Gas Getting To Stove Top Burners
Made the NAT to LP conversions as directed. Reversed the gas pressure reg cap and swapped out the fo...
Made the NAT to LP conversions as directed. Reversed the gas pressure reg cap and swapped out the fo...
(Posted by cschrade 9 years ago)


Whirlpool Gas Stove Model Gfg461lvs Oven Won't Light
(Posted by mrhowsk 9 years ago)
