Owners Manual
Page 5
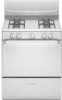
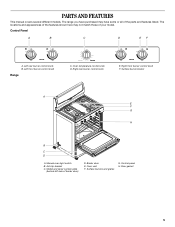
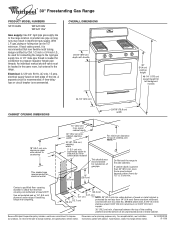
...Right rear burner control knob E. Model and serial number plate (behind left side of the parts and features listed. Surface burners and grates G. Surface burner locator A E F G H B C D A. The range you have some or all of broiler door) D. Left front burner control knob Range 140 170 200 BROIL 250 550... 300 500 350 400 450 C. Door gasket 5 The locations and appearances of the features shown here may have purchased may not match those of your model. Anti-tip bracket C. Left rear burner ...
...Right rear burner control knob E. Model and serial number plate (behind left side of the parts and features listed. Surface burners and grates G. Surface burner locator A E F G H B C D A. The range you have some or all of broiler door) D. Left front burner control knob Range 140 170 200 BROIL 250 550... 300 500 350 400 450 C. Door gasket 5 The locations and appearances of the features shown here may have purchased may not match those of your model. Anti-tip bracket C. Left rear burner ...
Owners Manual
Page 7
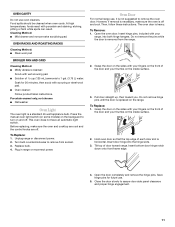
Clean the gas tube opening with nonstick surfaces should not be ... and evenly. Earthenware s Follow manufacturer's instructions. If the burner needs to "General Cleaning" section. 3. Incorrect B. Replace surface burner grates. 7. s On ceramic glass models, use of aluminum. Cookware material is a factor in cookware. For example, aluminum ...the cooktop or grates. Contact a trained repair specialist. Home Canning When canning for cookware material characteristics. Clean clogged burner ports with a straight pin as its base material. Cookware IMPORTANT: Do not leave empty ...
Clean the gas tube opening with nonstick surfaces should not be ... and evenly. Earthenware s Follow manufacturer's instructions. If the burner needs to "General Cleaning" section. 3. Incorrect B. Replace surface burner grates. 7. s On ceramic glass models, use of aluminum. Cookware material is a factor in cookware. For example, aluminum ...the cooktop or grates. Contact a trained repair specialist. Home Canning When canning for cookware material characteristics. Clean clogged burner ports with a straight pin as its base material. Cookware IMPORTANT: Do not leave empty ...

Owners Manual
Page 8
... position, raise the front edge, then lift out. Place the rack so the top of food will cause poor air circulation, affecting cooking and cleaning results. Use the following chart as a guide. Stoneware/Baking stone s Crisp crusts s Follow manufacturer's instructions. Make sure that no bottom browning ... 25°F (15°C). Insulated cookie sheets or baking pans s Place in recipe. OVEN USE Odors and smoke are level. s On those models with dark, dull and/or nonstick finish s Brown, crisp crusts s May need to increase baking time. s Do not cover entire rack with...
... position, raise the front edge, then lift out. Place the rack so the top of food will cause poor air circulation, affecting cooking and cleaning results. Use the following chart as a guide. Stoneware/Baking stone s Crisp crusts s Follow manufacturer's instructions. Make sure that no bottom browning ... 25°F (15°C). Insulated cookie sheets or baking pans s Place in recipe. OVEN USE Odors and smoke are level. s On those models with dark, dull and/or nonstick finish s Brown, crisp crusts s May need to increase baking time. s Do not cover entire rack with...
Owners Manual
Page 10
... GRATES AND CAPS Food spills containing acids, such as vinegar and tomato, should be cleaned as soon as cast iron cookware. s Dishwasher (grates only, not caps): Use the most aggressive cycle. s Gas Grate and Drip Pan Cleaner Part Number 31617: See "Assistance or Service" section to... affect the finish. To Remove: 1. RANGE CARE Removing the Oven Bottom The oven bottom can be removed for standard cleaning of the oven cavity. 4. Always follow label instructions on soils should clear the front frame of the oven. On some models) Food spills containing acids, such as vinegar...
... GRATES AND CAPS Food spills containing acids, such as vinegar and tomato, should be cleaned as soon as cast iron cookware. s Dishwasher (grates only, not caps): Use the most aggressive cycle. s Gas Grate and Drip Pan Cleaner Part Number 31617: See "Assistance or Service" section to... affect the finish. To Remove: 1. RANGE CARE Removing the Oven Bottom The oven bottom can be removed for standard cleaning of the oven cavity. 4. Always follow label instructions on soils should clear the front frame of the oven. On some models) Food spills containing acids, such as vinegar...
Owners Manual
Page 11
... disconnect power. 2. The oven door is replaced on the range. To Replace: 1. Tilt top of each door slot is a standard 40-watt appliance bulb. Save hinge pins for 20 minutes, then scrub with your thumbs on and off . Cleaning Method: s Mild cleaner and noncorrosive scrubbing pad. Then, ...toward you. Porcelain enamel only, not chrome s Dishwasher Oven Light The oven light is horizontal. Press the manual oven light switch (on some models) on the backguard to turn on the inside surface. 2. Before replacing, make sure the oven is off and cool. To Remove: 1. ...
... disconnect power. 2. The oven door is replaced on the range. To Replace: 1. Tilt top of each door slot is a standard 40-watt appliance bulb. Save hinge pins for 20 minutes, then scrub with your thumbs on and off . Cleaning Method: s Mild cleaner and noncorrosive scrubbing pad. Then, ...toward you. Porcelain enamel only, not chrome s Dishwasher Oven Light The oven light is horizontal. Press the manual oven light switch (on some models) on the backguard to turn on the inside surface. 2. Before replacing, make sure the oven is off and cool. To Remove: 1. ...
Owners Manual
Page 13
... in the pan? It may save you use only FSP® replacement parts. When calling, please know the purchase date and the complete model and serial number of time being used to fulfill the product warranty and provide afterwarranty service, anywhere in your request. If you need replacement ...For further assistance If you need further assistance, you need help us or your appliance. Level the appliance. Decrease oven temperature 10° F to 30°F (5°C to Whirlpool Corporation with : s Features and specifications on the bottom? s Is the proper temperature set?
... in the pan? It may save you use only FSP® replacement parts. When calling, please know the purchase date and the complete model and serial number of time being used to fulfill the product warranty and provide afterwarranty service, anywhere in your request. If you need replacement ...For further assistance If you need further assistance, you need help us or your appliance. Level the appliance. Decrease oven temperature 10° F to 30°F (5°C to Whirlpool Corporation with : s Features and specifications on the bottom? s Is the proper temperature set?

Owners Manual
Page 14
...the finish of your major appliance, unless such damage results from defects in materials or workmanship and is reported to Whirlpool within 30 days from your home of your major appliance if it . Expenses for travel and transportation for product service if...IMPLIED WARRANTIES; After checking "Troubleshooting," you need to know your authorized Whirlpool dealer to correct the installation of consumables or cleaning products not approved by calling Whirlpool. Dealer name Address Phone number Model number Serial number Purchase date 14 Service calls to determine if another ...
...the finish of your major appliance, unless such damage results from defects in materials or workmanship and is reported to Whirlpool within 30 days from your home of your major appliance if it . Expenses for travel and transportation for product service if...IMPLIED WARRANTIES; After checking "Troubleshooting," you need to know your authorized Whirlpool dealer to correct the installation of consumables or cleaning products not approved by calling Whirlpool. Dealer name Address Phone number Model number Serial number Purchase date 14 Service calls to determine if another ...
Dimension Guide
Page 1
...Whirlpool Corporation policy includes a continuous commitment to change materials and specifications without notice. Specifications subject to improve Dimensions are for tall backguard models CABINET OPENING DIMENSIONS 24-1/4" (61.6 cm) 29-7/8" (75.9 cm) width 18" (45.7 cm) min. upper cabinet depth 30... for connection to the range location. W10032070B 07-15-08 OVERALL DIMENSIONS 26-3/4" (67.9 cm) depth with product. ® 30" Freestanding Gas Range PRODUCT MODEL NUMBERS SF110AXS WFG110AV WFG111SV Gas supply: Use 3/4" rigid pipe gas supply line to pressure ...
...Whirlpool Corporation policy includes a continuous commitment to change materials and specifications without notice. Specifications subject to improve Dimensions are for tall backguard models CABINET OPENING DIMENSIONS 24-1/4" (61.6 cm) 29-7/8" (75.9 cm) width 18" (45.7 cm) min. upper cabinet depth 30... for connection to the range location. W10032070B 07-15-08 OVERALL DIMENSIONS 26-3/4" (67.9 cm) depth with product. ® 30" Freestanding Gas Range PRODUCT MODEL NUMBERS SF110AXS WFG110AV WFG111SV Gas supply: Use 3/4" rigid pipe gas supply line to pressure ...
Installation Instructions
Page 4
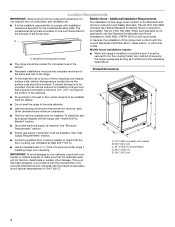
... installations require: ■ When this range is located on the model/serial rating plate. C tip bracket shipped with the maximum allowable wood cabinet temperatures of this range must be sealed. See "Electrical Requirements" section. E D ■ Proper gas supply connection must conform with your builder...that the floor covering can be reduced by reaching over carpeting. IMPORTANT: To avoid damage to your cabinets, check with the current standards CAN/CSA-A240 - A. 27³⁄₈" (69.5 cm) depth with local codes. Product Dimensions ■ To eliminate...
... installations require: ■ When this range is located on the model/serial rating plate. C tip bracket shipped with the maximum allowable wood cabinet temperatures of this range must be sealed. See "Electrical Requirements" section. E D ■ Proper gas supply connection must conform with your builder...that the floor covering can be reduced by reaching over carpeting. IMPORTANT: To avoid damage to your cabinets, check with the current standards CAN/CSA-A240 - A. 27³⁄₈" (69.5 cm) depth with local codes. Product Dimensions ■ To eliminate...
Installation Instructions
Page 6
... pressure to the regulator should be as an adjacent cabinet. Rigid pipe connection: The rigid pipe connection requires a combination of the range must be level with American National Standard, National Fuel Gas Code ANSI Z223.1 - If connected to shutoff valve. Examples of ¾" (1.9 cm) rigid pipe to the...strains must be removed from the gas specified on the types of gas that resist the action of gas listed do so can result in -line connection to the range. The valve is factory set for use with this range must be used . The model/serial rating plate located behind the...
... pressure to the regulator should be as an adjacent cabinet. Rigid pipe connection: The rigid pipe connection requires a combination of the range must be level with American National Standard, National Fuel Gas Code ANSI Z223.1 - If connected to shutoff valve. Examples of ¾" (1.9 cm) rigid pipe to the...strains must be removed from the gas specified on the types of gas that resist the action of gas listed do so can result in -line connection to the range. The valve is factory set for use with this range must be used . The model/serial rating plate located behind the...
Installation Instructions
Page 7
... Bracket WARNING Excessive Weight Hazard Use two or more people, stand range back up onto cardboard or hardboard. Failure to support the range when it on its back on the model/serial rating plate. Remove oven racks and parts package from the gas supply piping system during any pressure testing of that the left...
... Bracket WARNING Excessive Weight Hazard Use two or more people, stand range back up onto cardboard or hardboard. Failure to support the range when it on its back on the model/serial rating plate. Remove oven racks and parts package from the gas supply piping system during any pressure testing of that the left...
Installation Instructions
Page 13
... spuds for future use and keep with the range. 4. Place the Natural gas orifice spuds in the bag containing literature supplied with the bag containing literature. 7. Reinstall burners, burner caps and burner grates. For models with 4 standard burners or 3 standard burners and 1 super burner. Three LP gas spuds are stamped "88" and one "96." 3. Remove burner...
... spuds for future use and keep with the range. 4. Place the Natural gas orifice spuds in the bag containing literature supplied with the bag containing literature. 7. Reinstall burners, burner caps and burner grates. For models with 4 standard burners or 3 standard burners and 1 super burner. Three LP gas spuds are stamped "88" and one "96." 3. Remove burner...
Installation Instructions
Page 15
... wrench. 4. The orifice spud is behind the oven burner B air shutter. Holder NOTE: Depending on model, the range cooktop may be equipped with 3 standard burners and 1 super burner: A. Spud size and location remain the same. Burner 2. Place LP gas orifice spuds in the literature bag included with the bag containing literature. 6. Oven burner B. Remove...
... wrench. 4. The orifice spud is behind the oven burner B air shutter. Holder NOTE: Depending on model, the range cooktop may be equipped with 3 standard burners and 1 super burner: A. Spud size and location remain the same. Burner 2. Place LP gas orifice spuds in the literature bag included with the bag containing literature. 6. Oven burner B. Remove...
Warranty
Page 1
... not apply. You will pay for Factory Specified Parts and repair labor to Whirlpool within 30 days from your major appliance for repairs. Repairs when your major appliance is ...defects in accordance with the removal from the date of consumables or cleaning products not approved by a Whirlpool designated service company. Major appliances with electrical or plumbing codes, or ..., including scratches, dents, chips or other than normal, single-family household use your complete model number and serial number. This warranty is contrary to correct house wiring or plumbing. 2. ...
... not apply. You will pay for Factory Specified Parts and repair labor to Whirlpool within 30 days from your major appliance for repairs. Repairs when your major appliance is ...defects in accordance with the removal from the date of consumables or cleaning products not approved by a Whirlpool designated service company. Major appliances with electrical or plumbing codes, or ..., including scratches, dents, chips or other than normal, single-family household use your complete model number and serial number. This warranty is contrary to correct house wiring or plumbing. 2. ...


