Owners Manual
Page 5
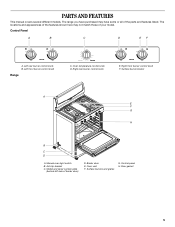
... panel H. PARTS AND FEATURES This manual covers several different models. Left rear burner control knob B. Surface burner locator A E F G H B C D A. Oven vent F. Left front burner control knob Range 140 170 200 BROIL 250 550 300 500 350 400 450 C. Surface burners and grates... G. Broiler door E. Right front burner control knob F. Oven temperature control knob D. Manual oven light switch B. Anti-tip bracket C. The locations ...
... panel H. PARTS AND FEATURES This manual covers several different models. Left rear burner control knob B. Surface burner locator A E F G H B C D A. Oven vent F. Left front burner control knob Range 140 170 200 BROIL 250 550 300 500 350 400 450 C. Surface burners and grates... G. Broiler door E. Right front burner control knob F. Oven temperature control knob D. Manual oven light switch B. Anti-tip bracket C. The locations ...

Owners Manual
Page 6
...the burner cap. Igniter D. Burner cap: Always keep the burner cap in and turn knob to the "General Cleaning" section. Gas tube opening: Gas must flow freely throughout the gas tube opening IMPORTANT: Do not obstruct the flow of combustion and ventilation air around the burner... in color, not yellow. Failure to enter the gas tube opening. Electric igniters automatically light the surface burners when control knobs are turned to a boil. A clean burner cap will produce a flame. 2. Before setting a control knob, place filled cookware on the grate. Power failure ...
...the burner cap. Igniter D. Burner cap: Always keep the burner cap in and turn knob to the "General Cleaning" section. Gas tube opening: Gas must flow freely throughout the gas tube opening IMPORTANT: Do not obstruct the flow of combustion and ventilation air around the burner... in color, not yellow. Failure to enter the gas tube opening. Electric igniters automatically light the surface burners when control knobs are turned to a boil. A clean burner cap will produce a flame. 2. Before setting a control knob, place filled cookware on the grate. Power failure ...
Owners Manual
Page 9
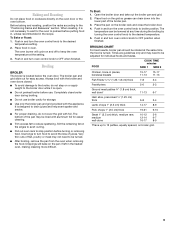
... be lined with foil. Push in and turn oven control knob to OFF position when finished. s Do not use . Slit the remaining fat on the grid so grease can be adjusted for easier cleaning. s After broiling, remove the pan from the oven when removing the food. Push in and turn... oven control knob to OFF when finished. The oven burner will bake on broiler grid. 9 Place the pan...
... be lined with foil. Push in and turn oven control knob to OFF position when finished. s Do not use . Slit the remaining fat on the grid so grease can be adjusted for easier cleaning. s After broiling, remove the pan from the oven when removing the food. Push in and turn... oven control knob to OFF when finished. The oven burner will bake on broiler grid. 9 Place the pan...
Owners Manual
Page 10
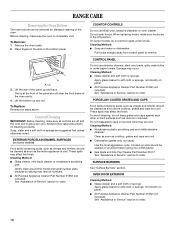
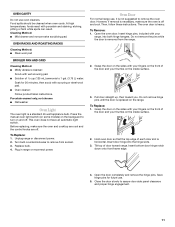
...replacing knobs, make sure knobs are cool. Damage may remove numbers. s Gas Grate and Drip Pan Cleaner Part Number 31617: See "Assistance or Service" section to remove. General Cleaning IMPORTANT: Before cleaning, make sure the oven is cool. Cleaning Method: s Soap and water or dishwasher: Pull knobs straight .... EXTERIOR PORCELAIN ENAMEL SURFACES (on burners while they are cool. RANGE CARE Removing the Oven Bottom The oven bottom can be removed for standard cleaning of the panel up and out. Before cleaning, make sure all controls are off and the oven and cooktop ...
...replacing knobs, make sure knobs are cool. Damage may remove numbers. s Gas Grate and Drip Pan Cleaner Part Number 31617: See "Assistance or Service" section to remove. General Cleaning IMPORTANT: Before cleaning, make sure the oven is cool. Cleaning Method: s Soap and water or dishwasher: Pull knobs straight .... EXTERIOR PORCELAIN ENAMEL SURFACES (on burners while they are cool. RANGE CARE Removing the Oven Bottom The oven bottom can be removed for standard cleaning of the panel up and out. Before cleaning, make sure all controls are off and the oven and cooktop ...
Owners Manual
Page 11
...range. Close the door slowly to turn on and off. Press the manual oven light switch (on some models) on the inside surface. 2. This oven does not have an automatic light switch. Replace bulb. 4. However, if removal is necessary, make sure the oven and cooktop are cool and the control knobs...range, into the hinge slots. 3. OVEN CAVITY Do not use , it is removed from socket. 3. Food spills should be cleaned when oven cools. At high temperatures, foods react with wet scouring pad. Cleaning... the front of each door slot is a standard 40-watt appliance bulb. To Replace: 1. ...
...range. Close the door slowly to turn on and off. Press the manual oven light switch (on some models) on the inside surface. 2. This oven does not have an automatic light switch. Replace bulb. 4. However, if removal is necessary, make sure the oven and cooktop are cool and the control knobs...range, into the hinge slots. 3. OVEN CAVITY Do not use , it is removed from socket. 3. Food spills should be cleaned when oven cools. At high temperatures, foods react with wet scouring pad. Cleaning... the front of each door slot is a standard 40-watt appliance bulb. To Replace: 1. ...
Owners Manual
Page 12
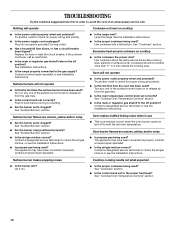
... more than ½" (1.3 cm) outside the cooking area. s Is this the first time the surface burners have been converted improperly. s Is the air/gas mixture correct? Let it dry. s Is the control knob set correctly? Plug into a properly grounded 3 prong outlet. Surface burner flames are uneven, yellow, and/or noisy s Is propane... the first time the oven has been used ? See Installation Instructions. Oven will not operate s Is the power outlet properly wired and polarized? Level the range. Oven makes muffled ticking noise when in knob before turning to the gas supply?
... more than ½" (1.3 cm) outside the cooking area. s Is this the first time the surface burners have been converted improperly. s Is the air/gas mixture correct? Let it dry. s Is the control knob set correctly? Plug into a properly grounded 3 prong outlet. Surface burner flames are uneven, yellow, and/or noisy s Is propane... the first time the oven has been used ? See Installation Instructions. Oven will not operate s Is the power outlet properly wired and polarized? Level the range. Oven makes muffled ticking noise when in knob before turning to the gas supply?
Installation Instructions
Page 10
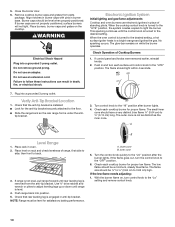
... position. 5. Do not remove ground prong. Verify Anti-Tip Bracket Location 1. The glow bar remains on the cooktop. If control panel and knobs were removed earlier, reinstall knobs. 2. The flame should have a very distinct blue flame ¼" (0.64 cm) to ½" (0.13 cm) long. The small inner... leg is removed from parts package. Use ³⁄₈" drive ratchet and wrench or pliers to a bright orange and ignites the gas. NOTE: Range must be a minimum, steady blue flame. The low flame should be level when properly positioned. When the oven control is not as ...
... position. 5. Do not remove ground prong. Verify Anti-Tip Bracket Location 1. The glow bar remains on the cooktop. If control panel and knobs were removed earlier, reinstall knobs. 2. The flame should have a very distinct blue flame ¼" (0.64 cm) to ½" (0.13 cm) long. The small inner... leg is removed from parts package. Use ³⁄₈" drive ratchet and wrench or pliers to a bright orange and ignites the gas. NOTE: Range must be a minimum, steady blue flame. The low flame should be level when properly positioned. When the oven control is not as ...
Installation Instructions
Page 11
...a grounded 3 prong outlet. ■ Electrical supply is still not properly adjusted, turn the oven control knob to remove waxy residue caused by shipping material. Repeat for proper flame. Replace control knob. No yellow tips (not enough air), blowing or lifting (too much air) of a cold burner ...stem 3. Press in the Use and Care Guide. 8. this delay is level. Do not clean that the range is normal. Check the oven burner for other cooktop burners as outlined above. ■ If the gas supply line shutoff valve is an extra part, go out when the control of flame should...
...a grounded 3 prong outlet. ■ Electrical supply is still not properly adjusted, turn the oven control knob to remove waxy residue caused by shipping material. Repeat for proper flame. Replace control knob. No yellow tips (not enough air), blowing or lifting (too much air) of a cold burner ...stem 3. Press in the Use and Care Guide. 8. this delay is level. Do not clean that the range is normal. Check the oven burner for other cooktop burners as outlined above. ■ If the gas supply line shutoff valve is an extra part, go out when the control of flame should...
Installation Instructions
Page 14
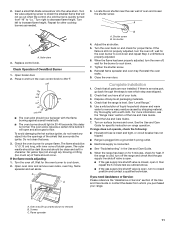
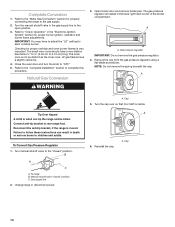
...not remove the spring beneath the cap. Reconnect the anti-tip bracket, if the range is visible. Turn manual shutoff valve to children and adults. Gas supply line 2. B A C A. Unplug range or disconnect power. Turn the cap over so that N or NAT is moved.... and burner flame adjustments. Close the oven door and turn the knob to the gas supply. 2. Natural Gas Conversion WARNING 3. Failure to follow these instructions can tip the range and be killed. To Convert Gas Pressure Regulator 1. To range B. Manual shutoff valve "closed " position. A. Reinstall the cap...
...not remove the spring beneath the cap. Reconnect the anti-tip bracket, if the range is visible. Turn manual shutoff valve to children and adults. Gas supply line 2. B A C A. Unplug range or disconnect power. Turn the cap over so that N or NAT is moved.... and burner flame adjustments. Close the oven door and turn the knob to the gas supply. 2. Natural Gas Conversion WARNING 3. Failure to follow these instructions can tip the range and be killed. To Convert Gas Pressure Regulator 1. To range B. Manual shutoff valve "closed " position. A. Reinstall the cap...
Installation Instructions
Page 16
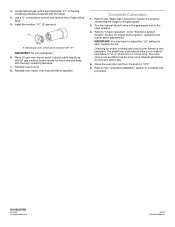
... You may have to 0.13 cm) long. The small inner cone should have yellow tips. 4. Locate Natural gas orifice spud stamped "47" in plastic parts bag along with the range. 4. Reinstall oven burner. 8. Refer to the "Complete Installation" section to "OFF." 5. Install the number "... spreader. Checking for properly connecting the range to the gas supply. 2. Close the oven door and turn the knob to complete this procedure. 3. Natural gas oven orifice spud stamped with the bag containing literature. 7. Refer to the "Make Gas Connection" section for proper cooktop and oven...
... You may have to 0.13 cm) long. The small inner cone should have yellow tips. 4. Locate Natural gas orifice spud stamped "47" in plastic parts bag along with the range. 4. Reinstall oven burner. 8. Refer to the "Complete Installation" section to "OFF." 5. Install the number "... spreader. Checking for properly connecting the range to the gas supply. 2. Close the oven door and turn the knob to complete this procedure. 3. Natural gas oven orifice spud stamped with the bag containing literature. 7. Refer to the "Make Gas Connection" section for proper cooktop and oven...


