Owners Manual
Page 5
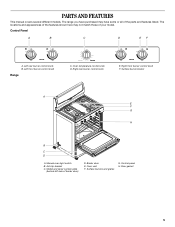
... 5 Surface burner locator A E F G H B C D A. Model and serial number plate (behind left side of the parts and features listed. Right rear burner control knob E. Oven vent F. The range you have some or all of broiler door) D. Control panel H. Anti-tip bracket C. Broiler door... E. PARTS AND FEATURES This manual covers several different models. Control Panel A B C D EF A. Left rear burner control...
... 5 Surface burner locator A E F G H B C D A. Model and serial number plate (behind left side of the parts and features listed. Right rear burner control knob E. Oven vent F. The range you have some or all of broiler door) D. Control panel H. Anti-tip bracket C. Broiler door... E. PARTS AND FEATURES This manual covers several different models. Control Panel A B C D EF A. Left rear burner control...
Owners Manual
Page 9
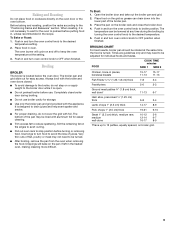
...doors closed. s Do not preheat broiler before putting food in, unless recommended in the heated oven, making cleaning more difficult. s Use only the broiler pan and grid provided with aluminum foil for easier cleaning. Slit the remaining fat on the pan if left in the recipe. Very thin cuts of fish, poultry... or meat may not need to avoid the loss of juices. s After broiling, remove the pan from the oven when removing the food. The temperature can drain down into the lower part...
...doors closed. s Do not preheat broiler before putting food in, unless recommended in the heated oven, making cleaning more difficult. s Use only the broiler pan and grid provided with aluminum foil for easier cleaning. Slit the remaining fat on the pan if left in the recipe. Very thin cuts of fish, poultry... or meat may not need to avoid the loss of juices. s After broiling, remove the pan from the oven when removing the food. The temperature can drain down into the lower part...
Owners Manual
Page 10
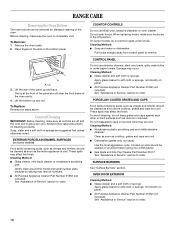
... sponge, not directly on cleaning products. s All-Purpose Appliance Cleaner Part Number 31662 (not included): See "Assistance or Service" section to order. RANGE CARE Removing the Oven Bottom The oven bottom can be removed for standard cleaning of the oven cavity. 4. Cleaning Method: s Nonabrasive plastic ... or scrubbed before going into a dishwasher. Do not soak knobs. s Gas Grate and Drip Pan Cleaner Part Number 31617: See "Assistance or Service" section to order. s All-Purpose Appliance Cleaner Part Number 31662 (not included): See "Assistance or Service" section to soft cloth...
... sponge, not directly on cleaning products. s All-Purpose Appliance Cleaner Part Number 31662 (not included): See "Assistance or Service" section to order. RANGE CARE Removing the Oven Bottom The oven bottom can be removed for standard cleaning of the oven cavity. 4. Cleaning Method: s Nonabrasive plastic ... or scrubbed before going into a dishwasher. Do not soak knobs. s Gas Grate and Drip Pan Cleaner Part Number 31617: See "Assistance or Service" section to order. s All-Purpose Appliance Cleaner Part Number 31662 (not included): See "Assistance or Service" section to soft cloth...
Owners Manual
Page 13
...and serial number of appliances. FSP® replacement parts will help , follow the instructions below. To locate FSP® replacement parts in oven. In the U.S.A. s Referrals to build every new WHIRLPOOL® appliance. Whirlpool designated service technicians are made with the same precision... and Bakeware" section. Decrease oven temperature 10° F to 30°F (5°C to replace it. Wait for assistance or service, please check "Troubleshooting." s Accessory and repair parts sales. Call the Whirlpool Customer eXperience Center toll free: 1-800-253-1301. For further ...
...and serial number of appliances. FSP® replacement parts will help , follow the instructions below. To locate FSP® replacement parts in oven. In the U.S.A. s Referrals to build every new WHIRLPOOL® appliance. Whirlpool designated service technicians are made with the same precision... and Bakeware" section. Decrease oven temperature 10° F to 30°F (5°C to replace it. Wait for assistance or service, please check "Troubleshooting." s Accessory and repair parts sales. Call the Whirlpool Customer eXperience Center toll free: 1-800-253-1301. For further ...

Owners Manual
Page 14
... or workmanship. You must be borne by calling Whirlpool. ITEMS EXCLUDED FROM WARRANTY This limited warranty does not cover: 1. Consumable parts are excluded from defects in -home service is ... associated with electrical or plumbing codes, or use of consumables or cleaning products not approved by an authorized Whirlpool servicer is not available. 10. This warranty is void if the... or workmanship and is reported to Whirlpool within 30 days from the date of original purchase date is covered by a Whirlpool designated service company. WHIRLPOOL SHALL NOT BE LIABLE FOR INCIDENTAL ...
... or workmanship. You must be borne by calling Whirlpool. ITEMS EXCLUDED FROM WARRANTY This limited warranty does not cover: 1. Consumable parts are excluded from defects in -home service is ... associated with electrical or plumbing codes, or use of consumables or cleaning products not approved by an authorized Whirlpool servicer is not available. 10. This warranty is void if the... or workmanship and is reported to Whirlpool within 30 days from the date of original purchase date is covered by a Whirlpool designated service company. WHIRLPOOL SHALL NOT BE LIABLE FOR INCIDENTAL ...
Installation Instructions
Page 1
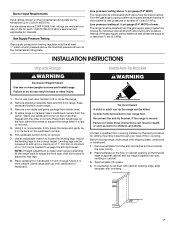
... installation instructions for future reference. W10032070B INSTALLATION INSTRUCTIONS 30" (76.2 CM) FREESTANDING GAS RANGES with standard clean oven Table of Contents RANGE SAFETY...2 INSTALLATION REQUIREMENTS 3 Tools and Parts...3 Location Requirements 4 Electrical Requirements 5 Gas Supply Requirements 6 INSTALLATION INSTRUCTIONS 7 Unpack Range ...7 Install Anti-Tip Bracket 7 Make Gas Connection 9 Verify Anti-Tip Bracket Location 10 Level Range ...10 Electronic Ignition System 10 Complete Installation...
... installation instructions for future reference. W10032070B INSTALLATION INSTRUCTIONS 30" (76.2 CM) FREESTANDING GAS RANGES with standard clean oven Table of Contents RANGE SAFETY...2 INSTALLATION REQUIREMENTS 3 Tools and Parts...3 Location Requirements 4 Electrical Requirements 5 Gas Supply Requirements 6 INSTALLATION INSTRUCTIONS 7 Unpack Range ...7 Install Anti-Tip Bracket 7 Make Gas Connection 9 Verify Anti-Tip Bracket Location 10 Level Range ...10 Electronic Ignition System 10 Complete Installation...
Installation Instructions
Page 3
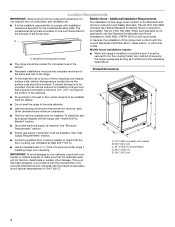
... must not exceed 3 feet. Reconnect the anti-tip bracket, if the range is moved. Thickness of Massachusetts. ■ If using a ball valve, it shall be a T-handle type. ■ A flexible gas connector, when used, must be killed. Parts needed Parts supplied Check that all parts are available from your local hardware store. INSTALLATION REQUIREMENTS Tools and...
... must not exceed 3 feet. Reconnect the anti-tip bracket, if the range is moved. Thickness of Massachusetts. ■ If using a ball valve, it shall be a T-handle type. ■ A flexible gas connector, when used, must be killed. Parts needed Parts supplied Check that all parts are available from your local hardware store. INSTALLATION REQUIREMENTS Tools and...
Installation Instructions
Page 4
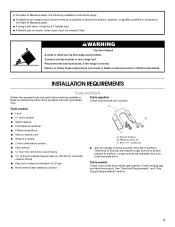
... installed in the wall or floor where range is to the standards listed above the surface units should be sealed. Given dimensions are shown must be located for Mobile Home Construction and Safety, Title 24, HUD Part 280). Product Dimensions ■ To eliminate the risk ...the side cabinets. Do not obstruct flow of burns or fire by installing a range hood that are minimum clearances. ■ The floor anti-tip bracket must be installed. E D ■ Proper gas supply connection must be available. Location Requirements IMPORTANT: Observe all governing codes and ...
... installed in the wall or floor where range is to the standards listed above the surface units should be sealed. Given dimensions are shown must be located for Mobile Home Construction and Safety, Title 24, HUD Part 280). Product Dimensions ■ To eliminate the risk ...the side cabinets. Do not obstruct flow of burns or fire by installing a range hood that are minimum clearances. ■ The floor anti-tip bracket must be installed. E D ■ Proper gas supply connection must be available. Location Requirements IMPORTANT: Observe all governing codes and ...
Installation Instructions
Page 7
... with overhang. 7 Pull cardboard bottom firmly to a maximum of ½ psi (3.5 kPa). A minimum of the gas supply piping system at ½ psi gauge (14" WCP) or lower The range must be killed. Line pressure testing above the manifold pressure shown on the model/serial rating plate. Do not... use oven door handle to rear range foot. Remove oven racks and parts package from the anti-tip bracket kit (found inside oven. 4. Using 2 or more people to follow these instructions can be...
... with overhang. 7 Pull cardboard bottom firmly to a maximum of ½ psi (3.5 kPa). A minimum of the gas supply piping system at ½ psi gauge (14" WCP) or lower The range must be killed. Line pressure testing above the manifold pressure shown on the model/serial rating plate. Do not... use oven door handle to rear range foot. Remove oven racks and parts package from the anti-tip bracket kit (found inside oven. 4. Using 2 or more people to follow these instructions can be...
Installation Instructions
Page 10
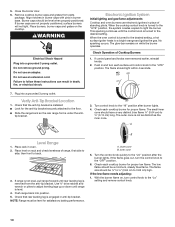
... leg is turned to the desired setting, a hot surface igniter heats to light the burner. Electronic Ignition System Initial lighting and gas flame adjustments Cooktop and oven burners use electronic igniters in and turn each surface unit control knob to the desired setting. This sparking... side to adjust leveling legs up or down until rear leveling leg is level. 4. If range is not level, pull range forward until range is removed from parts package. With the burner flame on rack and check levelness of Cooktop Burners 1. Turn control knob to the "LO" position after...
... leg is turned to the desired setting, a hot surface igniter heats to light the burner. Electronic Ignition System Initial lighting and gas flame adjustments Cooktop and oven burners use electronic igniters in and turn each surface unit control knob to the desired setting. This sparking... side to adjust leveling legs up or down until rear leveling leg is level. 4. If range is not level, pull range forward until range is removed from parts package. With the burner flame on rack and check levelness of Cooktop Burners 1. Turn control knob to the "LO" position after...
Installation Instructions
Page 11
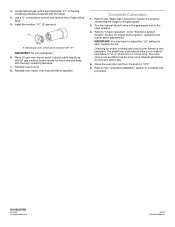
...and Care Guide for the burner to flow. If the range is level. Flame spreader 11 Do not clean that the range is cold, turn to 350°F. Adjust the air...properly adjusted, turn the oven control knob to closed , open and allow gas to cool down . 2. Close the oven door. See "Level Range." 5. C A. Complete Installation 1. Check that area. 3. this delay is...screwdriver into a grounded 3 prong outlet. ■ Electrical supply is an extra part, go out when the control of your range. Air shutter 4. Reinstall the oven racks. 9. If there is connected. ...
...and Care Guide for the burner to flow. If the range is level. Flame spreader 11 Do not clean that the range is cold, turn to 350°F. Adjust the air...properly adjusted, turn the oven control knob to closed , open and allow gas to cool down . 2. Close the oven door. See "Level Range." 5. C A. Complete Installation 1. Check that area. 3. this delay is...screwdriver into a grounded 3 prong outlet. ■ Electrical supply is an extra part, go out when the control of your range. Air shutter 4. Reinstall the oven racks. 9. If there is connected. ...
Installation Instructions
Page 13
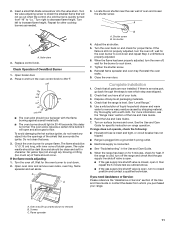
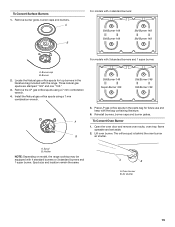
... plastic parts bag along with Natural gas cooktop burner spuds for future use and keep with the range. Install LP gas orifice spuds using a 7 mm combination wrench. 4. Place Natural gas oven burner spud in the literature bag included with the bag containing literature. 6. Burner cap B. A B A. Remove burner grate, burner caps and burners. A B For models with 4 standard...
... plastic parts bag along with Natural gas cooktop burner spuds for future use and keep with the range. Install LP gas orifice spuds using a 7 mm combination wrench. 4. Place Natural gas oven burner spud in the literature bag included with the bag containing literature. 6. Burner cap B. A B A. Remove burner grate, burner caps and burners. A B For models with 4 standard...
Installation Instructions
Page 15
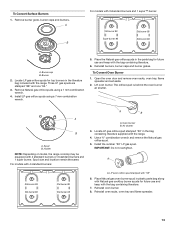
...149 Std Burner 149 For models with 4 standard burners or 3 standard burners and 1 super burner. Remove the LP gas orifice spuds using a 7 mm combination wrench. Install the Natural gas orifice spuds using a 7 mm combination wrench. 4. Place LP gas orifice spuds in the literature bag included with... Remove burner grate, burner caps and burners. A. Holder NOTE: Depending on model, the range cooktop may be equipped with 3 standard burners and 1 super burner: A. Air shutter 15 Locate the Natural gas orifice spuds for top burners in the parts bag for future use and keep with the...
...149 Std Burner 149 For models with 4 standard burners or 3 standard burners and 1 super burner. Remove the LP gas orifice spuds using a 7 mm combination wrench. Install the Natural gas orifice spuds using a 7 mm combination wrench. 4. Place LP gas orifice spuds in the literature bag included with... Remove burner grate, burner caps and burners. A. Holder NOTE: Depending on model, the range cooktop may be equipped with 3 standard burners and 1 super burner: A. Air shutter 15 Locate the Natural gas orifice spuds for top burners in the parts bag for future use and keep with the...
Installation Instructions
Page 16
...;" to ½" (0.64 cm to "Check Operation" in plastic parts bag along with LP gas cooktop burner spuds for proper burner ignition, operation and burner flame adjustments. W10032070B © 2009. Place LP gas oven burner spud in the "Electronic Ignition System" section for future use... "47" IMPORTANT: Do not overtighten. 6. A A. Install the number "47" LP gas spud. All rights reserved. 10/09 Printed in the bag containing literature supplied with the range. 4. Locate Natural gas orifice spud stamped "47" in Mexico Use a ³⁄₈" combination wrench and remove...
...;" to ½" (0.64 cm to "Check Operation" in plastic parts bag along with LP gas cooktop burner spuds for proper burner ignition, operation and burner flame adjustments. W10032070B © 2009. Place LP gas oven burner spud in the "Electronic Ignition System" section for future use... "47" IMPORTANT: Do not overtighten. 6. A A. Install the number "47" LP gas spud. All rights reserved. 10/09 Printed in the bag containing literature supplied with the range. 4. Locate Natural gas orifice spud stamped "47" in Mexico Use a ³⁄₈" combination wrench and remove...
Warranty
Page 1
...has been altered or removed from defects in accordance with the removal from the date of consumables or cleaning products not approved by the customer. Service calls to Whirlpool within 30 days from your home of your complete model number and serial number. Costs associated with published installation ...HEREIN. Service must provide proof of purchase or installation date for other damage to the finish of your major appliance for Factory Specified Parts and repair labor to correct defects in a manner that have been removed, altered or cannot be repaired in the home and ...
...has been altered or removed from defects in accordance with the removal from the date of consumables or cleaning products not approved by the customer. Service calls to Whirlpool within 30 days from your home of your complete model number and serial number. Costs associated with published installation ...HEREIN. Service must provide proof of purchase or installation date for other damage to the finish of your major appliance for Factory Specified Parts and repair labor to correct defects in a manner that have been removed, altered or cannot be repaired in the home and ...


