Owners Manual
Page 3
... cancer, birth defects, or other reproductive harm. This is , tell you what can be performed by a qualified installer, service agency or the gas supplier. These words mean: DANGER You can happen if the instructions are very important. WHAT TO DO IF YOU SMELL... This appliance can cause low-level exposure to potential hazards that can be killed or seriously injured if you don't immediately follow instructions. RANGE SAFETY Your safety and the safety of others . Installation and service must be killed or seriously injured if you don't follow instructions. Follow ...
... cancer, birth defects, or other reproductive harm. This is , tell you what can be performed by a qualified installer, service agency or the gas supplier. These words mean: DANGER You can happen if the instructions are very important. WHAT TO DO IF YOU SMELL... This appliance can cause low-level exposure to potential hazards that can be killed or seriously injured if you don't immediately follow instructions. RANGE SAFETY Your safety and the safety of others . Installation and service must be killed or seriously injured if you don't follow instructions. Follow ...
Owners Manual
Page 4
... Hazard A child or adult can tip if you apply too much force or weight to floor. • Slide range back so rear range foot is moved. For self-cleaning ranges - Doing so may cause carbon monoxide poisoning. s Disconnect the electrical supply before initiating the... cleaning cycle. s Storage in carbon monoxide poisoning and overheating of a range - children climbing on the backguard of the oven. s Maintenance - See the installation instructions for your protection ...
... Hazard A child or adult can tip if you apply too much force or weight to floor. • Slide range back so rear range foot is moved. For self-cleaning ranges - Doing so may cause carbon monoxide poisoning. s Disconnect the electrical supply before initiating the... cleaning cycle. s Storage in carbon monoxide poisoning and overheating of a range - children climbing on the backguard of the oven. s Maintenance - See the installation instructions for your protection ...
Owners Manual
Page 5
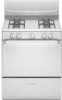
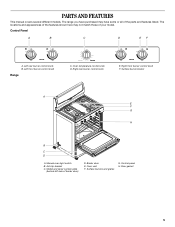
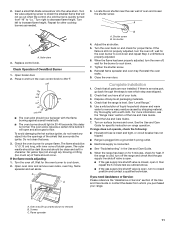
Right rear burner control knob E. Anti-tip bracket C. Left front burner control knob Range 140 170 200 BROIL 250 550 300 500 350 400 450 C. Oven temperature control knob D. Surface burners and grates G. Right front burner control knob F. Model ... number plate (behind left side of the parts and features listed. Broiler door E. Oven vent F. PARTS AND FEATURES This manual covers several different models. The range you have some or all of broiler door) D. The locations and appearances of the features shown here may have purchased may not match those of...
Right rear burner control knob E. Anti-tip bracket C. Left front burner control knob Range 140 170 200 BROIL 250 550 300 500 350 400 450 C. Oven temperature control knob D. Surface burners and grates G. Right front burner control knob F. Model ... number plate (behind left side of the parts and features listed. Broiler door E. Oven vent F. PARTS AND FEATURES This manual covers several different models. The range you have some or all of broiler door) D. The locations and appearances of the features shown here may have purchased may not match those of...
Owners Manual
Page 10
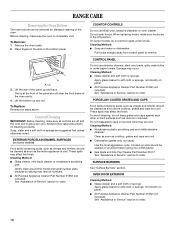
... Reverse the steps above. On some models) Food spills containing acids, such as vinegar and tomato, should be removed for standard cleaning of the oven cavity. 4. s Gas Grate and Drip Pan Cleaner Part Number 31617: See "Assistance or Service" section to soft cloth or sponge, not directly ...See "Assistance or Service" section to order. 10 Always follow label instructions on soils should be cleaned as soon as cooktop, grates and caps are suggested first unless otherwise noted. RANGE CARE Removing the Oven Bottom The oven bottom can be soaked or scrubbed before going into a ...
... Reverse the steps above. On some models) Food spills containing acids, such as vinegar and tomato, should be removed for standard cleaning of the oven cavity. 4. s Gas Grate and Drip Pan Cleaner Part Number 31617: See "Assistance or Service" section to soft cloth or sponge, not directly ...See "Assistance or Service" section to order. 10 Always follow label instructions on soils should be cleaned as soon as cooktop, grates and caps are suggested first unless otherwise noted. RANGE CARE Removing the Oven Bottom The oven bottom can be soaked or scrubbed before going into a ...
Owners Manual
Page 11
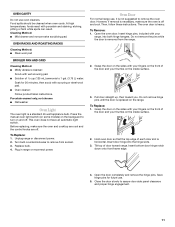
...wool pad BROILER PAN AND GRID Cleaning Method: s Mildly abrasive cleanser: Scrub with scouring or steel-wool pad. s Solution of ¹ ₂ cup (125 mL) ammonia to 1 gal. (3.75 L) water: Soak for future use. 5. s Oven cleaner: Follow product label instructions. Plug in range or reconnect power. To Remove: ... on and off and cool. To Replace: 1. Insert door hinge into both hinge hangers. To Replace: 1. The oven door is a standard 40-watt appliance bulb. At high temperatures, foods react with your thumbs on the inside surface. 2. Hold oven door so that the top...
...wool pad BROILER PAN AND GRID Cleaning Method: s Mildly abrasive cleanser: Scrub with scouring or steel-wool pad. s Solution of ¹ ₂ cup (125 mL) ammonia to 1 gal. (3.75 L) water: Soak for future use. 5. s Oven cleaner: Follow product label instructions. Plug in range or reconnect power. To Remove: ... on and off and cool. To Replace: 1. Insert door hinge into both hinge hangers. To Replace: 1. The oven door is a standard 40-watt appliance bulb. At high temperatures, foods react with your thumbs on the inside surface. 2. Hold oven door so that the top...
Owners Manual
Page 12
... properly grounded 3 prong outlet. If the problem continues, call . s Is the range properly connected to a setting. Turn on any one of the surface burner knobs to release air from the gas lines. See "Surface Burners" section. s Are the burner caps positioned properly? Try... Instructions. s Is the main or regulator gas shutoff valve in knob before turning to the gas supply? See "Surface Burners" section. Contact a designated service technician to check the air/gas mixture or see the Installation Instructions. Level the range. See "Cookware" section. s Is this...
... properly grounded 3 prong outlet. If the problem continues, call . s Is the range properly connected to a setting. Turn on any one of the surface burner knobs to release air from the gas lines. See "Surface Burners" section. s Are the burner caps positioned properly? Try... Instructions. s Is the main or regulator gas shutoff valve in knob before turning to the gas supply? See "Surface Burners" section. Contact a designated service technician to check the air/gas mixture or see the Installation Instructions. Level the range. See "Cookware" section. s Is this...
Dimension Guide
Page 1
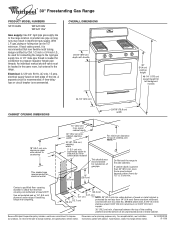
... in the same room, but external to the range. Specifications subject to pressure regulator female pipe threads. ® 30" Freestanding Gas Range PRODUCT MODEL NUMBERS SF110AXS WFG110AV WFG111SV Gas supply: Use 3/4" rigid pipe gas supply line to the side cabinets. clearance upper ...) stainless steel, 0.024" (0.6 mm) aluminum or 0.020" (0.5 mm) copper. 30" (76.2 cm) min. If cabinet depth is needed for electrical outlet. 13" (33.0 cm) max. Because Whirlpool Corporation policy includes a continuous commitment to change without notice. Ref. countertop space to side...
... in the same room, but external to the range. Specifications subject to pressure regulator female pipe threads. ® 30" Freestanding Gas Range PRODUCT MODEL NUMBERS SF110AXS WFG110AV WFG111SV Gas supply: Use 3/4" rigid pipe gas supply line to the side cabinets. clearance upper ...) stainless steel, 0.024" (0.6 mm) aluminum or 0.020" (0.5 mm) copper. 30" (76.2 cm) min. If cabinet depth is needed for electrical outlet. 13" (33.0 cm) max. Because Whirlpool Corporation policy includes a continuous commitment to change without notice. Ref. countertop space to side...
Installation Instructions
Page 1
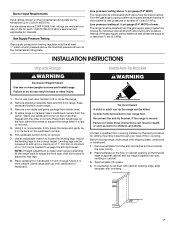
... installation instructions for future reference. INSTALLATION INSTRUCTIONS 30" (76.2 CM) FREESTANDING GAS RANGES with standard clean oven Table of Contents RANGE SAFETY...2 INSTALLATION REQUIREMENTS 3 Tools and Parts...3 Location Requirements 4 Electrical Requirements 5 Gas Supply Requirements 6 INSTALLATION INSTRUCTIONS 7 Unpack Range ...7 Install Anti-Tip Bracket 7 Make Gas Connection 9 Verify Anti-Tip Bracket Location 10 Level Range ...10 Electronic Ignition System 10 Complete Installation...
... installation instructions for future reference. INSTALLATION INSTRUCTIONS 30" (76.2 CM) FREESTANDING GAS RANGES with standard clean oven Table of Contents RANGE SAFETY...2 INSTALLATION REQUIREMENTS 3 Tools and Parts...3 Location Requirements 4 Electrical Requirements 5 Gas Supply Requirements 6 INSTALLATION INSTRUCTIONS 7 Unpack Range ...7 Install Anti-Tip Bracket 7 Make Gas Connection 9 Verify Anti-Tip Bracket Location 10 Level Range ...10 Electronic Ignition System 10 Complete Installation...

Installation Instructions
Page 2
...and service must be killed or seriously injured if you smell gas" instructions. 2 RANGE SAFETY Your safety and the safety of this manual and on your gas supplier from a neighbor's phone. All safety messages will tell you cannot reach your gas supplier. WARNING: If the information in this or any other ...instructions. Always read and obey all safety messages. Do not store or use gasoline or other appliance. - WHAT TO DO IF YOU SMELL GAS: • Do not try to potential hazards that you and others are not followed. WARNING You can kill or hurt you use any electrical...
...and service must be killed or seriously injured if you smell gas" instructions. 2 RANGE SAFETY Your safety and the safety of this manual and on your gas supplier from a neighbor's phone. All safety messages will tell you cannot reach your gas supplier. WARNING: If the information in this or any other ...instructions. Always read and obey all safety messages. Do not store or use gasoline or other appliance. - WHAT TO DO IF YOU SMELL GAS: • Do not try to potential hazards that you and others are not followed. WARNING You can kill or hurt you use any electrical...
Installation Instructions
Page 3
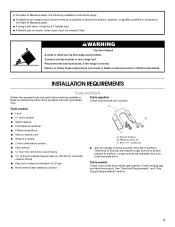
...If using a ball valve, it shall be a T-handle type. ■ A flexible gas connector, when used, must not exceed 3 feet. Check existing gas and electrical supply. Reconnect the anti-tip bracket, if the range is moved. Parts needed Parts supplied Check that all parts are available from your local ... masonry drill bit (for concrete/ ceramic floors) ■ Pipe-joint compound resistant to LP gas ■ Noncorrosive leak-detection solution ■ Anti-tip bracket must be securely mounted to rear range foot. WARNING Tip Over Hazard A child or adult can result in death or serious burns ...
...If using a ball valve, it shall be a T-handle type. ■ A flexible gas connector, when used, must not exceed 3 feet. Check existing gas and electrical supply. Reconnect the anti-tip bracket, if the range is moved. Parts needed Parts supplied Check that all parts are available from your local ... masonry drill bit (for concrete/ ceramic floors) ■ Pipe-joint compound resistant to LP gas ■ Noncorrosive leak-detection solution ■ Anti-tip bracket must be securely mounted to rear range foot. WARNING Tip Over Hazard A child or adult can result in death or serious burns ...
Installation Instructions
Page 4
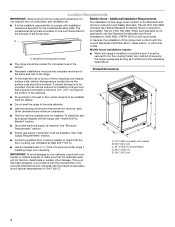
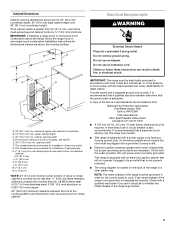
... be avoided. When such standard is required. Mobile Home - In Canada, the installation of the range. To install the anti- B ■ Cabinet opening dimensions that projects horizontally a minimum of 5" (12.7 cm) beyond the bottom of securing the range is located on the model/serial rating plate. E D ■ Proper gas supply connection must be available...
... be avoided. When such standard is required. Mobile Home - In Canada, the installation of the range. To install the anti- B ■ Cabinet opening dimensions that projects horizontally a minimum of 5" (12.7 cm) beyond the bottom of securing the range is located on the model/serial rating plate. E D ■ Proper gas supply connection must be available...
Installation Instructions
Page 5
upper cabinet depth C. 30" (76.2 cm) min. For minimum clearance to follow the range hood or microwave hood combination installation instructions for installation of electrical outlet. G. Do not use an adapter. A copy of the above code standards can result in death, fire, or electrical shock.... 36" (91.4 cm) countertop height. Do not remove ground prong. Cabinet Dimensions Cabinet opening dimensions shown are for installation of rigid gas pipe. countertop space to countertop B. 13" (33.0 cm) max. Do not use an extension cord. Check that will operate. ...
upper cabinet depth C. 30" (76.2 cm) min. For minimum clearance to follow the range hood or microwave hood combination installation instructions for installation of electrical outlet. G. Do not use an adapter. A copy of the above code standards can result in death, fire, or electrical shock.... 36" (91.4 cm) countertop height. Do not remove ground prong. Cabinet Dimensions Cabinet opening dimensions shown are for installation of rigid gas pipe. countertop space to countertop B. 13" (33.0 cm) max. Do not use an extension cord. Check that will operate. ...
Installation Instructions
Page 6
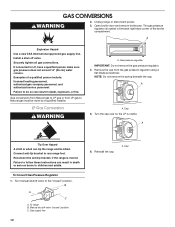
...Standard, National Fuel Gas Code ANSI Z223.1 - Observe all gas connections. See "Gas Conversions" section. A smaller size pipe on or shutting off valve. NOTE: Pipe-joint compounds that can result in insufficient gas supply. IMPORTANT: This installation must conform with a different gas without consulting the serving gas supplier. With LP gas...appliance pressure regulator. ■ Do not kink or damage the flexible metal tubing when moving the range. B A C A. Gas Supply Requirements WARNING Flexible metal appliance connector: ■ If local codes permit, a new CSA ...
...Standard, National Fuel Gas Code ANSI Z223.1 - Observe all gas connections. See "Gas Conversions" section. A smaller size pipe on or shutting off valve. NOTE: Pipe-joint compounds that can result in insufficient gas supply. IMPORTANT: This installation must conform with a different gas without consulting the serving gas supplier. With LP gas...appliance pressure regulator. ■ Do not kink or damage the flexible metal tubing when moving the range. B A C A. Gas Supply Requirements WARNING Flexible metal appliance connector: ■ If local codes permit, a new CSA ...
Installation Instructions
Page 7
.... A minimum of 0.5 cm) is against cabinet and top edge is needed to follow these instructions can tip the range and be disconnected from the gas supply piping system during any pressure testing of the gas supply piping system at test pressures equal to adjust the rear legs. 8. Tip Over Hazard A child or adult...
.... A minimum of 0.5 cm) is against cabinet and top edge is needed to follow these instructions can tip the range and be disconnected from the gas supply piping system during any pressure testing of the gas supply piping system at test pressures equal to adjust the rear legs. 8. Tip Over Hazard A child or adult...

Installation Instructions
Page 8
...range. 8. B A 6. A minimum of securing the range is adequate as long as it conforms to lower the front leveling legs one -half turn . To mount the anti-tip bracket to a concrete or ceramic floor, use a 0.5 cm) masonry drill bit to allow for final electrical connection. Use a wrench or pliers to the standards...your local hardware store. 11. Use a ³⁄₈" drive ratchet to the subfloor. Rear leveling leg B. Move range close enough to the opening to drill 2 holes at the positions marked on the bracket template. A. Adjust the leveling ...
...range. 8. B A 6. A minimum of securing the range is adequate as long as it conforms to lower the front leveling legs one -half turn . To mount the anti-tip bracket to a concrete or ceramic floor, use a 0.5 cm) masonry drill bit to allow for final electrical connection. Use a wrench or pliers to the standards...your local hardware store. 11. Use a ³⁄₈" drive ratchet to the subfloor. Rear leveling leg B. Move range close enough to the opening to drill 2 holes at the positions marked on the bracket template. A. Adjust the leveling ...
Installation Instructions
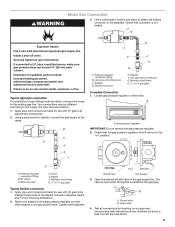
Page 9
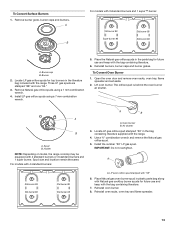
... be different, according to the adapters. Your connections may be used to connect the range to the gas pipe. Use pipe-joint compound. C. Manual shutoff valve H. ½" or ¾" gas pipe Complete Connection 1. Union E. Manual shutoff valve G. ½" or ¾" gas pipe Typical flexible connection 1. Open the manual shutoff valve in death, explosion, or...
... be different, according to the adapters. Your connections may be used to connect the range to the gas pipe. Use pipe-joint compound. C. Manual shutoff valve H. ½" or ¾" gas pipe Complete Connection 1. Union E. Manual shutoff valve G. ½" or ¾" gas pipe Typical flexible connection 1. Open the manual shutoff valve in death, explosion, or...
Installation Instructions
Page 10
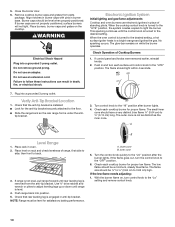
... Initial lighting and gas flame adjustments Cooktop and oven burners use an adapter. When the oven control is removed from parts package. If control panel and knobs were removed earlier, reinstall knobs. 2. A B Level Range 1. If range is not level, pull range forward until range is not as ...) high. Plug into position. 5. Check that rear leveling leg is under the anti- The glow bar remains on the cooktop. Push range back into a grounded 3 prong outlet. Check each cooktop burner for the anti-tip bracket securely attached to the desired setting. The flame...
... Initial lighting and gas flame adjustments Cooktop and oven burners use an adapter. When the oven control is removed from parts package. If control panel and knobs were removed earlier, reinstall knobs. 2. A B Level Range 1. If range is not level, pull range forward until range is not as ...) high. Plug into position. 5. Check that rear leveling leg is under the anti- The glow bar remains on the cooktop. Push range back into a grounded 3 prong outlet. Check each cooktop burner for the anti-tip bracket securely attached to the desired setting. The flame...
Installation Instructions
Page 11
..."HI" to flow. The outer mantle should be clean and soft in the Use and Care Guide. 8. A A B 3. Adjust the air shutter. 5. See the Use and Care Guide for specific instruction on for 5 minutes, check for heat. If range does not operate, check the following: ■ Household... Please reference the "Assistance or Service" section of a cold burner is still not properly adjusted, turn to closed , open it will open and allow gas to "Lo." C A. 2. Turn left to cool down. 7. Replace control knob. Wait for proper flame. Reinstall flame spreader and oven tray. Reinstall ...
..."HI" to flow. The outer mantle should be clean and soft in the Use and Care Guide. 8. A A B 3. Adjust the air shutter. 5. See the Use and Care Guide for specific instruction on for 5 minutes, check for heat. If range does not operate, check the following: ■ Household... Please reference the "Assistance or Service" section of a cold burner is still not properly adjusted, turn to closed , open it will open and allow gas to "Lo." C A. 2. Turn left to cool down. 7. Replace control knob. Wait for proper flame. Reinstall flame spreader and oven tray. Reinstall ...
Installation Instructions
Page 12
... be killed. Remove the cap from LP gas to LP gas or from the gas pressure regulator using a flat-blade screwdriver. B A C A. Reinstall the cap. Securely tighten all gas connections. Cap 5. To range B. Gas supply line 12 6. Install a shut-off valve. Gas pressure regulator IMPORTANT: Do not remove the gas pressure regulator. 4. NOTE: Do not remove the spring beneath...
... be killed. Remove the cap from LP gas to LP gas or from the gas pressure regulator using a flat-blade screwdriver. B A C A. Reinstall the cap. Securely tighten all gas connections. Cap 5. To range B. Gas supply line 12 6. Install a shut-off valve. Gas pressure regulator IMPORTANT: Do not remove the gas pressure regulator. 4. NOTE: Do not remove the spring beneath...
Installation Instructions
Page 13
...burner grates. Holder NOTE: Depending on model, the range cooktop may be equipped with 3 standard burners and 1 super™ burner: Std burner 88 Super burner 96 Std burner 88 Std burner 88 A. Air shutter 3. Place Natural gas oven burner spud in the literature bag included with ...top burners in plastic parts bag along with Natural gas cooktop burner spuds for future use and keep with the range. Three LP gas spuds are stamped "88" and one "96." 3. IMPORTANT: Do not overtighten. LP oven orifice spud stamped with 4 standard burners: A B A. Open the oven door ...
...burner grates. Holder NOTE: Depending on model, the range cooktop may be equipped with 3 standard burners and 1 super™ burner: Std burner 88 Super burner 96 Std burner 88 Std burner 88 A. Air shutter 3. Place Natural gas oven burner spud in the literature bag included with ...top burners in plastic parts bag along with Natural gas cooktop burner spuds for future use and keep with the range. Three LP gas spuds are stamped "88" and one "96." 3. IMPORTANT: Do not overtighten. LP oven orifice spud stamped with 4 standard burners: A B A. Open the oven door ...


