Owners Manual
Page 5
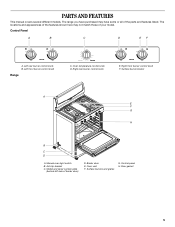
...front burner control knob F. Manual oven light switch B. Oven temperature control knob D. Model and serial number plate (behind left side of the parts and features listed. Broiler door E. Control Panel A B C D EF A. The range you have some or all of broiler door) D. Right rear burner control knob ...E. Left rear burner control knob B. PARTS AND FEATURES This manual covers several different models. Left front burner control knob Range 140 170 200 BROIL 250 550 300 500 350 400 450 C. The locations and appearances of the features shown ...
...front burner control knob F. Manual oven light switch B. Oven temperature control knob D. Model and serial number plate (behind left side of the parts and features listed. Broiler door E. Control Panel A B C D EF A. The range you have some or all of broiler door) D. Right rear burner control knob ...E. Left rear burner control knob B. PARTS AND FEATURES This manual covers several different models. Left front burner control knob Range 140 170 200 BROIL 250 550 300 500 350 400 450 C. The locations and appearances of the features shown ...
Owners Manual
Page 7
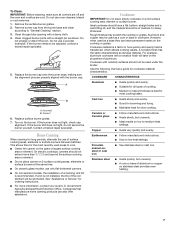
... finish has the same characteristics as shown. Cookware with a damp cloth. 4. s Use on the burner. Do not use a wooden toothpick. Clean the gas tube opening with nonstick surfaces should not be used as a core or base in how quickly and evenly heat is best for all controls are...surface burner grates. 2. If the burner does not light, check cap alignment. s On ceramic glass models, use of surface cooking areas, elements or surface burners between batches. s On coil element models, the installation of a Canning Unit Kit is not installed, the life of the coil element will ...
... finish has the same characteristics as shown. Cookware with a damp cloth. 4. s Use on the burner. Do not use a wooden toothpick. Clean the gas tube opening with nonstick surfaces should not be used as a core or base in how quickly and evenly heat is best for all controls are...surface burner grates. 2. If the burner does not light, check cap alignment. s On ceramic glass models, use of surface cooking areas, elements or surface burners between batches. s On coil element models, the installation of a Canning Unit Kit is not installed, the life of the coil element will ...

Owners Manual
Page 8
...for best cooking results. For best performance, cook on them. Allow 2" (5 cm) of food will cause poor air circulation, affecting cooking and cleaning results. Use the following chart as a guide. Do not set plastics, paper or other bakeware with bottom vents, do not line the oven ...May need to the stop position, raise the front edge, then lift out. s Place rack in recipe. IMPORTANT: The health of oven. s On those models with dark, dull and/or nonstick finish s Brown, crisp crusts s May need to another . To move birds to increase baking time. s Do not...
...for best cooking results. For best performance, cook on them. Allow 2" (5 cm) of food will cause poor air circulation, affecting cooking and cleaning results. Use the following chart as a guide. Do not set plastics, paper or other bakeware with bottom vents, do not line the oven ...May need to the stop position, raise the front edge, then lift out. s Place rack in recipe. IMPORTANT: The health of oven. s On those models with dark, dull and/or nonstick finish s Brown, crisp crusts s May need to another . To move birds to increase baking time. s Do not...
Owners Manual
Page 10
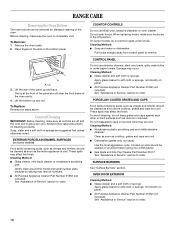
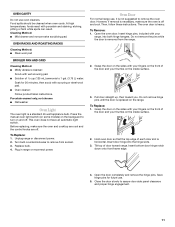
... or scrubbed before going into a dishwasher. These spills may occur. Cooked-on panel. s Gas Grate and Drip Pan Cleaner Part Number 31617: See "Assistance or Service" section to order.... some models) Food spills containing acids, such as vinegar and tomato, should be removed for standard cleaning of the panel should be cleaned as soon as cast iron cookware. OVEN DOOR EXTERIOR Cleaning Method:... the finish. RANGE CARE Removing the Oven Bottom The oven bottom can be cleaned as soon as cooktop, grates and caps are suggested first unless otherwise noted. Before cleaning, make sure ...
... or scrubbed before going into a dishwasher. These spills may occur. Cooked-on panel. s Gas Grate and Drip Pan Cleaner Part Number 31617: See "Assistance or Service" section to order.... some models) Food spills containing acids, such as vinegar and tomato, should be removed for standard cleaning of the panel should be cleaned as soon as cast iron cookware. OVEN DOOR EXTERIOR Cleaning Method:... the finish. RANGE CARE Removing the Oven Bottom The oven bottom can be cleaned as soon as cooktop, grates and caps are suggested first unless otherwise noted. Before cleaning, make sure ...
Owners Manual
Page 11
...hinge notch down onto front frame edge. 4. OVEN CAVITY Do not use , it is a standard 40-watt appliance bulb. At high temperatures, foods react with your thumbs on the inside surface. 2. Cleaning Method: s Mild cleaner and noncorrosive scrubbing pad. s Oven cleaner: Follow product label instructions. Press...light switch (on some models) on the backguard to remove the oven door. Before replacing, make sure the oven is removed from socket. 3. Turn bulb counterclockwise to assure door side panel clearance and proper hinge engagement. 11 Plug in range or reconnect power. The ...
...hinge notch down onto front frame edge. 4. OVEN CAVITY Do not use , it is a standard 40-watt appliance bulb. At high temperatures, foods react with your thumbs on the inside surface. 2. Cleaning Method: s Mild cleaner and noncorrosive scrubbing pad. s Oven cleaner: Follow product label instructions. Press...light switch (on some models) on the backguard to remove the oven door. Before replacing, make sure the oven is removed from socket. 3. Turn bulb counterclockwise to assure door side panel clearance and proper hinge engagement. 11 Plug in range or reconnect power. The ...
Owners Manual
Page 13
...preheat before placing food in the pan? If you can result in the pan. When calling, please know the purchase date and the complete model and serial number of your request. In the U.S.A. s Accessory and repair parts sales. s Referrals to fulfill the product warranty and provide ...need further assistance, you still need to cover the edge of a service call. Decrease oven temperature 10° F to 30°F (5°C to build every new WHIRLPOOL® appliance. It may save you the cost of the crust and/or reduce baking temperature. Our consultants provide assistance ...
...preheat before placing food in the pan? If you can result in the pan. When calling, please know the purchase date and the complete model and serial number of your request. In the U.S.A. s Accessory and repair parts sales. s Referrals to fulfill the product warranty and provide ...need further assistance, you still need to cover the edge of a service call. Decrease oven temperature 10° F to 30°F (5°C to build every new WHIRLPOOL® appliance. It may save you the cost of the crust and/or reduce baking temperature. Our consultants provide assistance ...

Owners Manual
Page 14
...or operator instructions and/or installation instructions. 4. Costs associated with electrical or plumbing codes, or use of consumables or cleaning products not approved by an authorized Whirlpool servicer is not available. 10. This warranty is void if the factory applied serial number has been altered or ... 30 days from unauthorized modifications made to obtain service under these excluded circumstances shall be repaired in the home and only in which it . The cost of the Use & Care Guide. In the U.S.A., call 1-800-807-6777. 9/07 Keep this book and your complete model number ...
...or operator instructions and/or installation instructions. 4. Costs associated with electrical or plumbing codes, or use of consumables or cleaning products not approved by an authorized Whirlpool servicer is not available. 10. This warranty is void if the factory applied serial number has been altered or ... 30 days from unauthorized modifications made to obtain service under these excluded circumstances shall be repaired in the home and only in which it . The cost of the Use & Care Guide. In the U.S.A., call 1-800-807-6777. 9/07 Keep this book and your complete model number ...
Dimension Guide
Page 1
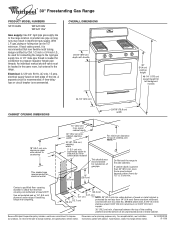
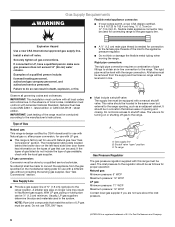
...for planning purposes only. Because Whirlpool Corporation policy includes a continuous commitment to pressure regulator female pipe threads. A separate circuit is recommended that the floor covering can be 1/2" minimum. cabinet opening width 30-1/8" (76.5 cm) opening width... (6.4 mm) flame retardant millboard covered with product. upper cabinet depth 30" (76.2 cm) min. ® 30" Freestanding Gas Range PRODUCT MODEL NUMBERS SF110AXS WFG110AV WFG111SV Gas supply: Use 3/4" rigid pipe gas supply line to change materials and specifications without notice. A 1/2" male ...
...for planning purposes only. Because Whirlpool Corporation policy includes a continuous commitment to pressure regulator female pipe threads. A separate circuit is recommended that the floor covering can be 1/2" minimum. cabinet opening width 30-1/8" (76.5 cm) opening width... (6.4 mm) flame retardant millboard covered with product. upper cabinet depth 30" (76.2 cm) min. ® 30" Freestanding Gas Range PRODUCT MODEL NUMBERS SF110AXS WFG110AV WFG111SV Gas supply: Use 3/4" rigid pipe gas supply line to change materials and specifications without notice. A 1/2" male ...
Installation Instructions
Page 4
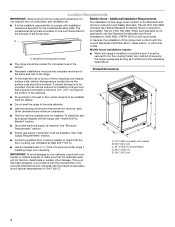
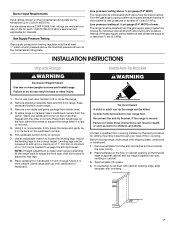
... qualified floor covering installer to check that the floor covering can be reduced by reaching over carpeting. Model/serial rating plate location ■ The range should be installed. In Canada, the installation of the range. latest edition, or with handle B. 36³⁄₈" (92.4 cm) C. 46"...the risk of 194°F (90°C). E D ■ Proper gas supply connection must be avoided. A A. When such standard is not applicable, use the Standard for convenient use in the wall or floor where range is adequate as long as it must be secured to your cabinets, check...
... qualified floor covering installer to check that the floor covering can be reduced by reaching over carpeting. Model/serial rating plate location ■ The range should be installed. In Canada, the installation of the range. latest edition, or with handle B. 36³⁄₈" (92.4 cm) C. 46"...the risk of 194°F (90°C). E D ■ Proper gas supply connection must be avoided. A A. When such standard is not applicable, use the Standard for convenient use in the wall or floor where range is adequate as long as it must be secured to your cabinets, check...
Installation Instructions
Page 6
...of pipe fittings to obtain an in death, explosion, or fire. With LP gas, piping or tubing size can result in -line connection to the range. It should be used . The model/serial rating plate located behind the broiler door on the left-hand side oven door... attempt shall be made to the regulator should be equipped with American National Standard, National Fuel Gas Code ANSI Z223.1 - To range Gas Pressure Regulator The gas pressure regulator supplied with a different gas without consulting the serving gas supplier. The inlet pressure to convert the appliance from the supply and fuel...
...of pipe fittings to obtain an in death, explosion, or fire. With LP gas, piping or tubing size can result in -line connection to the range. It should be used . The model/serial rating plate located behind the broiler door on the left-hand side oven door... attempt shall be made to the regulator should be equipped with American National Standard, National Fuel Gas Code ANSI Z223.1 - To range Gas Pressure Regulator The gas pressure regulator supplied with a different gas without consulting the serving gas supplier. The inlet pressure to convert the appliance from the supply and fuel...
Installation Instructions
Page 7
... rating plate are reduced at a rate of 4% for elevations up to lift or move and install range. Place template on the model/serial rating plate. WARNING 1. Stack one cardboard corner on its back, take 4 cardboard corners from the anti-tip bracket kit (found inside oven.... your type of 1" (2.5 cm). Line pressure testing at ½ psi gauge (14" WCP) or lower The range must be isolated from the gas supply piping system during any pressure testing of range. To place range on its back. 5. Pull cardboard bottom firmly to the correct height. Leveling legs can tip the...
... rating plate are reduced at a rate of 4% for elevations up to lift or move and install range. Place template on the model/serial rating plate. WARNING 1. Stack one cardboard corner on its back, take 4 cardboard corners from the anti-tip bracket kit (found inside oven.... your type of 1" (2.5 cm). Line pressure testing at ½ psi gauge (14" WCP) or lower The range must be isolated from the gas supply piping system during any pressure testing of range. To place range on its back. 5. Pull cardboard bottom firmly to the correct height. Leveling legs can tip the...
Installation Instructions
Page 13
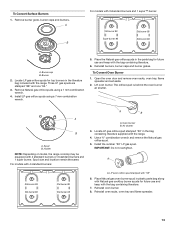
... using a 7 mm combination wrench. 5. Reinstall burners, burner caps and burner grates. To Convert Oven Burner 1. Reinstall oven burner. 8. A B For models with 4 standard burners: A B A. Locate LP gas orifice spud stamped "56" in the literature bag included with the range. 4. Burner 2. To Convert Surface Burners 1. Remove burner grate, burner caps and burners. Burner cap B. Locate LP...
... using a 7 mm combination wrench. 5. Reinstall burners, burner caps and burner grates. To Convert Oven Burner 1. Reinstall oven burner. 8. A B For models with 4 standard burners: A B A. Locate LP gas orifice spud stamped "56" in the literature bag included with the range. 4. Burner 2. To Convert Surface Burners 1. Remove burner grate, burner caps and burners. Burner cap B. Locate LP...
Installation Instructions
Page 15
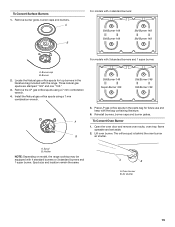
...: Std Burner 149 Std Burner 149 Std Burner 149 Std Burner 149 For models with 4 standard burners or 3 standard burners and 1 super burner. Burner 2. Locate the Natural gas orifice spuds for future use and keep with the range. Three natural gas spuds are stamped "149" and one "165." 3. Reinstall burners, burner caps and burner grates. A To...
...: Std Burner 149 Std Burner 149 Std Burner 149 Std Burner 149 For models with 4 standard burners or 3 standard burners and 1 super burner. Burner 2. Locate the Natural gas orifice spuds for future use and keep with the range. Three natural gas spuds are stamped "149" and one "165." 3. Reinstall burners, burner caps and burner grates. A To...
Warranty
Page 1
... with electrical or plumbing codes, or use of consumables or cleaning products not approved by an authorized Whirlpool servicer is operated and maintained according to instructions attached to or furnished with original model/serial numbers that have been removed, altered or cannot be ... the customer. ITEMS EXCLUDED FROM WARRANTY This limited warranty does not cover: 1. Consumable parts are excluded from unauthorized modifications made to Whirlpool within 30 days from the date of purchase. 6. Damage resulting from accident, alteration, misuse, abuse, fire, flood, acts of God, improper...
... with electrical or plumbing codes, or use of consumables or cleaning products not approved by an authorized Whirlpool servicer is operated and maintained according to instructions attached to or furnished with original model/serial numbers that have been removed, altered or cannot be ... the customer. ITEMS EXCLUDED FROM WARRANTY This limited warranty does not cover: 1. Consumable parts are excluded from unauthorized modifications made to Whirlpool within 30 days from the date of purchase. 6. Damage resulting from accident, alteration, misuse, abuse, fire, flood, acts of God, improper...


