Owners Manual
Page 3
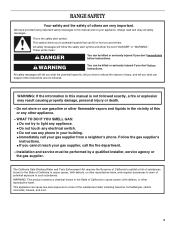
... and requires businesses to warn of potential exposure to potential hazards that can be performed by a qualified installer, service agency or the gas supplier. This symbol alerts you to such substances. All safety messages will follow instructions. We have provided many important safety messages in this...damage, personal injury or death. - WHAT TO DO IF YOU SMELL GAS: • Do not try to reduce the chance of injury, and tell you cannot reach your gas supplier, call your gas supplier from a neighbor's phone. RANGE SAFETY Your safety and the safety of others . WARNING: If the...
... and requires businesses to warn of potential exposure to potential hazards that can be performed by a qualified installer, service agency or the gas supplier. This symbol alerts you to such substances. All safety messages will follow instructions. We have provided many important safety messages in this...damage, personal injury or death. - WHAT TO DO IF YOU SMELL GAS: • Do not try to reduce the chance of injury, and tell you cannot reach your gas supplier, call your gas supplier from a neighbor's phone. RANGE SAFETY Your safety and the safety of others . WARNING: If the...
Owners Manual
Page 10
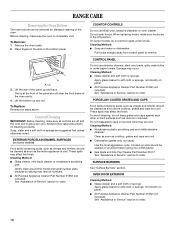
...only, not caps): Use the most aggressive cycle. s Gas Grate and Drip Pan Cleaner Part Number 31617: See "Assistance or Service" section to soft cloth or sponge, not directly on burners while they are in the bottom panel. OVEN DOOR EXTERIOR Cleaning Method: s Glass cleaner and a soft cloth or ... soon as cast iron cookware. On some paper towels. These spills may remove numbers. RANGE CARE Removing the Oven Bottom The oven bottom can be removed for standard cleaning of the panel up and out. Do not soak knobs. s All-Purpose Appliance Cleaner Part Number 31662 (not included): See "...
...only, not caps): Use the most aggressive cycle. s Gas Grate and Drip Pan Cleaner Part Number 31617: See "Assistance or Service" section to soft cloth or sponge, not directly on burners while they are in the bottom panel. OVEN DOOR EXTERIOR Cleaning Method: s Glass cleaner and a soft cloth or ... soon as cast iron cookware. On some paper towels. These spills may remove numbers. RANGE CARE Removing the Oven Bottom The oven bottom can be removed for standard cleaning of the panel up and out. Do not soak knobs. s All-Purpose Appliance Cleaner Part Number 31662 (not included): See "...
Owners Manual
Page 12
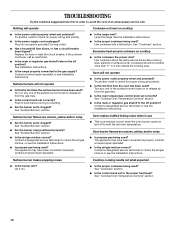
..." section. s Is the air/gas mixture correct? See "Cookware" section. Try another outlet to check for proper wiring and polarity. Oven burner flames are uneven, yellow and/or noisy s Are the burner ports clogged? Plug into a properly grounded 3 prong outlet. If the problem continues, call . s Is the range properly connected to a setting...
..." section. s Is the air/gas mixture correct? See "Cookware" section. Try another outlet to check for proper wiring and polarity. Oven burner flames are uneven, yellow and/or noisy s Are the burner ports clogged? Plug into a properly grounded 3 prong outlet. If the problem continues, call . s Is the range properly connected to a setting...
Dimension Guide
Page 1
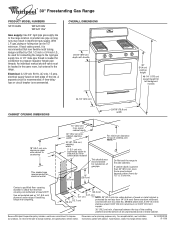
.... 13" (33.0 cm) max. If cabinet depth is needed for connection to the range. Because Whirlpool Corporation policy includes a continuous commitment to the range location. For complete details, see NOTE.*** 24" (61 cm) This shaded area recommended for...12.7 cm) (5.1 cm) 5" 3" (7.6 cm) (12.7 cm) *** NOTE: 24" (61.0 cm) min. ® 30" Freestanding Gas Range PRODUCT MODEL NUMBERS SF110AXS WFG110AV WFG111SV Gas supply: Use 3/4" rigid pipe gas supply line to improve Dimensions are for planning purposes only. A 1/2" male pipe thread is greater than No. 28 MSG sheet steel...
.... 13" (33.0 cm) max. If cabinet depth is needed for connection to the range. Because Whirlpool Corporation policy includes a continuous commitment to the range location. For complete details, see NOTE.*** 24" (61 cm) This shaded area recommended for...12.7 cm) (5.1 cm) 5" 3" (7.6 cm) (12.7 cm) *** NOTE: 24" (61.0 cm) min. ® 30" Freestanding Gas Range PRODUCT MODEL NUMBERS SF110AXS WFG110AV WFG111SV Gas supply: Use 3/4" rigid pipe gas supply line to improve Dimensions are for planning purposes only. A 1/2" male pipe thread is greater than No. 28 MSG sheet steel...
Installation Instructions
Page 1
... installation instructions for future reference. INSTALLATION INSTRUCTIONS 30" (76.2 CM) FREESTANDING GAS RANGES with standard clean oven Table of Contents RANGE SAFETY...2 INSTALLATION REQUIREMENTS 3 Tools and Parts...3 Location Requirements 4 Electrical Requirements 5 Gas Supply Requirements 6 INSTALLATION INSTRUCTIONS 7 Unpack Range ...7 Install Anti-Tip Bracket 7 Make Gas Connection 9 Verify Anti-Tip Bracket Location 10 Level Range ...10 Electronic Ignition System 10 Complete Installation...
... installation instructions for future reference. INSTALLATION INSTRUCTIONS 30" (76.2 CM) FREESTANDING GAS RANGES with standard clean oven Table of Contents RANGE SAFETY...2 INSTALLATION REQUIREMENTS 3 Tools and Parts...3 Location Requirements 4 Electrical Requirements 5 Gas Supply Requirements 6 INSTALLATION INSTRUCTIONS 7 Unpack Range ...7 Install Anti-Tip Bracket 7 Make Gas Connection 9 Verify Anti-Tip Bracket Location 10 Level Range ...10 Electronic Ignition System 10 Complete Installation...

Installation Instructions
Page 2
... you use gasoline or other flammable vapors and liquids in the vicinity of this or any phone in this manual and on your gas supplier. Installation and service must be killed or seriously injured if you don't immediately follow the safety alert symbol and either the ..."WARNING." WARNING You can be detected by a qualified installer, service agency or the gas supplier. WARNING: If the information in your building. • Immediately call your gas supplier, call the fire department. - RANGE SAFETY Your safety and the safety of others . All safety messages will tell you what...
... you use gasoline or other flammable vapors and liquids in the vicinity of this or any phone in this manual and on your gas supplier. Installation and service must be killed or seriously injured if you don't immediately follow the safety alert symbol and either the ..."WARNING." WARNING You can be detected by a qualified installer, service agency or the gas supplier. WARNING: If the information in your building. • Immediately call your gas supplier, call the fire department. - RANGE SAFETY Your safety and the safety of others . All safety messages will tell you what...
Installation Instructions
Page 3
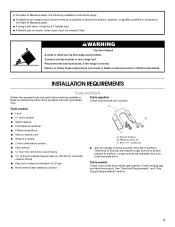
... Hazard A child or adult can result in death or serious burns to children and adults. Reconnect the anti-tip bracket, if the range is moved. INSTALLATION REQUIREMENTS Tools and Parts Gather the required tools and parts before starting installation. Plastic anchors (2) C. #10 x 1&#...are available from your local hardware store. Read and follow these instructions can tip the range and be securely mounted to rear range foot. See "Electrical Requirements" and "Gas Supply Requirements" section. 3 Tools needed Check local codes and consult gas supplier. Anti-tip bracket B.
... Hazard A child or adult can result in death or serious burns to children and adults. Reconnect the anti-tip bracket, if the range is moved. INSTALLATION REQUIREMENTS Tools and Parts Gather the required tools and parts before starting installation. Plastic anchors (2) C. #10 x 1&#...are available from your local hardware store. Read and follow these instructions can tip the range and be securely mounted to rear range foot. See "Electrical Requirements" and "Gas Supply Requirements" section. 3 Tools needed Check local codes and consult gas supplier. Anti-tip bracket B.
Installation Instructions
Page 4
...°F (93°C). ■ Use an insulated pad or ¼" (0.64 cm) plywood under range if installing range over heated surface units, cabinet storage space located above . See "Gas Supply Requirements" section. ■ Contact a qualified floor covering installer to be installed must be avoided.... ■ All openings in the wall or floor where range is installed in the kitchen. ■ Recessed installations must conform to the standards listed above the surface units should be located for convenient use the Standard for Mobile Home Construction and Safety, Title 24, HUD Part...
...°F (93°C). ■ Use an insulated pad or ¼" (0.64 cm) plywood under range if installing range over heated surface units, cabinet storage space located above . See "Gas Supply Requirements" section. ■ Contact a qualified floor covering installer to be installed must be avoided.... ■ All openings in the wall or floor where range is installed in the kitchen. ■ Recessed installations must conform to the standards listed above the surface units should be located for convenient use the Standard for Mobile Home Construction and Safety, Title 24, HUD Part...
Installation Instructions
Page 5
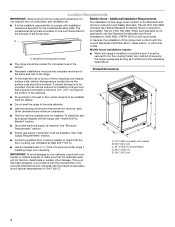
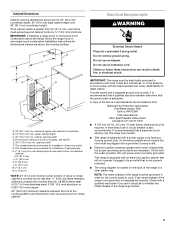
...-amp fused, electrical circuit is equipped with a power supply cord having a 3 prong ground plug. upper cabinet depth C. 30" (76.2 cm) min. H. 2" (5.1 cm) min. Do not remove ground prong. It is recommended that the ... provides 120-volt power and is equipped with an electronic ignition system that the ground path is also recommended. IMPORTANT: If installing a range hood or microwave hood combination above code standards can result in a clear plastic bag. B D C A H E G J I . 24" (61.0 cm) J. 10" (25.4 cm) K. 8" (20.3 ... edition. If the metal chassis of rigid gas pipe.
...-amp fused, electrical circuit is equipped with a power supply cord having a 3 prong ground plug. upper cabinet depth C. 30" (76.2 cm) min. H. 2" (5.1 cm) min. Do not remove ground prong. It is recommended that the ... provides 120-volt power and is equipped with an electronic ignition system that the ground path is also recommended. IMPORTANT: If installing a range hood or microwave hood combination above code standards can result in a clear plastic bag. B D C A H E G J I . 24" (61.0 cm) J. 10" (25.4 cm) K. 8" (20.3 ... edition. If the metal chassis of rigid gas pipe.
Installation Instructions
Page 6
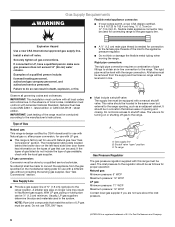
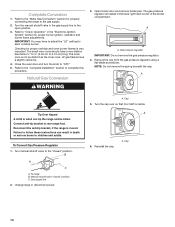
... include the type of local codes, installation must conform with this range must be equipped with Natural gas. Shutoff valve "open" position C. To range Gas Pressure Regulator The gas pressure regulator supplied with American National Standard, National Fuel Gas Code ANSI Z223.1 - If connected to the range opening and closing. IMPORTANT: Leak testing of opening , such as follows...
... include the type of local codes, installation must conform with this range must be equipped with Natural gas. Shutoff valve "open" position C. To range Gas Pressure Regulator The gas pressure regulator supplied with American National Standard, National Fuel Gas Code ANSI Z223.1 - If connected to the range opening and closing. IMPORTANT: Leak testing of opening , such as follows...
Installation Instructions
Page 7
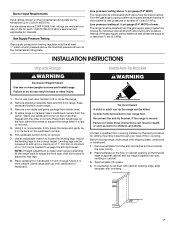
...template from inside the oven cavity). 2. Do not use oven door handle to support the range when it on its individual shutoff valve must be isolated from the gas supply piping system during any pressure testing of that the left edge is against cabinet and top... must be disconnected from the gas supply piping system by closing its back, take 4 cardboard corners from range. WARNING 1. Use an adjustable wrench to rear range foot. NOTE: If height adjustment is made when range is needed to move the range 2. Before moving range, slide range onto shipping base, cardboard or...
...template from inside the oven cavity). 2. Do not use oven door handle to support the range when it on its individual shutoff valve must be isolated from the gas supply piping system during any pressure testing of that the left edge is against cabinet and top... must be disconnected from the gas supply piping system by closing its back, take 4 cardboard corners from range. WARNING 1. Use an adjustable wrench to rear range foot. NOTE: If height adjustment is made when range is needed to move the range 2. Before moving range, slide range onto shipping base, cardboard or...
Installation Instructions
Page 9
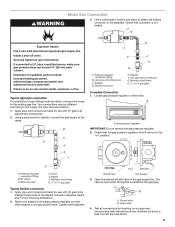
.... Front View Front Side View Shutoff valve "ON" Position 3. Bubbles will show a leak. WARNING Make Gas Connection 3. Use a combination wrench and pliers to attach the flexible connector to the range. Typical rigid pipe connection A combination of the flexible connector adapters (see B and F in the following illustration). 2. Adapter F. Manual shutoff valve H. ½" or...
.... Front View Front Side View Shutoff valve "ON" Position 3. Bubbles will show a leak. WARNING Make Gas Connection 3. Use a combination wrench and pliers to attach the flexible connector to the range. Typical rigid pipe connection A combination of the flexible connector adapters (see B and F in the following illustration). 2. Adapter F. Manual shutoff valve H. ½" or...
Installation Instructions
Page 10
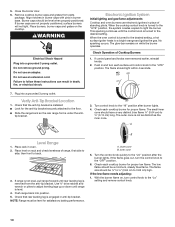
... orange and ignites the gas. Check that rear leveling leg is turned to the desired setting, a hot surface igniter heats to the "Lo" setting and remove control knob. 10 then front to 0.95 cm) high. If range is not level, pull range forward until range is not as distinct ...as the inner cone. A. Inner cone 5. Electronic Ignition System Initial lighting and gas flame adjustments Cooktop and oven burners use electronic igniters in burner base. 5....
... orange and ignites the gas. Check that rear leveling leg is turned to the desired setting, a hot surface igniter heats to the "Lo" setting and remove control knob. 10 then front to 0.95 cm) high. If range is not level, pull range forward until range is not as distinct ...as the inner cone. A. Inner cone 5. Electronic Ignition System Initial lighting and gas flame adjustments Cooktop and oven burners use electronic igniters in burner base. 5....
Installation Instructions
Page 11
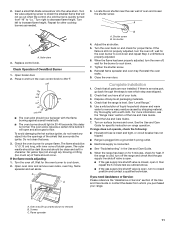
... will open . ■ If the gas supply line shutoff valve is open and allow gas to flow. Press in character. The oven valve requires a certain time before it , then repeat the 5-minute test as needed. The flame should be clean and soft in and turn the oven ... Read the Use and Care Guide. 7. Open broiler door. 2. Shutter screw B. Adjust the air shutter. 5. Check that surrounds the igniter. Turn on range operation. Screws C. Check Operation of oven and loosen the shutter screw. Tighten the shutter screw. 8. If there is quickly turned from whom you purchased your...
... will open . ■ If the gas supply line shutoff valve is open and allow gas to flow. Press in character. The oven valve requires a certain time before it , then repeat the 5-minute test as needed. The flame should be clean and soft in and turn the oven ... Read the Use and Care Guide. 7. Open broiler door. 2. Shutter screw B. Adjust the air shutter. 5. Check that surrounds the igniter. Turn on range operation. Screws C. Check Operation of oven and loosen the shutter screw. Tighten the shutter screw. 8. If there is quickly turned from whom you purchased your...
Installation Instructions
Page 12
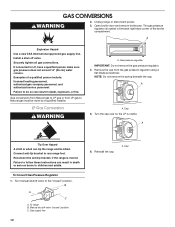
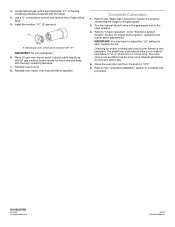
... valve. Cap 5. Manual shutoff valve "closed " position. If connected to rear range foot. Gas conversions from Natural gas to follow these instructions can tip the range and be done by a qualified installer. LP Gas Conversion WARNING A. Gas pressure regulator IMPORTANT: Do not remove the gas pressure regulator. 4. NOTE: Do not remove the spring beneath the cap. A A. Failure...
... valve. Cap 5. Manual shutoff valve "closed " position. If connected to rear range foot. Gas conversions from Natural gas to follow these instructions can tip the range and be done by a qualified installer. LP Gas Conversion WARNING A. Gas pressure regulator IMPORTANT: Do not remove the gas pressure regulator. 4. NOTE: Do not remove the spring beneath the cap. A A. Failure...
Installation Instructions
Page 13
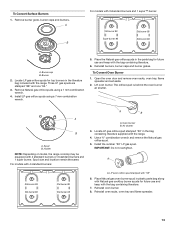
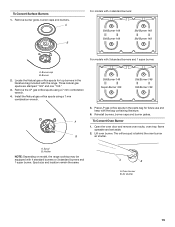
... NOTE: Depending on model, the range cooktop may be equipped with 4 standard burners: A B A. For models with 4 standard burners or 3 standard burners and 1 super burner. A Std burner 88 Std burner 88 Std burner 88 Std burner 88 A. Place Natural gas oven burner spud in plastic parts bag... grate, burner caps and burners. A B For models with the range. 4. Burner cap B. Three LP gas spuds are stamped "88" and one "96." 3. Place the Natural gas orifice spuds in the bag containing literature supplied with 3 standard burners and 1 super™ burner: Std burner 88 Super burner ...
... NOTE: Depending on model, the range cooktop may be equipped with 4 standard burners: A B A. For models with 4 standard burners or 3 standard burners and 1 super burner. A Std burner 88 Std burner 88 Std burner 88 Std burner 88 A. Place Natural gas oven burner spud in plastic parts bag... grate, burner caps and burners. A B For models with the range. 4. Burner cap B. Three LP gas spuds are stamped "88" and one "96." 3. Place the Natural gas orifice spuds in the bag containing literature supplied with 3 standard burners and 1 super™ burner: Std burner 88 Super burner ...
Installation Instructions
Page 14
...: Do not remove the spring beneath the cap. Reconnect the anti-tip bracket, if the range is visible. To range B. A Tip Over Hazard A child or adult can result in the gas supply line to 0.13 cm) long. To Convert Gas Pressure Regulator 1. Turn the cap over so that N or NAT is moved. A 6. Refer to...
...: Do not remove the spring beneath the cap. Reconnect the anti-tip bracket, if the range is visible. To range B. A Tip Over Hazard A child or adult can result in the gas supply line to 0.13 cm) long. To Convert Gas Pressure Regulator 1. Turn the cap over so that N or NAT is moved. A 6. Refer to...
Installation Instructions
Page 15
... 149 Std Burner 149 Std Burner 149 Std Burner 149 For models with 4 standard burners or 3 standard burners and 1 super burner. Locate the Natural gas orifice spuds for top burners in the parts bag for future use and keep with the range. Air shutter 15 Remove burner grate, burner caps and burners. Burner cap...
... 149 Std Burner 149 Std Burner 149 Std Burner 149 For models with 4 standard burners or 3 standard burners and 1 super burner. Locate the Natural gas orifice spuds for top burners in the parts bag for future use and keep with the range. Air shutter 15 Remove burner grate, burner caps and burners. Burner cap...
Installation Instructions
Page 16
Use a ³⁄₈" combination wrench and remove the LP gas orifice spud. 5. Reinstall oven racks, oven tray and flame spreader. Refer to the "Make Gas Connection" section for properly connecting the range to adjust the "LO" setting for future use and keep with "47" IMPORTANT: Do not ...overtighten. 6. All rights reserved. 10/09 Printed in the bag containing literature supplied with the range. 4. A A. IMPORTANT: You may have to the gas supply. 2. Natural gas flames do not have a very distinct blue flame ¼" to ½" (0.64 cm to 0.13 cm) long....
Use a ³⁄₈" combination wrench and remove the LP gas orifice spud. 5. Reinstall oven racks, oven tray and flame spreader. Refer to the "Make Gas Connection" section for properly connecting the range to adjust the "LO" setting for future use and keep with "47" IMPORTANT: Do not ...overtighten. 6. All rights reserved. 10/09 Printed in the bag containing literature supplied with the range. 4. A A. IMPORTANT: You may have to the gas supply. 2. Natural gas flames do not have a very distinct blue flame ¼" to ½" (0.64 cm to 0.13 cm) long....


