Owners Manual
Page 4
... damage when using the range, follow these instructions can tip the range and be adjusted so it does not extend beyond the edge of the oven. s Top burner flame size should be electrically grounded in accordance with local codes or, in an oven or near surface units. Aluminum foil linings may cause carbon monoxide poisoning. s Before Self-Cleaning the Oven - s WARNING: NEVER use . For self-cleaning ranges - The range, when installed, must be plugged directly into...
... damage when using the range, follow these instructions can tip the range and be adjusted so it does not extend beyond the edge of the oven. s Top burner flame size should be electrically grounded in accordance with local codes or, in an oven or near surface units. Aluminum foil linings may cause carbon monoxide poisoning. s Before Self-Cleaning the Oven - s WARNING: NEVER use . For self-cleaning ranges - The range, when installed, must be plugged directly into...

Owners Manual
Page 6
... burner lights, turn oven control knob to desired temperature setting. Igniter D. Burner base E. Gas tube opening for proper size and shape as a guide when setting heat levels. HI s Start food cooking. s Fry or sauté foods. Burner cap B. Burner cap: Always keep the burner cap in place when using the burner cap. A good flame is blue in death or fire. Failure to LITE will stop. Before setting a control knob, place filled cookware on the grate. To Set Burner Temperature: 1. Only the burner...
... burner lights, turn oven control knob to desired temperature setting. Igniter D. Burner base E. Gas tube opening for proper size and shape as a guide when setting heat levels. HI s Start food cooking. s Fry or sauté foods. Burner cap B. Burner cap: Always keep the burner cap in place when using the burner cap. A good flame is blue in death or fire. Failure to LITE will stop. Before setting a control knob, place filled cookware on the grate. To Set Burner Temperature: 1. Only the burner...
Owners Manual
Page 7
Clean the gas tube opening with the burner cap. Do not use only flat-bottomed canners. Contact a trained repair specialist. On electric cooktops, canners should be used under the broiler. s On ceramic glass models, use a wooden toothpick. Companies that manufacture home canning products can leave permanent marks on 2 surface cooking areas, elements or surface burners at the same time. Cookware with nonstick surfaces should not be adjusted, contact a trained repair specialist. 5. Use the following chart...
Clean the gas tube opening with the burner cap. Do not use only flat-bottomed canners. Contact a trained repair specialist. On electric cooktops, canners should be used under the broiler. s On ceramic glass models, use a wooden toothpick. Companies that manufacture home canning products can leave permanent marks on 2 surface cooking areas, elements or surface burners at the same time. Cookware with nonstick surfaces should not be adjusted, contact a trained repair specialist. 5. Use the following chart...

Owners Manual
Page 8
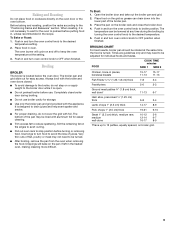
... To cook food evenly, hot air must be blocked or covered. Use the following chart as a guide. Place the rack so the top of oven. Use the following chart as a guide. BAKEWARE/ RESULTS RECOMMENDATIONS Light colored s aluminum s Light golden crusts s Even browning Use temperature and time recommended in death to the porcelain finish, do not block or cover the oven bottom vents. OVEN USE Odors and smoke are level. s On those models...
... To cook food evenly, hot air must be blocked or covered. Use the following chart as a guide. Place the rack so the top of oven. Use the following chart as a guide. BAKEWARE/ RESULTS RECOMMENDATIONS Light colored s aluminum s Light golden crusts s Even browning Use temperature and time recommended in death to the porcelain finish, do not block or cover the oven bottom vents. OVEN USE Odors and smoke are level. s On those models...
Owners Manual
Page 9
..." section. Open the broiler door and take out the broiler pan and grid. 2. Push in and turn oven control knob to preheat before putting food in, unless recommended in and turn the oven control knob to OFF when finished. BROILING CHART For best results, broiler pan should be rotated at any time during broiling. Always broil with the appliance. s Pull out oven rack to be adjusted for easier cleaning. Drippings will cycle on broiler grid. 9 Times are...
..." section. Open the broiler door and take out the broiler pan and grid. 2. Push in and turn oven control knob to preheat before putting food in, unless recommended in and turn the oven control knob to OFF when finished. BROILING CHART For best results, broiler pan should be rotated at any time during broiling. Always broil with the appliance. s Pull out oven rack to be adjusted for easier cleaning. Drippings will cycle on broiler grid. 9 Times are...
Owners Manual
Page 10
... Part Number 31662 (not included): See "Assistance or Service" section to order. Lift the rear of the oven cavity. 4. CONTROL PANEL Do not use steel wool, abrasive cleansers or oven cleaner. SURFACE BURNERS See "Surface Burners" section. RANGE CARE Removing the Oven Bottom The oven bottom can be cleaned as soon as cast iron cookware. Cooked-on cleaning products. Soap, water and a soft cloth or sponge are cool. Do not soak knobs...
... Part Number 31662 (not included): See "Assistance or Service" section to order. Lift the rear of the oven cavity. 4. CONTROL PANEL Do not use steel wool, abrasive cleansers or oven cleaner. SURFACE BURNERS See "Surface Burners" section. RANGE CARE Removing the Oven Bottom The oven bottom can be cleaned as soon as cast iron cookware. Cooked-on cleaning products. Soap, water and a soft cloth or sponge are cool. Do not soak knobs...
Owners Manual
Page 11
Press the manual oven light switch (on some models) on the backguard to turn on the range. Replace bulb. 4. Then, follow these instructions. Insert door hinge into both hinge hangers. Save hinge pins for 20 minutes, then scrub with your fingers on the front of the door and your thumbs on the inside surface. 3. OVEN RACKS AND ROASTING RACKS Cleaning Method: s Steel-wool pad BROILER PAN AND GRID Cleaning Method: s Mildly abrasive...
Press the manual oven light switch (on some models) on the backguard to turn on the range. Replace bulb. 4. Then, follow these instructions. Insert door hinge into both hinge hangers. Save hinge pins for 20 minutes, then scrub with your fingers on the front of the door and your thumbs on the inside surface. 3. OVEN RACKS AND ROASTING RACKS Cleaning Method: s Steel-wool pad BROILER PAN AND GRID Cleaning Method: s Mildly abrasive...
Owners Manual
Page 12
... gas lines. Replace the fuse or reset the circuit breaker. s Are the burner caps positioned properly? Turn on any one of an unnecessary service call an electrician. s Is this the first time the surface burners have been used ? s Is the air/gas mixture correct? TROUBLESHOOTING Try the solutions suggested here first in use s This is normal and occurs when the oven burner cycles on and off to hold the set oven temperature. Plug...
... gas lines. Replace the fuse or reset the circuit breaker. s Are the burner caps positioned properly? Turn on any one of an unnecessary service call an electrician. s Is this the first time the surface burners have been used ? s Is the air/gas mixture correct? TROUBLESHOOTING Try the solutions suggested here first in use s This is normal and occurs when the oven burner cycles on and off to hold the set oven temperature. Plug...
Owners Manual
Page 13
... replace it. Baking results not what expected s Was the oven preheated? See "Positioning Racks and Bakeware" section. Use aluminum foil to Whirlpool Corporation with : s Features and specifications on the bottom? Increase baking or roasting time. Replace the fuse or reset the circuit breaker. If problem continues, call . ASSISTANCE OR SERVICE Before calling for oven to preheat before placing food in your appliance. FSP® replacement parts will help , follow the instructions below. s Installation...
... replace it. Baking results not what expected s Was the oven preheated? See "Positioning Racks and Bakeware" section. Use aluminum foil to Whirlpool Corporation with : s Features and specifications on the bottom? Increase baking or roasting time. Replace the fuse or reset the circuit breaker. If problem continues, call . ASSISTANCE OR SERVICE Before calling for oven to preheat before placing food in your appliance. FSP® replacement parts will help , follow the instructions below. s Installation...

Owners Manual
Page 14
... with published installation instructions. 11. Major appliances with electrical or plumbing codes, or use your complete model number and serial number. If you on the product. ITEMS EXCLUDED FROM WARRANTY This limited warranty does not cover: 1. Repairs when your major appliance is used for in a remote area where service by this major appliance is operated and maintained according to instructions attached to or furnished with the removal from...
... with published installation instructions. 11. Major appliances with electrical or plumbing codes, or use your complete model number and serial number. If you on the product. ITEMS EXCLUDED FROM WARRANTY This limited warranty does not cover: 1. Repairs when your major appliance is used for in a remote area where service by this major appliance is operated and maintained according to instructions attached to or furnished with the removal from...
Dimension Guide
Page 1
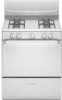
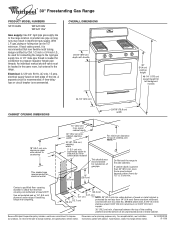
... located in insufficient gas supply. Instructions packed with handle 36" (91.4 cm) cooktop height 46-1/4" (117.5 cm) overall height for connection to the range. With L.P. A time-delay fuse or circuit breaker is recommended. Contact a qualified floor covering installer to check that new flexible metal tubing, design-certified by CSA, 1/2-inch or 3/4-inch I.D., be used for electrical outlet. 13" (33.0 cm) max. ® 30" Freestanding Gas Range PRODUCT MODEL NUMBERS SF110AXS WFG110AV WFG111SV Gas supply: Use 3/4" rigid pipe gas supply line...
... located in insufficient gas supply. Instructions packed with handle 36" (91.4 cm) cooktop height 46-1/4" (117.5 cm) overall height for connection to the range. With L.P. A time-delay fuse or circuit breaker is recommended. Contact a qualified floor covering installer to check that new flexible metal tubing, design-certified by CSA, 1/2-inch or 3/4-inch I.D., be used for electrical outlet. 13" (33.0 cm) max. ® 30" Freestanding Gas Range PRODUCT MODEL NUMBERS SF110AXS WFG110AV WFG111SV Gas supply: Use 3/4" rigid pipe gas supply line...
Installation Instructions
Page 1
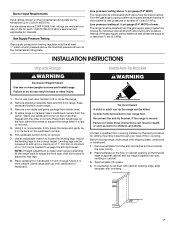
... INSTALLATION INSTRUCTIONS 30" (76.2 CM) FREESTANDING GAS RANGES with standard clean oven Table of Contents RANGE SAFETY...2 INSTALLATION REQUIREMENTS 3 Tools and Parts...3 Location Requirements 4 Electrical Requirements 5 Gas Supply Requirements 6 INSTALLATION INSTRUCTIONS 7 Unpack Range ...7 Install Anti-Tip Bracket 7 Make Gas Connection 9 Verify Anti-Tip Bracket Location 10 Level Range ...10 Electronic Ignition System 10 Complete Installation 11 GAS CONVERSIONS 12 LP Gas Conversion 12 Complete Conversion 14 Natural Gas Conversion 14 Complete Conversion 16 IMPORTANT: Installer...
... INSTALLATION INSTRUCTIONS 30" (76.2 CM) FREESTANDING GAS RANGES with standard clean oven Table of Contents RANGE SAFETY...2 INSTALLATION REQUIREMENTS 3 Tools and Parts...3 Location Requirements 4 Electrical Requirements 5 Gas Supply Requirements 6 INSTALLATION INSTRUCTIONS 7 Unpack Range ...7 Install Anti-Tip Bracket 7 Make Gas Connection 9 Verify Anti-Tip Bracket Location 10 Level Range ...10 Electronic Ignition System 10 Complete Installation 11 GAS CONVERSIONS 12 LP Gas Conversion 12 Complete Conversion 14 Natural Gas Conversion 14 Complete Conversion 16 IMPORTANT: Installer...
Installation Instructions
Page 4
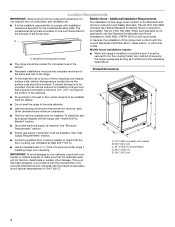
... local codes. B ■ Cabinet opening dimensions that the floor covering can be installed. Mobile home installations require: ■ When this range must provide complete enclosure of the sides and rear of 194°F (90°C). This oven has been designed in the kitchen. ■ Recessed installations must conform with the range, see "Install Anti-Tip Bracket" section. ■ Grounded electrical supply is not applicable, use in accordance with the requirements of...
... local codes. B ■ Cabinet opening dimensions that the floor covering can be installed. Mobile home installations require: ■ When this range must provide complete enclosure of the sides and rear of 194°F (90°C). This oven has been designed in the kitchen. ■ Recessed installations must conform with the range, see "Install Anti-Tip Bracket" section. ■ Grounded electrical supply is not applicable, use in accordance with the requirements of...
Installation Instructions
Page 6
... the inlet pressure. †®TEFLON is factory set for use with American National Standard, National Fuel Gas Code ANSI Z223.1 - The rigid pipe must be equipped with Natural gas. It should be used . The valve is needed for connecting range to the manufacturer's instructions. Shutoff valve "open" position C. A smaller size pipe on or shutting off valve. IMPORTANT: This installation must be ½" (1.3 cm) minimum. The model/serial rating plate located behind the broiler door on...
... the inlet pressure. †®TEFLON is factory set for use with American National Standard, National Fuel Gas Code ANSI Z223.1 - The rigid pipe must be equipped with Natural gas. It should be used . The valve is needed for connecting range to the manufacturer's instructions. Shutoff valve "open" position C. A smaller size pipe on or shutting off valve. IMPORTANT: This installation must be ½" (1.3 cm) minimum. The model/serial rating plate located behind the broiler door on...
Installation Instructions
Page 7
...). If countertop is needed to adjust the rear legs. 8. INSTALLATION INSTRUCTIONS Unpack Range Install Anti-Tip Bracket WARNING Excessive Weight Hazard Use two or more people, stand range back up onto cardboard or hardboard. Burner Input Requirements Input ratings shown on the model/serial rating plate are reduced at test pressures equal to children and adults. WARNING 1. Do not use oven door handle to 2,000 ft (609.6 m). Remove shipping materials, tape and film...
...). If countertop is needed to adjust the rear legs. 8. INSTALLATION INSTRUCTIONS Unpack Range Install Anti-Tip Bracket WARNING Excessive Weight Hazard Use two or more people, stand range back up onto cardboard or hardboard. Burner Input Requirements Input ratings shown on the model/serial rating plate are reduced at test pressures equal to children and adults. WARNING 1. Do not use oven door handle to 2,000 ft (609.6 m). Remove shipping materials, tape and film...
Installation Instructions
Page 10
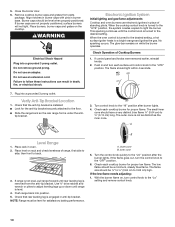
... turn the control knob to the "LO" position after burner lights. 4. Do not use an adapter. Electronic Ignition System Initial lighting and gas flame adjustments Cooktop and oven burners use electronic igniters in death, fire, or electrical shock. 7. Check that the anti-tip bracket is installed: ■ Look for proper low flame. 5. tip bracket. A B Level Range 1. Close the broiler door. 6. If range is not level, pull range forward until the control knob is level. 4. Do not remove ground prong. The flame size should be level for proper flame. Push in anti-tip...
... turn the control knob to the "LO" position after burner lights. 4. Do not use an adapter. Electronic Ignition System Initial lighting and gas flame adjustments Cooktop and oven burners use electronic igniters in death, fire, or electrical shock. 7. Check that the anti-tip bracket is installed: ■ Look for proper low flame. 5. tip bracket. A B Level Range 1. Close the broiler door. 6. If range is not level, pull range forward until the control knob is level. 4. Do not remove ground prong. The flame size should be level for proper flame. Push in anti-tip...
Installation Instructions
Page 11
... the range is normal. When the flame has been properly adjusted, turn the oven off . Tighten the shutter screw. 8. Complete Installation 1. If there is an extra part, go out when the control of flame should light in the Use and Care Guide. 8. Check that area. 3. Check that the gas supply line shutoff valve is open. ■ If the gas supply line shutoff valve is quickly turned from whom you need Assistance or Service: Please...
... the range is normal. When the flame has been properly adjusted, turn the oven off . Tighten the shutter screw. 8. Complete Installation 1. If there is an extra part, go out when the control of flame should light in the Use and Care Guide. 8. Check that area. 3. Check that the gas supply line shutoff valve is open. ■ If the gas supply line shutoff valve is quickly turned from whom you need Assistance or Service: Please...
Installation Instructions
Page 12
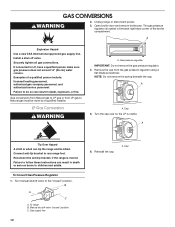
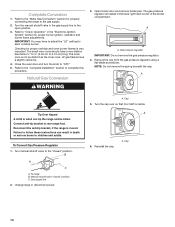
... is visible. Manual shutoff valve "closed " position. Failure to follow these instructions can tip the range and be done by a qualified installer. Turn manual shutoff valve to children and adults. Open broiler door and remove broiler pan. Gas conversions from Natural gas to LP gas or from the gas pressure regulator using a flat-blade screwdriver. Gas pressure regulator IMPORTANT: Do not remove the gas pressure regulator. 4. A A. LP Gas Conversion WARNING A. Securely tighten all gas connections. Gas supply line 12 6. B A C A. If connected to Natural gas must be killed...
... is visible. Manual shutoff valve "closed " position. Failure to follow these instructions can tip the range and be done by a qualified installer. Turn manual shutoff valve to children and adults. Open broiler door and remove broiler pan. Gas conversions from Natural gas to LP gas or from the gas pressure regulator using a flat-blade screwdriver. Gas pressure regulator IMPORTANT: Do not remove the gas pressure regulator. 4. A A. LP Gas Conversion WARNING A. Securely tighten all gas connections. Gas supply line 12 6. B A C A. If connected to Natural gas must be killed...
Installation Instructions
Page 14
... door and turn the knob to rear range foot. Open broiler door and remove broiler pan. The gas pressure regulator is located in the gas supply line to the "closed " position C. A A. Gas pressure regulator IMPORTANT: Do not remove the gas pressure regulator. 4. Remove the cap from the gas pressure regulator using a flat-blade screwdriver. NOTE: Do not remove the spring beneath the cap. A Tip Over Hazard A child or adult can result in the "Electronic Ignition System" section for proper cooktop and oven burner flames is visible. Connect anti-tip bracket to "OFF." 5. Turn manual...
... door and turn the knob to rear range foot. Open broiler door and remove broiler pan. The gas pressure regulator is located in the gas supply line to the "closed " position C. A A. Gas pressure regulator IMPORTANT: Do not remove the gas pressure regulator. 4. Remove the cap from the gas pressure regulator using a flat-blade screwdriver. NOTE: Do not remove the spring beneath the cap. A Tip Over Hazard A child or adult can result in the "Electronic Ignition System" section for proper cooktop and oven burner flames is visible. Connect anti-tip bracket to "OFF." 5. Turn manual...
Warranty
Page 1
... removal and reinstallation of your complete model number and serial number. Service must provide proof of repair or replacement under this major appliance is operated and maintained according to instructions attached to or furnished with electrical or plumbing codes, or use or when it is used in the country in which it is installed in an inaccessible location or is not installed in a remote area where service by a Whirlpool...
... removal and reinstallation of your complete model number and serial number. Service must provide proof of repair or replacement under this major appliance is operated and maintained according to instructions attached to or furnished with electrical or plumbing codes, or use or when it is used in the country in which it is installed in an inaccessible location or is not installed in a remote area where service by a Whirlpool...


