
User Manual
Page 2
... 9 OSD Functions PICTURE PARAMETERS: Brightness / Contrast / Saturation / Hue / Color Temp / Sharpness / Aspect Ratio / Backlight / Reset 13 PC PARAMETERS: Auto Adjust / Clock / Phase / Position 14 AUDIO SETTINGS: Volume / Bass / Treble / Balance / Mute / Speaker / Reset 15 PICTURE-IN-PICTURE: Display Mode / Main Source / PIP Source / Swap / PIP Position / PIP Size / Audio From.. 16...
... 9 OSD Functions PICTURE PARAMETERS: Brightness / Contrast / Saturation / Hue / Color Temp / Sharpness / Aspect Ratio / Backlight / Reset 13 PC PARAMETERS: Auto Adjust / Clock / Phase / Position 14 AUDIO SETTINGS: Volume / Bass / Treble / Balance / Mute / Speaker / Reset 15 PICTURE-IN-PICTURE: Display Mode / Main Source / PIP Source / Swap / PIP Position / PIP Size / Audio From.. 16...

User Manual
Page 4
... used . If this equipment does cause harmful interference to radio or television reception, which the receiver is connected. • Consult the Westinghouse Service Center or an experienced radio/Monitor technician for a Class B digital device, pursuant to part 15 of the following guidelines if it...protection against harmful interference in the United States and Canada. For LCD Monitors placed directly on the floor, only SJT type cord sets may cause harmful interference to radio communications if not installed and used in a residential installation. SEV Canada CSA Britain BASE/BS ...
... used . If this equipment does cause harmful interference to radio or television reception, which the receiver is connected. • Consult the Westinghouse Service Center or an experienced radio/Monitor technician for a Class B digital device, pursuant to part 15 of the following guidelines if it...protection against harmful interference in the United States and Canada. For LCD Monitors placed directly on the floor, only SJT type cord sets may cause harmful interference to radio communications if not installed and used in a residential installation. SEV Canada CSA Britain BASE/BS ...
User Manual
Page 13
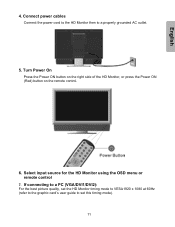
Select input source for the HD Monitor using the OSD menu or remote control 7. If connecting to a PC (VGA/DVI1/DVI2): For the best picture quality, set the HD Monitor timing mode to VESA1920 x 1080 at 60Hz (refer to the graphic card's user guide to a properly grounded AC outlet. 5. English 4. Connect power cables Connect the power cord to the HD Monitor then to set this timing mode). 11 Turn Power On Press the Power ON button on the right side of the HD Monitor, or press the Power ON (Red) button on the remote control. 6.
Select input source for the HD Monitor using the OSD menu or remote control 7. If connecting to a PC (VGA/DVI1/DVI2): For the best picture quality, set the HD Monitor timing mode to VESA1920 x 1080 at 60Hz (refer to the graphic card's user guide to a properly grounded AC outlet. 5. English 4. Connect power cables Connect the power cord to the HD Monitor then to set this timing mode). 11 Turn Power On Press the Power ON button on the right side of the HD Monitor, or press the Power ON (Red) button on the remote control. 6.
User Manual
Page 14
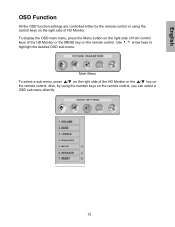
...-menu. Also, by the remote control or using the number keys on the right side of HD Monitor. English OSD Function All the OSD function settings are controlled either by using the control keys on the remote control, you can select a OSD sub-menu directly. 12 To display the OSD main...
...-menu. Also, by the remote control or using the number keys on the right side of HD Monitor. English OSD Function All the OSD function settings are controlled either by using the control keys on the remote control, you can select a OSD sub-menu directly. 12 To display the OSD main...
User Manual
Page 15
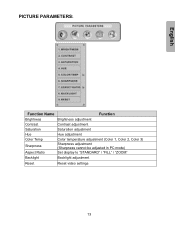
PICTURE PARAMETERS: English Function Name Function Brightness Brightness adjustment Contrast Contrast adjustment Saturation Saturation adjustment Hue Hue adjustment Color Temp Sharpness Aspect Ratio Color temperature adjustment (Color 1, Color 2, Color 3) Sharpness adjustment (Sharpness cannot be adjusted in PC mode) Set display to "STANDARD" / "FILL" / "ZOOM" Backlight Backlight adjustment Reset Reset video settings 13
PICTURE PARAMETERS: English Function Name Function Brightness Brightness adjustment Contrast Contrast adjustment Saturation Saturation adjustment Hue Hue adjustment Color Temp Sharpness Aspect Ratio Color temperature adjustment (Color 1, Color 2, Color 3) Sharpness adjustment (Sharpness cannot be adjusted in PC mode) Set display to "STANDARD" / "FILL" / "ZOOM" Backlight Backlight adjustment Reset Reset video settings 13

User Manual
Page 17
AUDIO SETTINGS: English Function Name Function Volume Volume adjustment Bass Bass adjustment Treble Treble adjustment Balance Balance adjustment Mute Select Audio OFF or ON Speaker Select internal or external speaker Reset Reset audio settings 15
AUDIO SETTINGS: English Function Name Function Volume Volume adjustment Bass Bass adjustment Treble Treble adjustment Balance Balance adjustment Mute Select Audio OFF or ON Speaker Select internal or external speaker Reset Reset audio settings 15

User Manual
Page 19
GENERAL SETTINGS: English Function Name Function Menu Position OSD horizontal/vertical position adjustment Menu Timeout Set the time to turn off the OSD automatically Language OSD language selection Sleep Timer Set sleep timer to turn off the power automatically Transparency Set OSD transparency level DPMS Select DPMS On/Off System Info Display Input source, type and signal Factory Reset Restore factory default settings 17
GENERAL SETTINGS: English Function Name Function Menu Position OSD horizontal/vertical position adjustment Menu Timeout Set the time to turn off the OSD automatically Language OSD language selection Sleep Timer Set sleep timer to turn off the power automatically Transparency Set OSD transparency level DPMS Select DPMS On/Off System Info Display Input source, type and signal Factory Reset Restore factory default settings 17
User Manual
Page 20
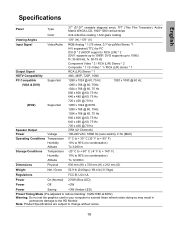
English Specifications Panel Type 37" (37.07" viewable diagonal area), TFT (Thin Film Transistor), Active Matrix WXGA LCD, 1920*1080 vertical stripe Color Anti-reflective coating + Anti-glare coating Viewing Angles 176° (H) / 176° (V) Input Signal Output Signal HDTV Compatibility Video/Audio RGB Analog * 1 (75 ohms, 0.7 Vp-p)/Mini-Stereo *1 H/V separated (TTL) for PC DVI-D * 2 (HDCP support) / RCA (L/R) * 2 (DVI1 supports up to 1080P, DVI2 supports up to 1080i) fh: 30-80 kHz, fv: 50-75 Hz Component Video * 2 / RCA (L/R) Stereo * 2 Composite * 1 / S-Video * 1 / RCA (L/R) ...
English Specifications Panel Type 37" (37.07" viewable diagonal area), TFT (Thin Film Transistor), Active Matrix WXGA LCD, 1920*1080 vertical stripe Color Anti-reflective coating + Anti-glare coating Viewing Angles 176° (H) / 176° (V) Input Signal Output Signal HDTV Compatibility Video/Audio RGB Analog * 1 (75 ohms, 0.7 Vp-p)/Mini-Stereo *1 H/V separated (TTL) for PC DVI-D * 2 (HDCP support) / RCA (L/R) * 2 (DVI1 supports up to 1080P, DVI2 supports up to 1080i) fh: 30-80 kHz, fv: 50-75 Hz Component Video * 2 / RCA (L/R) Stereo * 2 Composite * 1 / S-Video * 1 / RCA (L/R) ...
User Manual
Page 21
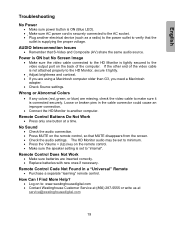
... the other end of the computer. No Sound • Check the audio connection. • Press MUTE on to: www.westinghousedigital.com • Contact Westinghouse Customer Service at (866) 287-5555 or write us at a time. Loose or broken pins in a "Universal" Remote • Purchase a separate ...the AC socket. • Plug another computer. AUDIO Interconnection Issues • Remember that MUTE disappears from the screen. • Check the audio settings. Wrong or Abnormal Colors • If any colors (red, green, or blue) are inserted correctly. • Replace batteries with new ones if...
... the other end of the computer. No Sound • Check the audio connection. • Press MUTE on to: www.westinghousedigital.com • Contact Westinghouse Customer Service at (866) 287-5555 or write us at a time. Loose or broken pins in a "Universal" Remote • Purchase a separate ...the AC socket. • Plug another computer. AUDIO Interconnection Issues • Remember that MUTE disappears from the screen. • Check the audio settings. Wrong or Abnormal Colors • If any colors (red, green, or blue) are inserted correctly. • Replace batteries with new ones if...
