
User Manual
Page 3
... the remote control. To Reduce The Risk Of Fire Or Electric Shock, Do Not Expose The HD Monitor To Rain Or Moisture! Power Cord Protection Power supply cords should be routed so that the area around the HD Monitor is provided and the manufacturer's instruction have been adhered to...HD Monitor and remove the batteries from direct sunlight to dripping or splashing and objects filled with care when moving it off and contact the Westinghouse Service Center. • WARNING - Your warranty does not cover repairs or attempted repairs by anyone not authorized by placing the HD Monitor on...
... the remote control. To Reduce The Risk Of Fire Or Electric Shock, Do Not Expose The HD Monitor To Rain Or Moisture! Power Cord Protection Power supply cords should be routed so that the area around the HD Monitor is provided and the manufacturer's instruction have been adhered to...HD Monitor and remove the batteries from direct sunlight to dripping or splashing and objects filled with care when moving it off and contact the Westinghouse Service Center. • WARNING - Your warranty does not cover repairs or attempted repairs by anyone not authorized by placing the HD Monitor on...

User Manual
Page 4
...used . For LCD Monitors placed directly on a desk or table, type SVT or SJT cord sets may be determined by Westinghouse Digital will not occur in the United States and Canada. Also, any unauthorized changes or modifications not expressly approved by turning ... Japan Electric Appliance Control Act IMPORTANT NOTICE CONCERNING POWER CORD SELECTION The specific power cord for this equipment does cause harmful interference to radio or television reception, which the receiver is connected. • Consult the Westinghouse Service Center or an experienced radio/Monitor technician ...
...used . For LCD Monitors placed directly on a desk or table, type SVT or SJT cord sets may be determined by Westinghouse Digital will not occur in the United States and Canada. Also, any unauthorized changes or modifications not expressly approved by turning ... Japan Electric Appliance Control Act IMPORTANT NOTICE CONCERNING POWER CORD SELECTION The specific power cord for this equipment does cause harmful interference to radio or television reception, which the receiver is connected. • Consult the Westinghouse Service Center or an experienced radio/Monitor technician ...
User Manual
Page 6
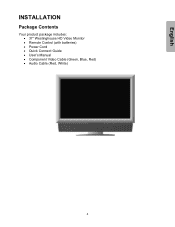
English INSTALLATION Package Contents Your product package includes: • 37" Westinghouse HD Video Monitor • Remote Control (with batteries) • Power Cord • Quick Connect Guide • User's Manual • Component Video Cable (Green, Blue, Red) • Audio Cable (Red, White) 4
English INSTALLATION Package Contents Your product package includes: • 37" Westinghouse HD Video Monitor • Remote Control (with batteries) • Power Cord • Quick Connect Guide • User's Manual • Component Video Cable (Green, Blue, Red) • Audio Cable (Red, White) 4
User Manual
Page 7
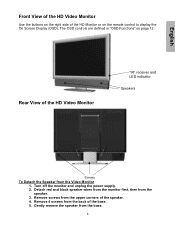
... the base. 5 Remove 4 screws from the upper corners of the base. 5. Gently remove the speaker from the speaker. 3. Turn off the monitor and unplug the power supply. 2. The OSD controls are defined in "OSD Functions" on the remote control to display the On Screen Display (OSD).
... the base. 5 Remove 4 screws from the upper corners of the base. 5. Gently remove the speaker from the speaker. 3. Turn off the monitor and unplug the power supply. 2. The OSD controls are defined in "OSD Functions" on the remote control to display the On Screen Display (OSD).
User Manual
Page 8
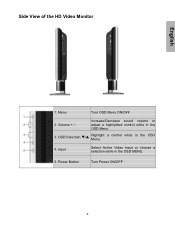
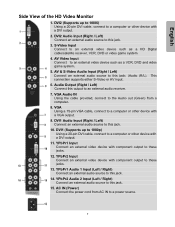
OSD Selection T/S Highlight Menu. Input Select Active Video Input or choose a selection while in the OSD 4. Power Button Turn Power ON/OFF 6 Menu Turn OSD Menu ON/OFF 2. Volume + / - Side View of the HD Video Monitor English 1. a control while in the OSD MENU. 5. Increase/Decrease sound volume or adjust a highlighted control while in the OSD Menu. 3.
OSD Selection T/S Highlight Menu. Input Select Active Video Input or choose a selection while in the OSD 4. Power Button Turn Power ON/OFF 6 Menu Turn OSD Menu ON/OFF 2. Volume + / - Side View of the HD Video Monitor English 1. a control while in the OSD MENU. 5. Increase/Decrease sound volume or adjust a highlighted control while in the OSD Menu. 3.
User Manual
Page 9
... external video device such as a VCR, DVD and video game system. 5. AV & S-Video Audio Input (Right / Left) Connect an external audio source to a power source. 7 This connection supports either S-Video or AV input. 6. Audio Output (Right / Left) Connect this jack. 15. VGA Using a 15-pin VGA cable,... video device with a DVI output. 11. YPbPr1 Audio 1 Input (Left / Right) Connect an external audio source to these jacks. 13. AC IN (Power) Connect the power cord from a computer. 8. DVI1 (Supports up to 1080i) Using a 20-pin DVI cable, connect to this jack. 14. S-Video Input Connect to...
... external video device such as a VCR, DVD and video game system. 5. AV & S-Video Audio Input (Right / Left) Connect an external audio source to a power source. 7 This connection supports either S-Video or AV input. 6. Audio Output (Right / Left) Connect this jack. 15. VGA Using a 15-pin VGA cable,... video device with a DVI output. 11. YPbPr1 Audio 1 Input (Left / Right) Connect an external audio source to these jacks. 13. AC IN (Power) Connect the power cord from a computer. 8. DVI1 (Supports up to 1080i) Using a 20-pin DVI cable, connect to this jack. 14. S-Video Input Connect to...
User Manual
Page 10
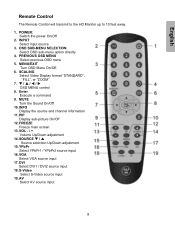
... away. 1. PIP Display sub-picture On/Off 12. YPbPr Select YPbPr1 / YPbPr2 source input 16. OSD SUB-MENU SELECTION Select OSD sub-menu option directly 4. POWER: Switch the power On/Off 2. INPUT Select input source 3. VOL - / + Volume Up/Down adjustment 14.
... away. 1. PIP Display sub-picture On/Off 12. YPbPr Select YPbPr1 / YPbPr2 source input 16. OSD SUB-MENU SELECTION Select OSD sub-menu option directly 4. POWER: Switch the power On/Off 2. INPUT Select input source 3. VOL - / + Volume Up/Down adjustment 14.
User Manual
Page 13
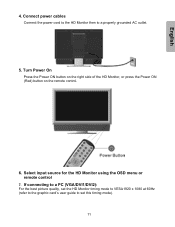
English 4. If connecting to a PC (VGA/DVI1/DVI2): For the best picture quality, set the HD Monitor timing mode to VESA1920 x 1080 at 60Hz (refer to the graphic card's user guide to a properly grounded AC outlet. 5. Turn Power On Press the Power ON button on the right side of the HD Monitor, or press the Power ON (Red) button on the remote control. 6. Select input source for the HD Monitor using the OSD menu or remote control 7. Connect power cables Connect the power cord to the HD Monitor then to set this timing mode). 11
English 4. If connecting to a PC (VGA/DVI1/DVI2): For the best picture quality, set the HD Monitor timing mode to VESA1920 x 1080 at 60Hz (refer to the graphic card's user guide to a properly grounded AC outlet. 5. Turn Power On Press the Power ON button on the right side of the HD Monitor, or press the Power ON (Red) button on the remote control. 6. Select input source for the HD Monitor using the OSD menu or remote control 7. Connect power cables Connect the power cord to the HD Monitor then to set this timing mode). 11

User Manual
Page 19
GENERAL SETTINGS: English Function Name Function Menu Position OSD horizontal/vertical position adjustment Menu Timeout Set the time to turn off the OSD automatically Language OSD language selection Sleep Timer Set sleep timer to turn off the power automatically Transparency Set OSD transparency level DPMS Select DPMS On/Off System Info Display Input source, type and signal Factory Reset Restore factory default settings 17
GENERAL SETTINGS: English Function Name Function Menu Position OSD horizontal/vertical position adjustment Menu Timeout Set the time to turn off the OSD automatically Language OSD language selection Sleep Timer Set sleep timer to turn off the power automatically Transparency Set OSD transparency level DPMS Select DPMS On/Off System Info Display Input source, type and signal Factory Reset Restore factory default settings 17
User Manual
Page 20
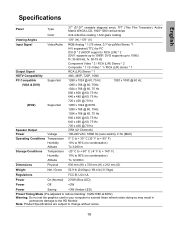
..., fv: 50-75 Hz Component Video * 2 / RCA (L/R) Stereo * 2 Composite * 1 / S-Video * 1 / RCA (L/R) stereo * 1 RCA (L/R) Stereo * 1 480i, 480P, 720P, 1080i PC Compatible (VGA & DVI1) (DVI2) Speaker Output Power Supported Supported Voltage 1280 x 1024 @ 60, 75 Hz 1920 x 1080 @ 60 Hz 1280 x 768 @ 60, 75Hz 1024 x 768 @ 60, 75 Hz 800 x 600 @ 60, 75... 12,000m Dimensions Physical 930 mm (W) x 720 mm (H) x 212 mm (D) Weight Net / Gross 52.9 lb (24.0kgs) / 69.4 lb (31.5kgs) Regulations FCC-B, UL/c-UL Power On (Normal) 270W (Blue LED...
..., fv: 50-75 Hz Component Video * 2 / RCA (L/R) Stereo * 2 Composite * 1 / S-Video * 1 / RCA (L/R) stereo * 1 RCA (L/R) Stereo * 1 480i, 480P, 720P, 1080i PC Compatible (VGA & DVI1) (DVI2) Speaker Output Power Supported Supported Voltage 1280 x 1024 @ 60, 75 Hz 1920 x 1080 @ 60 Hz 1280 x 768 @ 60, 75Hz 1024 x 768 @ 60, 75 Hz 800 x 600 @ 60, 75... 12,000m Dimensions Physical 930 mm (W) x 720 mm (H) x 212 mm (D) Weight Net / Gross 52.9 lb (24.0kgs) / 69.4 lb (31.5kgs) Regulations FCC-B, UL/c-UL Power On (Normal) 270W (Blue LED...
User Manual
Page 21
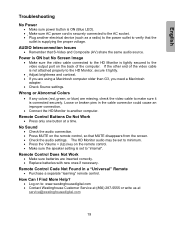
...connector could cause an improper connection. • Connect the HD Monitor to : www.westinghousedigital.com • Contact Westinghouse Customer Service at (866) 287-5555 or write us at a time. Power is ON but No Screen Image • Make sure the video cable connected to the HD Monitor is set...com 19 No Sound • Check the audio connection. • Press MUTE on to another electrical device (such as a radio) to the power outlet to the HD Monitor, secure it is not attached properly to verify that the outlet is supplying the proper voltage. AUDIO Interconnection Issues •...
...connector could cause an improper connection. • Connect the HD Monitor to : www.westinghousedigital.com • Contact Westinghouse Customer Service at (866) 287-5555 or write us at a time. Power is ON but No Screen Image • Make sure the video cable connected to the HD Monitor is set...com 19 No Sound • Check the audio connection. • Press MUTE on to another electrical device (such as a radio) to the power outlet to the HD Monitor, secure it is not attached properly to verify that the outlet is supplying the proper voltage. AUDIO Interconnection Issues •...


