
English Manual
Page 2
...8226;e• •-r•h a••..tal! IMPORTANT PRECAUTIONS WARNING: To reduce the risk of this manual. that the cables are on "a level Your hand could bedome pinched between sguymrfascyes.tCeomveforrthperoftloeoctriobnen. ,eeth,the home the assist upright and the assist arm...TABLE OF CONTENTS IMPORTANT PRECAUTIONS BEFORE YOU BEGIN ASSEMBLY HOW TO USE THE HOME GYM SYSTEM WEIGHT RESISTANCE CHART TROUBLE-SHOOTING AND MAINTENANCE CABLE DIAGRAMS ORDERING REPLACEMENT PARTS FULL 90 DAY WARRANTY 2 3 4 22 24 25 26 Back Cover Back Cover Note: A PART IDENTIFICATION ...
...8226;e• •-r•h a••..tal! IMPORTANT PRECAUTIONS WARNING: To reduce the risk of this manual. that the cables are on "a level Your hand could bedome pinched between sguymrfascyes.tCeomveforrthperoftloeoctriobnen. ,eeth,the home the assist upright and the assist arm...TABLE OF CONTENTS IMPORTANT PRECAUTIONS BEFORE YOU BEGIN ASSEMBLY HOW TO USE THE HOME GYM SYSTEM WEIGHT RESISTANCE CHART TROUBLE-SHOOTING AND MAINTENANCE CABLE DIAGRAMS ORDERING REPLACEMENT PARTS FULL 90 DAY WARRANTY 2 3 4 22 24 25 26 Back Cover Back Cover Note: A PART IDENTIFICATION ...
English Manual
Page 11
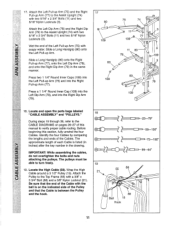
... 5/16" x 2 3/4" Bolts (11) and two 5/16" Nylon Locknuts (3). Be sure that the Cable is listed (in inches) after the key number in the same manner. Attach the Left Dip Arm (78) and the Right Dip Arm (79) to the CABLE DIAGRAMS on the indicated side of this section, fully unwind the four... Cables. Wet the end of the Cables. Identify the four Cables by comparing the lengths and ends of the Left Pull-up Arm. The approximate length of...
... 5/16" x 2 3/4" Bolts (11) and two 5/16" Nylon Locknuts (3). Be sure that the Cable is listed (in inches) after the key number in the same manner. Attach the Left Dip Arm (78) and the Right Dip Arm (79) to the CABLE DIAGRAMS on the indicated side of this section, fully unwind the four... Cables. Wet the end of the Cables. Identify the four Cables by comparing the lengths and ends of the Left Pull-up Arm. The approximate length of...
English Manual
Page 21
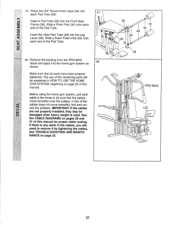
... parts will need to the home gym system as 48 shown. See the CABLE DIAGRAMS on pages 26 and 27 of the Pad Tube. Before using the home gym system, pull each end of this manual. IMPORTANT: If the cables are not properly installed, they may be damaged when heavy weight is any... USE THE HOME GYM SYSTEM, beginning on page 25. 0 36 30 34 28 34 0 30 0 29 0 PRO 9645 lR ci) ----- 00 21 Remove the backing from the PRO 9645 decal and apply it to remove it by tightening the cables. Slide a Foam Foam Pad (30) onto each Pad Tube (28). 47 Insert a Pad Tube (28...
... parts will need to the home gym system as 48 shown. See the CABLE DIAGRAMS on pages 26 and 27 of the Pad Tube. Before using the home gym system, pull each end of this manual. IMPORTANT: If the cables are not properly installed, they may be damaged when heavy weight is any... USE THE HOME GYM SYSTEM, beginning on page 25. 0 36 30 34 28 34 0 30 0 29 0 PRO 9645 lR ci) ----- 00 21 Remove the backing from the PRO 9645 decal and apply it to remove it by tightening the cables. Slide a Foam Foam Pad (30) onto each Pad Tube (28). 47 Insert a Pad Tube (28...

English Manual
Page 26
High Cable (58) and Low Cable (23) 2 3 :11 1 High Pulley 5 4 6 High Cable (58) 5-Long "U"-Bracket Low Cable (23) Front Weight Stack-8 4 0 3 2 1-Low Pulley 26 CABLE DIAGRAMS The cable diagrams on these pages show the proper positioning of the High Cable (58), the Low Cable (23), the Military Press Cable (72), and the Leg Press Cable (99). Be sure that the cables will not function...
High Cable (58) and Low Cable (23) 2 3 :11 1 High Pulley 5 4 6 High Cable (58) 5-Long "U"-Bracket Low Cable (23) Front Weight Stack-8 4 0 3 2 1-Low Pulley 26 CABLE DIAGRAMS The cable diagrams on these pages show the proper positioning of the High Cable (58), the Low Cable (23), the Military Press Cable (72), and the Leg Press Cable (99). Be sure that the cables will not function...


