

English Manual
Page 2
TABLE OF CONTENTS WARNING DECAL PLACEMENT 2 IMPORTANT PRECAUTIONS 3 BEFORE YOU BEGIN 4 PART IDENTIFICATION CHART 5 ASSEMBLY 6 ADJUSTMENTS 10 EXERCISE GUIDELINES 12 PART LIST 14 EXPLODED DRAWING 15 ORDERING REPLACEMENT PARTS Back Cover FULL 90 DAY WARRANTY Back Cover WARNING DECAL PLACEMENT The decal shown at 1-800-736-6879, Monday through Saturday, 7 a.m. Apply the replacement decal...
TABLE OF CONTENTS WARNING DECAL PLACEMENT 2 IMPORTANT PRECAUTIONS 3 BEFORE YOU BEGIN 4 PART IDENTIFICATION CHART 5 ASSEMBLY 6 ADJUSTMENTS 10 EXERCISE GUIDELINES 12 PART LIST 14 EXPLODED DRAWING 15 ORDERING REPLACEMENT PARTS Back Cover FULL 90 DAY WARRANTY Back Cover WARNING DECAL PLACEMENT The decal shown at 1-800-736-6879, Monday through Saturday, 7 a.m. Apply the replacement decal...
English Manual
Page 3
Use the weight bench only as described in any worn parts immediately. 6. Make sure all parts are using it. Keep hands and feet away from the weight bench at all precautions. 3. Note: The weight bench does not include a barbell or weights. ... to support a maximum user weight of serious injury, read the following important precau- Keep children under the age of 12 and pets away from moving parts. 9. When adding or removing weights, always keep some weight on the weight rests, make sure that all users of the weight bench are adequately informed...
Use the weight bench only as described in any worn parts immediately. 6. Make sure all parts are using it. Keep hands and feet away from the weight bench at all precautions. 3. Note: The weight bench does not include a barbell or weights. ... to support a maximum user weight of serious injury, read the following important precau- Keep children under the age of 12 and pets away from moving parts. 9. When adding or removing weights, always keep some weight on the weight rests, make sure that all users of the weight bench are adequately informed...
English Manual
Page 4
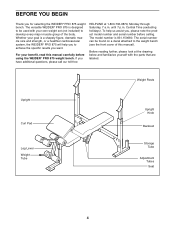
...calling. until 7 p.m. Before reading further, please look at 1-800-736-6879, Monday through Saturday, 7 a.m. If you for selecting the WEIDER® PRO 875 weight bench. To help you to the weight bench (see the front cover of the body. Weight Rests Upright Curl Pad Leg Lever ... The serial number can be used with the parts that are labeled. The model number is a shapely figure, dramatic muscle size and strength, or a healthier cardiovascular system, the WEIDER® PRO 875 will help us assist you want. The versatile WEIDER® PRO 875 is designed to be found on a decal...
...calling. until 7 p.m. Before reading further, please look at 1-800-736-6879, Monday through Saturday, 7 a.m. If you for selecting the WEIDER® PRO 875 weight bench. To help you to the weight bench (see the front cover of the body. Weight Rests Upright Curl Pad Leg Lever ... The serial number can be used with the parts that are labeled. The model number is a shapely figure, dramatic muscle size and strength, or a healthier cardiovascular system, the WEIDER® PRO 875 will help us assist you want. The versatile WEIDER® PRO 875 is designed to be found on a decal...
English Manual
Page 5
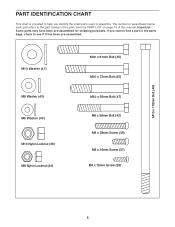
..., check to see if it has been pre-assembled. PART IDENTIFICATION CHART This chart is provided to help you cannot find a part in assembly. M10 x 178mm Bolt (46) M10 Washer (41) M8 Washer (43) M6 Washer (40) M10 Nylon Locknut (36) M8 Nylon Locknut (44) M10 x 81mm ... x 65mm Bolt (47) M8 x 58mm Bolt (42) M6 x 38mm Screw (39) M6 x 16mm Screw (37) M4 x 16mm Screw (38) 5 The number in parenthesis below each part refers to the part number of the part, from the PART LIST on page 14 of this manual. Important: Some parts may have been pre-assembled for shipping purposes.
..., check to see if it has been pre-assembled. PART IDENTIFICATION CHART This chart is provided to help you cannot find a part in assembly. M10 x 178mm Bolt (46) M10 Washer (41) M8 Washer (43) M6 Washer (40) M10 Nylon Locknut (36) M8 Nylon Locknut (44) M10 x 81mm ... x 65mm Bolt (47) M8 x 58mm Bolt (42) M6 x 38mm Screw (39) M6 x 16mm Screw (37) M4 x 16mm Screw (38) 5 The number in parenthesis below each part refers to the part number of the part, from the PART LIST on page 14 of this manual. Important: Some parts may have been pre-assembled for shipping purposes.
English Manual
Page 6
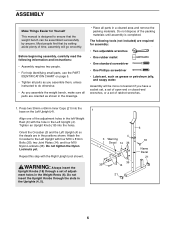
... smoothly. Do not tighten the Nylon Locknuts yet. Do not insert the Upright Knobs through a set of adjustment holes in the drawings. • Place all parts are required for Yourself This manual is completed. Tighten an Upright Knob (18) into the base on page 5. • Tighten all... parts as grease or petroleum jelly, and soapy water. Repeat this step with the hole in the left Weight Rest (6) with the Right Upright (not shown). ...
... smoothly. Do not tighten the Nylon Locknuts yet. Do not insert the Upright Knobs through a set of adjustment holes in the drawings. • Place all parts are required for Yourself This manual is completed. Tighten an Upright Knob (18) into the base on page 5. • Tighten all... parts as grease or petroleum jelly, and soapy water. Repeat this step with the hole in the left Weight Rest (6) with the Right Upright (not shown). ...
English Manual
Page 9
8. Slide two Foam Pads (20) onto the ends of all parts are properly tightened before you use of each Pad Tube (19). The use the weight bench. Press two 3/4" Round Inner Caps (29) into each Pad Tube (19). 8 20 9 20 9. Slide the third Pad Tube through the Leg Lever (9). Make sure that all remaining parts will be explained in the Front Leg (1). Slide two Pad Tubes (19) through the holes in ADJUSTMENTS, beginning on page 10. 37 37 12 9 Attach the Curl Pad (13) to the Curl Post (12) with 9 two M6 x 16mm Screws (37). 13 1 29 19 29 19 29 20 10.
8. Slide two Foam Pads (20) onto the ends of all parts are properly tightened before you use of each Pad Tube (19). The use the weight bench. Press two 3/4" Round Inner Caps (29) into each Pad Tube (19). 8 20 9 20 9. Slide the third Pad Tube through the Leg Lever (9). Make sure that all remaining parts will be explained in the Front Leg (1). Slide two Pad Tubes (19) through the holes in ADJUSTMENTS, beginning on page 10. 37 37 12 9 Attach the Curl Pad (13) to the Curl Post (12) with 9 two M6 x 16mm Screws (37). 13 1 29 19 29 19 29 20 10.
English Manual
Page 10
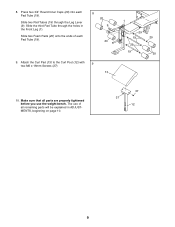
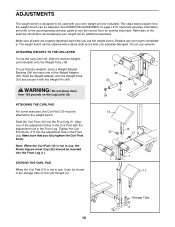
... several exercises. Refer also to see the correct form for additional exercises. Tighten the Curl Post Knob (17) into the Front Leg (1). Make sure all parts are properly tightened each end of the adjustment holes in the Curl Post with your weight set (not included). Slide the Curl Post (12) into... the Leg Lever (9). 9 48 33 15 34 34 ATTACHING THE CURL PAD For some exercises, the Curl Pad (13) must be adjusted. Replace any worn parts immediately. ATTACHING WEIGHTS TO THE LEG LEVER To use the weight bench. Align one of the Weight Adapter (33).
... several exercises. Refer also to see the correct form for additional exercises. Tighten the Curl Post Knob (17) into the Front Leg (1). Make sure all parts are properly tightened each end of the adjustment holes in the Curl Post with your weight set (not included). Slide the Curl Post (12) into... the Leg Lever (9). 9 48 33 15 34 34 ATTACHING THE CURL PAD For some exercises, the Curl Pad (13) must be adjusted. Replace any worn parts immediately. ATTACHING WEIGHTS TO THE LEG LEVER To use the weight bench. Align one of the Weight Adapter (33).
English Manual
Page 12
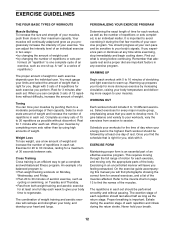
.... An example of a balanced program is an efficient way to 10 different exercises. It is important to your energy level is an essential part of 30 seconds between sets. Remember that you feeling exhausted. Warming up . WORKING OUT Each workout should be sensitive to avoid overdoing it... the exertion stage of the body. EXERCISE FORM Maintaining proper form is the highest. This requires moving only the appropriate parts of each set . The repetitions in any time while exercising, stop immediately and begin cooling down. Exhale during the return stroke.
.... An example of a balanced program is an efficient way to 10 different exercises. It is important to your energy level is an essential part of 30 seconds between sets. Remember that you feeling exhausted. Warming up . WORKING OUT Each workout should be sensitive to avoid overdoing it... the exertion stage of the body. EXERCISE FORM Maintaining proper form is the highest. This requires moving only the appropriate parts of each set . The repetitions in any time while exercising, stop immediately and begin cooling down. Exhale during the return stroke.
English Manual
Page 13
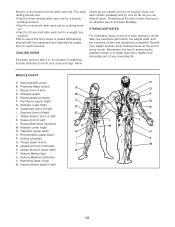
... (neck) B. Stretching at the end of every month. Plan to spend the first couple of weeks familiarizing yourself with 5 to make exercise a regular and enjoyable part of your arms and legs. Gluteus Maximus (buttocks) V. Rest for a short period of time after each set for a toning work- The ideal resting periods are...
... (neck) B. Stretching at the end of every month. Plan to spend the first couple of weeks familiarizing yourself with 5 to make exercise a regular and enjoyable part of your arms and legs. Gluteus Maximus (buttocks) V. Rest for a short period of time after each set for a toning work- The ideal resting periods are...

English Manual
Page 14
... No. Qty. Qty. Specifications are subject to change without notice. Description Key No. See the back cover of this manual for information on ordering replacement parts. 14 Description 1 1 Front Leg 2 1 Frame 3 1 Crossbar 4 1 Left Upright 5 1 Right Upright 6 2 Weight Rest 7 1 Right Backrest Frame 8 1 Left Backrest Frame 9 1 Leg Lever 10 1 Backrest 11 1 Seat ... M8 Nylon Locknut 45 1 M10 x 72mm Bolt 46 1 M10 x 178mm Bolt 47 2 M10 x 65mm Bolt 48 1 Weight Pin # 1 User's Manual # 1 Exercise Guide "#" Indicates a non-illustrated part.
... No. Qty. Qty. Specifications are subject to change without notice. Description Key No. See the back cover of this manual for information on ordering replacement parts. 14 Description 1 1 Front Leg 2 1 Frame 3 1 Crossbar 4 1 Left Upright 5 1 Right Upright 6 2 Weight Rest 7 1 Right Backrest Frame 8 1 Left Backrest Frame 9 1 Leg Lever 10 1 Backrest 11 1 Seat ... M8 Nylon Locknut 45 1 M10 x 72mm Bolt 46 1 M10 x 178mm Bolt 47 2 M10 x 65mm Bolt 48 1 Weight Pin # 1 User's Manual # 1 Exercise Guide "#" Indicates a non-illustrated part.
English Manual
Page 16
... be replaced, call the toll-free numbers listed at the left. When requesting help assembling or operating the WEIDER® PRO 875 • a part is used commercially or for immediate purchase or special order when you may also have other rights which vary from the date ...following information: • The MODEL NUMBER of the product (831.150680) • The NAME of the product (WEIDER® PRO 875 weight bench) • The PART NUMBER and DESCRIPTION of the PART (see the PART LIST and the EXPLODED DRAWING on a decal attached to state. See the front cover of this manual) SEARS, ...
... be replaced, call the toll-free numbers listed at the left. When requesting help assembling or operating the WEIDER® PRO 875 • a part is used commercially or for immediate purchase or special order when you may also have other rights which vary from the date ...following information: • The MODEL NUMBER of the product (831.150680) • The NAME of the product (WEIDER® PRO 875 weight bench) • The PART NUMBER and DESCRIPTION of the PART (see the PART LIST and the EXPLODED DRAWING on a decal attached to state. See the front cover of this manual) SEARS, ...


