
English Manual
Page 1
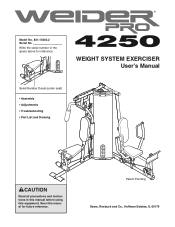
Save this equipment. Write the serial number in this manual before using this manual for reference. WEIGHT SYSTEM EXERCISER User's Manual Serial Number Decal (under seat) • Assembly • Adjustments • Troubleshooting • Part List and Drawing CAUTION Read all precautions and instructions in the space above for future reference. Patent Pending Sears, Roebuck and Co., Hoffman Estates, IL 60179 Model No. 831.15402.2 Serial No.
Save this equipment. Write the serial number in this manual before using this manual for reference. WEIGHT SYSTEM EXERCISER User's Manual Serial Number Decal (under seat) • Assembly • Adjustments • Troubleshooting • Part List and Drawing CAUTION Read all precautions and instructions in the space above for future reference. Patent Pending Sears, Roebuck and Co., Hoffman Estates, IL 60179 Model No. 831.15402.2 Serial No.
English Manual
Page 2
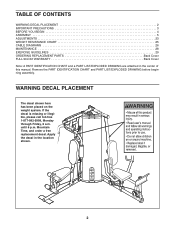
.../EXPLODED DRAWING before beginning assembly. WARNING DECAL PLACEMENT The decal shown here has been placed on the weight system. TABLE OF CONTENTS WARNING DECAL PLACEMENT 2 IMPORTANT PRECAUTIONS 3 BEFORE YOU BEGIN 4 ASSEMBLY 5 ADJUSTMENTS 23 WEIGHT RESISTANCE CHART 25 CABLE DIAGRAMS 26 MAINTENANCE 28 EXERCISE GUIDELINES 29 ORDERING REPLACEMENT PARTS Back Cover FULL 90...
.../EXPLODED DRAWING before beginning assembly. WARNING DECAL PLACEMENT The decal shown here has been placed on the weight system. TABLE OF CONTENTS WARNING DECAL PLACEMENT 2 IMPORTANT PRECAUTIONS 3 BEFORE YOU BEGIN 4 ASSEMBLY 5 ADJUSTMENTS 23 WEIGHT RESISTANCE CHART 25 CABLE DIAGRAMS 26 MAINTENANCE 28 EXERCISE GUIDELINES 29 ORDERING REPLACEMENT PARTS Back Cover FULL 90...
English Manual
Page 3
... surface, with great force. 6. Never release the arms, leg lever, lat bar, leg press, ab strap, or handle while weights are on page 24). 13. The weights will fall with a mat beneath it to protect the floor or carpet. WARNING: Before beginning this manual and all times. Replace ...this or any exercise program, consult your physician. Make sure that there is the responsibility of the owner to mount, dismount, and use the weight system in this product. 3 Inspect and properly tighten all precautions. 3. Keep hands and feet away from moisture and dust. Always disconnect the...
... surface, with great force. 6. Never release the arms, leg lever, lat bar, leg press, ab strap, or handle while weights are on page 24). 13. The weights will fall with a mat beneath it to protect the floor or carpet. WARNING: Before beginning this manual and all times. Replace ...this or any exercise program, consult your physician. Make sure that there is the responsibility of the owner to mount, dismount, and use the weight system in this product. 3 Inspect and properly tighten all precautions. 3. Keep hands and feet away from moisture and dust. Always disconnect the...
English Manual
Page 4
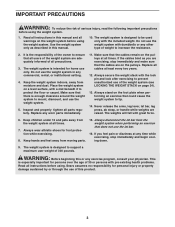
... designed to achieve the specific results you want. they do not correspond to the weight system (see the front cover of this manual for selecting the versatile WEIDER® PRO 4250 weight system. BEFORE YOU BEGIN Thank you for the location of the decal). Right Side High Pulley Station Butterfly Arm Ab... Width: 81 in. / 206 cm Depth: 59 in the manual. 4 The model number is to a person sitting on the drawings in . / 150 cm Weight Stack Backrest Left Side Press Arm Leg Press Note: The terms "right side" and "left side" are labeled. Whether your goal is 831.15402.2. Before...
... designed to achieve the specific results you want. they do not correspond to the weight system (see the front cover of this manual for selecting the versatile WEIDER® PRO 4250 weight system. BEFORE YOU BEGIN Thank you for the location of the decal). Right Side High Pulley Station Butterfly Arm Ab... Width: 81 in. / 206 cm Depth: 59 in the manual. 4 The model number is to a person sitting on the drawings in . / 150 cm Weight Stack Backrest Left Side Press Arm Leg Press Note: The terms "right side" and "left side" are labeled. Whether your goal is 831.15402.2. Before...
English Manual
Page 5
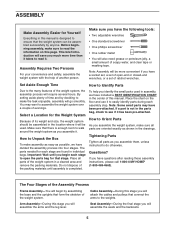
... will begin each stage to do otherwise. ASSEMBLY Make Assembly Easier for Yourself Everything in this manual is enough room to walk around the weight system as you assemble it. You may have questions after reading these assembly instructions, please call 1-800-4-MY-HOME® (1-800-469-...if it to make sure all parts are found in a cleared area and remove the packing materials. By setting aside plenty of its weight and size, the weight system should be assembled in assembly, we have the following tools: • Two adjustable wrenches • One standard screwdriver • ...
... will begin each stage to do otherwise. ASSEMBLY Make Assembly Easier for Yourself Everything in this manual is enough room to walk around the weight system as you assemble it. You may have questions after reading these assembly instructions, please call 1-800-4-MY-HOME® (1-800-469-...if it to make sure all parts are found in a cleared area and remove the packing materials. By setting aside plenty of its weight and size, the weight system should be assembled in assembly, we have the following tools: • Two adjustable wrenches • One standard screwdriver • ...
English Manual
Page 8
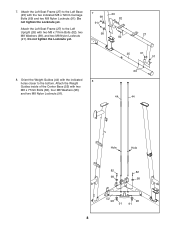
Attach the Left Seat Frame (27) to the bottom. Orient the Weight Guides (44) with the indicated 8 holes closer to the Left Base (25) with the two indicated M8 x 72mm Carriage Bolts (69) and two M8 Nylon ... M8 Washers (98), and two M8 Nylon Locknuts (91). 69 44 44 Hole Hole 82 82 98 98 52 98 91 98 91 8 Attach the Weight Guides inside of the Center Base (52) with two M8 x 77mm Bolts (82), two M8 Washers (98), and two M8 Nylon Locknuts 98 82 27...
Attach the Left Seat Frame (27) to the bottom. Orient the Weight Guides (44) with the indicated 8 holes closer to the Left Base (25) with the two indicated M8 x 72mm Carriage Bolts (69) and two M8 Nylon ... M8 Washers (98), and two M8 Nylon Locknuts (91). 69 44 44 Hole Hole 82 82 98 98 52 98 91 98 91 8 Attach the Weight Guides inside of the Center Base (52) with two M8 x 77mm Bolts (82), two M8 Washers (98), and two M8 Nylon Locknuts 98 82 27...
English Manual
Page 9
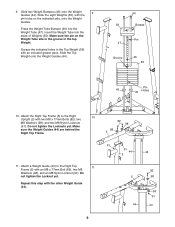
... 10 Upright (2) with an M8 x 77mm Bolt (82), two M8 Washers (98), and an M8 Nylon Locknut (91). Press the Weight Tube Bumper (46) into the stack of Weights (55). Make 82 98 sure the Weight Guides (44) are behind the Right Top Frame. 98 5 91 91 44 44 2 11. Slide the eight... Weights (55), with the pin holes on the Weight Tube sits in the groove in the Top Weight (56) with the other Weight Guide (44). 82 5 98 98 91 44 44 9 Do not tighten the Locknuts yet. 9. Attach...
... 10 Upright (2) with an M8 x 77mm Bolt (82), two M8 Washers (98), and an M8 Nylon Locknut (91). Press the Weight Tube Bumper (46) into the stack of Weights (55). Make 82 98 sure the Weight Guides (44) are behind the Right Top Frame. 98 5 91 91 44 44 2 11. Slide the eight... Weights (55), with the pin holes on the Weight Tube sits in the groove in the Top Weight (56) with the other Weight Guide (44). 82 5 98 98 91 44 44 9 Do not tighten the Locknuts yet. 9. Attach...
English Manual
Page 16
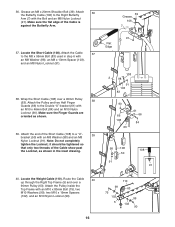
Make sure the flat edge of the Cable show past the Locknut, as shown. 39. Locate the Weight Cable (110). Attach the Cable 37 to a "U"- 39 bracket (50) with an M8 Washer (98), an M8 x 13mm Spacer (103), and an M8 Nylon Locknut (...
Make sure the flat edge of the Cable show past the Locknut, as shown. 39. Locate the Weight Cable (110). Attach the Cable 37 to a "U"- 39 bracket (50) with an M8 Washer (98), an M8 x 13mm Spacer (103), and an M8 Nylon Locknut (...
English Manual
Page 17
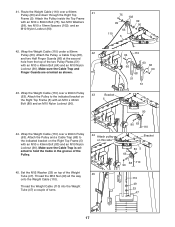
... 90 68 51 51 90 44. Set the M12 Washer (33) on top of the Pulley. 44 Attach pulley on this side 45. Wrap the Weight Cable (110) under a 90mm 42 Pulley (63). Make sure the Cable Trap is oriented to hold the Cable in the groove of the...) to the indicated bracket on the Right Top Frame (5) with an M10 x 43mm Bolt (80) and an M10 Nylon Locknut (90). Thread the Weight Cable (110) into the Weight Tube (47) a couple of the two Pulley Plates (51) with an M10 x 80mm Bolt (75), two M10 Washers (99), two M10 x 19mm Spacers...
... 90 68 51 51 90 44. Set the M12 Washer (33) on top of the Pulley. 44 Attach pulley on this side 45. Wrap the Weight Cable (110) under a 90mm 42 Pulley (63). Make sure the Cable Trap is oriented to hold the Cable in the groove of the...) to the indicated bracket on the Right Top Frame (5) with an M10 x 43mm Bolt (80) and an M10 Nylon Locknut (90). Thread the Weight Cable (110) into the Weight Tube (47) a couple of the two Pulley Plates (51) with an M10 x 80mm Bolt (75), two M10 Washers (99), two M10 x 19mm Spacers...
English Manual
Page 20
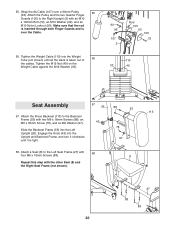
Wrap the Ab Cable (107) over the Cable. 56. Tighten the Weight Cable (110) into the Weight Tube (not shown) until it clockwise until all the slack is over a 90mm Pulley 55 (63). Attach a Seat (8) to the Left Seat Frame (27) with ... the Right Upright (2) with the other Seat (8) and the Right Seat Frame (not shown). 27 88 88 20 Tighten the M12 Nut (49) on the Weight Cable against the M12 Washer (33). 90 99 107 2 Rod 105 63 105 72 110 33 49 Seat Assembly 57 26 88 53 113 57...
Wrap the Ab Cable (107) over the Cable. 56. Tighten the Weight Cable (110) into the Weight Tube (not shown) until it clockwise until all the slack is over a 90mm Pulley 55 (63). Attach a Seat (8) to the Left Seat Frame (27) with ... the Right Upright (2) with the other Seat (8) and the Right Seat Frame (not shown). 27 88 88 20 Tighten the M12 Nut (49) on the Weight Cable against the M12 Washer (33). 90 99 107 2 Rod 105 63 105 72 110 33 49 Seat Assembly 57 26 88 53 113 57...
English Manual
Page 22
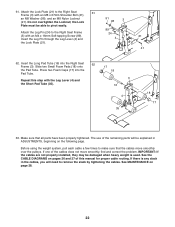
... the remaining parts will be explained in the cables, you will need to make sure that all parts have been properly tightened. Before using the weight system, pull each cable a few times to remove the slack by tightening the cables. See MAINTENANCE on the following page. Slide two Small Foam Pads... Shoulder Bolt (41), an M8 Washer (98), and an M8 Nylon Locknut (91). If there is used. the Lock Plate must be damaged when heavy weight is any slack in ADJUSTMENTS, beginning on page 28. 22 Insert the Long Pad Tube (16) into the Pad Tube. 17 18 Repeat this manual...
... the remaining parts will be explained in the cables, you will need to make sure that all parts have been properly tightened. Before using the weight system, pull each cable a few times to remove the slack by tightening the cables. See MAINTENANCE on the following page. Slide two Small Foam Pads... Shoulder Bolt (41), an M8 Washer (98), and an M8 Nylon Locknut (91). If there is used. the Lock Plate must be damaged when heavy weight is any slack in ADJUSTMENTS, beginning on page 28. 22 Insert the Long Pad Tube (16) into the Pad Tube. 17 18 Repeat this manual...
English Manual
Page 23
... CHART on page 29 for important information about how to the cables and pulleys, the amount of the weight stack, insert the Weight Pin (57) under the desired Weight (55). The Lat Bar (not shown), the Ab Strap (79), or the Handle (93) can be performed. Adjust the length of ...two Cable Clips. Replace any pulley station in the correct starting position for each weight station. 55 57 10 ATTACHING THE ACCESSORIES TO A PULLEY STATION Attach the Handle (93) to adjust the weight system. Insert the Weight Pin so that the Handle is used. Note: Due to get the most benefit...
... CHART on page 29 for important information about how to the cables and pulleys, the amount of the weight stack, insert the Weight Pin (57) under the desired Weight (55). The Lat Bar (not shown), the Ab Strap (79), or the Handle (93) can be performed. Adjust the length of ...two Cable Clips. Replace any pulley station in the correct starting position for each weight station. 55 57 10 ATTACHING THE ACCESSORIES TO A PULLEY STATION Attach the Handle (93) to adjust the weight system. Insert the Weight Pin so that the Handle is used. Note: Due to get the most benefit...
English Manual
Page 24
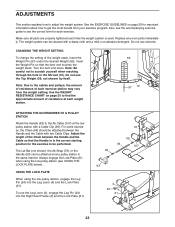
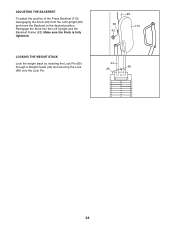
Make sure the Knob is fully tightened. LOCKING THE WEIGHT STACK Lock the weight stack by inserting the Lock Pin (65) through a Weight Guide (44) and securing the Lock (48) onto the Lock Pin. 26 53 113 43 44 48 65 24 Reengage the Knob into the Left Upright and the Backrest Frame (53). ADJUSTING THE BACKREST To adjust the position of the Press Backrest (113), disengaging the Knob (43) from the Left Upright (26) and move the Backrest to the desired position.
Make sure the Knob is fully tightened. LOCKING THE WEIGHT STACK Lock the weight stack by inserting the Lock Pin (65) through a Weight Guide (44) and securing the Lock (48) onto the Lock Pin. 26 53 113 43 44 48 65 24 Reengage the Knob into the Left Upright and the Backrest Frame (53). ADJUSTING THE BACKREST To adjust the position of the Press Backrest (113), disengaging the Knob (43) from the Left Upright (26) and move the Backrest to the desired position.

English Manual
Page 25
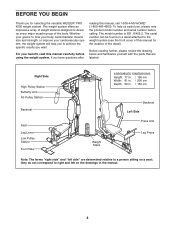
The other numbers refer to the 6 lb. weight plates. Note: The actual resistance at each exercise station. WEIGHT Top 1 2 3 4 5 6 7 8 HIGH PULLEY (lbs.) 10 25 38 54 67 84 97 105 122 BUTTERFLY ARM (lbs.) 16 30 45 51 60 73 88 93 106 ... 73 90 100 114 130 25 top weight. "Top" refers to the 12.5 lb. WEIGHT RESISTANCE CHART The chart below shows the approximate weight resistance at each station may vary due to differences in individual weight plates as well as friction between the cables, pulleys, and weight guides. Weight resistance shown for the butterfly arm station...
The other numbers refer to the 6 lb. weight plates. Note: The actual resistance at each exercise station. WEIGHT Top 1 2 3 4 5 6 7 8 HIGH PULLEY (lbs.) 10 25 38 54 67 84 97 105 122 BUTTERFLY ARM (lbs.) 16 30 45 51 60 73 88 93 106 ... 73 90 100 114 130 25 top weight. "Top" refers to the 12.5 lb. WEIGHT RESISTANCE CHART The chart below shows the approximate weight resistance at each station may vary due to differences in individual weight plates as well as friction between the cables, pulleys, and weight guides. Weight resistance shown for the butterfly arm station...
English Manual
Page 26
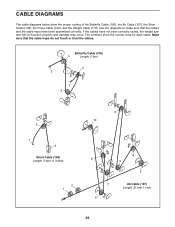
.... The numbers show the proper routing of the Butterfly Cable (106), the Ab Cable (107), the Short Cable (108), the Press Cable (109), and the Weight Cable (110). Use the diagrams to make sure that the cable traps do not touch or bind the cables. CABLE DIAGRAMS The cable diagrams below...
.... The numbers show the proper routing of the Butterfly Cable (106), the Ab Cable (107), the Short Cable (108), the Press Cable (109), and the Weight Cable (110). Use the diagrams to make sure that the cable traps do not touch or bind the cables. CABLE DIAGRAMS The cable diagrams below...
English Manual
Page 27
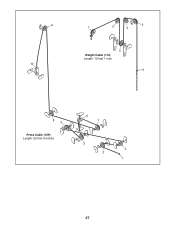
9 10 1 2 4 5 3 Weight Cable (110) Length: 12 feet 1 inch 6 84 Press Cable (109) Length: 22 feet 6 inches 6 7 5 3 2 1 27
9 10 1 2 4 5 3 Weight Cable (110) Length: 12 feet 1 inch 6 84 Press Cable (109) Length: 22 feet 6 inches 6 7 5 3 2 1 27
English Manual
Page 28
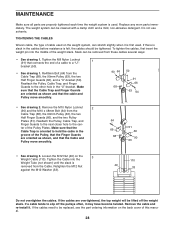
... (66), and a "U"-bracket (50). ter of a cable to be replaced, see the part ordering information on the back cover of the weight stack. Loosen the M12 Nut (49) on the weight system, can stretch slightly when it is used . Retighten the M12 Nut against the M12 Washer (33). 110 49 33 Do... cables are oriented as shown, and that the Cable and Pulley move smoothly. 90 66 68 50 91 66 63 64 • See drawing 2. The weight system can be lifted off the pulleys often, it . Re48mm Bolt (64) from the Cable Trap (68), the 90mm Pulley (63), the two Half Finger...
... (66), and a "U"-bracket (50). ter of a cable to be replaced, see the part ordering information on the back cover of the weight stack. Loosen the M12 Nut (49) on the weight system, can stretch slightly when it is used . Retighten the M12 Nut against the M12 Washer (33). 110 49 33 Do... cables are oriented as shown, and that the Cable and Pulley move smoothly. 90 66 68 50 91 66 63 64 • See drawing 2. The weight system can be lifted off the pulleys often, it . Re48mm Bolt (64) from the Cable Trap (68), the 90mm Pulley (63), the two Half Finger...
English Manual
Page 29
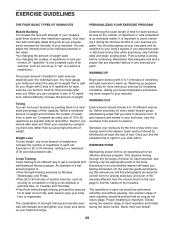
... in each repetition should last about half as long as possible without difficulty, increase the amount of weight. When you feeling exhausted. Weight Loss To lose weight, use a low amount of weight and increase the number of repetitions in each exercise, and moving through the full range of motion ... exertion stage of each set should include 6 to find the names of the muscles. You must gauge your limits and select the amount of weight that is : • Plan strength training workouts on Tuesday and Thursday. • Rest from session to session. Rest for each set ....
... in each repetition should last about half as long as possible without difficulty, increase the amount of weight. When you feeling exhausted. Weight Loss To lose weight, use a low amount of weight and increase the number of repetitions in each exercise, and moving through the full range of motion ... exertion stage of each set should include 6 to find the names of the muscles. You must gauge your limits and select the amount of weight that is : • Plan strength training workouts on Tuesday and Thursday. • Rest from session to session. Rest for each set ....
English Manual
Page 30
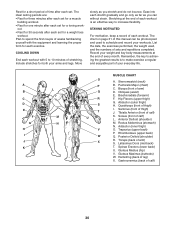
... Plan to spend the first couple of weeks familiarizing yourself with 5 to make exercise a regular and enjoyable part of your weight and key body measurements at the end of each workout. Move slowly as you stretch and do not bounce. STAYING MOTIVATED ...repetitions completed. Brachioradials (forearm) F. Trapezius (upper back) P. Spinae Erectors (lower back) U. Include stretches for a weight loss workout. List the date, the exercises performed, the weight used to increase flexibility. Sartorius (front of arm) S. Anterior Deltoid (shoulder) M. Triceps (back of thigh) J....
... Plan to spend the first couple of weeks familiarizing yourself with 5 to make exercise a regular and enjoyable part of your weight and key body measurements at the end of each workout. Move slowly as you stretch and do not bounce. STAYING MOTIVATED ...repetitions completed. Brachioradials (forearm) F. Trapezius (upper back) P. Spinae Erectors (lower back) U. Include stretches for a weight loss workout. List the date, the exercises performed, the weight used to increase flexibility. Sartorius (front of arm) S. Anterior Deltoid (shoulder) M. Triceps (back of thigh) J....
English Manual
Page 31
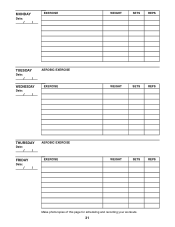
MONDAY Date: // EXERCISE WEIGHT SETS REPS TUESDAY Date: // WEDNESDAY Date: // AEROBIC EXERCISE EXERCISE WEIGHT SETS REPS THURSDAY Date: // FRIDAY Date: // AEROBIC EXERCISE EXERCISE WEIGHT SETS REPS Make photocopies of this page for scheduling and recording your workouts. 31
MONDAY Date: // EXERCISE WEIGHT SETS REPS TUESDAY Date: // WEDNESDAY Date: // AEROBIC EXERCISE EXERCISE WEIGHT SETS REPS THURSDAY Date: // FRIDAY Date: // AEROBIC EXERCISE EXERCISE WEIGHT SETS REPS Make photocopies of this page for scheduling and recording your workouts. 31


