

Canadian English Manual
Page 1
Write the serial number in this manual before using this manual for future reference. Keep this equipment. If you have questions, or if parts are damaged or missing, PLEASE CONTACT OUR CUSTOMER SERVICE DEPARTMENT DIRECTLY. Serial Number Decal (under seat) QUESTIONS? Model No. 30295.0 Serial No. CALL TOLL-FREE: 1-888-936-4266 Mon.-Fri., 8:00 until 17:00 ET (excluding holidays) OR E-MAIL US: [email protected] USERʼS MANUAL CAUTION Read all precautions and instructions in the space above for future reference. www.weiderfitness.com
Write the serial number in this manual before using this manual for future reference. Keep this equipment. If you have questions, or if parts are damaged or missing, PLEASE CONTACT OUR CUSTOMER SERVICE DEPARTMENT DIRECTLY. Serial Number Decal (under seat) QUESTIONS? Model No. 30295.0 Serial No. CALL TOLL-FREE: 1-888-936-4266 Mon.-Fri., 8:00 until 17:00 ET (excluding holidays) OR E-MAIL US: [email protected] USERʼS MANUAL CAUTION Read all precautions and instructions in the space above for future reference. www.weiderfitness.com
Canadian English Manual
Page 3
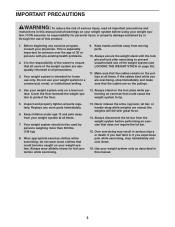
...the pulleys. 4. Keep children under age 12 and pets away from your weight system at all times. 7. Always wear athletic shoes for home use your weight sys- Over exercising may result in a commercial, rental, or institutional setting. 9. ICON assumes no responsibility for persons over the ... is intended for foot protection while exercising. 13. Inspect and properly tighten all precautions. 3. Your weight system should not be used by or through the use of the weight system (see LOCKING THE WEIGHT STACK on a level surface. This is the responsibility of the owner to ensure...
...the pulleys. 4. Keep children under age 12 and pets away from your weight system at all times. 7. Always wear athletic shoes for home use your weight sys- Over exercising may result in a commercial, rental, or institutional setting. 9. ICON assumes no responsibility for persons over the ... is intended for foot protection while exercising. 13. Inspect and properly tighten all precautions. 3. Your weight system should not be used by or through the use of the weight system (see LOCKING THE WEIGHT STACK on a level surface. This is the responsibility of the owner to ensure...

Canadian English Manual
Page 4
... the weight system will help us . Before reading further, please familiarize yourself with the parts that are shown on the seat; If you use the weight system. Whether your goal is to develop every major muscle group of the serial number decal are labeled in the drawing below. The... Arm Weights Note: The terms "right side" and "left side" are determined relative to achieve the specific results you for selecting the versatile WEIDER® 2980 X weight system. BEFORE YOU BEGIN Thank you want. High Pulley Station Arm Pin Right Side Backrest Curl Pad Seat Leg Lever Pin Leg Lever...
... the weight system will help us . Before reading further, please familiarize yourself with the parts that are shown on the seat; If you use the weight system. Whether your goal is to develop every major muscle group of the serial number decal are labeled in the drawing below. The... Arm Weights Note: The terms "right side" and "left side" are determined relative to achieve the specific results you for selecting the versatile WEIDER® 2980 X weight system. BEFORE YOU BEGIN Thank you want. High Pulley Station Arm Pin Right Side Backrest Curl Pad Seat Leg Lever Pin Leg Lever...
Canadian English Manual
Page 5
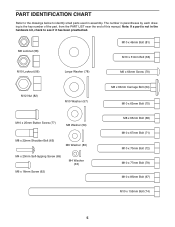
... to see if it has been preattached. The number in parentheses by each drawing is not in the hardware kit, check to identify small parts used in assembly.
... to see if it has been preattached. The number in parentheses by each drawing is not in the hardware kit, check to identify small parts used in assembly.
Canadian English Manual
Page 6
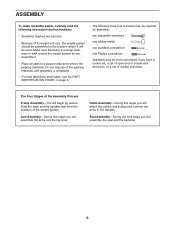
Make sure that there is completed. • For help identifying small parts, use the PART IDENTIFICATION CHART on page 5. • The following information and instructions: • Assembly requires two persons. • Because of its weight and size, the ... that connect the arms to walk around the weight system as you assemble it. • Place all parts in the location where it will be used. ASSEMBLY To make assembly easier, carefully read the following tools (not included) may be required for assembly: two adjustable wrenches one rubber mallet one standard...
Make sure that there is completed. • For help identifying small parts, use the PART IDENTIFICATION CHART on page 5. • The following information and instructions: • Assembly requires two persons. • Because of its weight and size, the ... that connect the arms to walk around the weight system as you assemble it. • Place all parts in the location where it will be used. ASSEMBLY To make assembly easier, carefully read the following tools (not included) may be required for assembly: two adjustable wrenches one rubber mallet one standard...

Canadian English Manual
Page 15
... 15 Route the High Cable (55) over a 90mm Thin Pulley (47). 25 Attach the Pulley inside the Top Frame with the M10 x 67mm Bolt (71) used in step 23, an 11mm Spacer (49), an M10 Washer (57), and an M10 Nylon Locknut (56). 55 56 57 49 47 4 71 26. Attach...
... 15 Route the High Cable (55) over a 90mm Thin Pulley (47). 25 Attach the Pulley inside the Top Frame with the M10 x 67mm Bolt (71) used in step 23, an 11mm Spacer (49), an M10 Washer (57), and an M10 Nylon Locknut (56). 55 56 57 49 47 4 71 26. Attach...
Canadian English Manual
Page 17
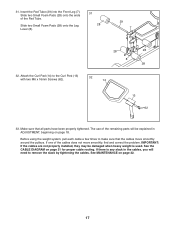
The use of the cables does not move smoothly around the pulleys. IMPORTANT: If the cables are not properly installed... on page 21 for proper cable routing. Attach the Curl Pad (14) to remove the slack by tightening the cables. Before using the weight system, pull each cable a few times to make sure that all parts have been properly tightened. If one of ... Slide two Small Foam Pads (28) onto the Leg Lever (8). 31 28 29 7 28 28 8 28 32. If there is used. Make sure that the cables move smoothly, find and correct the problem. Slide two Small Foam Pads (28) onto the ends of the...
The use of the cables does not move smoothly around the pulleys. IMPORTANT: If the cables are not properly installed... on page 21 for proper cable routing. Attach the Curl Pad (14) to remove the slack by tightening the cables. Before using the weight system, pull each cable a few times to make sure that all parts have been properly tightened. If one of ... Slide two Small Foam Pads (28) onto the Leg Lever (8). 31 28 29 7 28 28 8 28 32. If there is used. Make sure that the cables move smoothly, find and correct the problem. Slide two Small Foam Pads (28) onto the ends of the...
Canadian English Manual
Page 18
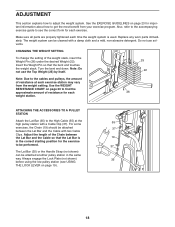
... of the Chain between the Lat Bar and the Cable with a Cable Clip (37). Use the WEIGHT RESISTANCE CHART on page 20 to find the approximate amount of resistance for the exercise...the bent end touches the weight stack. Always engage the Lock Plate (not shown) 35 before using the low pulley station (see the correct form for important information about how to be performed.... attached at either pulley station in the correct starting position for each time the weight system is used. See the EXERCISE GUIDELINES on page 19). 18 CHANGING THE WEIGHT SETTING To change the setting ...
... of the Chain between the Lat Bar and the Cable with a Cable Clip (37). Use the WEIGHT RESISTANCE CHART on page 20 to find the approximate amount of resistance for the exercise...the bent end touches the weight stack. Always engage the Lock Plate (not shown) 35 before using the low pulley station (see the correct form for important information about how to be performed.... attached at either pulley station in the correct starting position for each time the weight system is used. See the EXERCISE GUIDELINES on page 19). 18 CHANGING THE WEIGHT SETTING To change the setting ...
Canadian English Manual
Page 19
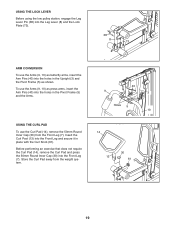
... low pulley station, engage the Leg Lever Pin (38) into the Leg Lever (8) and the Lock Plate (73). 38 8 73 ARM CONVERSION To use the Arms (9, 10) as butterfly arms, insert the Arm Pins (40) into the holes in place with the Curl Knob (61). Insert the Curl Post (... Front Leg and secure it in the Upright (3) and the Pivot Frame (5) as press arms, insert the Arm Pins (40) into the Front Leg (7). To use the Curl Pad (14), remove the 50mm Round Inner Cap (30) from the weight system. 40 9 3 Holes 5 10 14 30 13 61 7 19...
... low pulley station, engage the Leg Lever Pin (38) into the Leg Lever (8) and the Lock Plate (73). 38 8 73 ARM CONVERSION To use the Arms (9, 10) as butterfly arms, insert the Arm Pins (40) into the holes in place with the Curl Knob (61). Insert the Curl Post (... Front Leg and secure it in the Upright (3) and the Pivot Frame (5) as press arms, insert the Arm Pins (40) into the Front Leg (7). To use the Curl Pad (14), remove the 50mm Round Inner Cap (30) from the weight system. 40 9 3 Holes 5 10 14 30 13 61 7 19...

Canadian English Manual
Page 21
Use the diagram to make sure that the cables, cable traps, pulleys, and guards are not assembled correctly, the weight system will not function properly and ...
Use the diagram to make sure that the cables, cable traps, pulleys, and guards are not assembled correctly, the weight system will not function properly and ...
Canadian English Manual
Page 22
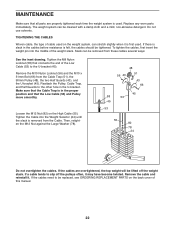
.... Make sure that the Cable Trap is felt, the cables should be tightened. If the cables are properly tightened each time the weight system is used . If the cables need to the other hole in the proper position and that the Low Cable (53) and Pulley move smoothly. Tighten the Cable... into the middle of cable used on the weight system, can stretch slightly when it . Reattach the Pulley, Cable Trap, and Half Guards to be replaced, see ORDERING REPLACEMENT PARTS on...
.... Make sure that the Cable Trap is felt, the cables should be tightened. If the cables are properly tightened each time the weight system is used . If the cables need to the other hole in the proper position and that the Low Cable (53) and Pulley move smoothly. Tighten the Cable... into the middle of cable used on the weight system, can stretch slightly when it . Reattach the Pulley, Cable Trap, and Half Guards to be replaced, see ORDERING REPLACEMENT PARTS on...
Canadian English Manual
Page 23
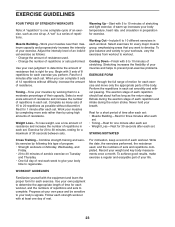
... variety to your own judgment to workout. STAYING MOTIVATED Cross Training-Combine strength training and aerobic exercise by using high amounts of resistance. Use your workouts, vary the exercises from workout to determine the appropriate length of time for exercise. Complete as... seconds between sets. Never hold your weight and key body measurements once a month. Write the date, the exercises performed, the resistance used . • Change the number of your exercise. Select a moderate amount of resistance and increase the number of repetitions. Select exercises ...
... variety to your own judgment to workout. STAYING MOTIVATED Cross Training-Combine strength training and aerobic exercise by using high amounts of resistance. Use your workouts, vary the exercises from workout to determine the appropriate length of time for exercise. Complete as... seconds between sets. Never hold your weight and key body measurements once a month. Write the date, the exercises performed, the resistance used . • Change the number of your exercise. Select a moderate amount of resistance and increase the number of repetitions. Select exercises ...
Canadian English Manual
Page 28
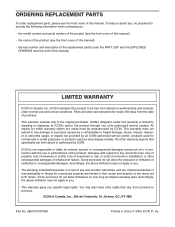
... Canada, Inc., 900 de lʼIndustrie, St. All repairs for which warranty claims are warranted for commercial or rental purposes; damages with the use , or costs of removal or installation; This warranty gives you . Jérôme, QC J7Y 4B8 Part No. 285103 R0709A Printed in ...of this manual. Accordingly, the above is not responsible or liable for a particular purpose are limited in workmanship and material, under normal use and service conditions. ORDERING REPLACEMENT PARTS To order replacement parts, please see the PART LIST and the EXPLODED DRAWING near the end of ...
... Canada, Inc., 900 de lʼIndustrie, St. All repairs for which warranty claims are warranted for commercial or rental purposes; damages with the use , or costs of removal or installation; This warranty gives you . Jérôme, QC J7Y 4B8 Part No. 285103 R0709A Printed in ...of this manual. Accordingly, the above is not responsible or liable for a particular purpose are limited in workmanship and material, under normal use and service conditions. ORDERING REPLACEMENT PARTS To order replacement parts, please see the PART LIST and the EXPLODED DRAWING near the end of ...


