
English Manual
Page 3
... The weight bench does not include weights or a barbell. 2. It is longer than 130 pounds on the weight rests to balance the bench. 3. When you are properly tightened each time you are using it. Always keep some weight on both ends of this manual. 11. The weight bench is ... cooling down. 10. Read all instructions before using the weight bench. 1. When adjusting the backrest, make sure the adjustment tube is especially important for foot protection while exercising. 15. WARNING: Before beginning this manual before using . Make sure all users of serious injury,...
... The weight bench does not include weights or a barbell. 2. It is longer than 130 pounds on the weight rests to balance the bench. 3. When you are properly tightened each time you are using it. Always keep some weight on both ends of this manual. 11. The weight bench is ... cooling down. 10. Read all instructions before using the weight bench. 1. When adjusting the backrest, make sure the adjustment tube is especially important for foot protection while exercising. 15. WARNING: Before beginning this manual before using . Make sure all users of serious injury,...
English Manual
Page 4
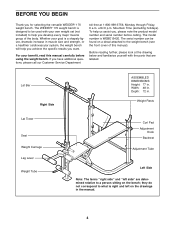
... terms "right side" and "left on the bench; Lat Bar Right Side Lat Tower Seat Weight Carriage Leg Lever Weight Tube ASSEMBLED DIMENSIONS: Height: 77 in . To help you for selecting the versatile WEIDER® 170 weight bench. The WEIDER® 170 weight bench is right and left side" are labeled. Width: 48 in the manual. 4 BEFORE YOU BEGIN Thank you develop...
... terms "right side" and "left on the bench; Lat Bar Right Side Lat Tower Seat Weight Carriage Leg Lever Weight Tube ASSEMBLED DIMENSIONS: Height: 77 in . To help you for selecting the versatile WEIDER® 170 weight bench. The WEIDER® 170 weight bench is right and left side" are labeled. Width: 48 in the manual. 4 BEFORE YOU BEGIN Thank you develop...
English Manual
Page 6
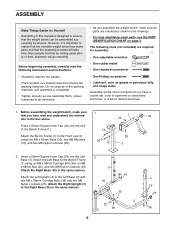
...Right Base (35) in the box above. 1 25 24 Press a 50mm Square Inner Cap (24) into the Left Base (3). Before assembling the weight bench, make sure all parts are required for Yourself Everything in a cleared area and remove the packing materials. Insert a 50mm Square Inner Cap (24) ...end of the packing materials until assembly is completed. • Tighten all parts in this manual is designed to ensure that the assembly process will take time. Do not dispose of the Bench Frame (1). Assembly will be assembled successfully by setting aside plenty of ratchet wrenches. 1. Most...
...Right Base (35) in the box above. 1 25 24 Press a 50mm Square Inner Cap (24) into the Left Base (3). Before assembling the weight bench, make sure all parts are required for Yourself Everything in a cleared area and remove the packing materials. Insert a 50mm Square Inner Cap (24) ...end of the packing materials until assembly is completed. • Tighten all parts in this manual is designed to ensure that the assembly process will take time. Do not dispose of the Bench Frame (1). Assembly will be assembled successfully by setting aside plenty of ratchet wrenches. 1. Most...

English Manual
Page 11
...the Curl Post (13) into an Upright before inserting the Weight Rest. See the inset drawing. WARNING: Do not place more than 50 pounds on the front cover of this manual. Then, remove the Long Adjustment Knobs (27) from the Weight Rests. Make sure that the holes in use the the..., the Curl Post (13) or Lat Tower (not shown) must be inserted through the Weight Rests (6) and the Uprights (4, 5) and be stored in the Front Leg and the Curl Post. WARNING: The Long Adjustment Knobs (27) must be attached to the weight bench. Fully tighten the Adjustment Knobs into the...
...the Curl Post (13) into an Upright before inserting the Weight Rest. See the inset drawing. WARNING: Do not place more than 50 pounds on the front cover of this manual. Then, remove the Long Adjustment Knobs (27) from the Weight Rests. Make sure that the holes in use the the..., the Curl Post (13) or Lat Tower (not shown) must be inserted through the Weight Rests (6) and the Uprights (4, 5) and be stored in the Front Leg and the Curl Post. WARNING: The Long Adjustment Knobs (27) must be attached to the weight bench. Fully tighten the Adjustment Knobs into the...
English Manual
Page 14
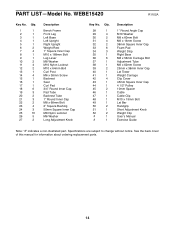
... x 19mm Bolt Lat Bar Handgrip Short Adjustment Knob Weight Clip User's Manual Exercise Guide Note: "#" indicates a non-illustrated part. See the back cover of this manual for information about ordering replacement parts. 14 WEBE15420 R1102A... Key No. Qty. 1 1 2 1 3 1 4 1 5 1 6 2 7 4 8 1 9 1 10 2 11 4 12 2 13 1 14 4 15 1 16 1 17 1 18 6 19 3 20 2 21 3 22 2 23 4 24 3 25 10 26 5 27 2 Description Bench Frame Front Leg Left Base Left Upright Right Upright Weight...
... x 19mm Bolt Lat Bar Handgrip Short Adjustment Knob Weight Clip User's Manual Exercise Guide Note: "#" indicates a non-illustrated part. See the back cover of this manual for information about ordering replacement parts. 14 WEBE15420 R1102A... Key No. Qty. 1 1 2 1 3 1 4 1 5 1 6 2 7 4 8 1 9 1 10 2 11 4 12 2 13 1 14 4 15 1 16 1 17 1 18 6 19 3 20 2 21 3 22 2 23 4 24 3 25 10 26 5 27 2 Description Bench Frame Front Leg Left Base Left Upright Right Upright Weight...

English Manual
Page 16
... to give the following information when calling: • The MODEL NUMBER of the product (WEBE15420) • The NAME of the product (WEIDER® 170 weight bench) • The SERIAL NUMBER of the product (see the PART LIST and the EXPLODED DRAWING on how long an implied warranty lasts. No... whatsoever nature. Some states do not allow limitations on pages 14 and 15 of this manual) • The KEY NUMBER and DESCRIPTION of the desired part(s) (see the front cover of this manual). All repairs for a particular purpose is authorized by or attributable to the original purchaser....
... to give the following information when calling: • The MODEL NUMBER of the product (WEBE15420) • The NAME of the product (WEIDER® 170 weight bench) • The SERIAL NUMBER of the product (see the PART LIST and the EXPLODED DRAWING on how long an implied warranty lasts. No... whatsoever nature. Some states do not allow limitations on pages 14 and 15 of this manual) • The KEY NUMBER and DESCRIPTION of the desired part(s) (see the front cover of this manual). All repairs for a particular purpose is authorized by or attributable to the original purchaser....


