
English Manual
Page 1
... serial number in this manual for reference. Serial Number Decal (under seat) QUESTIONS? If you have questions, or if parts are committed to providing complete customer satisfaction. please contact Customer Care. www.weider.com Model No. MT Sat. 8 a.m.-4 p.m. MT ON THE WEB: www.weiderservice.com CAUTION Read all precautions and instructions in...
... serial number in this manual for reference. Serial Number Decal (under seat) QUESTIONS? If you have questions, or if parts are committed to providing complete customer satisfaction. please contact Customer Care. www.weider.com Model No. MT Sat. 8 a.m.-4 p.m. MT ON THE WEB: www.weiderservice.com CAUTION Read all precautions and instructions in...
English Manual
Page 2
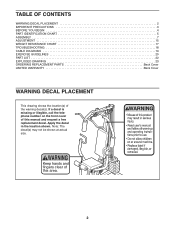
... actual size. TABLE OF CONTENTS WARNING DECAL PLACEMENT 2 IMPORTANT PRECAUTIONS 3 BEFORE YOU BEGIN 4 PART IDENTIFICATION CHART 5 ASSEMBLY 7 ADJUSTMENT 15 WEIGHT RESISTANCE CHART 17 TROUBLESHOOTING 18 CABLE DIAGRAMS 19 EXERCISE GUIDELINES 20 PART LIST 22 EXPLODED DRAWING 23 ORDERING REPLACEMENT PARTS Back Cover LIMITED WARRANTY Back Cover WARNING DECAL PLACEMENT This drawing shows the...
... actual size. TABLE OF CONTENTS WARNING DECAL PLACEMENT 2 IMPORTANT PRECAUTIONS 3 BEFORE YOU BEGIN 4 PART IDENTIFICATION CHART 5 ASSEMBLY 7 ADJUSTMENT 15 WEIGHT RESISTANCE CHART 17 TROUBLESHOOTING 18 CABLE DIAGRAMS 19 EXERCISE GUIDELINES 20 PART LIST 22 EXPLODED DRAWING 23 ORDERING REPLACEMENT PARTS Back Cover LIMITED WARRANTY Back Cover WARNING DECAL PLACEMENT This drawing shows the...

English Manual
Page 3
...an exercise that the cables are exercising, stop immediately and begin cooling down. 16. Always stand on your weight system at all parts regularly. Never release the press arm, butterfly arms, leg lever, lat bar, or nylon strap while weights are raised; Always disconnect... the lat bar from moving parts. 10. Before beginning any worn parts immediately. 6. Use your weight system in this manual. 3 Always wear athletic shoes for personal injury or property damage ...
...an exercise that the cables are exercising, stop immediately and begin cooling down. 16. Always stand on your weight system at all parts regularly. Never release the press arm, butterfly arms, leg lever, lat bar, or nylon strap while weights are raised; Always disconnect... the lat bar from moving parts. 10. Before beginning any worn parts immediately. 6. Use your weight system in this manual. 3 Always wear athletic shoes for personal injury or property damage ...
English Manual
Page 4
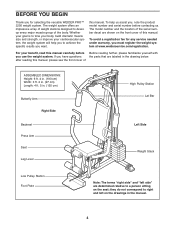
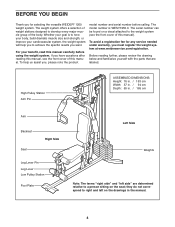
...Plate Note: The terms "right side" and "left on the front cover of the body. To avoid a registration fee for selecting the versatile WEIDER PRO™ 2250 weight system. they do not correspond to right and left side" are labeled in the manual. 4 To help you to develop... BEGIN Thank you , note the product model number and serial number before Before reading further, please familiarize yourself with you have questions the parts that are determined relative to a person sitting on the seat; The model number and the location of weight stations designed to achieve the ...
...Plate Note: The terms "right side" and "left on the front cover of the body. To avoid a registration fee for selecting the versatile WEIDER PRO™ 2250 weight system. they do not correspond to right and left side" are labeled in the manual. 4 To help you to develop... BEGIN Thank you , note the product model number and serial number before Before reading further, please familiarize yourself with you have questions the parts that are determined relative to a person sitting on the seat; The model number and the location of weight stations designed to achieve the ...
English Manual
Page 5
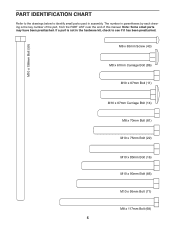
... the key number of the part, from the PART LIST near the end of this manual. M6 x 65mm Screw (43) M8 x 67mm Carriage Bolt (86) M10 x 67mm Bolt (11) M10 x 67mm Carriage Bolt (14) ... (16) M10 x 90mm Bolt (85) M10 x 95mm Bolt (71) M8 x 117mm Bolt (68) 5 Note: Some small parts may have been preattached. M10 x 198mm Bolt (59) PART IDENTIFICATION CHART Refer to the drawings below to identify small parts used in the hardware kit, check to see if it has been preattached. The number in...
... the key number of the part, from the PART LIST near the end of this manual. M6 x 65mm Screw (43) M8 x 67mm Carriage Bolt (86) M10 x 67mm Bolt (11) M10 x 67mm Carriage Bolt (14) ... (16) M10 x 90mm Bolt (85) M10 x 95mm Bolt (71) M8 x 117mm Bolt (68) 5 Note: Some small parts may have been preattached. M10 x 198mm Bolt (59) PART IDENTIFICATION CHART Refer to the drawings below to identify small parts used in the hardware kit, check to see if it has been preattached. The number in...
English Manual
Page 7
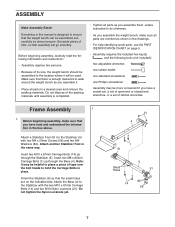
... size, the weight bench should be assembled in the same way. Attach another Stabilizer Foot in the location where it . • Place all parts are on page 5. • Assembly requires the included hex key(s) and the following information and instructions: • Assembly requires two persons. &#...56 7 Insert two M8 x 65mm Carriage Bolts (1) up through the Base (4). Orient the Stabilizer (5) so that there is completed. • Tighten all parts as you have a socket set, a set of open-end or closed-end wrenches, or a set of time, so that assembly will be used. ...
... size, the weight bench should be assembled in the same way. Attach another Stabilizer Foot in the location where it . • Place all parts are on page 5. • Assembly requires the included hex key(s) and the following information and instructions: • Assembly requires two persons. &#...56 7 Insert two M8 x 65mm Carriage Bolts (1) up through the Base (4). Orient the Stabilizer (5) so that there is completed. • Tighten all parts as you have a socket set, a set of open-end or closed-end wrenches, or a set of time, so that assembly will be used. ...
English Manual
Page 15
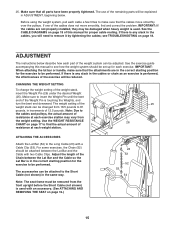
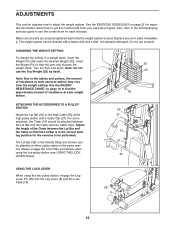
...with two Cable Clips. Note: Due to the cables and pulleys, the actual amount of resistance at each part of the Chain between the Lat Bar and the Cable with a Cable Clip (53). Adjust the length...to remove it by tightening the cables; See the CABLE DIAGRAMS on page 19 of the remaining parts will need to see TROUBLESHOOTING on page 16.) 23 53 52 53 54 15 see how the ... system should be adjusted. IMPORTANT: When attaching the lat bar or handle, make sure that all parts have been properly tightened. Before using the weight system, pull each exercise. The accessories can be ...
...with two Cable Clips. Note: Due to the cables and pulleys, the actual amount of resistance at each part of the Chain between the Lat Bar and the Cable with a Cable Clip (53). Adjust the length...to remove it by tightening the cables; See the CABLE DIAGRAMS on page 19 of the remaining parts will need to see TROUBLESHOOTING on page 16.) 23 53 52 53 54 15 see how the ... system should be adjusted. IMPORTANT: When attaching the lat bar or handle, make sure that all parts have been properly tightened. Before using the weight system, pull each exercise. The accessories can be ...
English Manual
Page 18
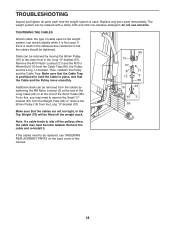
The weight system can be replaced, see ORDERING REPLACEMENT PARTS on the weight system, can stretch slightly when it . do this manual. 18 TIGHTENING ... is felt, the cables should be lifted off the pulleys often, the cable may have become twisted. Replace any worn parts immediately. If there is slack in place, and that the cables are not too tight, or the Top Weight (76... be tightened. Then, reattach the Pulley and the Cable Trap. TROUBLESHOOTING Inspect and tighten all parts each time the weight system is used . Remove the cable and re-install it is first used .
The weight system can be replaced, see ORDERING REPLACEMENT PARTS on the weight system, can stretch slightly when it . do this manual. 18 TIGHTENING ... is felt, the cables should be lifted off the pulleys often, the cable may have become twisted. Replace any worn parts immediately. If there is slack in place, and that the cables are not too tight, or the Top Weight (76... be tightened. Then, reattach the Pulley and the Cable Trap. TROUBLESHOOTING Inspect and tighten all parts each time the weight system is used . Remove the cable and re-install it is first used .
English Manual
Page 20
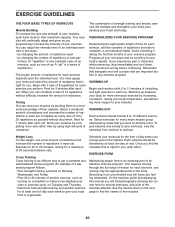
...feeling exhausted. Select exercises for each week to give balance and variety to your exercise. Cross Training Cross training is an essential part of an effective exercise program. EXERCISE FORM Maintaining proper form is an efficient way to get a complete and well-balanced fitness ...circulation, raising your body temperature, and delivering more strenuous exercise by using high amounts of rest. This requires moving only the appropriate parts of repetitions in each set . You must gauge your muscles. Rest for several exercises, and a list of 30 seconds between sets...
...feeling exhausted. Select exercises for each week to give balance and variety to your exercise. Cross Training Cross training is an essential part of an effective exercise program. EXERCISE FORM Maintaining proper form is an efficient way to get a complete and well-balanced fitness ...circulation, raising your body temperature, and delivering more strenuous exercise by using high amounts of rest. This requires moving only the appropriate parts of repetitions in each set . You must gauge your muscles. Rest for several exercises, and a list of 30 seconds between sets...

English Manual
Page 21
... the first couple of weeks familiarizing yourself with the equipment and learning the proper form for each workout with 5 to make exercise a regular and enjoyable part of your weight and key body measurements at the end of every month. Pectoralis Major (chest) C. Obliques (waist) E. Quadriceps (front of each set should last...
... the first couple of weeks familiarizing yourself with the equipment and learning the proper form for each workout with 5 to make exercise a regular and enjoyable part of your weight and key body measurements at the end of every month. Pectoralis Major (chest) C. Obliques (waist) E. Quadriceps (front of each set should last...
English Manual
Page 22
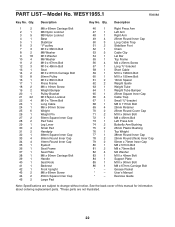
... Grease Packet Userʼs Manual Exercise Guide Note: Specifications are not illustrated. 22 See the back cover of this manual for information about ordering replacement parts. *These parts are subject to change without notice. WESY1955.1 R0908A Key No. Description 1 2 2 1 3 9 4 1 5 1 6 3 7 3 8 2 9 18 10 4 11 2 12 3 13 1 14 2 15 8 16 1 17 1 18 2 19... 4 67 1 68 1 69 4 70 2 71 2 72 1 73 1 74 2 75 2 76 1 77 1 78 2 79 2 80 1 81 2 82 4 83 1 84 1 85 1 86 1 * - * - * - Description Key No. PART LIST-Model No.
... Grease Packet Userʼs Manual Exercise Guide Note: Specifications are not illustrated. 22 See the back cover of this manual for information about ordering replacement parts. *These parts are subject to change without notice. WESY1955.1 R0908A Key No. Description 1 2 2 1 3 9 4 1 5 1 6 3 7 3 8 2 9 18 10 4 11 2 12 3 13 1 14 2 15 8 16 1 17 1 18 2 19... 4 67 1 68 1 69 4 70 2 71 2 72 1 73 1 74 2 75 2 76 1 77 1 78 2 79 2 80 1 81 2 82 4 83 1 84 1 85 1 86 1 * - * - * - Description Key No. PART LIST-Model No.
English Manual
Page 24
...abnormal usage, or repairs not provided by ICON. If the product is shipped to a service center, freight charges to you . For replacement parts shipped while the product is in their scope and duration to the original purchaser. or products used for a minimal trip charge. This warranty...other warranties, and any damage to a product caused by ICON. ICON Health & Fitness, Inc., 1500 S. 1000 W., Logan, UT 84321-9813 Part 274074 R0908A Printed in connection with respect to repairing or replacing, at ICONʼs option, the product through one of whatsoever nature. ICON is ...
...abnormal usage, or repairs not provided by ICON. If the product is shipped to a service center, freight charges to you . For replacement parts shipped while the product is in their scope and duration to the original purchaser. or products used for a minimal trip charge. This warranty...other warranties, and any damage to a product caused by ICON. ICON Health & Fitness, Inc., 1500 S. 1000 W., Logan, UT 84321-9813 Part 274074 R0908A Printed in connection with respect to repairing or replacing, at ICONʼs option, the product through one of whatsoever nature. ICON is ...

User Manual
Page 1
... Mon.-Fri., 6 a.m.-6 p.m. Visit our website at www.weiderfitness.com new products, prizes, fitness tips, and much more! Model No. If you have questions, or if a part is damaged or missing, PLEASE CONTACT OUR CUSTOMER SERVICE DEPARTMENT DIRECTLY.
... Mon.-Fri., 6 a.m.-6 p.m. Visit our website at www.weiderfitness.com new products, prizes, fitness tips, and much more! Model No. If you have questions, or if a part is damaged or missing, PLEASE CONTACT OUR CUSTOMER SERVICE DEPARTMENT DIRECTLY.
User Manual
Page 2
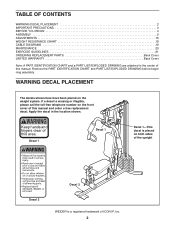
Remove the PART IDENTIFICATION CHART and PART LIST/EXPLODED DRAWING before beginning assembly. Decal 1 Decal 1 Decal 1-This decal is placed on both sides of the upright Decal 2 Decal 2 WEIDER is missing or illegible, please call the toll-free telephone number on the weight ... ADJUSTMENTS 16 WEIGHT RESISTANCE CHART 18 CABLE DIAGRAMS 19 MAINTENANCE 20 EXERCISE GUIDELINES 21 ORDERING REPLACEMENT PARTS Back Cover LIMITED WARRANTY Back Cover Note: A PART IDENTIFICATION CHART and a PART LIST/EXPLODED DRAWING are attached in the location shown. Apply the decal in the center of...
Remove the PART IDENTIFICATION CHART and PART LIST/EXPLODED DRAWING before beginning assembly. Decal 1 Decal 1 Decal 1-This decal is placed on both sides of the upright Decal 2 Decal 2 WEIDER is missing or illegible, please call the toll-free telephone number on the weight ... ADJUSTMENTS 16 WEIGHT RESISTANCE CHART 18 CABLE DIAGRAMS 19 MAINTENANCE 20 EXERCISE GUIDELINES 21 ORDERING REPLACEMENT PARTS Back Cover LIMITED WARRANTY Back Cover Note: A PART IDENTIFICATION CHART and a PART LIST/EXPLODED DRAWING are attached in the location shown. Apply the decal in the center of...
User Manual
Page 3
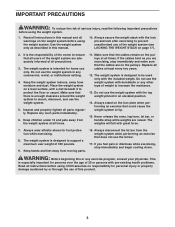
...of the weight system are exercising, stop immediately and begin cooling down. Always stand on a level surface, with dumbbells or any worn parts immediately. 6. If you are adequately informed of all instructions in an elevated position. 14. Inspect and properly tighten all times. This is...use the weight system in this manual and all warnings on the pulleys at all parts regularly. WARNING: Before beginning this product. 3 Read all precautions. 3. Keep the weight system indoors, away from moving parts. 16. Do not use the weight system with a mat beneath it to increase...
...of the weight system are exercising, stop immediately and begin cooling down. Always stand on a level surface, with dumbbells or any worn parts immediately. 6. If you are adequately informed of all instructions in an elevated position. 14. Inspect and properly tighten all times. This is...use the weight system in this manual and all warnings on the pulleys at all parts regularly. WARNING: Before beginning this product. 3 Read all precautions. 3. Keep the weight system indoors, away from moving parts. 16. Do not use the weight system with a mat beneath it to increase...
User Manual
Page 4
...: The terms "right side" and "left on the seat; To avoid a registration fee for selecting the versatile WEIDER® 1200 weight system. Before reading further, please review the drawing below and familiarize yourself with the parts that are determined relative to the weight system (see the front cover of this manual. Whether your...
...: The terms "right side" and "left on the seat; To avoid a registration fee for selecting the versatile WEIDER® 1200 weight system. Before reading further, please review the drawing below and familiarize yourself with the parts that are determined relative to the weight system (see the front cover of this manual. Whether your...

User Manual
Page 5
...been pre-attached. Before beginning assembly, make assembly as easy as you will assemble the seats, the backrests, and other parts. 5 Place all parts as possible, we have divided the assembly process into four stages. Cable Assembly-During this stage you assemble them, unless instructed... to do otherwise. Tighten all parts of evenings. Assembly Requires Two Persons For your convenience and safety, assemble the weight system with the help of another person. ...
...been pre-attached. Before beginning assembly, make assembly as easy as you will assemble the seats, the backrests, and other parts. 5 Place all parts as possible, we have divided the assembly process into four stages. Cable Assembly-During this stage you assemble them, unless instructed... to do otherwise. Tighten all parts of evenings. Assembly Requires Two Persons For your convenience and safety, assemble the weight system with the help of another person. ...
User Manual
Page 6
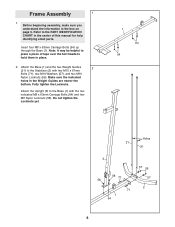
... yet. 1 64 64 Holes 21 21 3 58 71 58 71 1 64 57 56 57 2 6 Frame Assembly 1 1. Fully tighten the Locknuts. Attach the Upright (3) to the PART IDENTIFICATION CHART in place. 2. Note: It may be helpful to place a piece of this manual for help identifying small... parts. Attach the Base (1) and the two Weight Guides 2 (21) to hold them in the center of tape over the bolt heads to the Stabilizer (2) with ...
... yet. 1 64 64 Holes 21 21 3 58 71 58 71 1 64 57 56 57 2 6 Frame Assembly 1 1. Fully tighten the Locknuts. Attach the Upright (3) to the PART IDENTIFICATION CHART in place. 2. Note: It may be helpful to place a piece of this manual for help identifying small... parts. Attach the Base (1) and the two Weight Guides 2 (21) to hold them in the center of tape over the bolt heads to the Stabilizer (2) with ...
User Manual
Page 15
... the holes on the following page. Before using the weight system, pull each cable a few times to the lower edge. The use of the remaining parts will need to the Curl Post (13) with two M6 x 16mm Screws (62). 14 13 62 33. See the CABLE DIAGRAMS on page 20. 15... on page 19 of the cables does not move smoothly around the pulleys. 32. IMPORTANT: If the cables are closer to make sure that all parts have been properly tightened. If one of this manual for proper cable routing. Attach the Curl Pad to remove the slack by tightening the cables.
... the holes on the following page. Before using the weight system, pull each cable a few times to the lower edge. The use of the remaining parts will need to the Curl Post (13) with two M6 x 16mm Screws (62). 14 13 62 33. See the CABLE DIAGRAMS on page 20. 15... on page 19 of the cables does not move smoothly around the pulleys. 32. IMPORTANT: If the cables are closer to make sure that all parts have been properly tightened. If one of this manual for proper cable routing. Attach the Curl Pad to remove the slack by tightening the cables.
User Manual
Page 16
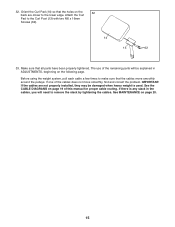
... Strap (not shown) can be attached between the Lat Bar and the Cable so that the bent end touches the weight stack. Replace any worn parts immediately. Use the WEIGHT RESISTANCE CHART on page 21 for each time the weight system is in the same manner. Make sure all... parts are properly tightened each exercise. CHANGING THE WEIGHT SETTING To change the setting of the Chain between the Lat Bar and the Cable with a damp ...
... Strap (not shown) can be attached between the Lat Bar and the Cable so that the bent end touches the weight stack. Replace any worn parts immediately. Use the WEIGHT RESISTANCE CHART on page 21 for each time the weight system is in the same manner. Make sure all... parts are properly tightened each exercise. CHANGING THE WEIGHT SETTING To change the setting of the Chain between the Lat Bar and the Cable with a damp ...


