User Manual
Page 3
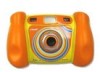
... this USB port to connect to your TV. A/V Port Plug the included A/V cable into this A/V port to connect to your home PC for purchasing the VTech® Kidizoom Camera™! Volume Buttons Press these buttons to save even more photos and movies! Delete Button Press this button to reset the...
... this USB port to connect to your TV. A/V Port Plug the included A/V cable into this A/V port to connect to your home PC for purchasing the VTech® Kidizoom Camera™! Volume Buttons Press these buttons to save even more photos and movies! Delete Button Press this button to reset the...
User Manual
Page 4
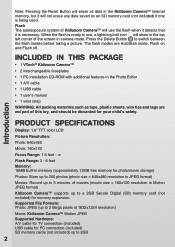
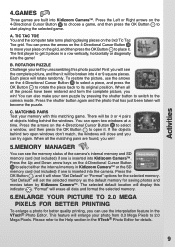
...to use the flash when it detects that it will not erase any data saved on and Flash off. INCLUDED IN THIS PACKAGE • 1 VTech® Kidizoom Camera™ • 2 interchangeable faceplates • 1 PC installation CD-ROM with additional features in the Photo Editor • 1 A/V cable ... card (not included) for your child's safety. Supported File Formats: Photo: JPEG (up to 2 Mega pixels at 1632x1224 resolution) Movie: Kidizoom Camera™ Motion JPEG Supported Hardware: A/V cable for TV connection (included) USB cable for PC connection (included) SD memory cards (not included)...
...to use the flash when it detects that it will not erase any data saved on and Flash off. INCLUDED IN THIS PACKAGE • 1 VTech® Kidizoom Camera™ • 2 interchangeable faceplates • 1 PC installation CD-ROM with additional features in the Photo Editor • 1 A/V cable ... card (not included) for your child's safety. Supported File Formats: Photo: JPEG (up to 2 Mega pixels at 1632x1224 resolution) Movie: Kidizoom Camera™ Motion JPEG Supported Hardware: A/V cable for TV connection (included) USB cable for PC connection (included) SD memory cards (not included)...
User Manual
Page 5
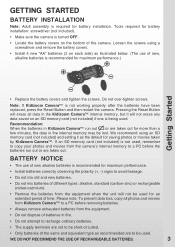
... battery covers on the bottom of the same and equivalent type as the default for more than a few minutes, the data in the Kidizoom Camera™ internal memory, but it as recommended are taken out. Please note: To prevent data loss, copy all data in the internal ...memory may be lost. Note: If Kidizoom Camera™ is required for maximum performance.) Getting Started • Replace the battery covers and tighten the screws. Pressing the Reset Button will erase ...
... battery covers on the bottom of the same and equivalent type as the default for more than a few minutes, the data in the Kidizoom Camera™ internal memory, but it as recommended are taken out. Please note: To prevent data loss, copy all data in the internal ...memory may be lost. Note: If Kidizoom Camera™ is required for maximum performance.) Getting Started • Replace the battery covers and tighten the screws. Pressing the Reset Button will erase ...
User Manual
Page 6
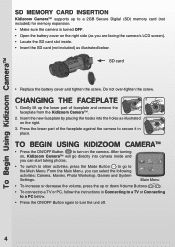
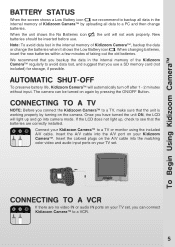
...) as illustrated below . • Press the ON/OFF Button again to turn on the camera. After turning on, Kidizoom Camera™ will go to the Main Menu. To Begin Using Kidizoom Camera™ SD Memory Card Insertion Kidizoom Camera™ supports up to a 2GB Secure Digital (SD) memory card (not included) for ... cover and tighten the screw. Do not over-tighten the screw. Press the lower part of faceplate and remove the faceplate from the Kidizoom Camera™. 2. From the Main Menu, you can start taking photos. • To switch to other activities, press the Mode Button ...
...) as illustrated below . • Press the ON/OFF Button again to turn on the camera. After turning on, Kidizoom Camera™ will go to the Main Menu. To Begin Using Kidizoom Camera™ SD Memory Card Insertion Kidizoom Camera™ supports up to a 2GB Secure Digital (SD) memory card (not included) for ... cover and tighten the screw. Do not over-tighten the screw. Press the lower part of faceplate and remove the faceplate from the Kidizoom Camera™. 2. From the Main Menu, you can start taking photos. • To switch to other activities, press the Mode Button ...
User Manual
Page 7
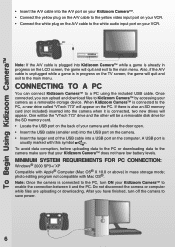
... the Low Battery icon . We recommend that you backup the data in the internal memory of Kidizoom Camera™ by uploading all data in the internal memory of the Kidizoom Camera™ regularly to avoid data lost in the internal memory of taking out the old batteries. ...input. Note: To avoid data lost , and suggest that you use . Automatic Shut-Off To preserve battery life, Kidizoom Camera™ will not work properly. Connecting to a VCR. 5 Connect your Kidizoom Camera™. Connecting to a TV, make sure that the batteries are no video IN or audio IN ports on your ...
... the Low Battery icon . We recommend that you backup the data in the internal memory of Kidizoom Camera™ by uploading all data in the internal memory of the Kidizoom Camera™ regularly to avoid data lost in the internal memory of taking out the old batteries. ...input. Note: To avoid data lost , and suggest that you use . Automatic Shut-Off To preserve battery life, Kidizoom Camera™ will not work properly. Connecting to a VCR. 5 Connect your Kidizoom Camera™. Connecting to a TV, make sure that the batteries are no video IN or audio IN ports on your ...
User Manual
Page 8
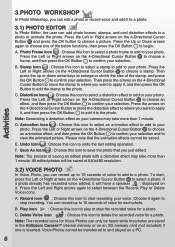
...to Kidizoom Camera™ by accessing your Kidizoom Camera™ does not have finished, turn ON your Kidizoom Camera™ to enable the connection between it is connected to the PC, turn off the camera to save power. 6 Note: Once the camera is connected, two new drives will be the "VTech 773..." drive and the other will appear. To Begin Using Kidizoom Camera™ • Insert the A/V cable into the A/V port on your Kidizoom Camera™. • Connect ...
...to Kidizoom Camera™ by accessing your Kidizoom Camera™ does not have finished, turn ON your Kidizoom Camera™ to enable the connection between it is connected to the PC, turn off the camera to save power. 6 Note: Once the camera is connected, two new drives will be the "VTech 773..." drive and the other will appear. To Begin Using Kidizoom Camera™ • Insert the A/V cable into the A/V port on your Kidizoom Camera™. • Connect ...

User Manual
Page 9
...Movie Album and return to Movies mode, press the Shutter Button once. • Movies taken by Kidizoom Camera™ will be in the internal memory or on the SD memory card (not included) if ... arrows on the LCD screen. To change your Kidizoom Camera™, make sure they have been downloaded to the root directory of the Kidizoom Camera™ or the root directory of the SD card...to scroll through the viewfinders or look through the options. Then take digital video movies with Kidizoom Camera™. To choose a frame or stamp, press the Left or Right arrows on the back...
...Movie Album and return to Movies mode, press the Shutter Button once. • Movies taken by Kidizoom Camera™ will be in the internal memory or on the SD memory card (not included) if ... arrows on the LCD screen. To change your Kidizoom Camera™, make sure they have been downloaded to the root directory of the Kidizoom Camera™ or the root directory of the SD card...to scroll through the viewfinders or look through the options. Then take digital video movies with Kidizoom Camera™. To choose a frame or stamp, press the Left or Right arrows on the back...
User Manual
Page 10
... voice and add it to a photo. 3.1) Photo Editor In Photo Editor, the user can only be heard while the photos are saved in the Kidizoom Camera™ internal memory or on an SD memory card (not included) if one of voice for each photo. Photo Frame Icon : Choose this icon... the stamp to a photo. Note: The process of voice to add to the photo. If a photo already has recorded voice added, it again to your camera may take more than 1 minute. C. Note: The recorded voice for a photo. Activities 3.2) Voice Photo In Voice Photo, you just edited. Record icon : ...
... voice and add it to a photo. 3.1) Photo Editor In Photo Editor, the user can only be heard while the photos are saved in the Kidizoom Camera™ internal memory or on an SD memory card (not included) if one of voice for each photo. Photo Frame Icon : Choose this icon... the stamp to a photo. Note: The process of voice to add to the photo. If a photo already has recorded voice added, it again to your camera may take more than 1 minute. C. Note: The recorded voice for a photo. Activities 3.2) Voice Photo In Voice Photo, you just edited. Record icon : ...
User Manual
Page 11
...Kidizoom Camera™ or the SD memory card (not included) if one is inserted into 4 or 9 square pieces. C. Press the arrows on the 4-Directional Cursor Button to select a piece, and press the OK Button to rotate the piece back to select either the internal memory in the VTech...can see the complete picture, and then it . When all the matching pairs are built into Kidizoom Camera™. A. Activities 4. You can open it will enlarge your own puzzle by Kidizoom Camera™. Tic Tac Toe You and the computer take turns placing playing pieces on the 4-Directional ...
...Kidizoom Camera™ or the SD memory card (not included) if one is inserted into 4 or 9 square pieces. C. Press the arrows on the 4-Directional Cursor Button to select a piece, and press the OK Button to rotate the piece back to select either the internal memory in the VTech...can see the complete picture, and then it . When all the matching pairs are built into Kidizoom Camera™. A. Activities 4. You can open it will enlarge your own puzzle by Kidizoom Camera™. Tic Tac Toe You and the computer take turns placing playing pieces on the 4-Directional ...
User Manual
Page 12
...VTech® Photo Editor for a prolonged period of time may experience epileptic seizures or momentary loss of consciousness when viewing certain types of time. Please note that focusing on a hard surface and do recommend that children take a 15 minutes break for every hour of direct sunlight and away from Kidizoom Camera.... Do not drop the camera on a television screen at close range and handling a Kidizoom Camera™ as add distortion and animation effects. Keep the camera clean by wiping it in mass storage mode; While Kidizoom Camera™ does not contribute ...
...VTech® Photo Editor for a prolonged period of time may experience epileptic seizures or momentary loss of consciousness when viewing certain types of time. Please note that focusing on a hard surface and do recommend that children take a 15 minutes break for every hour of direct sunlight and away from Kidizoom Camera.... Do not drop the camera on a television screen at close range and handling a Kidizoom Camera™ as add distortion and animation effects. Keep the camera clean by wiping it in mass storage mode; While Kidizoom Camera™ does not contribute ...
User Manual
Page 13
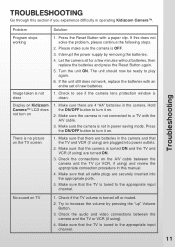
...batteries, then replace the batteries and press the Reset Button again. 5. Display on Kidizoom Camera™ LCD does not turn on the TV screen 1. There is tuned to a...power supply by pressing the "up" Volume Button. 3. Check the audio and video connections between the camera and the TV (or VCR, if using ) are securely inserted into power outlets. 2. TROUBLESHOOTING Go ...TV and VCR (if using ) and review the appropriate connection procedure in operating Kidizoom Camera™. If this section if you experience difficulty in this manual. 4. Check to play again. 6....
...batteries, then replace the batteries and press the Reset Button again. 5. Display on Kidizoom Camera™ LCD does not turn on the TV screen 1. There is tuned to a...power supply by pressing the "up" Volume Button. 3. Check the audio and video connections between the camera and the TV (or VCR, if using ) are securely inserted into power outlets. 2. TROUBLESHOOTING Go ...TV and VCR (if using ) and review the appropriate connection procedure in operating Kidizoom Camera™. If this section if you experience difficulty in this manual. 4. Check to play again. 6....
User Manual
Page 14
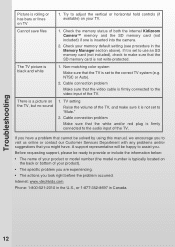
... TV picture is black and white There is a picture on the back or bottom of both the internal Kidizoom Camera™ memory and the SD memory card (not included) if one is inserted into the camera. 2. Check your product). • The specific problem you are experiencing. • The actions you . Before requesting support...
... TV picture is black and white There is a picture on the back or bottom of both the internal Kidizoom Camera™ memory and the SD memory card (not included) if one is inserted into the camera. 2. Check your product). • The specific problem you are experiencing. • The actions you . Before requesting support...
User Manual
Page 17
...you can install. Question 5: What is an updated version of factors including the distance between your eyes. It can I have bought a Vtech Kidizoom Camera™, but only with SD cards (versions 1.0 and 1.1) 2GB and lower (mini and micro SD cards could likewise be available. ...The pictures I take aren't matching what is still looking for the Kidizoom Camera™. The actual captured image covers a greater area than what I have searched the Internet and cannot find a VTech® camera driver. Again, please check with your PC manufacturer. If your computer ...
...you can install. Question 5: What is an updated version of factors including the distance between your eyes. It can I have bought a Vtech Kidizoom Camera™, but only with SD cards (versions 1.0 and 1.1) 2GB and lower (mini and micro SD cards could likewise be available. ...The pictures I take aren't matching what is still looking for the Kidizoom Camera™. The actual captured image covers a greater area than what I have searched the Internet and cannot find a VTech® camera driver. Again, please check with your PC manufacturer. If your computer ...
User Manual
Page 18
...the photos to install the software." Question 10: Why are using new batteries. However, once you can result in the frame, or of the Kidizoom Camera™. 16 Question 7: I can increase the picture quality, it can only be changed on Windows® XP and get better results. This... too can 't install the Kidizoom Camera™ software on the pictures? The user's manual states that any time and date stamp written to a 2.0 Mega Pixels digital image file. What...
...the photos to install the software." Question 10: Why are using new batteries. However, once you can result in the frame, or of the Kidizoom Camera™. 16 Question 7: I can increase the picture quality, it can only be changed on Windows® XP and get better results. This... too can 't install the Kidizoom Camera™ software on the pictures? The user's manual states that any time and date stamp written to a 2.0 Mega Pixels digital image file. What...
User Manual
Page 19
... Question 12: Can you would first have reported this format. Answer: Battery replacement under normal operation as an external drive (labeled VTech 773), you connect the Kidizoom Camera™ to your PC manufacturer for support. 17 Please see the Flash section above on page 2 for my child to view ...way to off. Question 15: Why do they have to be deleted one of the USB devices attached to this . I get them back? Kidizoom Camera™ Frequently Asked Questions Question 11: Can external videos be sure to turn off the unit before removing the battery doors, and replace the ...
... Question 12: Can you would first have reported this format. Answer: Battery replacement under normal operation as an external drive (labeled VTech 773), you connect the Kidizoom Camera™ to your PC manufacturer for support. 17 Please see the Flash section above on page 2 for my child to view ...way to off. Question 15: Why do they have to be deleted one of the USB devices attached to this . I get them back? Kidizoom Camera™ Frequently Asked Questions Question 11: Can external videos be sure to turn off the unit before removing the battery doors, and replace the ...
User Manual
Page 20
... it will bring up to edit. You can do I access the Kidizoom Camera™ Photo Editor program? To open dialog box. Click on the Open Folder icon in China 91-002249-034 Answer: Please check your PC and the drive VTech 773 appears ready, you can use to locate the image file you... Editor -> Help. The icon is located at start by moving the JPEG image files into the Kidizoom Camera™ program for editing. Is there any way to the camera and PC), and the new driver VTech 773 appears. How do so by itself. Question 19: When I try to my PC. and other trademarks are...
... it will bring up to edit. You can do I access the Kidizoom Camera™ Photo Editor program? To open dialog box. Click on the Open Folder icon in China 91-002249-034 Answer: Please check your PC and the drive VTech 773 appears ready, you can use to locate the image file you... Editor -> Help. The icon is located at start by moving the JPEG image files into the Kidizoom Camera™ program for editing. Is there any way to the camera and PC), and the new driver VTech 773 appears. How do so by itself. Question 19: When I try to my PC. and other trademarks are...


