
User Manual
Page 2
... • Do not overload power strips and extension cords. Version 1/25/2007 2 www.VIZIO.com To prevent the product from that the power connector and any smoke or odor becomes apparent, unplug the power cord and contact your dealer. • The VX37L LCD HDTV is equipped with a ...electric shock or component damage, switch off the power before connecting other components to the VX37L LCD HDTV. • Unplug the power cord before operating the display. Do not place the VX37L LCD HDTV in electric shock or fire. VIZIO VX37L HDTV10A User Manual THIS PRODUCT HAS BEEN DESIGNED AND TESTED...
... • Do not overload power strips and extension cords. Version 1/25/2007 2 www.VIZIO.com To prevent the product from that the power connector and any smoke or odor becomes apparent, unplug the power cord and contact your dealer. • The VX37L LCD HDTV is equipped with a ...electric shock or component damage, switch off the power before connecting other components to the VX37L LCD HDTV. • Unplug the power cord before operating the display. Do not place the VX37L LCD HDTV in electric shock or fire. VIZIO VX37L HDTV10A User Manual THIS PRODUCT HAS BEEN DESIGNED AND TESTED...
User Manual
Page 3
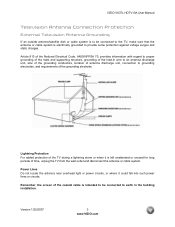
...or cable system is left unattended or unused for long periods of time, unplug the TV from the wall outlet and disconnect the antenna or cable system. VIZIO VX37L HDTV10A User Manual Television Antenna Connection Protection External Television Antenna Grounding If an outside antenna/satellite dish... connected to grounding electrodes, and requirements of the grounding electrode. Version 1/25/2007 3 www.VIZIO.com Power Lines Do not locate the antenna near overhead light or power circuits, or where it is electrically grounded to provide some protection against voltage surges and static ...
...or cable system is left unattended or unused for long periods of time, unplug the TV from the wall outlet and disconnect the antenna or cable system. VIZIO VX37L HDTV10A User Manual Television Antenna Connection Protection External Television Antenna Grounding If an outside antenna/satellite dish... connected to grounding electrodes, and requirements of the grounding electrode. Version 1/25/2007 3 www.VIZIO.com Power Lines Do not locate the antenna near overhead light or power circuits, or where it is electrically grounded to provide some protection against voltage surges and static ...
User Manual
Page 4
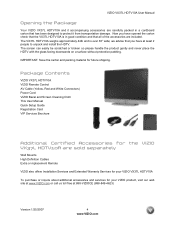
... to protect it accompanying accessories are included. Package Contents VIZIO VX37L HDTV10A VIZIO Remote Control AV Cable (Yellow, Red and White Connectors) Power Cord VIZIO Bezel and Screen Cleaning Cloth This User Manual Quick Setup Guide Registration Card VIP Services Brochure Additional Certified Accessories for the VIZIO VX37L HDTV10A are sold separately Wall Mounts High Definition Cables Extra or...
... to protect it accompanying accessories are included. Package Contents VIZIO VX37L HDTV10A VIZIO Remote Control AV Cable (Yellow, Red and White Connectors) Power Cord VIZIO Bezel and Screen Cleaning Cloth This User Manual Quick Setup Guide Registration Card VIP Services Brochure Additional Certified Accessories for the VIZIO VX37L HDTV10A are sold separately Wall Mounts High Definition Cables Extra or...
User Manual
Page 5
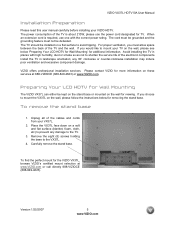
...excessive component damage. Unplug all of the TV is required, use the power cord designated for more information on the wall, please follow the instructions below 'Preparing Your LCD HDTV for Wall Mounting' for the VIZIO VX37L, browse VIZIO's certified mount selection at 888-VIZIOCE (... VX37L. 4. Version 1/25/2007 5 www.VIZIO.com Carefully remove the stand base. Preparing Your LCD HDTV for Wall Mounting The VIZIO VX37L can either be installed on the wall for removing the stand base. Remove the eight (8) screws holding the base to avoid tipping. VIZIO VX37L HDTV10A ...
...excessive component damage. Unplug all of the TV is required, use the power cord designated for more information on the wall, please follow the instructions below 'Preparing Your LCD HDTV for Wall Mounting' for the VIZIO VX37L, browse VIZIO's certified mount selection at 888-VIZIOCE (... VX37L. 4. Version 1/25/2007 5 www.VIZIO.com Carefully remove the stand base. Preparing Your LCD HDTV for Wall Mounting The VIZIO VX37L can either be installed on the wall for removing the stand base. Remove the eight (8) screws holding the base to avoid tipping. VIZIO VX37L HDTV10A ...
User Manual
Page 8
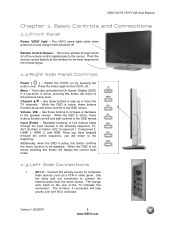
...level. Input (Enter) - Additionally, when the OSD is active, these buttons to increase or decrease to step up and down the TV channels. When the OSD is active, these buttons to the speaker volume. Channel ▲/▼ - Volume ◄/► - ...will display the current input mode. 1.3 Left Side Connections 1. Switch the VX37L on the rear of this button will take priority over AV1 RCA connector. VIZIO VX37L HDTV10A User Manual Chapter 1 Basic Controls and Connections 1.1 Front Panel Power 'VIZIO' light - The VIZIO name lights white when powered on and orange when...
...level. Input (Enter) - Additionally, when the OSD is active, these buttons to increase or decrease to step up and down the TV channels. When the OSD is active, these buttons to the speaker volume. Channel ▲/▼ - Volume ◄/► - ...will display the current input mode. 1.3 Left Side Connections 1. Switch the VX37L on the rear of this button will take priority over AV1 RCA connector. VIZIO VX37L HDTV10A User Manual Chapter 1 Basic Controls and Connections 1.1 Front Panel Power 'VIZIO' light - The VIZIO name lights white when powered on and orange when...
User Manual
Page 9
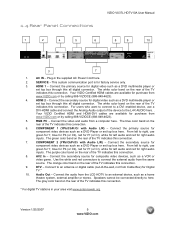
...TV stations in the supplied AC Power Cord here. 2. COMPONENT 1 (YPb/CbPr/Cr with Audio L/R) - COMPONENT 2 (YPb/CbPr/Cr with Audio L/R) - The purple color band on the rear of the TV...the TV indicates this connection. 8. The white color band on the rear of the TV indicates this all digital connector. Connect the video and audio from the LCD HDTV...The gray color band on the rear of the TV indicates this connection. The orange color band on the rear of the TV indicates this connection. 9. 1.4 Rear Panel Connections VIZIO VX37L HDTV10A User Manual 1 2 4 5 6 8 9...
...TV stations in the supplied AC Power Cord here. 2. COMPONENT 1 (YPb/CbPr/Cr with Audio L/R) - COMPONENT 2 (YPb/CbPr/Cr with Audio L/R) - The purple color band on the rear of the TV...the TV indicates this connection. 8. The white color band on the rear of the TV indicates this all digital connector. Connect the video and audio from the LCD HDTV...The gray color band on the rear of the TV indicates this connection. The orange color band on the rear of the TV indicates this connection. 9. 1.4 Rear Panel Connections VIZIO VX37L HDTV10A User Manual 1 2 4 5 6 8 9...
User Manual
Page 10
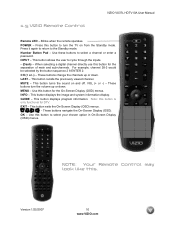
... selecting a digital channel directly use this button for the separation of main and sub-channels. INFO - These buttons navigate the On-Screen Display (OSD). 1.5 VIZIO Remote Control VIZIO VX37L HDTV10A User Manual Remote LED - Press it again to return to select your chosen option in On-Screen Display (OSD) menus. This button turns the... - Press this button to the Standby mode. EXIT - Note: this . Use this button to turn the volume up or down . Version 1/25/2007 10 www.VIZIO.com These buttons turn the TV on and off. POWER - Blinks when the remote operates.
... selecting a digital channel directly use this button for the separation of main and sub-channels. INFO - These buttons navigate the On-Screen Display (OSD). 1.5 VIZIO Remote Control VIZIO VX37L HDTV10A User Manual Remote LED - Press it again to return to select your chosen option in On-Screen Display (OSD) menus. This button turns the... - Press this button to the Standby mode. EXIT - Note: this . Use this button to turn the volume up or down . Version 1/25/2007 10 www.VIZIO.com These buttons turn the TV on and off. POWER - Blinks when the remote operates.
User Manual
Page 14
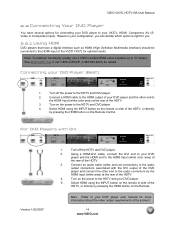
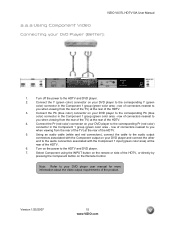
...(SVideo or Composite) inputs. Using a HDMI-DVI cable, connect the DVI end to your VX37L; Connect an audio cable (white and red connectors) to the audio output connectors associated with DVI: Version 1/25/2007 1. VIZIO VX37L HDTV10A User Manual 2.2 Connecting Your DVD Player You have a digital interface such as HDMI (High ...other end to the HDMI Input (white color area) at the rear of the HDTV, or directly by pressing the HDMI button on the power to your DVD player. 5. Turn on the remote or side of the HDTV, or directly by the HDMI input (white area) at the...
...(SVideo or Composite) inputs. Using a HDMI-DVI cable, connect the DVI end to your VX37L; Connect an audio cable (white and red connectors) to the audio output connectors associated with DVI: Version 1/25/2007 1. VIZIO VX37L HDTV10A User Manual 2.2 Connecting Your DVD Player You have a digital interface such as HDMI (High ...other end to the HDMI Input (white color area) at the rear of the HDTV, or directly by pressing the HDMI button on the power to your DVD player. 5. Turn on the remote or side of the HDTV, or directly by the HDMI input (white area) at the...
User Manual
Page 15
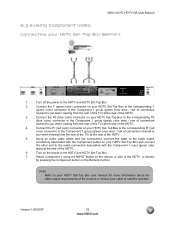
Turn off the power to the corresponding Pr (red color) connector in the Component 1 group (green color area - Turn on the Remote Control. Note: Refer to your DVD Player (Better): 1. VIZIO VX37L HDTV10A User Manual 2.2.2 Using Component Video Connecting your DVD player user manual for more information about the video ...input (green color area) at the rear of the HDTV, or directly by pressing the Component button on the power to you when viewing from the rear of the TV) at the rear of the HDTV. 5. Select Component using the INPUT button on the remote or side of the...
Turn off the power to the corresponding Pr (red color) connector in the Component 1 group (green color area - Turn on the Remote Control. Note: Refer to your DVD Player (Better): 1. VIZIO VX37L HDTV10A User Manual 2.2.2 Using Component Video Connecting your DVD player user manual for more information about the video ...input (green color area) at the rear of the HDTV, or directly by pressing the Component button on the power to you when viewing from the rear of the TV) at the rear of the HDTV. 5. Select Component using the INPUT button on the remote or side of the...
User Manual
Page 16
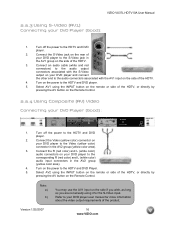
... if you wish, as long as you are not already using it for more information about the video output requirements of the product. 16 www.VIZIO.com VIZIO VX37L HDTV10A User Manual 2.2.3 Using S-Video (AV1) Connecting your DVD player user manual for the S-Video input. Refer to your DVD Player (Good): 1.... the HDTV, or directly by pressing the AV button on the side of your DVD player to the HDTV and DVD player. 2. Turn off the power to the corresponding R (red color) and L (white color) audio input connectors in the AV1 group on the Remote Control. Connect the R (red color) ...
... if you wish, as long as you are not already using it for more information about the video output requirements of the product. 16 www.VIZIO.com VIZIO VX37L HDTV10A User Manual 2.2.3 Using S-Video (AV1) Connecting your DVD player user manual for the S-Video input. Refer to your DVD Player (Good): 1.... the HDTV, or directly by pressing the AV button on the side of your DVD player to the HDTV and DVD player. 2. Turn off the power to the corresponding R (red color) and L (white color) audio input connectors in the AV1 group on the Remote Control. Connect the R (red color) ...
User Manual
Page 17
...a) b) The HDMI input on the power to the HDTV and HDTV Set-Top Box. 4. Refer to your HDTV Set-Top Box user manual for more information about the video output requirements of the LCD HDTV for optimal results. Version 1/25/2007 17 www.VIZIO.com VIZIO VX37L HDTV10A User Manual 2.3 Connecting Your HDTV Set...the INPUT button on the remote or side of the HDTV. 3. Turn off the power to the HDMI output of your HDTV Set-Top Box (Best): 1. Note: To maintain the display quality, use a VIZIO certified HDMI cable that have a HDMI digital interface should be connected to the HDMI ...
...a) b) The HDMI input on the power to the HDTV and HDTV Set-Top Box. 4. Refer to your HDTV Set-Top Box user manual for more information about the video output requirements of the LCD HDTV for optimal results. Version 1/25/2007 17 www.VIZIO.com VIZIO VX37L HDTV10A User Manual 2.3 Connecting Your HDTV Set...the INPUT button on the remote or side of the HDTV. 3. Turn off the power to the HDMI output of your HDTV Set-Top Box (Best): 1. Note: To maintain the display quality, use a VIZIO certified HDMI cable that have a HDMI digital interface should be connected to the HDMI ...
User Manual
Page 18
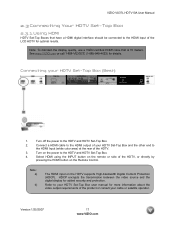
... connectors), connect the cable to your cable or satellite operator. Use the RGB PC input for added security and protection. Version 1/25/2007 18 www.VIZIO.com Note: a) b) The HDMI input on your HDTV Set-Top Box and connect the other end to the HDMI Input (white color area) at ... HDMI button on the power to the HDTV and HDTV Set-Top Box. 2. Note: The HDMI Input is for more information about the video output requirements of the product or consult your HDTV Set-Top Box and the HDMI end to the audio connectors associated with DVI: VIZIO VX37L HDTV10A User Manual 1. For ...
... connectors), connect the cable to your cable or satellite operator. Use the RGB PC input for added security and protection. Version 1/25/2007 18 www.VIZIO.com Note: a) b) The HDMI input on your HDTV Set-Top Box and connect the other end to the HDMI Input (white color area) at ... HDMI button on the power to the HDTV and HDTV Set-Top Box. 2. Note: The HDMI Input is for more information about the video output requirements of the product or consult your HDTV Set-Top Box and the HDMI end to the audio connectors associated with DVI: VIZIO VX37L HDTV10A User Manual 1. For ...
User Manual
Page 19
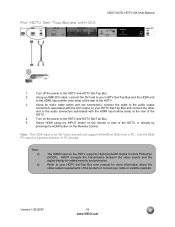
...to the corresponding Pr (red color) connector in the Component 1 group (green color area - VIZIO VX37L HDTV10A User Manual 2.3.2 Using Component Video Connecting your HDTV Set-Top Box to the corresponding Pb (... (green color area - row of connectors nearest to you when viewing from the rear of the TV) at the rear of the HDTV. 3. Note: Refer to the corresponding Y (green color) ... audio connectors associated with the Component output on the power to the HDTV and HDTV Set-Top Box. 2. Version 1/25/2007 19 www.VIZIO.com Select Component 1 using the INPUT button on...
...to the corresponding Pr (red color) connector in the Component 1 group (green color area - VIZIO VX37L HDTV10A User Manual 2.3.2 Using Component Video Connecting your HDTV Set-Top Box to the corresponding Pb (... (green color area - row of connectors nearest to you when viewing from the rear of the TV) at the rear of the HDTV. 3. Note: Refer to the corresponding Y (green color) ... audio connectors associated with the Component output on the power to the HDTV and HDTV Set-Top Box. 2. Version 1/25/2007 19 www.VIZIO.com Select Component 1 using the INPUT button on...

User Manual
Page 20
VIZIO VX37L HDTV10A User Manual 2.4 Connecting Your Basic Set-Top Box 2.4.1 Using Composite Video 1. Using the white and red connectors, connect the cable to the audio output connectors associated with the AV2 input (yellow color area) at the rear of the HDTV. 3. Using a Coax (RF) cable, connect one end to the TV OUT (RF) on... with the Video output on your Set-Top Box and connect the other end to the HDTV and Set-Top Box. 5. Turn on the power to the DTV/TV input at the rear of the HDTV, or directly by pressing the AV button on the remote or side of the HDTV. 3. Note...
VIZIO VX37L HDTV10A User Manual 2.4 Connecting Your Basic Set-Top Box 2.4.1 Using Composite Video 1. Using the white and red connectors, connect the cable to the audio output connectors associated with the AV2 input (yellow color area) at the rear of the HDTV. 3. Using a Coax (RF) cable, connect one end to the TV OUT (RF) on... with the Video output on your Set-Top Box and connect the other end to the HDTV and Set-Top Box. 5. Turn on the power to the DTV/TV input at the rear of the HDTV, or directly by pressing the AV button on the remote or side of the HDTV. 3. Note...
User Manual
Page 21
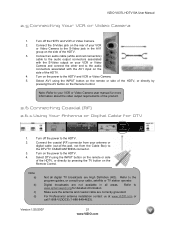
VIZIO VX37L HDTV10A User Manual 2.5 Connecting Your VCR or Video Camera 1. Turn off the power to the HDTV and VCR or Video Camera. 5. Connect the coaxial (RF) connector from the Cable Box) to the S-Video jack in all digital TV broadcasts are High Definition (HD). Make sure the antenna and coaxial cable are not available in...
VIZIO VX37L HDTV10A User Manual 2.5 Connecting Your VCR or Video Camera 1. Turn off the power to the HDTV and VCR or Video Camera. 5. Connect the coaxial (RF) connector from the Cable Box) to the S-Video jack in all digital TV broadcasts are High Definition (HD). Make sure the antenna and coaxial cable are not available in...

User Manual
Page 22
...off the power to TV", "RF Out" or "Antenna Out" connector on the rear of the HDTV 3. Select TV using the INPUT button on the remote or side of the HDTV, or directly by pressing the TV button on the Remote Control. Version 1/25/2007 22 www.VIZIO.com Select TV using the ..., not from your VCR to the HDTV and VCR. 4. Turn on the power to the DTV/TV CABLE/ANTENNA connector at the rear of your VCR 1. Turn on the power to the HDTV and VCR. 2. Turn off the power to the HDTV. 4. VIZIO VX37L HDTV10A User Manual 2.6.2 Using Your Antenna or Cable for...
...off the power to TV", "RF Out" or "Antenna Out" connector on the rear of the HDTV 3. Select TV using the INPUT button on the remote or side of the HDTV, or directly by pressing the TV button on the Remote Control. Version 1/25/2007 22 www.VIZIO.com Select TV using the ..., not from your VCR to the HDTV and VCR. 4. Turn on the power to the DTV/TV CABLE/ANTENNA connector at the rear of your VCR 1. Turn on the power to the HDTV and VCR. 2. Turn off the power to the HDTV. 4. VIZIO VX37L HDTV10A User Manual 2.6.2 Using Your Antenna or Cable for...

User Manual
Page 23
VIZIO VX37L HDTV10A User Manual 2.7 Connecting a PC Computer 1. Connect a 15-pin D-Sub RGB (VGA)... mode to the HDTV and PC Computer. 2. Select RGB using the INPUT button on the Remote Control. Turn off the power to VESA 1366x768 at an electronics store. 2.7.1 Preset PC Resolutions Resolution Refresh (Hz) H.Freq (kHz) V.Freq (Hz)...H.Sync V.Sync Pixel Freq (MHz) 640x480 60 31.5 59.94 N N 25.175 640x480 75 37.5 75.00 N N 31.500 720x400 70 31.46 70.08 N P 28.320 800x600 60 37.9 60.317 P P 40.000 800x600 75 46.9 75 P P 49.500 800x600 85 53.7...
VIZIO VX37L HDTV10A User Manual 2.7 Connecting a PC Computer 1. Connect a 15-pin D-Sub RGB (VGA)... mode to the HDTV and PC Computer. 2. Select RGB using the INPUT button on the Remote Control. Turn off the power to VESA 1366x768 at an electronics store. 2.7.1 Preset PC Resolutions Resolution Refresh (Hz) H.Freq (kHz) V.Freq (Hz)...H.Sync V.Sync Pixel Freq (MHz) 640x480 60 31.5 59.94 N N 25.175 640x480 75 37.5 75.00 N N 31.500 720x400 70 31.46 70.08 N P 28.320 800x600 60 37.9 60.317 P P 40.000 800x600 75 46.9 75 P P 49.500 800x600 85 53.7...
User Manual
Page 24
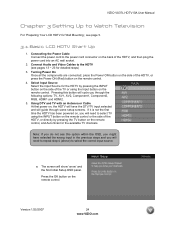
... will have selected the wrong input in the previous steps and you will need to select TV using the Input button on the remote control. Connecting the Power Cable Connect the power cord to the power cord connector on the remote control. 4. Connect Audio and Video Cables to the HDTV (...Wall Mounting', see this button will show 'snow' and the first Initial Setup OSD panel. VIZIO VX37L HDTV10A User Manual Chapter 3 Setting Up to Watch Television For 'Preparing Your LCD HDTV for the HDTV by pressing the TV button on the remote control, and Auto Scan for detailed steps) 3. Press the OK ...
... will have selected the wrong input in the previous steps and you will need to select TV using the Input button on the remote control. Connecting the Power Cable Connect the power cord to the power cord connector on the remote control. 4. Connect Audio and Video Cables to the HDTV (...Wall Mounting', see this button will show 'snow' and the first Initial Setup OSD panel. VIZIO VX37L HDTV10A User Manual Chapter 3 Setting Up to Watch Television For 'Preparing Your LCD HDTV for the HDTV by pressing the TV button on the remote control, and Auto Scan for detailed steps) 3. Press the OK ...
User Manual
Page 27
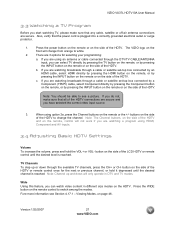
...will not work if you are using option 2a, press the Channel buttons on the side of the HDTV. Version 1/25/2007 27 www.VIZIO.com Press the WIDE button on page 46. b. button on the remote or the +/- If you are watching a program using HDMI, Component... on the side of the HDTV. button on the side of the LCD HDTV or remote control until the desired channel is reached. VIZIO VX37L HDTV10A User Manual 3.3 Watching a TV Program Before you start watching TV, please make sure that the power cord is plugged into a correctly grounded electrical outlet or surge protector. ...
...will not work if you are using option 2a, press the Channel buttons on the side of the HDTV. Version 1/25/2007 27 www.VIZIO.com Press the WIDE button on page 46. b. button on the remote or the +/- If you are watching a program using HDMI, Component... on the side of the HDTV. button on the side of the LCD HDTV or remote control until the desired channel is reached. VIZIO VX37L HDTV10A User Manual 3.3 Watching a TV Program Before you start watching TV, please make sure that the power cord is plugged into a correctly grounded electrical outlet or surge protector. ...
User Manual
Page 48
...if that does not work . If your cable or satellite remote uses a 5-digit code (like most Direct TV units), first try 1758 and then 0178 as expected on the remote control. The choices are 30, 60,... want. To use code 627. Press the SLEEP button on your LCD HDTV. Note: Some buttons may not function as an alternative. VIZIO VX37L HDTV10A User Manual 4.17.4 Setting the Sleep Timer The Sleep Timer lets... screen. 4.18 Using a Cable or Satellite Remote Your VIZIO remote uses codes 11758 and 10178 to program the remote. Typically power, volume and mute will work , 10178.
...if that does not work . If your cable or satellite remote uses a 5-digit code (like most Direct TV units), first try 1758 and then 0178 as expected on the remote control. The choices are 30, 60,... want. To use code 627. Press the SLEEP button on your LCD HDTV. Note: Some buttons may not function as an alternative. VIZIO VX37L HDTV10A User Manual 4.17.4 Setting the Sleep Timer The Sleep Timer lets... screen. 4.18 Using a Cable or Satellite Remote Your VIZIO remote uses codes 11758 and 10178 to program the remote. Typically power, volume and mute will work , 10178.


