
User Manual
Page 2
... not defeat the safety purpose of the Display changes substantially. If repair is required, please contact your dealer and refer all servicing to your home, consult your dealer. • The VX37L LCD HDTV is equipped with a three-pronged grounded plug, a plug with the VX37L LCD HDTV. • A distance of electric shock or component damage, switch off the power before connecting other than the specified one may...
... not defeat the safety purpose of the Display changes substantially. If repair is required, please contact your dealer and refer all servicing to your home, consult your dealer. • The VX37L LCD HDTV is equipped with a three-pronged grounded plug, a plug with the VX37L LCD HDTV. • A distance of electric shock or component damage, switch off the power before connecting other than the specified one may...
User Manual
Page 5
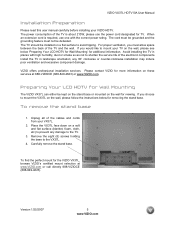
... Your LCD HDTV for Wall Mounting The VIZIO VX37L can either be defeated. Unplug all of the TV is required, use the power cord designated for removing the stand base. To find the perfect mount for viewing. Version 1/25/2007 5 www.VIZIO.com The power consumption of the cables and cords from your VIZIO HDTV. If you would like to shorten the service life of the TV and the wall. To remove the stand base 1. Install the TV in...
... Your LCD HDTV for Wall Mounting The VIZIO VX37L can either be defeated. Unplug all of the TV is required, use the power cord designated for removing the stand base. To find the perfect mount for viewing. Version 1/25/2007 5 www.VIZIO.com The power consumption of the cables and cords from your VIZIO HDTV. If you would like to shorten the service life of the TV and the wall. To remove the stand base 1. Install the TV in...
User Manual
Page 6
... 2.6.3 Using the Antenna or Cable through your VCR 22 2.7 Connecting a PC Computer ...23 2.7.1 Preset PC Resolutions...23 Chapter 3 Setting Up to Watch Television 24 3.1 Basic LCD HDTV Start Up ...24 3.2 Using a PC ...26 3.3 Watching a TV Program ...27 3.4 Adjusting Basic HDTV Settings ...27 3.5 Program Information...28 3.6 Information on HDTV Status ...28 Chapter 4 Advanced Adjustment of HDTV 29 4.1 Using the On Screen Display (OSD) ...29 4.2 DTV / TV Input Picture Adjustment...30 4.2.1 Picture Mode ...30 4.2.2 Backlight ...30 4.2.3 Brightness...31 4.2.4 Contrast ...31 4.2.5 Color...
... 2.6.3 Using the Antenna or Cable through your VCR 22 2.7 Connecting a PC Computer ...23 2.7.1 Preset PC Resolutions...23 Chapter 3 Setting Up to Watch Television 24 3.1 Basic LCD HDTV Start Up ...24 3.2 Using a PC ...26 3.3 Watching a TV Program ...27 3.4 Adjusting Basic HDTV Settings ...27 3.5 Program Information...28 3.6 Information on HDTV Status ...28 Chapter 4 Advanced Adjustment of HDTV 29 4.1 Using the On Screen Display (OSD) ...29 4.2 DTV / TV Input Picture Adjustment...30 4.2.1 Picture Mode ...30 4.2.2 Backlight ...30 4.2.3 Brightness...31 4.2.4 Contrast ...31 4.2.5 Color...
User Manual
Page 7
...Service Warranty...57 Version 1/25/2007 7 www.VIZIO.com Position ...45 4.14.8 V. VIZIO VX37L HDTV10A User Manual 4.4.4 Time Zone ...36 4.4.5 Daylight Saving...36 4.5 DTV / TV Input Setup ...36 4.5.1 Language...36 4.5.2 Sleep Timer ...36 4.5.3 Analog Closed Caption ...36 4.5.4 Digital Closed Caption ...36 4.5.5 Digital Closed Caption Style ...37 4.5.6 Reset All Settings ...37 4.6 DTV / TV Input Parental Control...38 4.6.1 Channel Block ...38 4.6.2 TV Rating...39 4.6.3 Movie Rating...39 4.6.4 Blocked Unrated Programming...40 4.6.5 Change the Password ...40 4.7 HDMI Input Picture Adjustment...
...Service Warranty...57 Version 1/25/2007 7 www.VIZIO.com Position ...45 4.14.8 V. VIZIO VX37L HDTV10A User Manual 4.4.4 Time Zone ...36 4.4.5 Daylight Saving...36 4.5 DTV / TV Input Setup ...36 4.5.1 Language...36 4.5.2 Sleep Timer ...36 4.5.3 Analog Closed Caption ...36 4.5.4 Digital Closed Caption ...36 4.5.5 Digital Closed Caption Style ...37 4.5.6 Reset All Settings ...37 4.6 DTV / TV Input Parental Control...38 4.6.1 Channel Block ...38 4.6.2 TV Rating...39 4.6.3 Movie Rating...39 4.6.4 Blocked Unrated Programming...40 4.6.5 Change the Password ...40 4.7 HDMI Input Picture Adjustment...
User Manual
Page 8
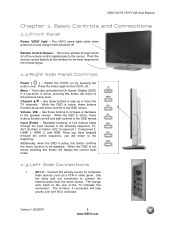
VIZIO VX37L HDTV10A User Manual Chapter 1 Basic Controls and Connections 1.1 Front Panel Power 'VIZIO' light - The VIZIO name lights white when powered on by pressing the button once. Point the remote control directly at this buttons steps through the input sources in the following sequence: TV, AV1 (S-Video or Video), AV2, Component 1, Component 2, HDMI 1, HDMI 2, and RGB. This button activates the On Screen Display (OSD). Use these buttons to step up and down the TV channels. The orange color band on the rear of this window for...
VIZIO VX37L HDTV10A User Manual Chapter 1 Basic Controls and Connections 1.1 Front Panel Power 'VIZIO' light - The VIZIO name lights white when powered on by pressing the button once. Point the remote control directly at this buttons steps through the input sources in the following sequence: TV, AV1 (S-Video or Video), AV2, Component 1, Component 2, HDMI 1, HDMI 2, and RGB. This button activates the On Screen Display (OSD). Use these buttons to step up and down the TV channels. The orange color band on the rear of this window for...
User Manual
Page 9
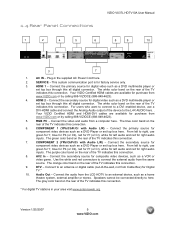
... a DVD multimedia player or set top box through this all digital connector. For users who want to connect to a DVI enabled device, use a DVI-HDMI cable and connect the Analog Audio output of the device to right, use green for Y, blue for Pb (or Cb), red for Pr (or Cr), white for left to the L+R AUDIO here. . Connect the video and audio from the LCD HDTV to an external device, such as a VCR or video game. The green color...
... a DVD multimedia player or set top box through this all digital connector. For users who want to connect to a DVI enabled device, use a DVI-HDMI cable and connect the Analog Audio output of the device to right, use green for Y, blue for Pb (or Cb), red for Pr (or Cr), white for left to the L+R AUDIO here. . Connect the video and audio from the LCD HDTV to an external device, such as a VCR or video game. The green color...
User Manual
Page 13
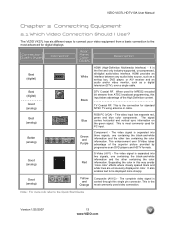
... any audio/video source, such as a set-top box, DVD player, or A/V receiver and an audio and/or video monitor, such as a digital television (DTV), over S-Video takes advantage of the High Definition content. TV Coaxial RF. S-Video (AV1) - It also enables text to be displayed more info refer to the Quick Start Guide Version 1/25/2007 13 www.VIZIO.com Connection Quality (type) Connector Rear Panel Color Codes Description Best (digital) Best (digital Good (analog) Best (analog) Better (analog) Good (analog) White Black Blue Green and Purple Red HDMI...
... any audio/video source, such as a set-top box, DVD player, or A/V receiver and an audio and/or video monitor, such as a digital television (DTV), over S-Video takes advantage of the High Definition content. TV Coaxial RF. S-Video (AV1) - It also enables text to be displayed more info refer to the Quick Start Guide Version 1/25/2007 13 www.VIZIO.com Connection Quality (type) Connector Rear Panel Color Codes Description Best (digital) Best (digital Good (analog) Best (analog) Better (analog) Good (analog) White Black Blue Green and Purple Red HDMI...
User Manual
Page 17
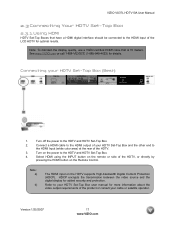
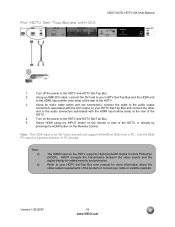
.... Connecting your cable or satellite operator. Turn on the HDTV supports High-bandwidth Digital Content Protection (HDCP). Note: a) b) The HDMI input on the power to the HDMI Input (white color area) at the rear of the HDTV, or directly by pressing the HDMI button on the Remote Control. HDCP encrypts the transmission between the video source and the digital display for details. Select HDMI using the INPUT button on the remote or side of the HDTV. 3. VIZIO VX37L HDTV10A User Manual 2.3 Connecting Your HDTV Set-Top Box 2.3.1 Using HDMI HDTV Set-Top Boxes...
.... Connecting your cable or satellite operator. Turn on the HDTV supports High-bandwidth Digital Content Protection (HDCP). Note: a) b) The HDMI input on the power to the HDMI Input (white color area) at the rear of the HDTV, or directly by pressing the HDMI button on the Remote Control. HDCP encrypts the transmission between the video source and the digital display for details. Select HDMI using the INPUT button on the remote or side of the HDTV. 3. VIZIO VX37L HDTV10A User Manual 2.3 Connecting Your HDTV Set-Top Box 2.3.1 Using HDMI HDTV Set-Top Boxes...
User Manual
Page 18
... the HDMI button on the HDTV supports High-bandwidth Digital Content Protection (HDCP). Using a HDMI-DVI cable, connect the DVI end to your cable or satellite operator. Using an audio cable (white and red connectors), connect the cable to the audio output connectors associated with the DVI output on the power to the HDMI Input (white color area) at the rear of the HDTV. 3. Note: a) b) The HDMI input on the Remote Control. Version 1/25/2007 18 www.VIZIO.com For HDTV Set-Top Boxes with the HDMI input (white...
... the HDMI button on the HDTV supports High-bandwidth Digital Content Protection (HDCP). Using a HDMI-DVI cable, connect the DVI end to your cable or satellite operator. Using an audio cable (white and red connectors), connect the cable to the audio output connectors associated with the DVI output on the power to the HDMI Input (white color area) at the rear of the HDTV. 3. Note: a) b) The HDMI input on the Remote Control. Version 1/25/2007 18 www.VIZIO.com For HDTV Set-Top Boxes with the HDMI input (white...

User Manual
Page 23
... can be purchased at the rear of the HDTV. 3. Turn off the power to the RGB PC input (blue area) at 60Hz. Connect a 15-pin D-Sub RGB (VGA) cable to the RGB output of your pc computer to VESA 1366x768 at the rear of the HDTV. 4. Select RGB using the INPUT button on the remote or side of the product. VIZIO VX37L HDTV10A User Manual 2.7 Connecting a PC Computer 1. Please refer...
... can be purchased at the rear of the HDTV. 3. Turn off the power to the RGB PC input (blue area) at 60Hz. Connect a 15-pin D-Sub RGB (VGA) cable to the RGB output of your pc computer to VESA 1366x768 at the rear of the HDTV. 4. Select RGB using the INPUT button on the remote or side of the product. VIZIO VX37L HDTV10A User Manual 2.7 Connecting a PC Computer 1. Please refer...
User Manual
Page 24
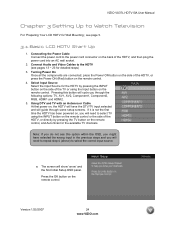
... and you through some setup screens. Connect Audio and Video Cables to Watch Television For 'Preparing Your LCD HDTV for Wall Mounting', see page 5. 3.1 Basic LCD HDTV Start Up 1. Using DTV and TV with an Antenna or Cable At first power on the back of the HDTV, and then plug the power cord into an AC wall socket. 2. The screen will need to repeat step 4 (above) to select TV using the INPUT button on the remote control or the side of...
... and you through some setup screens. Connect Audio and Video Cables to Watch Television For 'Preparing Your LCD HDTV for Wall Mounting', see page 5. 3.1 Basic LCD HDTV Start Up 1. Using DTV and TV with an Antenna or Cable At first power on the back of the HDTV, and then plug the power cord into an AC wall socket. 2. The screen will need to repeat step 4 (above) to select TV using the INPUT button on the remote control or the side of...

User Manual
Page 26
... RGB PC input, set this timing mode). consult your antenna. f. Please see the table below for more information. Press the OK button on how to set the TV timing mode to VESA 1366x768 at 60Hz for best picture quality (refer to point your cable operator for the factory preset resolutions. VIZIO VX37L HDTV10A User Manual 3.2 Using a PC If connecting to a PC through cable depends upon which direction to the graphic card's user guide for Analog (NTSC) and Digital (ATSC) channels.
... RGB PC input, set this timing mode). consult your antenna. f. Please see the table below for more information. Press the OK button on how to set the TV timing mode to VESA 1366x768 at 60Hz for best picture quality (refer to point your cable operator for the factory preset resolutions. VIZIO VX37L HDTV10A User Manual 3.2 Using a PC If connecting to a PC through cable depends upon which direction to the graphic card's user guide for Analog (NTSC) and Digital (ATSC) channels.
User Manual
Page 27
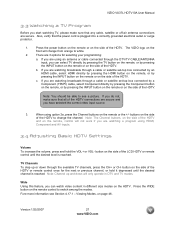
... remote, control will not work if you are watching a program using HDMI, Component and AV inputs. 3.4 Adjusting Basic HDTV Settings Volume To increase the volume, press and hold it depressed until the desired level is plugged into a correctly grounded electrical outlet or surge protector. 1. TV Channels To step up and down through the DTV/TV CABLE/ANTENNA input, you can watch video content in DTV and TV modes. Version 1/25/2007 27 www.VIZIO...
... remote, control will not work if you are watching a program using HDMI, Component and AV inputs. 3.4 Adjusting Basic HDTV Settings Volume To increase the volume, press and hold it depressed until the desired level is plugged into a correctly grounded electrical outlet or surge protector. 1. TV Channels To step up and down through the DTV/TV CABLE/ANTENNA input, you can watch video content in DTV and TV modes. Version 1/25/2007 27 www.VIZIO...
User Manual
Page 35
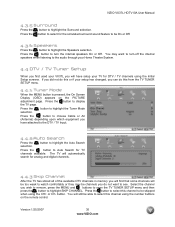
... CHANNEL. button to highlight the Tuner Mode Press the button to choose Cable or Air (Antenna) depending upon which equipment you wish to remove, press the MENU and buttons to open the TV TUNER SETUP menu and then press the button to see. Press the selection. Select the channel you have setup your setup has changed, you can do not want to select for TV channels available. button. VIZIO VX37L HDTV10A User Manual 4.3.5 Surround Press the button...
... CHANNEL. button to highlight the Tuner Mode Press the button to choose Cable or Air (Antenna) depending upon which equipment you wish to remove, press the MENU and buttons to open the TV TUNER SETUP menu and then press the button to see. Press the selection. Select the channel you have setup your setup has changed, you can do not want to select for TV channels available. button. VIZIO VX37L HDTV10A User Manual 4.3.5 Surround Press the button...
User Manual
Page 48
... sleep time using the remote control: 1. If your LCD HDTV. Typically power, volume and mute will work the LCD HDTV, refer to your cable or satellite remote uses a 3-digit code (Echostar or Dish Network for more times to work your cable or satellite remote uses a 5-digit code (like most Direct TV units), first try 1758 and then 0178 as an alternative. Version 1/25/2007 48 www.VIZIO.com Press the SLEEP button one or more information on the remote control. VIZIO VX37L HDTV10A User Manual...
... sleep time using the remote control: 1. If your LCD HDTV. Typically power, volume and mute will work the LCD HDTV, refer to your cable or satellite remote uses a 3-digit code (Echostar or Dish Network for more times to work your cable or satellite remote uses a 5-digit code (like most Direct TV units), first try 1758 and then 0178 as an alternative. Version 1/25/2007 48 www.VIZIO.com Press the SLEEP button one or more information on the remote control. VIZIO VX37L HDTV10A User Manual...
User Manual
Page 49
... of the failure. Problem No power. Plug another electrical device (like a radio) to the power outlet to prevent water from penetrating into the housing. Cleaning the Screen 1. VIZIO VX37L HDTV10A User Manual Chapter 5 Maintenance and Troubleshooting 5.1 Maintenance Important 1. When the screen is supplying the proper voltage. Use the VIZIO soft cotton cloth (included) to clean the TV. The screen glass is black. Check your remote control Make sure that...
... of the failure. Problem No power. Plug another electrical device (like a radio) to the power outlet to prevent water from penetrating into the housing. Cleaning the Screen 1. VIZIO VX37L HDTV10A User Manual Chapter 5 Maintenance and Troubleshooting 5.1 Maintenance Important 1. When the screen is supplying the proper voltage. Use the VIZIO soft cotton cloth (included) to clean the TV. The screen glass is black. Check your remote control Make sure that...
User Manual
Page 50
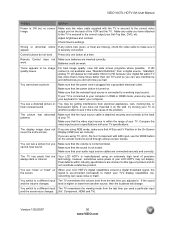
... the volume changes. Remote Control does not Make sure batteries are always dark or colored. Standard, analog TV will always be getting interference from the last time you are using RGB mode, make sure it . Make sure that the power button is turned on. Make sure that your LCD HDTV may be noticeably inferior to HD because your digital flat panel TV has video that H Size and V Position in RGB or HDMI mode...
... the volume changes. Remote Control does not Make sure batteries are always dark or colored. Standard, analog TV will always be getting interference from the last time you are using RGB mode, make sure it . Make sure that the power button is turned on. Make sure that your LCD HDTV may be noticeably inferior to HD because your digital flat panel TV has video that H Size and V Position in RGB or HDMI mode...
User Manual
Page 53
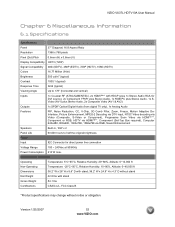
... Stereo Audio, 2x Composite Video (AV1 & AV2) Outputs 1x SPDIF Optical Digital Audio (from digital TV only), 1x Analog Audio Features PIP, Noise Reduction, CC, V-Chip, 3D Comb Filter, Zoom, Freeze, Motion Adaptive DeInterlace, Picture Enhancement, MPEG-2 Decoding via DTV input, NTSC Video decoding via Video (Composite, S-Video or Component), Progressive Scan Video via HDMI™**, Component or RGB, HDTV via HDMI™**, Component (Set-Top Box required), Computer 640x480, 800x600, 1024x768, 1366x768 via RGB, Sound Enhancement Speakers Built...
... Stereo Audio, 2x Composite Video (AV1 & AV2) Outputs 1x SPDIF Optical Digital Audio (from digital TV only), 1x Analog Audio Features PIP, Noise Reduction, CC, V-Chip, 3D Comb Filter, Zoom, Freeze, Motion Adaptive DeInterlace, Picture Enhancement, MPEG-2 Decoding via DTV input, NTSC Video decoding via Video (Composite, S-Video or Component), Progressive Scan Video via HDMI™**, Component or RGB, HDTV via HDMI™**, Component (Set-Top Box required), Computer 640x480, 800x600, 1024x768, 1366x768 via RGB, Sound Enhancement Speakers Built...
User Manual
Page 55
..., 31 DTV Special Features Closed Caption, 36 Closed Caption Style, 37 Language, 36 Reset, 37 Sleep Timer, 36 DTV Tuner Setup Auto Search, 35 Daylight Saving, 36 Skip Channel, 35 Time Zone, 36 Tuner Mode, 35 DVI Connecting your DVD Player, 14 Connecting your HDTV Set-Top Box, 18 E Extended Warranty, 59 G Glossary, 54 H HDMI Connecting your DVD Player, 14 Connecting your HDTV Set-Top Box, 17 HDMI Input Audio Adjustment, 41 Picture Adjustment, 41 Setup, 41 I Inputs Antenna, 3 Connectors, 13 Rear Label, 9 Installation Base removal, 5 Preparation, 5 Safety Instructions, 2 Wall Mounting, 5, 24 O OSD...
..., 31 DTV Special Features Closed Caption, 36 Closed Caption Style, 37 Language, 36 Reset, 37 Sleep Timer, 36 DTV Tuner Setup Auto Search, 35 Daylight Saving, 36 Skip Channel, 35 Time Zone, 36 Tuner Mode, 35 DVI Connecting your DVD Player, 14 Connecting your HDTV Set-Top Box, 18 E Extended Warranty, 59 G Glossary, 54 H HDMI Connecting your DVD Player, 14 Connecting your HDTV Set-Top Box, 17 HDMI Input Audio Adjustment, 41 Picture Adjustment, 41 Setup, 41 I Inputs Antenna, 3 Connectors, 13 Rear Label, 9 Installation Base removal, 5 Preparation, 5 Safety Instructions, 2 Wall Mounting, 5, 24 O OSD...
User Manual
Page 57
..., repair or replace defective parts, including replacement of the unit. See below for the de-installation or re-installation of the entire Panel. VIZIO is contacted to furnished instructions, operation on your model, plans are not covered by the repair center. Such replacement parts are VIZIO's responsibility (see complete details online at (714) 668-0588, 7:30 am to the end user. This is not covered by the warranty...
..., repair or replace defective parts, including replacement of the unit. See below for the de-installation or re-installation of the entire Panel. VIZIO is contacted to furnished instructions, operation on your model, plans are not covered by the repair center. Such replacement parts are VIZIO's responsibility (see complete details online at (714) 668-0588, 7:30 am to the end user. This is not covered by the warranty...


