User Guide
Page 2
... not attempt to repair or service the product yourself. VIZIO® VW37L HDTV40A User Manual Important Safety Instructions This product is designed and manufactured to operate within defined design limits, and misuse may result in fire or electric shock. • The wall socket shall be installed near the equipment and shall be easily accessible. • Only the marked power source can injure a person...
... not attempt to repair or service the product yourself. VIZIO® VW37L HDTV40A User Manual Important Safety Instructions This product is designed and manufactured to operate within defined design limits, and misuse may result in fire or electric shock. • The wall socket shall be installed near the equipment and shall be easily accessible. • Only the marked power source can injure a person...
User Guide
Page 3
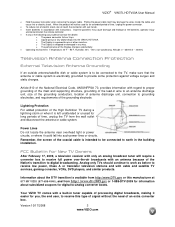
... a built-in any way. Your VIZIO TV comes with instructions. When the product will require a converter box to receive full power over-the-air broadcasts with only an analog broadcast tuner will not be connected to digital broadcasting. o The Display is available from http://www.DTV.gov or this type of signal without the need of the Display changes substantially. • Operating environment. Lightning Protection For added...
... a built-in any way. Your VIZIO TV comes with instructions. When the product will require a converter box to receive full power over-the-air broadcasts with only an analog broadcast tuner will not be connected to digital broadcasting. o The Display is available from http://www.DTV.gov or this type of signal without the need of the Display changes substantially. • Operating environment. Lightning Protection For added...
User Guide
Page 4
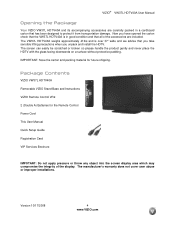
... Remote Control Power Cord This User Manual Quick Setup Guide Registration Card VIP Services Brochure IMPOTANT: Do not apply pressure or throw any object into the screen display area which may compromise the integrity of the accessories are carefully packed in good condition and that you take sensible lifting precautions when you unpack and install the HDTV. Version 10/17/2008 4 www.VIZIO.com VIZIO® VW37L...
... Remote Control Power Cord This User Manual Quick Setup Guide Registration Card VIP Services Brochure IMPOTANT: Do not apply pressure or throw any object into the screen display area which may compromise the integrity of the accessories are carefully packed in good condition and that you take sensible lifting precautions when you unpack and install the HDTV. Version 10/17/2008 4 www.VIZIO.com VIZIO® VW37L...

User Guide
Page 5
... this user manual carefully before installing your VIZIO HDTV. For proper ventilation, you would like to shorten the service life of the electronic components. Avoid installing the TV in landscape orientation; Version 10/17/2008 5 www.VIZIO.com VIZIO® VW37L HDTV40A User Manual Additional Certified Accessories for the VIZIO VW37L HDTV40A are sold separately Wall Mounts High Definition Cables Extra or replacement Remote VIZIO also offers Installation Services and Extended Warranty Services for your VIZIO VW37L HDTV40A...
... this user manual carefully before installing your VIZIO HDTV. For proper ventilation, you would like to shorten the service life of the electronic components. Avoid installing the TV in landscape orientation; Version 10/17/2008 5 www.VIZIO.com VIZIO® VW37L HDTV40A User Manual Additional Certified Accessories for the VIZIO VW37L HDTV40A are sold separately Wall Mounts High Definition Cables Extra or replacement Remote VIZIO also offers Installation Services and Extended Warranty Services for your VIZIO VW37L HDTV40A...
User Guide
Page 6
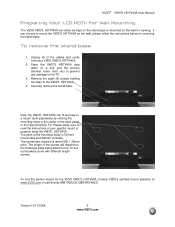
... to the TV set, our brackets come with different length screws. Remove the eight (8) screws holding the base to the VW37L HDTV40A. 4. The screw type required is 510mm horizontally and 200mm vertically. To remove the stand base 1. Unplug all of your VIZIO VW37L HDTV40A. 2. Place the VW37L HDTV40A face down on the wall for viewing. Please make sure to read the instructions of the cables and cords from your specific mount to properly...
... to the TV set, our brackets come with different length screws. Remove the eight (8) screws holding the base to the VW37L HDTV40A. 4. The screw type required is 510mm horizontally and 200mm vertically. To remove the stand base 1. Unplug all of your VIZIO VW37L HDTV40A. 2. Place the VW37L HDTV40A face down on the wall for viewing. Please make sure to read the instructions of the cables and cords from your specific mount to properly...
User Guide
Page 7
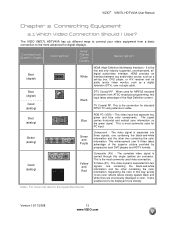
...)...22 2.5.5 Using Composite (AV) Video ...22 2.6 Connecting Your VCR or Video Camera ...23 2.7 Connecting an external Receiver/Amp ...24 2.7.1 Optical Output of Audio received with HD Programs 24 2.8 Connecting a PC Computer ...25 2.8.1 Preset PC Resolutions...26 2.9 Setting Up to Watch Television ...27 2.10 Basic LCD HDTV Start Up ...27 2.11 Watching a TV Program ...33 2.12 Adjusting Basic HDTV Settings ...34 2.13 Program Information...35 Chapter 3 Advanced Adjustment of HDTV 36 3.1 Using the On Screen Display (OSD) ...36 3.2 DTV / TV Input Picture Adjustment...37 3.2.1 Picture Mode ...37...
...)...22 2.5.5 Using Composite (AV) Video ...22 2.6 Connecting Your VCR or Video Camera ...23 2.7 Connecting an external Receiver/Amp ...24 2.7.1 Optical Output of Audio received with HD Programs 24 2.8 Connecting a PC Computer ...25 2.8.1 Preset PC Resolutions...26 2.9 Setting Up to Watch Television ...27 2.10 Basic LCD HDTV Start Up ...27 2.11 Watching a TV Program ...33 2.12 Adjusting Basic HDTV Settings ...34 2.13 Program Information...35 Chapter 3 Advanced Adjustment of HDTV 36 3.1 Using the On Screen Display (OSD) ...36 3.2 DTV / TV Input Picture Adjustment...37 3.2.1 Picture Mode ...37...
User Guide
Page 8
... 3.5.2 Sleep Timer ...48 3.5.3 Wide ...48 3.5.4 Input Naming ...49 3.5.5 Closed Caption (CC)...50 3.5.6 Digital Closed Caption Style (Digital CC Style 50 3.5.7 System Reset ...51 DTV / TV Input Parental Control...52 3.5.8 Channel Block ...52 3.5.9 US TV Rating...53 3.5.10 US Movie Rating (For US) ...54 3.5.11 Canadian English Rating ...54 3.5.12 Canadian French Rating...55 3.5.13 DTV Rating ...55 3.5.14 Blocked Unrated Programming...56 3.5.15 Change the Password ...56 3.6 HDMI Input Picture Adjustment ...57 3.7 HDMI Input Audio Adjustment ...57 3.8 HDMI Input Setup...
... 3.5.2 Sleep Timer ...48 3.5.3 Wide ...48 3.5.4 Input Naming ...49 3.5.5 Closed Caption (CC)...50 3.5.6 Digital Closed Caption Style (Digital CC Style 50 3.5.7 System Reset ...51 DTV / TV Input Parental Control...52 3.5.8 Channel Block ...52 3.5.9 US TV Rating...53 3.5.10 US Movie Rating (For US) ...54 3.5.11 Canadian English Rating ...54 3.5.12 Canadian French Rating...55 3.5.13 DTV Rating ...55 3.5.14 Blocked Unrated Programming...56 3.5.15 Change the Password ...56 3.6 HDMI Input Picture Adjustment ...57 3.7 HDMI Input Audio Adjustment ...57 3.8 HDMI Input Setup...
User Guide
Page 10
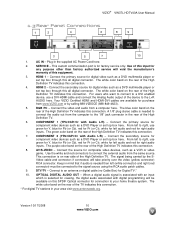
... Power Cord here. 2. HDMI 1 - Connect the secondary source for right audio inputs. Use the white and red connectors to the signal source using the RCA audio patch cables. 9. Connect to right, use green for Y, blue for Pb (or Cb), red for Pr (or Cr), white for left audio and red for digital video such as a DVD Player or set top box here. Video cable and connector; The blue color band on rear side of the TV indicates this connection. 4. Connect the source for factory service only. VIZIO® VW37L HDTV40A User Manual 1.3 Rear Panel Connections...
... Power Cord here. 2. HDMI 1 - Connect the secondary source for right audio inputs. Use the white and red connectors to the signal source using the RCA audio patch cables. 9. Connect to right, use green for Y, blue for Pb (or Cb), red for Pr (or Cr), white for left audio and red for digital video such as a DVD Player or set top box here. Video cable and connector; The blue color band on rear side of the TV indicates this connection. 4. Connect the source for factory service only. VIZIO® VW37L HDTV40A User Manual 1.3 Rear Panel Connections...
User Guide
Page 13
... bit streams from a basic connection to connect your video equipment from ATSC broadcast programming, this way avoids 'cross color' effects where closely spaced black and white lines are erroneously displayed in this input takes advantage of the superior picture provided by progressive scan DVD players and HDTV formats. This enhancement over a single cable. The VIZIO VW37L HDTV40A has six different ways to the most commonly used for standard NTSC TV using antenna or cable.
... bit streams from a basic connection to connect your video equipment from ATSC broadcast programming, this way avoids 'cross color' effects where closely spaced black and white lines are erroneously displayed in this input takes advantage of the superior picture provided by progressive scan DVD players and HDTV formats. This enhancement over a single cable. The VIZIO VW37L HDTV40A has six different ways to the most commonly used for standard NTSC TV using antenna or cable.
User Guide
Page 15
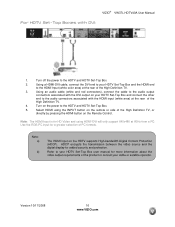
... the video source and the digital display for details. Connect a HDMI cable to the HDMI output of the High Definition TV, or directly by pressing the HDMI button on the HDTV supports High-bandwidth Digital Content Protection (HDCP). Version 10/17/2008 15 www.VIZIO.com Length is being used, used HDMI 2 as the input and follow steps 1 through 3; Note: a) b) The HDMI input on the Remote Control. 5. Turn on the power to the HDMI input of the LCD HDTV for...
... the video source and the digital display for details. Connect a HDMI cable to the HDMI output of the High Definition TV, or directly by pressing the HDMI button on the HDTV supports High-bandwidth Digital Content Protection (HDCP). Version 10/17/2008 15 www.VIZIO.com Length is being used, used HDMI 2 as the input and follow steps 1 through 3; Note: a) b) The HDMI input on the Remote Control. 5. Turn on the power to the HDMI input of the LCD HDTV for...
User Guide
Page 16
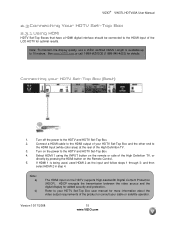
... HDTV Set-Top Box. 2. Select HDMI using HDMI-DVI will only support 640x480 at 60Hz from a PC. Note: a) b) The HDMI input on the power to the audio output connectors associated with the DVI output on the Remote Control. Using an audio cable (white and red connectors), connect the cable to the HDTV and HDTV Set-Top Box. 5. Note: The HDMI Input is for added security and protection. Turn off the power to the audio connectors associated with DVI: 1. VIZIO® VW37L HDTV40A User Manual For HDTV Set...
... HDTV Set-Top Box. 2. Select HDMI using HDMI-DVI will only support 640x480 at 60Hz from a PC. Note: a) b) The HDMI input on the power to the audio output connectors associated with the DVI output on the Remote Control. Using an audio cable (white and red connectors), connect the cable to the HDTV and HDTV Set-Top Box. 5. Note: The HDMI Input is for added security and protection. Turn off the power to the audio connectors associated with DVI: 1. VIZIO® VW37L HDTV40A User Manual For HDTV Set...
User Guide
Page 27
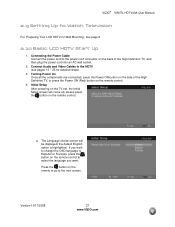
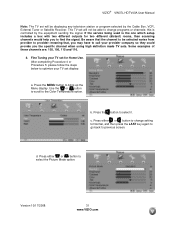
... screen will come up; Version 10/17/2008 27 www.VIZIO.com Connecting the Power Cable Connect the power cord to the power cord connector on the back of the High Definition TV, or press the Power ON (Red) button on the remote control. VIZIO® VW37L HDTV40A User Manual 2.9 Setting Up to Watch Television For 'Preparing Your LCD HDTV for Wall Mounting', see pages 13 ~ 25 for detailed steps) 3. please press the button on the remote control. 4. Connect Audio and Video Cables...
... screen will come up; Version 10/17/2008 27 www.VIZIO.com Connecting the Power Cable Connect the power cord to the power cord connector on the back of the High Definition TV, or press the Power ON (Red) button on the remote control. VIZIO® VW37L HDTV40A User Manual 2.9 Setting Up to Watch Television For 'Preparing Your LCD HDTV for Wall Mounting', see pages 13 ~ 25 for detailed steps) 3. please press the button on the remote control. 4. Connect Audio and Video Cables...

User Guide
Page 30
... (S-VIDEO), Component1, Component2, RGB, HDMI1 and HDMI2. a. Select the correct input connection; c. When finished, the Complete screen will see a picture on your TV set . Press the button on the remote control. b. Pressing this button will cycle you must use the HDMI (best) or Component connection. Version 10/17/2008 30 www.VIZIO.com Now follow the procedure below to display channels from a different signal (External TV Tuner, VCR, Cable Box or Satellite Receiver) source, using the Input button on the remote control...
... (S-VIDEO), Component1, Component2, RGB, HDMI1 and HDMI2. a. Select the correct input connection; c. When finished, the Complete screen will see a picture on your TV set . Press the button on the remote control. b. Pressing this button will cycle you must use the HDMI (best) or Component connection. Version 10/17/2008 30 www.VIZIO.com Now follow the procedure below to display channels from a different signal (External TV Tuner, VCR, Cable Box or Satellite Receiver) source, using the Input button on the remote control...
User Guide
Page 31
... service being used is controlled by the Cable Box, VCR, External Tuner or Satellite Receiver. Press the MENU button to call your TV set will not be displaying any television station or program selected by the equipment sending the signal. VIZIO® VW37L HDTV40A User Manual Note: The TV set for two different (distant) rooms, then scanning channels would help you to previous screen. meaning that the channel to be selected varies from provider to select the Picture Mode...
... service being used is controlled by the Cable Box, VCR, External Tuner or Satellite Receiver. Press the MENU button to call your TV set will not be displaying any television station or program selected by the equipment sending the signal. VIZIO® VW37L HDTV40A User Manual Note: The TV set for two different (distant) rooms, then scanning channels would help you to previous screen. meaning that the channel to be selected varies from provider to select the Picture Mode...

User Guide
Page 65
... the screen to clean the TV. Version 10/17/2008 65 www.VIZIO.com If your cable or satellite remote uses a 5-digit code (like most Direct TV units), first try 1758 and then 0178 as toluene, rosin and alcohol) to avoid cracking. Chapter 4 Maintenance and Troubleshooting 4.1 Maintenance Important 1. Typically power, volume and mute will work your LCD HDTV. Do not use a cable or satellite remote to work the LCD HDTV, refer...
... the screen to clean the TV. Version 10/17/2008 65 www.VIZIO.com If your cable or satellite remote uses a 5-digit code (like most Direct TV units), first try 1758 and then 0178 as toluene, rosin and alcohol) to avoid cracking. Chapter 4 Maintenance and Troubleshooting 4.1 Maintenance Important 1. Typically power, volume and mute will work your LCD HDTV. Do not use a cable or satellite remote to work the LCD HDTV, refer...
User Guide
Page 67
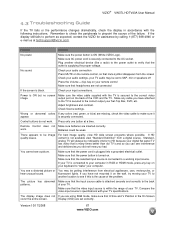
No sound. Power is securely connected. Wrong or abnormal colors If any colors (red, green, or blue) are missing, check the video cable to make sure that H Size and V Position in the On Screen cover the entire screen. fluorescent lights. The picture has abnormal patterns. Compare the video input source's specifications with the TV is secured to the correct output your Set-Top Box, DVD, etc. The display image does not If you have not mounted it...
No sound. Power is securely connected. Wrong or abnormal colors If any colors (red, green, or blue) are missing, check the video cable to make sure that H Size and V Position in the On Screen cover the entire screen. fluorescent lights. The picture has abnormal patterns. Compare the video input source's specifications with the TV is secured to the correct output your Set-Top Box, DVD, etc. The display image does not If you have not mounted it...

User Guide
Page 68
.... VIZIO® VW37L HDTV40A User Manual Problem Solution If you are always dark or colored. The LCD HDTV has the capability of expanding this function follow steps on page 33 on warranty service or repair, after the warranty period, please contact our Support Department at the expense of operations: 6:00am - 9:00pm PST Monday - Customer support and quality service are connected securely and correctly. You switch to match your audio input source cables...
.... VIZIO® VW37L HDTV40A User Manual Problem Solution If you are always dark or colored. The LCD HDTV has the capability of expanding this function follow steps on page 33 on warranty service or repair, after the warranty period, please contact our Support Department at the expense of operations: 6:00am - 9:00pm PST Monday - Customer support and quality service are connected securely and correctly. You switch to match your audio input source cables...
User Guide
Page 70
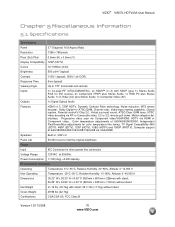
... Digital for ATSC/QAM, Channel skip, Video/input naming capability, Closed caption, Parental control/V-Chip 2.0, Virtual surround sound, ATSC/Clear QAM tuner, NTSC video decoding via RF or Composite video, 3:2 or 2:2 reverse pull-down, Motion adaptive deinterlace, Progressive video scan via Component video/VGA/HDMI, HDTV via HDMI or Component video, Color temperature adjustments of 5400K/6500K/9300K, Independent Red/Green/Blue adjustments for color temperature fine tuning, TV Signal Compatibility 480i (SDTV), 480P (EDTV), 720P (HDTV), 1080i (HDTV) and 1080P (FHDTV), Computer support...
... Digital for ATSC/QAM, Channel skip, Video/input naming capability, Closed caption, Parental control/V-Chip 2.0, Virtual surround sound, ATSC/Clear QAM tuner, NTSC video decoding via RF or Composite video, 3:2 or 2:2 reverse pull-down, Motion adaptive deinterlace, Progressive video scan via Component video/VGA/HDMI, HDTV via HDMI or Component video, Color temperature adjustments of 5400K/6500K/9300K, Independent Red/Green/Blue adjustments for color temperature fine tuning, TV Signal Compatibility 480i (SDTV), 480P (EDTV), 720P (HDTV), 1080i (HDTV) and 1080P (FHDTV), Computer support...
User Guide
Page 72
..., 39, 61 Picture Mode, 37 Sharpness, 40 Tint, 39 DTV Tuner Setup Auto Search, 46 Daylight Saving, 47 Skip Channel, 46 Time Zone, 47 Tuner Mode, 46 DVI Connecting your DVD Player, 20 Connecting your HDTV Set-Top Box, 16 G Glossary, 71 H HDMI Connecting your DVD Player, 19 Connecting your HDTV Set-Top Box, 15 HDMI Input Audio Adjustment, 57 Picture Adjustment, 57 Setup, 57 I Inputs Antenna, 3 Connectors, 13 Rear Label, 10 Installation Base removal, 6 Preparation, 5 Wall Mounting, 5, 6, 27 O OSD Brightness Adjustment, 70 Color Adjustment, 13 Contrast Adjustment, 70 Outputs Using 5.1 Surround with...
..., 39, 61 Picture Mode, 37 Sharpness, 40 Tint, 39 DTV Tuner Setup Auto Search, 46 Daylight Saving, 47 Skip Channel, 46 Time Zone, 47 Tuner Mode, 46 DVI Connecting your DVD Player, 20 Connecting your HDTV Set-Top Box, 16 G Glossary, 71 H HDMI Connecting your DVD Player, 19 Connecting your HDTV Set-Top Box, 15 HDMI Input Audio Adjustment, 57 Picture Adjustment, 57 Setup, 57 I Inputs Antenna, 3 Connectors, 13 Rear Label, 10 Installation Base removal, 6 Preparation, 5 Wall Mounting, 5, 6, 27 O OSD Brightness Adjustment, 70 Color Adjustment, 13 Contrast Adjustment, 70 Outputs Using 5.1 Surround with...

User Guide
Page 73
... Using your Cable or Satellite Remote to Operate your VIZIO TV, 65 RGB Connecting your PC, 25 S Screen Size explanation, 64 S-Video Connecting your DVD Player, 22 Connecting your VCR, 23 Connecting your Video Camera, 23 T Technical Specifications, 70, 71 Troubleshooting Guide, 67 TV Audio Adjustment, 43 Input Setup, 48 VIZIO® VW37L HDTV40A User Manual Parental Control, 52 Picture Adjustment, 37 TV Audio Adjust Balance, 44 Bass, 43 Digital Audio Out, 45 Simulated Surround Sound, 44 Speakers On/Off, 45 Treble, 44 Volume, 43 TV Input Setup, 48 Closed Caption, 50 Input Naming, 49 Sleep Timer...
... Using your Cable or Satellite Remote to Operate your VIZIO TV, 65 RGB Connecting your PC, 25 S Screen Size explanation, 64 S-Video Connecting your DVD Player, 22 Connecting your VCR, 23 Connecting your Video Camera, 23 T Technical Specifications, 70, 71 Troubleshooting Guide, 67 TV Audio Adjustment, 43 Input Setup, 48 VIZIO® VW37L HDTV40A User Manual Parental Control, 52 Picture Adjustment, 37 TV Audio Adjust Balance, 44 Bass, 43 Digital Audio Out, 45 Simulated Surround Sound, 44 Speakers On/Off, 45 Treble, 44 Volume, 43 TV Input Setup, 48 Closed Caption, 50 Input Naming, 49 Sleep Timer...


