VHT215 Quick Start Guide
Page 1
QUICK START GUIDE HOME THEATER SOUND BAR WITH WIRELESS SUBWOOFER VHT215 -
QUICK START GUIDE HOME THEATER SOUND BAR WITH WIRELESS SUBWOOFER VHT215 -
VHT215 Quick Start Guide
Page 3
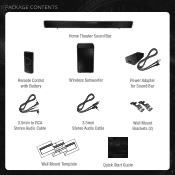
PACKAGE CONTENTS Home Theater Sound Bar Remote Control with Battery Wireless Subwoofer Power Adapter for Sound Bar 3.5mm to RCA 3.5mm Wall Mount Stereo Audio Cable Stereo Audio Cable Brackets (2) Wall Mount Template LEAVETHIS MARK HERE S PAC EWBLAEEATLMVWLARKEHEMERETEOHNUITSNHSTEPIASNCO1G9.7E5U"WCETBNNLTEAREEEDLINTAMLE BMWVLARPKAEHMEELRRETEAOHNATUINTESNDHSTEYPIAOSNOCU1G9.7E5U"RWCETNMBNTTAERARKEEDHVLEINRMTLEE BWLPAMELREAOANTUNETDNH E SOUND BAR AND TING TEMPLATE YOUR TV 19.75" MARK HERE CENTER LINE YOUR TV MARKHERE Quick Start Guide 1
PACKAGE CONTENTS Home Theater Sound Bar Remote Control with Battery Wireless Subwoofer Power Adapter for Sound Bar 3.5mm to RCA 3.5mm Wall Mount Stereo Audio Cable Stereo Audio Cable Brackets (2) Wall Mount Template LEAVETHIS MARK HERE S PAC EWBLAEEATLMVWLARKEHEMERETEOHNUITSNHSTEPIASNCO1G9.7E5U"WCETBNNLTEAREEEDLINTAMLE BMWVLARPKAEHMEELRRETEAOHNATUINTESNDHSTEYPIAOSNOCU1G9.7E5U"RWCETNMBNTTAERARKEEDHVLEINRMTLEE BWLPAMELREAOANTUNETDNH E SOUND BAR AND TING TEMPLATE YOUR TV 19.75" MARK HERE CENTER LINE YOUR TV MARKHERE Quick Start Guide 1

VHT215 Quick Start Guide
Page 4
Input Press to increase or decrease overall volume. Power Cord 2 Power Light When Sound Bar is on, this light is on or off . Power Switch Press to turn on or off . Volume Up/Down Press to change input source. CONTROLS & CONNECTIONS Info Display Displays volume, input, and other information. Power Press to re-link the Subwoofer with the Sound Bar. Link LED Light Link Button Used to turn on .
Input Press to increase or decrease overall volume. Power Cord 2 Power Light When Sound Bar is on, this light is on or off . Power Switch Press to turn on or off . Volume Up/Down Press to change input source. CONTROLS & CONNECTIONS Info Display Displays volume, input, and other information. Power Press to re-link the Subwoofer with the Sound Bar. Link LED Light Link Button Used to turn on .
VHT215 Quick Start Guide
Page 7
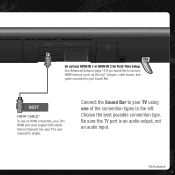
Be sure the TV port is an audio output, not an audio input. *Not Included 5 See Advanced Setup on page 16 if you would like to connect HDMI devices (such as Blu-ray™ players, cable boxes, and game consoles) to the left. Choose the best possible connection type. Do not use an HDMI connection, your TV's HDMI port must support ARC (Audio Return Channel). See your Sound Bar. Connect the Sound Bar to your TV using one of the connection types to your TV's user manual for First-Time Setup. BEST HDMI CABLE* To use HDMI IN 1 or HDMI IN 2 for details.
Be sure the TV port is an audio output, not an audio input. *Not Included 5 See Advanced Setup on page 16 if you would like to connect HDMI devices (such as Blu-ray™ players, cable boxes, and game consoles) to the left. Choose the best possible connection type. Do not use an HDMI connection, your TV's HDMI port must support ARC (Audio Return Channel). See your Sound Bar. Connect the Sound Bar to your TV using one of the connection types to your TV's user manual for First-Time Setup. BEST HDMI CABLE* To use HDMI IN 1 or HDMI IN 2 for details.

VHT215 Quick Start Guide
Page 9
6 Sound Bar is in the front corner of the room, up to ear level. For the best surround sound experience, position the speakers as shown. 7 Wireless Subwoofer is centered below the TV, close to 60 feet away from the Sound Bar. Bass is projected outward.
6 Sound Bar is in the front corner of the room, up to ear level. For the best surround sound experience, position the speakers as shown. 7 Wireless Subwoofer is centered below the TV, close to 60 feet away from the Sound Bar. Bass is projected outward.
VHT215 Quick Start Guide
Page 11
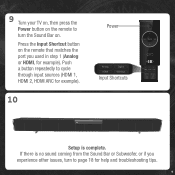
Push a button repeatedly to cycle through input sources (HDMI 1, HDMI 2, HDMI ARC for example). 10 Power Input Shortcuts Setup is no sound coming from the Sound Bar or Subwoofer, or if you used in step 1 (Analog or HDMI, for help and troubleshooting tips. 9 9 Turn your TV on, then press the Power button on . Press the Input Shortcut button on the remote that matches the port you experience other issues, turn to turn the Sound Bar on the remote to page 18 for example). If there is complete.
Push a button repeatedly to cycle through input sources (HDMI 1, HDMI 2, HDMI ARC for example). 10 Power Input Shortcuts Setup is no sound coming from the Sound Bar or Subwoofer, or if you used in step 1 (Analog or HDMI, for help and troubleshooting tips. 9 9 Turn your TV on, then press the Power button on . Press the Input Shortcut button on the remote that matches the port you experience other issues, turn to turn the Sound Bar on the remote to page 18 for example). If there is complete.

VHT215 Quick Start Guide
Page 12
...*These buttons only control an iPod® or iPhone® connected to decrease overall system volume. USING THE REMOTE Power Press to turn the sound on or off . SRS TruVolume Press to activate SRS WOW HD. Press again to activate or deactivate SRS TruVolume. SRS WOW When on ,... SRS TruSurround delivers enveloping, immersive surround sound, making every seat in the room the "sweet spot". Previous Press to go to last track.* Volume Down Press to VIZIO High Definition Home Theater Headphones with Wireless iPod Dock. 10 Bass Press to increase...
...*These buttons only control an iPod® or iPhone® connected to decrease overall system volume. USING THE REMOTE Power Press to turn the sound on or off . SRS TruVolume Press to activate SRS WOW HD. Press again to activate or deactivate SRS TruVolume. SRS WOW When on ,... SRS TruSurround delivers enveloping, immersive surround sound, making every seat in the room the "sweet spot". Previous Press to go to last track.* Volume Down Press to VIZIO High Definition Home Theater Headphones with Wireless iPod Dock. 10 Bass Press to increase...
VHT215 Quick Start Guide
Page 13
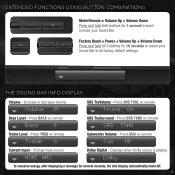
THE SOUND BAR INFO DISPLAY Volume - Change input source HDMI ARC Subwoofer Volume - Press SRS TVOL on remote Bass 9 SRS TruSurround - Displays when Dolby source is playing ..., the Info Display automatically shuts off. 11 Factory Reset = Power + Volume Up + Volume Down Press and hold both buttons for 1 second to mute/ unmute your Sound Bar to return your Sound Bar. Increase or decrease volume Volume 15 SRS TruVolume -
THE SOUND BAR INFO DISPLAY Volume - Change input source HDMI ARC Subwoofer Volume - Press SRS TVOL on remote Bass 9 SRS TruSurround - Displays when Dolby source is playing ..., the Info Display automatically shuts off. 11 Factory Reset = Power + Volume Up + Volume Down Press and hold both buttons for 1 second to mute/ unmute your Sound Bar to return your Sound Bar. Increase or decrease volume Volume 15 SRS TruVolume -
VHT215 Quick Start Guide
Page 14
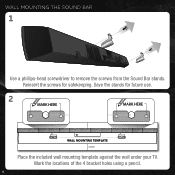
WALL MOUNTING THE SOUND BAR 1 UNDLEBAAVREATNHDISYSOPUARCETVBETW Use a phillips-head screwdriver to remove the screws from the Sound Bar stands. Save the stands for safekeeping. Mark the locations of the 4 bracket holes using a pencil. 12 Reinsert the screws for future use. 2 MARK HERE MARK HERE EMPLATE WALL MO LEAVE THIS SPACE BETWEEN THE SOUND BAR AND YOUR TV MARK HERE MARK HERE 19.75" WALL MOUNTING TEMPLATE CENTER LINE Place the included wall mounting template against the wall under your TV.
WALL MOUNTING THE SOUND BAR 1 UNDLEBAAVREATNHDISYSOPUARCETVBETW Use a phillips-head screwdriver to remove the screws from the Sound Bar stands. Save the stands for safekeeping. Mark the locations of the 4 bracket holes using a pencil. 12 Reinsert the screws for future use. 2 MARK HERE MARK HERE EMPLATE WALL MO LEAVE THIS SPACE BETWEEN THE SOUND BAR AND YOUR TV MARK HERE MARK HERE 19.75" WALL MOUNTING TEMPLATE CENTER LINE Place the included wall mounting template against the wall under your TV.
VHT215 Quick Start Guide
Page 15
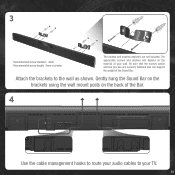
Be sure that the screws and/or anchors you use are not included. Gently hang the Sound Bar on the brackets using the wall mount posts on the material of the Bar. 4 Use the cable management hooks to route your audio cables to the wall as shown. 3 Recommended screw diameter: 4mm Recommended screw length: 8mm or greater The screws and anchors depicted are securely fastened and can support the weight of the Sound Bar. Attach the brackets to your wall. The appropriate screws and anchors will depend on the back of your TV. 13
Be sure that the screws and/or anchors you use are not included. Gently hang the Sound Bar on the brackets using the wall mount posts on the material of the Bar. 4 Use the cable management hooks to route your audio cables to the wall as shown. 3 Recommended screw diameter: 4mm Recommended screw length: 8mm or greater The screws and anchors depicted are securely fastened and can support the weight of the Sound Bar. Attach the brackets to your wall. The appropriate screws and anchors will depend on the back of your TV. 13
VHT215 Quick Start Guide
Page 16
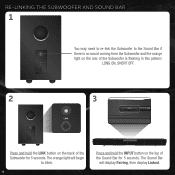
The Sound Bar will begin to the Sound Bar if there is no sound coming from the Subwoofer and the orange light on the rear of the Subwoofer is flashing in this pattern: LONG ON, SHORT OFF. 2 3 Press and hold the INPUT button on the back of the Sound Bar for 5 seconds. RE-LINKING THE SUBWOOFER AND SOUND BAR 1 You may need to re-link the Subwoofer to blink. 14 Press and hold the LINK button on the top of the Subwoofer for 5 seconds. The orange light will display Pairing, then display Linked.
The Sound Bar will begin to the Sound Bar if there is no sound coming from the Subwoofer and the orange light on the rear of the Subwoofer is flashing in this pattern: LONG ON, SHORT OFF. 2 3 Press and hold the INPUT button on the back of the Sound Bar for 5 seconds. RE-LINKING THE SUBWOOFER AND SOUND BAR 1 You may need to re-link the Subwoofer to blink. 14 Press and hold the LINK button on the top of the Subwoofer for 5 seconds. The orange light will display Pairing, then display Linked.
VHT215 Quick Start Guide
Page 17
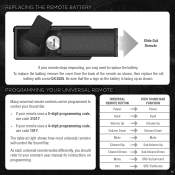
...sure that the + sign on programming. UNIVERSAL REMOTE BUTTON Power Input Volume Up Volume Down Mute Channel Up Channel Down Menu Info VIZIO SOUND BAR FUNCTION Power Input Volume Up Volume Down Mute Sub Volume Up Sub Volume Down SRS TruSurround SRS TruVolume 15 PROGRAMMING YOUR UNIVERSAL REMOTE... Many universal remote controls can be programmed to control your Sound Bar. • If your remote uses a 5-digit programming code, use code 1517. The table at right shows how most universal remotes ...
...sure that the + sign on programming. UNIVERSAL REMOTE BUTTON Power Input Volume Up Volume Down Mute Channel Up Channel Down Menu Info VIZIO SOUND BAR FUNCTION Power Input Volume Up Volume Down Mute Sub Volume Up Sub Volume Down SRS TruSurround SRS TruVolume 15 PROGRAMMING YOUR UNIVERSAL REMOTE... Many universal remote controls can be programmed to control your Sound Bar. • If your remote uses a 5-digit programming code, use code 1517. The table at right shows how most universal remotes ...

VHT215 Quick Start Guide
Page 18
If connecting a video device, you can use any device). DIGITAL OPTICAL CABLE* DIGITAL COAXIAL CABLE* Optical, Coaxial, and 3.5mm cables transmit audio only. Connect a single HDMI cable to a device, change the input source on the Sound Bar. To listen to your TV. 3.5MM CABLE Game Console 16 Network Media Player Tablet/MP3 Player/Laptop ADVANCED SETUP Connect up to five different devices to the Sound Bar (devices shown are examples-you will need a separate video connection from the device to your TV.
If connecting a video device, you can use any device). DIGITAL OPTICAL CABLE* DIGITAL COAXIAL CABLE* Optical, Coaxial, and 3.5mm cables transmit audio only. Connect a single HDMI cable to a device, change the input source on the Sound Bar. To listen to your TV. 3.5MM CABLE Game Console 16 Network Media Player Tablet/MP3 Player/Laptop ADVANCED SETUP Connect up to five different devices to the Sound Bar (devices shown are examples-you will need a separate video connection from the device to your TV.
VHT215 Quick Start Guide
Page 19
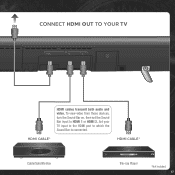
Set your TV input to the HDMI port to HDMI 1 or HDMI 2. CONNECT HDMI OUT TO YOUR TV HDMI cables transmit both audio and video. HDMI CABLE* HDMI CABLE* 21 Cable/Satellite Box Blu-ray Player *Not Included 17 To view video from these devices, turn the Sound Bar on, then set the Sound Bar input to which the Sound Bar is connected.
Set your TV input to the HDMI port to HDMI 1 or HDMI 2. CONNECT HDMI OUT TO YOUR TV HDMI cables transmit both audio and video. HDMI CABLE* HDMI CABLE* 21 Cable/Satellite Box Blu-ray Player *Not Included 17 To view video from these devices, turn the Sound Bar on, then set the Sound Bar input to which the Sound Bar is connected.

VHT215 Quick Start Guide
Page 20
...? Dolby Digital is based in the United States. Phone: Fax: Email: Web: (877) 698-4946 (949) 585-9563 techsupport@vizio.com www.vizio.com/support Hours of your Sound Bar. • Press MUTE on the Subwoofer are securely connected. • Connect a different source device (TV, Blu-ray player,...• Increase the volume. all cables and wires are blinking in this pattern: LONG OFF, SHORT ON, you have your VIZIO model number, serial number, and date of your Sound Bar. • Ensure the power cords are securely connected. • Turn the Subwoofer power switch to ON. •...
...? Dolby Digital is based in the United States. Phone: Fax: Email: Web: (877) 698-4946 (949) 585-9563 techsupport@vizio.com www.vizio.com/support Hours of your Sound Bar. • Press MUTE on the Subwoofer are securely connected. • Connect a different source device (TV, Blu-ray player,...• Increase the volume. all cables and wires are blinking in this pattern: LONG OFF, SHORT ON, you have your VIZIO model number, serial number, and date of your Sound Bar. • Ensure the power cords are securely connected. • Turn the Subwoofer power switch to ON. •...

VHT215 Quick Start Guide
Page 22
...VARY FROM STATE TO STATE. VIZIO SPECIFICATIONS Sound Bar: Subwoofer: Frequency Response (Sound Bar): Frequency Response (Subwoofer): Subwoofer Wireless Range: Sound Pressure Level (Sound Bar): Sound Pressure Level (Subwoofer): Voltage (Sound Bar): Voltage (Subwoofer): Dimensions (Sound Bar): Dimensions (Subwoofer): Net Weight (Sound Bar): Net Weight (Subwoofer...returns to the original purchaser of Service Defective Products must utilize either repair or replace the Product at VIZIO's option and sole discretion. THERE ARE NO EXPRESS WARRANTIES OTHER THAN THOSE LISTED OR DESCRIBED ABOVE. ...
...VARY FROM STATE TO STATE. VIZIO SPECIFICATIONS Sound Bar: Subwoofer: Frequency Response (Sound Bar): Frequency Response (Subwoofer): Subwoofer Wireless Range: Sound Pressure Level (Sound Bar): Sound Pressure Level (Subwoofer): Voltage (Sound Bar): Voltage (Subwoofer): Dimensions (Sound Bar): Dimensions (Subwoofer): Net Weight (Sound Bar): Net Weight (Subwoofer...returns to the original purchaser of Service Defective Products must utilize either repair or replace the Product at VIZIO's option and sole discretion. THERE ARE NO EXPRESS WARRANTIES OTHER THAN THOSE LISTED OR DESCRIBED ABOVE. ...
VHT215 Quick Start Guide
Page 23
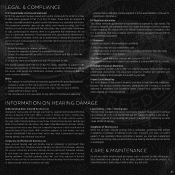
... may be used in order to correct such interference. INFORMATION ON HEARING DAMAGE Understanding Noise Induced Hearing Loss Exposure to loud sounds can radiate radio frequency energy, and if not installed and used in accordance with the instructions, may have your hearing. ...This Class B digital apparatus complies with Part 15 of the following two conditions: 1. Contact local authorities to operate the equipment. 2. Loud Sounds + Time = Hearing Loss The more time you are designed to radio or television reception, which the receiver is not responsible for any ...
... may be used in order to correct such interference. INFORMATION ON HEARING DAMAGE Understanding Noise Induced Hearing Loss Exposure to loud sounds can radiate radio frequency energy, and if not installed and used in accordance with the instructions, may have your hearing. ...This Class B digital apparatus complies with Part 15 of the following two conditions: 1. Contact local authorities to operate the equipment. 2. Loud Sounds + Time = Hearing Loss The more time you are designed to radio or television reception, which the receiver is not responsible for any ...


