
VHT215 Quick Start Guide
Page 1
HOME THEATER SOUND BAR WITH WIRELESS SUBWOOFER VHT215 - QUICK START GUIDE
HOME THEATER SOUND BAR WITH WIRELESS SUBWOOFER VHT215 - QUICK START GUIDE
VHT215 Quick Start Guide
Page 2
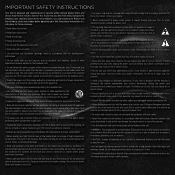
... before cleaning your Unit, hold the power plug, not the cord. Danger of important operating and servicing instructions in any heat sources such as radiators, heat registers, stoves, or other cables are provided for long periods of the polarized or grounding-type plug. The mains plug shall remain readily operable. When a cart is used for its installation, use in this apparatus near your Unit...
... before cleaning your Unit, hold the power plug, not the cord. Danger of important operating and servicing instructions in any heat sources such as radiators, heat registers, stoves, or other cables are provided for long periods of the polarized or grounding-type plug. The mains plug shall remain readily operable. When a cart is used for its installation, use in this apparatus near your Unit...
VHT215 Quick Start Guide
Page 3
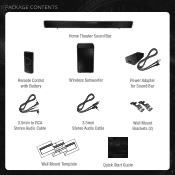
PACKAGE CONTENTS Home Theater Sound Bar Remote Control with Battery Wireless Subwoofer Power Adapter for Sound Bar 3.5mm to RCA 3.5mm Wall Mount Stereo Audio Cable Stereo Audio Cable Brackets (2) Wall Mount Template LEAVETHIS MARK HERE S PAC EWBLAEEATLMVWLARKEHEMERETEOHNUITSNHSTEPIASNCO1G9.7E5U"WCETBNNLTEAREEEDLINTAMLE BMWVLARPKAEHMEELRRETEAOHNATUINTESNDHSTEYPIAOSNOCU1G9.7E5U"RWCETNMBNTTAERARKEEDHVLEINRMTLEE BWLPAMELREAOANTUNETDNH E SOUND BAR AND TING TEMPLATE YOUR TV 19.75" MARK HERE CENTER LINE YOUR TV MARKHERE Quick Start Guide 1
PACKAGE CONTENTS Home Theater Sound Bar Remote Control with Battery Wireless Subwoofer Power Adapter for Sound Bar 3.5mm to RCA 3.5mm Wall Mount Stereo Audio Cable Stereo Audio Cable Brackets (2) Wall Mount Template LEAVETHIS MARK HERE S PAC EWBLAEEATLMVWLARKEHEMERETEOHNUITSNHSTEPIASNCO1G9.7E5U"WCETBNNLTEAREEEDLINTAMLE BMWVLARPKAEHMEELRRETEAOHNATUINTESNDHSTEYPIAOSNOCU1G9.7E5U"RWCETNMBNTTAERARKEEDHVLEINRMTLEE BWLPAMELREAOANTUNETDNH E SOUND BAR AND TING TEMPLATE YOUR TV 19.75" MARK HERE CENTER LINE YOUR TV MARKHERE Quick Start Guide 1

VHT215 Quick Start Guide
Page 4
CONTROLS & CONNECTIONS Info Display Displays volume, input, and other information. Power Light When Sound Bar is on, this light is on or off . Input Press to re-link the Subwoofer with the Sound Bar. Link LED Light Link Button Used to change input source. Power Switch Press to turn on or off . Power Press to increase or decrease overall volume. Power Cord 2 Volume Up/Down Press to turn on .
CONTROLS & CONNECTIONS Info Display Displays volume, input, and other information. Power Light When Sound Bar is on, this light is on or off . Input Press to re-link the Subwoofer with the Sound Bar. Link LED Light Link Button Used to change input source. Power Switch Press to turn on or off . Power Press to increase or decrease overall volume. Power Cord 2 Volume Up/Down Press to turn on .

VHT215 Quick Start Guide
Page 5
Digital Optical In Digital Coaxial In Analog 3.5mm In Wall Mount Posts Hub/Client Switch Power Port Service Port (Should be set to HUB) (For use by authorized service technician only.) HDMI Out (ARC) HDMI In (1, 2) 3
Digital Optical In Digital Coaxial In Analog 3.5mm In Wall Mount Posts Hub/Client Switch Power Port Service Port (Should be set to HUB) (For use by authorized service technician only.) HDMI Out (ARC) HDMI In (1, 2) 3

VHT215 Quick Start Guide
Page 6
FIRST-TIME SETUP 1 BETTER DIGITAL OPTICAL CABLE* BETTER DIGITAL COAXIAL CABLE* GOOD 3.5MM CABLE GOOD 3.5MM TO RCA CABLE CHOOSE ONE CABLE: GOOD BETTER BEST AND CONNECT IT TO YOUR TV 4
FIRST-TIME SETUP 1 BETTER DIGITAL OPTICAL CABLE* BETTER DIGITAL COAXIAL CABLE* GOOD 3.5MM CABLE GOOD 3.5MM TO RCA CABLE CHOOSE ONE CABLE: GOOD BETTER BEST AND CONNECT IT TO YOUR TV 4
VHT215 Quick Start Guide
Page 7
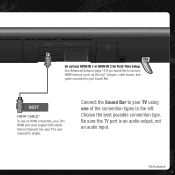
See Advanced Setup on page 16 if you would like to connect HDMI devices (such as Blu-ray™ players, cable boxes, and game consoles) to the left. See your TV's HDMI port must support ARC (Audio Return Channel). Be sure the TV port is an audio output, not an audio input. *Not Included 5 Choose the best possible connection type. Connect the Sound Bar to your TV using one of the connection types to your Sound Bar. BEST HDMI CABLE* To use HDMI IN 1 or HDMI IN 2 for details. Do not use an HDMI connection, your TV's user manual for First-Time Setup.
See Advanced Setup on page 16 if you would like to connect HDMI devices (such as Blu-ray™ players, cable boxes, and game consoles) to the left. See your TV's HDMI port must support ARC (Audio Return Channel). Be sure the TV port is an audio output, not an audio input. *Not Included 5 Choose the best possible connection type. Connect the Sound Bar to your TV using one of the connection types to your Sound Bar. BEST HDMI CABLE* To use HDMI IN 1 or HDMI IN 2 for details. Do not use an HDMI connection, your TV's user manual for First-Time Setup.

VHT215 Quick Start Guide
Page 9
Wireless Subwoofer is in the front corner of the room, up to ear level. 6 Sound Bar is centered below the TV, close to 60 feet away from the Sound Bar. For the best surround sound experience, position the speakers as shown. 7 Bass is projected outward.
Wireless Subwoofer is in the front corner of the room, up to ear level. 6 Sound Bar is centered below the TV, close to 60 feet away from the Sound Bar. For the best surround sound experience, position the speakers as shown. 7 Bass is projected outward.
VHT215 Quick Start Guide
Page 11
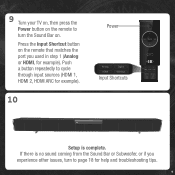
9 Turn your TV on, then press the Power button on the remote to turn to cycle through input sources (HDMI 1, HDMI 2, HDMI ARC for example). 10 Power Input Shortcuts Setup is no sound coming from the Sound Bar or Subwoofer, or if you experience other issues, turn the Sound Bar on the remote that matches the port you used in step 1 (Analog or HDMI, for help and troubleshooting tips. 9 Press the Input Shortcut button on . If there is complete. Push a button repeatedly to page 18 for example).
9 Turn your TV on, then press the Power button on the remote to turn to cycle through input sources (HDMI 1, HDMI 2, HDMI ARC for example). 10 Power Input Shortcuts Setup is no sound coming from the Sound Bar or Subwoofer, or if you experience other issues, turn the Sound Bar on the remote that matches the port you used in step 1 (Analog or HDMI, for help and troubleshooting tips. 9 Press the Input Shortcut button on . If there is complete. Push a button repeatedly to page 18 for example).

VHT215 Quick Start Guide
Page 12
... channel changes. Press repeatedly to cycle through available inputs (HDMI 1, HDMI 2, etc.) SRS TruVolume When on or off . Treble Press to increase or decrease the bass output (explosions, deep voices, etc). Press again to activate SRS TruSurround HD. SRS TruSurround HD Press to activate SRS WOW HD. USING THE REMOTE Power Press to turn the sound on , SRS TruSurround delivers enveloping, immersive surround sound, making...
... channel changes. Press repeatedly to cycle through available inputs (HDMI 1, HDMI 2, etc.) SRS TruVolume When on or off . Treble Press to increase or decrease the bass output (explosions, deep voices, etc). Press again to activate SRS TruSurround HD. SRS TruSurround HD Press to activate SRS WOW HD. USING THE REMOTE Power Press to turn the sound on , SRS TruSurround delivers enveloping, immersive surround sound, making...
VHT215 Quick Start Guide
Page 13
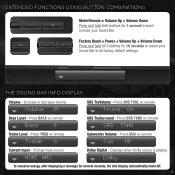
Press SRS TSHD on remote Sub 10 Dolby Digital - Change input source HDMI ARC Subwoofer Volume - THE SOUND BAR INFO DISPLAY Volume - Press SUB on remote SRS TSHD Treble Level - Displays when Dolby source is playing Dolby To conserve energy, after displaying a message for several seconds, the Info Display automatically shuts off. 11 Press SRS TVOL on remote Bass 9 SRS TruSurround - Increase or decrease volume Volume 15 SRS TruVolume - Factory Reset = Power + Volume Up + Volume Down Press and hold both buttons for 1 second to mute...
Press SRS TSHD on remote Sub 10 Dolby Digital - Change input source HDMI ARC Subwoofer Volume - THE SOUND BAR INFO DISPLAY Volume - Press SUB on remote SRS TSHD Treble Level - Displays when Dolby source is playing Dolby To conserve energy, after displaying a message for several seconds, the Info Display automatically shuts off. 11 Press SRS TVOL on remote Bass 9 SRS TruSurround - Increase or decrease volume Volume 15 SRS TruVolume - Factory Reset = Power + Volume Up + Volume Down Press and hold both buttons for 1 second to mute...
VHT215 Quick Start Guide
Page 15
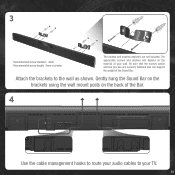
3 Recommended screw diameter: 4mm Recommended screw length: 8mm or greater The screws and anchors depicted are securely fastened and can support the weight of the Sound Bar. Attach the brackets to your TV. 13 Gently hang the Sound Bar on the brackets using the wall mount posts on the material of the Bar. 4 Use the cable management hooks to route your wall. The appropriate screws and anchors will depend on the back of your audio cables to the wall as shown. Be sure that the screws and/or anchors you use are not included.
3 Recommended screw diameter: 4mm Recommended screw length: 8mm or greater The screws and anchors depicted are securely fastened and can support the weight of the Sound Bar. Attach the brackets to your TV. 13 Gently hang the Sound Bar on the brackets using the wall mount posts on the material of the Bar. 4 Use the cable management hooks to route your wall. The appropriate screws and anchors will depend on the back of your audio cables to the wall as shown. Be sure that the screws and/or anchors you use are not included.

VHT215 Quick Start Guide
Page 16
RE-LINKING THE SUBWOOFER AND SOUND BAR 1 You may need to re-link the Subwoofer to blink. 14 Press and hold the LINK button on the top of the Subwoofer for 5 seconds. The orange light will display Pairing, then display Linked. The Sound Bar will begin to the Sound Bar if there is no sound coming from the Subwoofer and the orange light on the rear of the Subwoofer is flashing in this pattern: LONG ON, SHORT OFF. 2 3 Press and hold the INPUT button on the back of the Sound Bar for 5 seconds.
RE-LINKING THE SUBWOOFER AND SOUND BAR 1 You may need to re-link the Subwoofer to blink. 14 Press and hold the LINK button on the top of the Subwoofer for 5 seconds. The orange light will display Pairing, then display Linked. The Sound Bar will begin to the Sound Bar if there is no sound coming from the Subwoofer and the orange light on the rear of the Subwoofer is flashing in this pattern: LONG ON, SHORT OFF. 2 3 Press and hold the INPUT button on the back of the Sound Bar for 5 seconds.
VHT215 Quick Start Guide
Page 17
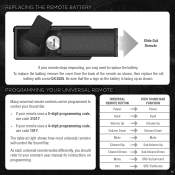
... replace the battery. UNIVERSAL REMOTE BUTTON Power Input Volume Up Volume Down Mute Channel Up Channel Down Menu Info VIZIO SOUND BAR FUNCTION Power Input Volume Up Volume Down Mute Sub Volume Up Sub Volume Down SRS TruSurround SRS TruVolume 15 Be sure that the + sign on programming. The table at right shows how most universal remotes will control the Sound Bar. As each universal remote works differently, you may need to control your Sound Bar. • If your remote uses a 5-digit programming code, use code 31517. • If your remote's user manual...
... replace the battery. UNIVERSAL REMOTE BUTTON Power Input Volume Up Volume Down Mute Channel Up Channel Down Menu Info VIZIO SOUND BAR FUNCTION Power Input Volume Up Volume Down Mute Sub Volume Up Sub Volume Down SRS TruSurround SRS TruVolume 15 Be sure that the + sign on programming. The table at right shows how most universal remotes will control the Sound Bar. As each universal remote works differently, you may need to control your Sound Bar. • If your remote uses a 5-digit programming code, use code 31517. • If your remote's user manual...

VHT215 Quick Start Guide
Page 18
Connect a single HDMI cable to your TV. DIGITAL OPTICAL CABLE* DIGITAL COAXIAL CABLE* Optical, Coaxial, and 3.5mm cables transmit audio only. If connecting a video device, you can use any device). ADVANCED SETUP Connect up to five different devices to a device, change the input source on the Sound Bar. To listen to the Sound Bar (devices shown are examples-you will need a separate video connection from the device to your TV. 3.5MM CABLE Game Console 16 Network Media Player Tablet/MP3 Player/Laptop
Connect a single HDMI cable to your TV. DIGITAL OPTICAL CABLE* DIGITAL COAXIAL CABLE* Optical, Coaxial, and 3.5mm cables transmit audio only. If connecting a video device, you can use any device). ADVANCED SETUP Connect up to five different devices to a device, change the input source on the Sound Bar. To listen to the Sound Bar (devices shown are examples-you will need a separate video connection from the device to your TV. 3.5MM CABLE Game Console 16 Network Media Player Tablet/MP3 Player/Laptop
VHT215 Quick Start Guide
Page 19
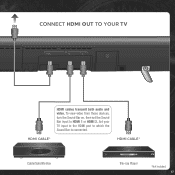
To view video from these devices, turn the Sound Bar on, then set the Sound Bar input to which the Sound Bar is connected. Set your TV input to the HDMI port to HDMI 1 or HDMI 2. HDMI CABLE* HDMI CABLE* 21 Cable/Satellite Box Blu-ray Player *Not Included 17 CONNECT HDMI OUT TO YOUR TV HDMI cables transmit both audio and video.
To view video from these devices, turn the Sound Bar on, then set the Sound Bar input to which the Sound Bar is connected. Set your TV input to the HDMI port to HDMI 1 or HDMI 2. HDMI CABLE* HDMI CABLE* 21 Cable/Satellite Box Blu-ray Player *Not Included 17 CONNECT HDMI OUT TO YOUR TV HDMI cables transmit both audio and video.

VHT215 Quick Start Guide
Page 20
...; Select a different input source (HDMI, Analog, Digital, or Wireless). • Be sure the audio cable coming from the Sound Bar. • Increase the volume. There is no power. • Press the POWER button on the remote control or on page 14. • Move the Subwoofer closer to the Sound Bar. • Turn the Subwoofer power switch to which the Sound Bar is connected to an audio output, not an audio input. • If listening to an HDMI source, be playing...
...; Select a different input source (HDMI, Analog, Digital, or Wireless). • Be sure the audio cable coming from the Sound Bar. • Increase the volume. There is no power. • Press the POWER button on the remote control or on page 14. • Move the Subwoofer closer to the Sound Bar. • Turn the Subwoofer power switch to which the Sound Bar is connected to an audio output, not an audio input. • If listening to an HDMI source, be playing...

VHT215 Quick Start Guide
Page 21
... the VIZIO 3D Blu-ray™ Player with Internet Apps • Plays Blu-ray 3D and Blu-ray™ Discs for full high definition 3D and 1080p video playback • View personal photo files (JPG) or listen to your digital music (MP3) using the built-in USB port • Upscales your existing DVD library to 1080p quality and plays audio CDs for added versatility • Enjoy up to 7.1 channels of digital audio output via HDMI with Dolby...
... the VIZIO 3D Blu-ray™ Player with Internet Apps • Plays Blu-ray 3D and Blu-ray™ Discs for full high definition 3D and 1080p video playback • View personal photo files (JPG) or listen to your digital music (MP3) using the built-in USB port • Upscales your existing DVD library to 1080p quality and plays audio CDs for added versatility • Enjoy up to 7.1 channels of digital audio output via HDMI with Dolby...

VHT215 Quick Start Guide
Page 22
... HDMI logo and High-Definition Multimedia Interface are trademarks of Apple Inc., registered in the U.S. Changing the factory default settings or enabling other features will provide instructions for packing and shipping the covered Product to the VIZIO service center. Products with Stand) 40.1" x 3.3" x 1.9" (without Stand) 8.5" x 12.8" x 11.0" 4.9 lbs 11.0 lbs 25.1 lbs FCC, NOM, cULus 20 Technical Support will increase power...
... HDMI logo and High-Definition Multimedia Interface are trademarks of Apple Inc., registered in the U.S. Changing the factory default settings or enabling other features will provide instructions for packing and shipping the covered Product to the VIZIO service center. Products with Stand) 40.1" x 3.3" x 1.9" (without Stand) 8.5" x 12.8" x 11.0" 4.9 lbs 11.0 lbs 25.1 lbs FCC, NOM, cULus 20 Technical Support will increase power...
VHT215 Quick Start Guide
Page 23
... sound can lead to hearing loss, including aging and side effects of certain medications, the most common cause of pressure or fullness in your ears from household waste. Do not spray cleaners directly on a circuit different from temporary hearing damage in a residential installation. Shielded interface cables and AC power cord, if any, must accept any interference received...
... sound can lead to hearing loss, including aging and side effects of certain medications, the most common cause of pressure or fullness in your ears from household waste. Do not spray cleaners directly on a circuit different from temporary hearing damage in a residential installation. Shielded interface cables and AC power cord, if any, must accept any interference received...


