VHT215 Quick Start Guide
Page 3
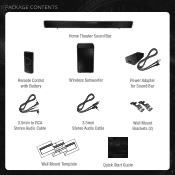
PACKAGE CONTENTS Home Theater Sound Bar Remote Control with Battery Wireless Subwoofer Power Adapter for Sound Bar 3.5mm to RCA 3.5mm Wall Mount Stereo Audio Cable Stereo Audio Cable Brackets (2) Wall Mount Template LEAVETHIS MARK HERE S PAC EWBLAEEATLMVWLARKEHEMERETEOHNUITSNHSTEPIASNCO1G9.7E5U"WCETBNNLTEAREEEDLINTAMLE BMWVLARPKAEHMEELRRETEAOHNATUINTESNDHSTEYPIAOSNOCU1G9.7E5U"RWCETNMBNTTAERARKEEDHVLEINRMTLEE BWLPAMELREAOANTUNETDNH E SOUND BAR AND TING TEMPLATE YOUR TV 19.75" MARK HERE CENTER LINE YOUR TV MARKHERE Quick Start Guide 1
PACKAGE CONTENTS Home Theater Sound Bar Remote Control with Battery Wireless Subwoofer Power Adapter for Sound Bar 3.5mm to RCA 3.5mm Wall Mount Stereo Audio Cable Stereo Audio Cable Brackets (2) Wall Mount Template LEAVETHIS MARK HERE S PAC EWBLAEEATLMVWLARKEHEMERETEOHNUITSNHSTEPIASNCO1G9.7E5U"WCETBNNLTEAREEEDLINTAMLE BMWVLARPKAEHMEELRRETEAOHNATUINTESNDHSTEYPIAOSNOCU1G9.7E5U"RWCETNMBNTTAERARKEEDHVLEINRMTLEE BWLPAMELREAOANTUNETDNH E SOUND BAR AND TING TEMPLATE YOUR TV 19.75" MARK HERE CENTER LINE YOUR TV MARKHERE Quick Start Guide 1
VHT215 Quick Start Guide
Page 14
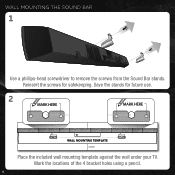
Reinsert the screws for future use. 2 MARK HERE MARK HERE EMPLATE WALL MO LEAVE THIS SPACE BETWEEN THE SOUND BAR AND YOUR TV MARK HERE MARK HERE 19.75" WALL MOUNTING TEMPLATE CENTER LINE Place the included wall mounting template against the wall under your TV. WALL MOUNTING THE SOUND BAR 1 UNDLEBAAVREATNHDISYSOPUARCETVBETW Use a phillips-head screwdriver to remove the screws from the Sound Bar stands. Mark the locations of the 4 bracket holes using a pencil. 12 Save the stands for safekeeping.
Reinsert the screws for future use. 2 MARK HERE MARK HERE EMPLATE WALL MO LEAVE THIS SPACE BETWEEN THE SOUND BAR AND YOUR TV MARK HERE MARK HERE 19.75" WALL MOUNTING TEMPLATE CENTER LINE Place the included wall mounting template against the wall under your TV. WALL MOUNTING THE SOUND BAR 1 UNDLEBAAVREATNHDISYSOPUARCETVBETW Use a phillips-head screwdriver to remove the screws from the Sound Bar stands. Mark the locations of the 4 bracket holes using a pencil. 12 Save the stands for safekeeping.
VHT215 Quick Start Guide
Page 15
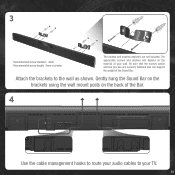
Gently hang the Sound Bar on the brackets using the wall mount posts on the material of your wall. 3 Recommended screw diameter: 4mm Recommended screw length: 8mm or greater The screws and anchors depicted are securely fastened and can support the weight of the Sound Bar. The appropriate screws and anchors will depend on the back of the Bar. 4 Use the cable management hooks to route your TV. 13 Be sure that the screws and/or anchors you use are not included. Attach the brackets to your audio cables to the wall as shown.
Gently hang the Sound Bar on the brackets using the wall mount posts on the material of your wall. 3 Recommended screw diameter: 4mm Recommended screw length: 8mm or greater The screws and anchors depicted are securely fastened and can support the weight of the Sound Bar. The appropriate screws and anchors will depend on the back of the Bar. 4 Use the cable management hooks to route your TV. 13 Be sure that the screws and/or anchors you use are not included. Attach the brackets to your audio cables to the wall as shown.

