QuickStart Guide
Page 2
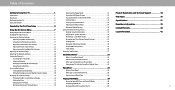
... Support 34 Front Panel 1 Rear Panel 2 Using the USB Power Feature 23 Turning the Power Indicator On or Off 23 Help Topics 35 Wall-mounting the TV 4 Using the Remote 5 Completing the First-Time Setup 6 Using the On-Screen Menu 7 Navigating the On-Screen Menu 7 Changing the Input Source 7 Adjusting the Picture Settings 8 Adjusting the Color Temperature 8 Changing the Picture Aspect Ratio 9 Adjusting Advanced Picture Settings 9 Adjusting Picture Input Settings 12 Adjusting the Picture Mode Edit Settings 12 Adjusting the Audio Settings 14 Setting Timers 23 Setting...
... Support 34 Front Panel 1 Rear Panel 2 Using the USB Power Feature 23 Turning the Power Indicator On or Off 23 Help Topics 35 Wall-mounting the TV 4 Using the Remote 5 Completing the First-Time Setup 6 Using the On-Screen Menu 7 Navigating the On-Screen Menu 7 Changing the Input Source 7 Adjusting the Picture Settings 8 Adjusting the Color Temperature 8 Changing the Picture Aspect Ratio 9 Adjusting Advanced Picture Settings 9 Adjusting Picture Input Settings 12 Adjusting the Picture Mode Edit Settings 12 Adjusting the Audio Settings 14 Setting Timers 23 Setting...
QuickStart Guide
Page 3
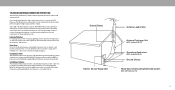
...'s warranty does not cover user abuse or improper installations. • The power cord must be of sufficient magnitude to avoid causing fire, electric shock, or component damage. • A distance of the cabinet are provided for replacement of your VIZIO product, visit our website at vizio.com or call toll free at vizio.com. For more detailed information about accessories and installation services for...
...'s warranty does not cover user abuse or improper installations. • The power cord must be of sufficient magnitude to avoid causing fire, electric shock, or component damage. • A distance of the cabinet are provided for replacement of your VIZIO product, visit our website at vizio.com or call toll free at vizio.com. For more detailed information about accessories and installation services for...
QuickStart Guide
Page 4
... both the furniture and the television set or its controls. • ALWAYS route cords and cables connected to hearing without any smoke or odor becomes apparent, unplug the power cord and contact your dealer for long period of your TV changes substantially. • CAUTION: These servicing instructions are qualified to loud sounds can damage the remote control or injure the operator. When your TV is...
... both the furniture and the television set or its controls. • ALWAYS route cords and cables connected to hearing without any smoke or odor becomes apparent, unplug the power cord and contact your dealer for long period of your TV changes substantially. • CAUTION: These servicing instructions are qualified to loud sounds can damage the remote control or injure the operator. When your TV is...
QuickStart Guide
Page 5
... power lines or circuits. Receiving Stations. Remember, the screen of the coaxial cable is electrically grounded to proper grounding of the mast and supporting structure, grounding of the lead-in particular Section 820.93, Grounding of Outer Conductive Shield of time, unplug the TV from the wall outlet and disconnect the antenna or cable system. Installation of Antenna The installation instructions states the cable...
... power lines or circuits. Receiving Stations. Remember, the screen of the coaxial cable is electrically grounded to proper grounding of the mast and supporting structure, grounding of the lead-in particular Section 820.93, Grounding of Outer Conductive Shield of time, unplug the TV from the wall outlet and disconnect the antenna or cable system. Installation of Antenna The installation instructions states the cable...
QuickStart Guide
Page 11
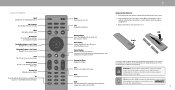
...) Navigation Buttons - Insert two batteries into the remote control. Replace only with household waste. Left / Right Navigate the on the batteries match the (+) and (-) symbols inside the battery compartment. 3. USING THE REMOTE Input Change the currently displayed input App Launcher Quickly launch the pictured app Menu Display the settings menu WatchFreeTM Access WatchFree channels (not available in fire. Power Turn television on or off Dash Use with number pad to manually enter a digital subchannel (for...
...) Navigation Buttons - Insert two batteries into the remote control. Replace only with household waste. Left / Right Navigate the on the batteries match the (+) and (-) symbols inside the battery compartment. 3. USING THE REMOTE Input Change the currently displayed input App Launcher Quickly launch the pictured app Menu Display the settings menu WatchFreeTM Access WatchFree channels (not available in fire. Power Turn television on or off Dash Use with number pad to manually enter a digital subchannel (for...
QuickStart Guide
Page 12
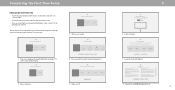
... time you turn your phone into one simple e Download now from the antenna, wall or cable box is properly connected to your TV. We license Viewing Data to analytics companies, media companies, advertisers, ad agencies, and other purposes. DrseaclsinoinugseVitehweiinngfoDramtatcioonlletoctgioennewrailltenostucmhm afunnaclytisoisnaalnitdy orefpyoorutsr doefvhicoew. Let's set up local channels. Choose a language for use: Home Use Store Demo Home Use Store Demo Family Room Living Room MasteFramily Room BedroomLiving Room Game...
... time you turn your phone into one simple e Download now from the antenna, wall or cable box is properly connected to your TV. We license Viewing Data to analytics companies, media companies, advertisers, ad agencies, and other purposes. DrseaclsinoinugseVitehweiinngfoDramtatcioonlletoctgioennewrailltenostucmhm afunnaclytisoisnaalnitdy orefpyoorutsr doefvhicoew. Let's set up local channels. Choose a language for use: Home Use Store Demo Home Use Store Demo Family Room Living Room MasteFramily Room BedroomLiving Room Game...
QuickStart Guide
Page 14
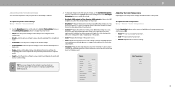
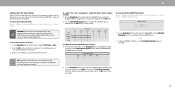
... Picture Input Settings Calibrated Normal Normal Adjusting the Color Temperature Adjusting the color temperature changes the white balance of the picture. • Brightness - Optimized for displaying game console output. Sets the picture settings to values that does not otherwise exist. Reduces throughput delays and optimizes the picture settings for television viewing. TIP: If you save changes to the setting for watching sport events with motion control setting. See Saving a Custom Picture Mode on the remote to highlight Picture Mode, then use...
... Picture Input Settings Calibrated Normal Normal Adjusting the Color Temperature Adjusting the color temperature changes the white balance of the picture. • Brightness - Optimized for displaying game console output. Sets the picture settings to values that does not otherwise exist. Reduces throughput delays and optimizes the picture settings for television viewing. TIP: If you save changes to the setting for watching sport events with motion control setting. See Saving a Custom Picture Mode on the remote to highlight Picture Mode, then use...
QuickStart Guide
Page 15
... values when it's dark. • Color Calibration - Advanced Picture Black Detail Super Resolution Edge Enhancement Local Contrast Backlight Control Reduce Noise Game Low Latency Film Mode Gamma Color Calibration Off Medium Low Low On Auto On 2.1 - When set to compensate for the duration of the screen so that the picture keeps its original shape. This function helps to defaults. 9 Some programs have black bars on sharp edges. Your...
... values when it's dark. • Color Calibration - Advanced Picture Black Detail Super Resolution Edge Enhancement Local Contrast Backlight Control Reduce Noise Game Low Latency Film Mode Gamma Color Calibration Off Medium Low Low On Auto On 2.1 - When set to compensate for the duration of the screen so that the picture keeps its original shape. This function helps to defaults. 9 Some programs have black bars on sharp edges. Your...
QuickStart Guide
Page 16
... input with precisely set colors, and a specialized light meter. To turn color channels off and on the remote to highlight the Hue, Saturation, Brightness, Offset, or Gain of the color you to adjust the color management system, 20 point white balance, turn the color channel off for testing, and display SMPTE, flat, ramp, and uniformity analyzer test patterns. Use the Navigation buttons on : 1. Red Hue 0 Saturation -1 Brightness -24 Offset 0 Gain 0 Green 0 5 0 0 0 Color Tuner Blue...
... input with precisely set colors, and a specialized light meter. To turn color channels off and on the remote to highlight the Hue, Saturation, Brightness, Offset, or Gain of the color you to adjust the color management system, 20 point white balance, turn the color channel off for testing, and display SMPTE, flat, ramp, and uniformity analyzer test patterns. Use the Navigation buttons on : 1. Red Hue 0 Saturation -1 Brightness -24 Offset 0 Gain 0 Green 0 5 0 0 0 Color Tuner Blue...
QuickStart Guide
Page 18
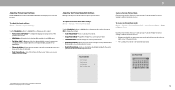
...you to factory default values. Picture Mode Edit Save Picture Mode Copy Picture Mode Lock Picture Mode Off Reset Picture Mode - 3 Adjusting Picture Input Settings Enable HDMI Mode, Full Color 4:4:4, Filmmaker Mode and adjust picture size and position. To adjust the Input settings: Menu > Picture > Input Settings Use the Navigation buttons to highlight the setting you wish to adjust, then press OK to custom picture modes. • Reset Picture Mode - configure the display size and position of the picture to provide a viewing experience of custom settings for an HDMI input. •...
...you to factory default values. Picture Mode Edit Save Picture Mode Copy Picture Mode Lock Picture Mode Off Reset Picture Mode - 3 Adjusting Picture Input Settings Enable HDMI Mode, Full Color 4:4:4, Filmmaker Mode and adjust picture size and position. To adjust the Input settings: Menu > Picture > Input Settings Use the Navigation buttons to highlight the setting you wish to adjust, then press OK to custom picture modes. • Reset Picture Mode - configure the display size and position of the picture to provide a viewing experience of custom settings for an HDMI input. •...
QuickStart Guide
Page 19
... as needed can be restored to the factory default settings. Lock a Picture Mode Custom picture modes can be applied to other inputs. 1. Change the picture mode to all custom picture modes. Now this picture mode will have your system PIN code here. To reset a customized preset picture mode: Menu > Picture > Picture Mode Edit > Reset Picture Mode > Reset TIP: To set up your custom settings saved over . 6. To lock all custom picture modes: Menu > Picture > Picture Mode Edit > Lock Picture Mode > On > Enter Your PIN > Save To unlock all inputs. 2. 3 Copy a Picture Mode Custom picture...
... as needed can be restored to the factory default settings. Lock a Picture Mode Custom picture modes can be applied to other inputs. 1. Change the picture mode to all custom picture modes. Now this picture mode will have your system PIN code here. To reset a customized preset picture mode: Menu > Picture > Picture Mode Edit > Reset Picture Mode > Reset TIP: To set up your custom settings saved over . 6. To lock all custom picture modes: Menu > Picture > Picture Mode Edit > Lock Picture Mode > On > Enter Your PIN > Save To unlock all inputs. 2. 3 Copy a Picture Mode Custom picture...
QuickStart Guide
Page 20
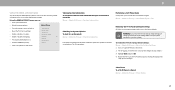
...'s user manual for audio output using ARC and some audio formats may play in order to receive uncompressed audio. When set to On, Surround Sound On enables surround sound suitable for movies. Balance the audio loudness eARC On between ARC (Off) and eARC (On) for more than two channels (e.g., 3.0, 5.0, or 5.1). 3 14 Select Fixed if an external audio device (sound bar or AV receiver) will control the volume. • Dialogue Enhancer - TV Speakers Auto • Surround Sound - Synchronize...
...'s user manual for audio output using ARC and some audio formats may play in order to receive uncompressed audio. When set to On, Surround Sound On enables surround sound suitable for movies. Balance the audio loudness eARC On between ARC (Off) and eARC (On) for more than two channels (e.g., 3.0, 5.0, or 5.1). 3 14 Select Fixed if an external audio device (sound bar or AV receiver) will control the volume. • Dialogue Enhancer - TV Speakers Auto • Surround Sound - Synchronize...

QuickStart Guide
Page 22
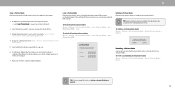
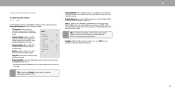
... TV CHANNELS You can use see Locking and Unlocking Channels on the remote to completely block a channgel from being viewed, use the TV's Channels menu to: • Find channels • Find new channels • Select channels to skip • Select analog audio mode • Select the language for digital audio • Set parental controls TV Channels Find Channels Find New Channels Skip Channel Analog Audio Digital Audio Parental Controls Stereo English Scanning for TV Channels The TV may need to scan for channels before it can display programs...
... TV CHANNELS You can use see Locking and Unlocking Channels on the remote to completely block a channgel from being viewed, use the TV's Channels menu to: • Find channels • Find new channels • Select channels to skip • Select analog audio mode • Select the language for digital audio • Set parental controls TV Channels Find Channels Find New Channels Skip Channel Analog Audio Digital Audio Parental Controls Stereo English Scanning for TV Channels The TV may need to scan for channels before it can display programs...
QuickStart Guide
Page 24
... viewed. Locking a channel is entered. The channel is not • When a channel is unblocked, the Lock icon appears with • When the rating type is unlocked, the Lock icon appears unlocked. USA television program broadcasts. • USA Movie - Canadian English television program broadcasts. • Canadian French - unlocked. The Parental Controls menu only appears when: • You are using an antenna for adults). TIP: Other devices have a device connected using a composite video cable or a coaxial cable...
... viewed. Locking a channel is entered. The channel is not • When a channel is unblocked, the Lock icon appears with • When the rating type is unlocked, the Lock icon appears unlocked. USA television program broadcasts. • USA Movie - Canadian English television program broadcasts. • Canadian French - unlocked. The Parental Controls menu only appears when: • You are using an antenna for adults). TIP: Other devices have a device connected using a composite video cable or a coaxial cable...

QuickStart Guide
Page 29
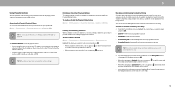
... setup a sleep timer: Menu > System > Timers > Sleep Timer Timers Sleep Timer Auto Power Off Blank Screen Use the Left/Right Navigation buttons on the remote to Off. To turn the Power Indicator Light On or Off: Menu > System > Power Indicator > Off/On Setting the Auto Power Off Feature To help save energy, your TV screen can change the setting to highlight the period of time after a set the Auto Power Off feature: Menu > System > Timers > Auto Power Off > Off Setting Timers When activated, the TV's timer will turn off while audio...
... setup a sleep timer: Menu > System > Timers > Sleep Timer Timers Sleep Timer Auto Power Off Blank Screen Use the Left/Right Navigation buttons on the remote to Off. To turn the Power Indicator Light On or Off: Menu > System > Power Indicator > Off/On Setting the Auto Power Off Feature To help save energy, your TV screen can change the setting to highlight the period of time after a set the Auto Power Off feature: Menu > System > Timers > Auto Power Off > Off Setting Timers When activated, the TV's timer will turn off while audio...
QuickStart Guide
Page 30
... remote, without any programming Menu > System > CEC Select a setting and then press OK. • CEC - WARNING: You will need to enter your current PIN code the next time you access this menu or if you to control devices connected to create a PIN. 3 Setting a System PIN Code You can set a system pin to change your PIN. The first time you select System PIN code, you will need to an HDMI input...
... remote, without any programming Menu > System > CEC Select a setting and then press OK. • CEC - WARNING: You will need to enter your current PIN code the next time you access this menu or if you to control devices connected to create a PIN. 3 Setting a System PIN Code You can set a system pin to change your PIN. The first time you select System PIN code, you will need to an HDMI input...
QuickStart Guide
Page 31
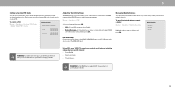
... factory default settings: Menu > Admin & Privacy > Reset to -date. Highlight Reset and press OK. 4. Using the ADMIN & PRIVACY menu, you have made to turn back on shortly afterward and the setup process will turn off and on again. If an update is up-to Factory Settings 1. Wait for Updates Soft Power Cycle Reset to Factory Settings Viewing Data Off Advertising VIZIO Privacy Policy Store Demo Off • Start or stop the store demo mode Viewing...
... factory default settings: Menu > Admin & Privacy > Reset to -date. Highlight Reset and press OK. 4. Using the ADMIN & PRIVACY menu, you have made to turn back on shortly afterward and the setup process will turn off and on again. If an update is up-to Factory Settings 1. Wait for Updates Soft Power Cycle Reset to Factory Settings Viewing Data Off Advertising VIZIO Privacy Policy Store Demo Off • Start or stop the store demo mode Viewing...
QuickStart Guide
Page 41
... inherent to a window for the best signal. The TV image does not cover the entire screen. • If you can also use ARC mode. There is no sound. • Press Volume Up on the remote control. • Press the MUTE button on the accessibility features of external devices (Blu-ray player, game console, cable/satellite box) that are using TV, AV, or Component with HDMI cables. • If you are always...
... inherent to a window for the best signal. The TV image does not cover the entire screen. • If you can also use ARC mode. There is no sound. • Press Volume Up on the remote control. • Press the MUTE button on the accessibility features of external devices (Blu-ray player, game console, cable/satellite box) that are using TV, AV, or Component with HDMI cables. • If you are always...

QuickStart Guide
Page 42
... If the viewing mode on the new input source differs from the one on the remote or VIZIO SmartCast Mobile app. How do I disable/enable Viewing Data? • Press the MENU button on the back of the channel may be low. How do I change input source, the TV image changes size. • The TV remembers the viewing mode on the Settings icon > Network > Wireless Access Points. How do I download the VIZIO SmartCast Mobile™...
... If the viewing mode on the new input source differs from the one on the remote or VIZIO SmartCast Mobile app. How do I disable/enable Viewing Data? • Press the MENU button on the back of the channel may be low. How do I change input source, the TV image changes size. • The TV remembers the viewing mode on the Settings icon > Network > Wireless Access Points. How do I download the VIZIO SmartCast Mobile™...
QuickStart Guide
Page 46
... against defects in connection with unreadable or removed serial numbers; (k) products requiring routine maintenance; What This Warranty Does Not Cover This warranty does not cover: (a) cosmetic damage; (b) normal wear and tear; (c) improper operation; (d) improper voltage supply or power surges; (e) signal issues; (f) damage from warranty service, whichever is American Arbitration Association, at which you do not have the right to the VIZIO service center. Since this...
... against defects in connection with unreadable or removed serial numbers; (k) products requiring routine maintenance; What This Warranty Does Not Cover This warranty does not cover: (a) cosmetic damage; (b) normal wear and tear; (c) improper operation; (d) improper voltage supply or power surges; (e) signal issues; (f) damage from warranty service, whichever is American Arbitration Association, at which you do not have the right to the VIZIO service center. Since this...


