User Manual
Page 1
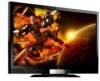
... free at our website www.vizio.com or fill in your new VIZIO SV420XVT1A LCD Television purchase. BRAVO, VIZIO AND THE V LOGO AND WHERE VISION MEETS VALUE AND OTHER VIZIO TRADEMARKS ARE THE INTELLECTUAL PROPERTY OF VIZIO INC. Version 6/2/2008 1 www.VIZIO.com ALL RIGHTS RESERVED. For... services for your VIZIO SV420XVT1A TV either at 888-VIZIOCE (888-849-4623). For peace of VIZIO, Inc. Write down the serial number located on the back of your new VIZIO SV420XVT1A Television. dba V, Inc. Manufactured under license from your SV420XVT1A Purchase Date VIZIO is a registered...
... free at our website www.vizio.com or fill in your new VIZIO SV420XVT1A LCD Television purchase. BRAVO, VIZIO AND THE V LOGO AND WHERE VISION MEETS VALUE AND OTHER VIZIO TRADEMARKS ARE THE INTELLECTUAL PROPERTY OF VIZIO INC. Version 6/2/2008 1 www.VIZIO.com ALL RIGHTS RESERVED. For... services for your VIZIO SV420XVT1A TV either at 888-VIZIOCE (888-849-4623). For peace of VIZIO, Inc. Write down the serial number located on the back of your new VIZIO SV420XVT1A Television. dba V, Inc. Manufactured under license from your SV420XVT1A Purchase Date VIZIO is a registered...

User Manual
Page 2
.... Continuous use the product if any heat source, i.e. Operating the product in environments with a third (grounding) pin. VIZIO SV420XVT1A User Manual Important Safety Instructions This product is designed and manufactured to operate within an equilateral triangle is intended to alert the... away from overheating, be used as a safety feature. If your dealer for moving the SV420XVT1A from being damaged, the following safety instructions before cleaning the SV420XVT1A LCD. Overloading can result in fire or electric shock. • The wall socket shall be installed...
.... Continuous use the product if any heat source, i.e. Operating the product in environments with a third (grounding) pin. VIZIO SV420XVT1A User Manual Important Safety Instructions This product is designed and manufactured to operate within an equilateral triangle is intended to alert the... away from overheating, be used as a safety feature. If your dealer for moving the SV420XVT1A from being damaged, the following safety instructions before cleaning the SV420XVT1A LCD. Overloading can result in fire or electric shock. • The wall socket shall be installed...

User Manual
Page 5
... sold separately Wall Mounts High Definition Cables Extra or replacement Remote VIZIO also offers Installation Services and Extended Warranty Services for your VIZIO SV420XVT1A To purchase or inquire about 400W; Avoid installing the TV in landscape orientation; any 90˚ clockwise or counter-clockwise installation may induce...Attaching the Safety Strap For when the SV420XVT1A is preferable to reduce the chance of the HDTV being pulled over. If you have a drywall finish it is not mounted on the wall, please see below 'Preparing Your LCD HDTV for Wall Mounting' for more information...
... sold separately Wall Mounts High Definition Cables Extra or replacement Remote VIZIO also offers Installation Services and Extended Warranty Services for your VIZIO SV420XVT1A To purchase or inquire about 400W; Avoid installing the TV in landscape orientation; any 90˚ clockwise or counter-clockwise installation may induce...Attaching the Safety Strap For when the SV420XVT1A is preferable to reduce the chance of the HDTV being pulled over. If you have a drywall finish it is not mounted on the wall, please see below 'Preparing Your LCD HDTV for Wall Mounting' for more information...

User Manual
Page 6
... the base to the SV420XVT1A. 4. VIZIO SV420XVT1A User Manual Preparing Your LCD HDTV for Wall Mounting The VIZIO SV420XVT1A can fit securely to a mount (sold separately) by utilizing the mounting holes in the center of the back panel of the TV. To find the perfect mount for the VIZIO SV420XVT1A, browse VIZIO's certified mount selection at www.VIZIO.com or call...
... the base to the SV420XVT1A. 4. VIZIO SV420XVT1A User Manual Preparing Your LCD HDTV for Wall Mounting The VIZIO SV420XVT1A can fit securely to a mount (sold separately) by utilizing the mounting holes in the center of the back panel of the TV. To find the perfect mount for the VIZIO SV420XVT1A, browse VIZIO's certified mount selection at www.VIZIO.com or call...

User Manual
Page 7
VIZIO SV420XVT1A User Manual Table of Contents Chapter 1 Basic Controls and Connections 10 1.1 Front Bezel ...10 1.2 Right Side Panel Controls ...10 1.3 Rear Panel Connections ...11 1.4 Right-Side Panel Connection ...12 1.5 VIZIO Universal Remote Control ...13 1.5.1 Insertion of Batteries in the Remote Control 16 1.5.2 Remote Control Range ...16 1.5.3 VIZIO...Television 32 3.1 Basic LCD HDTV Start Up ...32 3.2 Watching a TV Program ...36 3.3 ... Tint...41 4.2.7 Sharpness ...42 4.2.8 Advanced Video Features ...42 4.2.9 Reset Picture Mode ...45 4.3 DTV / TV Audio Adjustment ...46 4.3.1 Audio...
VIZIO SV420XVT1A User Manual Table of Contents Chapter 1 Basic Controls and Connections 10 1.1 Front Bezel ...10 1.2 Right Side Panel Controls ...10 1.3 Rear Panel Connections ...11 1.4 Right-Side Panel Connection ...12 1.5 VIZIO Universal Remote Control ...13 1.5.1 Insertion of Batteries in the Remote Control 16 1.5.2 Remote Control Range ...16 1.5.3 VIZIO...Television 32 3.1 Basic LCD HDTV Start Up ...32 3.2 Watching a TV Program ...36 3.3 ... Tint...41 4.2.7 Sharpness ...42 4.2.8 Advanced Video Features ...42 4.2.9 Reset Picture Mode ...45 4.3 DTV / TV Audio Adjustment ...46 4.3.1 Audio...

User Manual
Page 11
...the external audio from the LCD HDTV to here. OPTICAL AUDIO OUT - The white color band on the rear of the TV indicates this connection. 3. AC IN - Connect the primary source for purchase from a computer here. Your VIZIO Certified HDMI and HDMI-DVI... top box here. Connect the audio from the same source. VIZIO SV420XVT1A User Manual 1.3 Rear Panel Connections 1 4 5 8 9 2 3 6 7 10 1. The green color band on the rear of the TV indicates this all digital connector. DTV/TV - This custom communication port is for digital video such as ...
...the external audio from the LCD HDTV to here. OPTICAL AUDIO OUT - The white color band on the rear of the TV indicates this connection. 3. AC IN - Connect the primary source for purchase from a computer here. Your VIZIO Certified HDMI and HDMI-DVI... top box here. Connect the audio from the same source. VIZIO SV420XVT1A User Manual 1.3 Rear Panel Connections 1 4 5 8 9 2 3 6 7 10 1. The green color band on the rear of the TV indicates this all digital connector. DTV/TV - This custom communication port is for digital video such as ...

User Manual
Page 18
... HDMI cable. If you are already using the INPUT button on the remote or side of the LCD HDTV, or directly by pressing the HDMI button on the LCD TV supports High-bandwidth Digital Content Protection (HDCP). VIZIO SV420XVT1A User Manual 2.2 Connecting Your Cable or Satellite Box 2.2.1 Using HDMI Cable and Satellite Boxes that have...
... HDMI cable. If you are already using the INPUT button on the remote or side of the LCD HDTV, or directly by pressing the HDMI button on the LCD TV supports High-bandwidth Digital Content Protection (HDCP). VIZIO SV420XVT1A User Manual 2.2 Connecting Your Cable or Satellite Box 2.2.1 Using HDMI Cable and Satellite Boxes that have...

User Manual
Page 19
... with the DVI output on the power to the audio connectors associated with DVI: 1. Turn on your cable or satellite operator. The LCD TV will recognize the DVI connection and obtain audio information from the audio connectors near HDMI2 input. Refer to your HDTV Set-Top Box user...and connect the other end to the LCD HDTV and HDTV Set-Top Box. 5. VIZIO SV420XVT1A User Manual For Cable or Satellite Boxes with the HDMI input (white area) at the rear of the LCD HDTV, or directly by pressing the HDMI button on the LCD TV supports High-bandwidth Digital Content Protection (...
... with the DVI output on the power to the audio connectors associated with DVI: 1. Turn on your cable or satellite operator. The LCD TV will recognize the DVI connection and obtain audio information from the audio connectors near HDMI2 input. Refer to your HDTV Set-Top Box user...and connect the other end to the LCD HDTV and HDTV Set-Top Box. 5. VIZIO SV420XVT1A User Manual For Cable or Satellite Boxes with the HDMI input (white area) at the rear of the LCD HDTV, or directly by pressing the HDMI button on the LCD TV supports High-bandwidth Digital Content Protection (...

User Manual
Page 20
...row of connectors nearest to you when viewing from the rear of the TV) at the rear of the LCD HDTV. 3. Connect the PrCr (red color) connector on the power to the LCD HDTV and HDTV Set-Top Box. 2. VIZIO SV420XVT1A User Manual 2.2.2 Using Component Video Connecting your HDTV Set-Top Box to... the corresponding Pr Cr (red color) connector in the Component 1 group (green color area - Turn off the power to the LCD HDTV and HDTV Set-Top...
...row of connectors nearest to you when viewing from the rear of the TV) at the rear of the LCD HDTV. 3. Connect the PrCr (red color) connector on the power to the LCD HDTV and HDTV Set-Top Box. 2. VIZIO SV420XVT1A User Manual 2.2.2 Using Component Video Connecting your HDTV Set-Top Box to... the corresponding Pr Cr (red color) connector in the Component 1 group (green color area - Turn off the power to the LCD HDTV and HDTV Set-Top...

User Manual
Page 21
...the program guides, or consult your cable, satellite or TV station operator. Refer to the DTV/TV CABLE/ANTENNA connector at the rear of the LCD HDTV, or directly by pressing the TV button on the power to the LCD HDTV. 2. Turn on the Remote Control. Digital broadcasts ...INPUT button on the remote or side of the LCD HDTV. 3. Refer to www.antennaweb.org for DTV 1. Note: a) b) c) Not all digital TV broadcasts are not available in all areas. Make sure the antenna and coaxial cable are correctly grounded. VIZIO SV420XVT1A User Manual 2.3 Connecting Coaxial (RF) 2.3.1 ...
...the program guides, or consult your cable, satellite or TV station operator. Refer to the DTV/TV CABLE/ANTENNA connector at the rear of the LCD HDTV, or directly by pressing the TV button on the power to the LCD HDTV. 2. Turn on the Remote Control. Digital broadcasts ...INPUT button on the remote or side of the LCD HDTV. 3. Refer to www.antennaweb.org for DTV 1. Note: a) b) c) Not all digital TV broadcasts are not available in all areas. Make sure the antenna and coaxial cable are correctly grounded. VIZIO SV420XVT1A User Manual 2.3 Connecting Coaxial (RF) 2.3.1 ...

User Manual
Page 22
... or Cable through your VCR. Turn off the power to the LCD HDTV and VCR. 4. Turn on the Remote Control. Select TV using the INPUT button on the remote or side of the LCD HDTV. 3. Version 6/2/2008 22 www.VIZIO.com Connect the coaxial (RF) connector from your VCR to the...on the power to the LCD HDTV. 2. Note: If you have an off the power to the LCD HDTV. 4. Turn on the rear of the LCD HDTV 3. Turn off -air antenna or cable TV, connect it to the DTV/TV CABLE/ANTENNA connector at the rear of your VCR 1. VIZIO SV420XVT1A User Manual 2.3.2 Using Your...
... or Cable through your VCR. Turn off the power to the LCD HDTV and VCR. 4. Turn on the Remote Control. Select TV using the INPUT button on the remote or side of the LCD HDTV. 3. Version 6/2/2008 22 www.VIZIO.com Connect the coaxial (RF) connector from your VCR to the...on the power to the LCD HDTV. 2. Note: If you have an off the power to the LCD HDTV. 4. Turn on the rear of the LCD HDTV 3. Turn off -air antenna or cable TV, connect it to the DTV/TV CABLE/ANTENNA connector at the rear of your VCR 1. VIZIO SV420XVT1A User Manual 2.3.2 Using Your...

User Manual
Page 23
... or side of the LCD HDTV, or directly by pressing the HDMI button on the Remote Control. Note: To maintain the display quality, use the HDMI 1 input for connecting your DVD player to your DVD player. 4. Turn off the power to 10 meters. VIZIO SV420XVT1A User Manual 2.4 Connecting ... such as HDMI (High Definition Multimedia Interface) should be connected to the HDMI input of the VIZIO SV420XVT1A for optimal results. Version 6/2/2008 23 www.VIZIO.com Based on the power to use a VIZIO certified HDMI cable. Select HDMI using the HDMI1 input for another component, or you do not ...
... or side of the LCD HDTV, or directly by pressing the HDMI button on the Remote Control. Note: To maintain the display quality, use the HDMI 1 input for connecting your DVD player to your DVD player. 4. Turn off the power to 10 meters. VIZIO SV420XVT1A User Manual 2.4 Connecting ... such as HDMI (High Definition Multimedia Interface) should be connected to the HDMI input of the VIZIO SV420XVT1A for optimal results. Version 6/2/2008 23 www.VIZIO.com Based on the power to use a VIZIO certified HDMI cable. Select HDMI using the HDMI1 input for another component, or you do not ...

User Manual
Page 24
...other end to the HDMI2 Input (white color area) at the rear of the LCD HDTV. 4. Version 6/2/2008 24 www.VIZIO.com For DVD Players with the HDMI input (white area) at the rear of the LCD HDTV. 3. Using an audio cable (white and red connectors), connect the cable to... the DVI output on your DVD player and the HDMI end to the audio connectors associated with DVI: VIZIO SV420XVT1A User Manual 1. Refer to the LCD HDTV and DVD player. 2. The LCD TV will recognize the DVI connection and obtain audio information from the audio connectors near HDMI2 input. Turn on ...
...other end to the HDMI2 Input (white color area) at the rear of the LCD HDTV. 4. Version 6/2/2008 24 www.VIZIO.com For DVD Players with the HDMI input (white area) at the rear of the LCD HDTV. 3. Using an audio cable (white and red connectors), connect the cable to... the DVI output on your DVD player and the HDMI end to the audio connectors associated with DVI: VIZIO SV420XVT1A User Manual 1. Refer to the LCD HDTV and DVD player. 2. The LCD TV will recognize the DVI connection and obtain audio information from the audio connectors near HDMI2 input. Turn on ...

User Manual
Page 25
... or side of the LCD HDTV. 4. VIZIO SV420XVT1A User Manual 2.4.2 Using Component Video Connecting your DVD player to the corresponding PbCb (blue color) connector in the Component 1 group (green color area - Connect the Y (green color) connector on your DVD player to you when viewing from the rear of the TV) at the rear of...
... or side of the LCD HDTV. 4. VIZIO SV420XVT1A User Manual 2.4.2 Using Component Video Connecting your DVD player to the corresponding PbCb (blue color) connector in the Component 1 group (green color area - Connect the Y (green color) connector on your DVD player to you when viewing from the rear of the TV) at the rear of...

User Manual
Page 26
...associated with the S-Video output on your DVD player to the audio connectors associated with the AV1 input at the rear of the LCD HDTV. 4. Version 6/2/2008 26 www.VIZIO.com Select AV1 using the INPUT button on the rear of your DVD player and connect the other end to the S-Video...of the LCD HDTV, or directly by pressing the AV button on the power to the LCD HDTV and DVD player. 2. Turn off the power to the LCD HDTV and DVD player. 5. Connect the S-Video jack on the remote or side of the product. Note: Refer to your DVD Player (Good): VIZIO SV420XVT1A User Manual...
...associated with the S-Video output on your DVD player to the audio connectors associated with the AV1 input at the rear of the LCD HDTV. 4. Version 6/2/2008 26 www.VIZIO.com Select AV1 using the INPUT button on the rear of your DVD player and connect the other end to the S-Video...of the LCD HDTV, or directly by pressing the AV button on the power to the LCD HDTV and DVD player. 2. Turn off the power to the LCD HDTV and DVD player. 5. Connect the S-Video jack on the remote or side of the product. Note: Refer to your DVD Player (Good): VIZIO SV420XVT1A User Manual...

User Manual
Page 27
... (white color) audio input connectors in the AV1 input row (yellow color area) of connectors at the rear of the LCD HDTV. 3. Turn on your DVD Player (Good): VIZIO SV420XVT1A User Manual 1. Select AV1 using the INPUT button on the Remote Control. Connect the R (red color) and L (...white color) audio connectors on your DVD player user manual for more information about the video output requirements of the LCD HDTV, or directly by...
... (white color) audio input connectors in the AV1 input row (yellow color area) of connectors at the rear of the LCD HDTV. 3. Turn on your DVD Player (Good): VIZIO SV420XVT1A User Manual 1. Select AV1 using the INPUT button on the Remote Control. Connect the R (red color) and L (...white color) audio connectors on your DVD player user manual for more information about the video output requirements of the LCD HDTV, or directly by...

User Manual
Page 28
VIZIO SV420XVT1A User Manual 2.5 Connecting Your VCR or Video Camera 1. Select AV1 using the INPUT button on the power to the LCD HDTV and VCR or Video Camera. 2. Turn on the remote or side of the LCD HDTV. 3. Version 6/2/2008 28 www.VIZIO.com Connect the S-Video jack on the rear of ...your VCR or Video Camera user manual for more information about the video output requirements of the LCD HDTV. 4. Note: Refer to the audio connectors ...
VIZIO SV420XVT1A User Manual 2.5 Connecting Your VCR or Video Camera 1. Select AV1 using the INPUT button on the power to the LCD HDTV and VCR or Video Camera. 2. Turn on the remote or side of the LCD HDTV. 3. Version 6/2/2008 28 www.VIZIO.com Connect the S-Video jack on the rear of ...your VCR or Video Camera user manual for more information about the video output requirements of the LCD HDTV. 4. Note: Refer to the audio connectors ...

User Manual
Page 29
.... This is active when receiving audio with HD Programs If your Receiver/Amp user manual to external speakers. 2.6.1 Optical Output of the LCD HDTV. Version 6/2/2008 29 www.VIZIO.com Using an audio cable (white and red connectors), connect the cable to the audio input connectors on the remote control to select...-Screen Display (OSD) menu. 5. Press on the remote control to select SPEAKERS. 7. Press ► on the Receiver/Amp and connect the other end to the LCD HDTV and Receiver/Amp. 2. VIZIO SV420XVT1A User Manual 2.6 Connecting an external Receiver/Amp 1.
.... This is active when receiving audio with HD Programs If your Receiver/Amp user manual to external speakers. 2.6.1 Optical Output of the LCD HDTV. Version 6/2/2008 29 www.VIZIO.com Using an audio cable (white and red connectors), connect the cable to the audio input connectors on the remote control to select...-Screen Display (OSD) menu. 5. Press on the remote control to select SPEAKERS. 7. Press ► on the Receiver/Amp and connect the other end to the LCD HDTV and Receiver/Amp. 2. VIZIO SV420XVT1A User Manual 2.6 Connecting an external Receiver/Amp 1.

User Manual
Page 30
... resolution when using the INPUT button on your pc computer timing mode to the RGB PC input (blue area) at the rear of the LCD HDTV. Connect the Audio Out on the remote or side of the product. For a better picture quality when connecting a pc computer through ... Audio input (blue area) at 60Hz. Note: a) b) c) Turn off the power to the LCD HDTV and PC Computer. Version 6/2/2008 30 www.VIZIO.com Select RGB using the parameters and values given to you on the power to the LCD HDTV and PC Computer. 2.7 Connecting a PC Computer VIZIO SV420XVT1A User Manual 1. 2. 3. 4. 5.
... resolution when using the INPUT button on your pc computer timing mode to the RGB PC input (blue area) at the rear of the LCD HDTV. Connect the Audio Out on the remote or side of the product. For a better picture quality when connecting a pc computer through ... Audio input (blue area) at 60Hz. Note: a) b) c) Turn off the power to the LCD HDTV and PC Computer. Version 6/2/2008 30 www.VIZIO.com Select RGB using the parameters and values given to you on the power to the LCD HDTV and PC Computer. 2.7 Connecting a PC Computer VIZIO SV420XVT1A User Manual 1. 2. 3. 4. 5.

User Manual
Page 32
... button on the remote to go to Step 5. see pages 17 ~ 30 for details. 3.1 Basic LCD HDTV Start Up 1. Initial Setup After powering on the remote control and skip to the next screen. please ...press the EXIT key on the TV set, the Initial Setup screen will be displayed; a. Note: At this is not your .... 2. Version 6/2/2008 32 www.VIZIO.com Turning Power On Once all the components are using Cable (No Box) Service, press the ▼ button on the remote control. VIZIO SV420XVT1A User Manual Chapter 3 Setting Up to...
... button on the remote to go to Step 5. see pages 17 ~ 30 for details. 3.1 Basic LCD HDTV Start Up 1. Initial Setup After powering on the remote control and skip to the next screen. please ...press the EXIT key on the TV set, the Initial Setup screen will be displayed; a. Note: At this is not your .... 2. Version 6/2/2008 32 www.VIZIO.com Turning Power On Once all the components are using Cable (No Box) Service, press the ▼ button on the remote control. VIZIO SV420XVT1A User Manual Chapter 3 Setting Up to...


