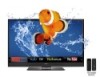
M3D550KD User Manual
Page 2
This product qualifies for ENERGY STAR in the "factory default" setting and this is the setting in which power savings will increase power consumption that could exceed the limits necessary to qualify for ENERGY STAR rating. SRS StudioSound HD is incorporated ... technology is a trademark of HDMI Licensing LLC. Dolby and the double-D symbol are trademarks or registered trademarks of SRS Labs, Inc. Changing the factory default picture settings or enabling other features will be achieved.
This product qualifies for ENERGY STAR in the "factory default" setting and this is the setting in which power savings will increase power consumption that could exceed the limits necessary to qualify for ENERGY STAR rating. SRS StudioSound HD is incorporated ... technology is a trademark of HDMI Licensing LLC. Dolby and the double-D symbol are trademarks or registered trademarks of SRS Labs, Inc. Changing the factory default picture settings or enabling other features will be achieved.

M3D550KD User Manual
Page 8
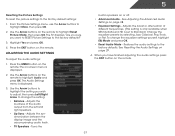
... 36 1 Back (Model M3D470KD 11 Remote Control - Table of Digital Closed Captions.. 23 Activating the Sleep Timer 23 Setting the Auto Power Off Feature 23 Adjusting the Picture Settings 24 Adjusting the Advanced Picture Settings 25 Adjusting the Color Temperature 26 Adjusting the Picture Size and Position 26 Resetting the Picture Settings 27 Adjusting the Audio Settings 27 Adjusting the...
... 36 1 Back (Model M3D470KD 11 Remote Control - Table of Digital Closed Captions.. 23 Activating the Sleep Timer 23 Setting the Auto Power Off Feature 23 Adjusting the Picture Settings 24 Adjusting the Advanced Picture Settings 25 Adjusting the Color Temperature 26 Adjusting the Picture Size and Position 26 Resetting the Picture Settings 27 Adjusting the Audio Settings 27 Adjusting the...
M3D550KD User Manual
Page 9
...Setting the Time Zone 37 Adjusting the CEC Settings 38 Using the Help Menu 38 Displaying System Information 39 Resetting the TV Settings 39 Restoring the TV to Factory Default Settings... 39 Using Guided Setup 40 Using the Info Window 41 Using the USB Media Player 42 Using the USB Media Player 42 Connecting a USB Thumb Drive to the TV 42 Playing USB Media 42 Using VIZIO...Profile 47 Removing a User Profile 48 Restoring the VIA Dock to the Factory Default Settings...... 48 How to View 3D 49 How Theater 3D Works 49 What You Need...
...Setting the Time Zone 37 Adjusting the CEC Settings 38 Using the Help Menu 38 Displaying System Information 39 Resetting the TV Settings 39 Restoring the TV to Factory Default Settings... 39 Using Guided Setup 40 Using the Info Window 41 Using the USB Media Player 42 Using the USB Media Player 42 Connecting a USB Thumb Drive to the TV 42 Playing USB Media 42 Using VIZIO...Profile 47 Removing a User Profile 48 Restoring the VIA Dock to the Factory Default Settings...... 48 How to View 3D 49 How Theater 3D Works 49 What You Need...
M3D550KD User Manual
Page 27
...- The TV displays, "3D viewing mode enabled. Go to -use on-screen menu. Select the 3D mode to match the content you must set the 3D mode to highlight the 3D icon and press OK. Please wear 3D glasses." Put on -screen menu is displayed. 3. Press the...8226; Change the input source • Change the screen aspect ratio • Set up closed captioning • Activate the sleep timer • Adjust the picture settings • Adjust the audio settings • Change network settings • Change TV settings • Access the help menu Changing the 3D Mode To correctly view 3D content...
...- The TV displays, "3D viewing mode enabled. Go to -use on-screen menu. Select the 3D mode to match the content you must set the 3D mode to highlight the 3D icon and press OK. Please wear 3D glasses." Put on -screen menu is displayed. 3. Press the...8226; Change the input source • Change the screen aspect ratio • Set up closed captioning • Activate the sleep timer • Adjust the picture settings • Adjust the audio settings • Change network settings • Change TV settings • Access the help menu Changing the 3D Mode To correctly view 3D content...
M3D550KD User Manual
Page 29
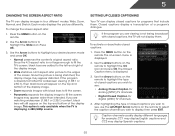
... the display image may appear wider than intended. Closed captions display a transcription of the display image. • Wide stretches a 4:3 aspect ratio picture to fill the screen. Press the MENU button on -screen menu is not large enough to fill the TV's screen, black bars are watching ...screen. Press the MENU button on the remote to select the caption channel you are added to the left and right of a program's dialogue. Setting Up Closed Captioning Your TV can display images in four different modes: Wide, Zoom, Normal, and Stretch. To activate or deactivate closed captions:...
... the display image may appear wider than intended. Closed captions display a transcription of the display image. • Wide stretches a 4:3 aspect ratio picture to fill the screen. Press the MENU button on -screen menu is not large enough to fill the TV's screen, black bars are watching ...screen. Press the MENU button on the remote to select the caption channel you are added to the left and right of a program's dialogue. Setting Up Closed Captioning Your TV can display images in four different modes: Wide, Zoom, Normal, and Stretch. To activate or deactivate closed captions:...
M3D550KD User Manual
Page 31
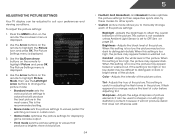
... suit your preferences and viewing conditions. Use the Up/Down Arrow buttons on the remote to OFF. Adjusts the edge sharpness of the picture settings: Backlight - Tint - To adjust the picture settings: 1. The Picture Settings menu is set to highlight the Picture icon and press OK. This setting is useful in adjusting the flesh tones in the most cases.
... suit your preferences and viewing conditions. Use the Up/Down Arrow buttons on the remote to OFF. Adjusts the edge sharpness of the picture settings: Backlight - Tint - To adjust the picture settings: 1. The Picture Settings menu is set to highlight the Picture icon and press OK. This setting is useful in adjusting the flesh tones in the most cases.
M3D550KD User Manual
Page 32
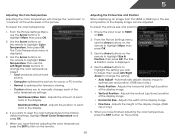
5 Adjusting the Advanced Picture Settings To adjust the advanced picture settings: 1. Use the Arrow buttons to highlight the setting you have finished adjusting the Advanced Picture Settings, press the EXIT button on the remote. 25 Allows selection of the type of the image when the camera ...; Ambient Light Sensor - The ambient light sensor detects the light levels in the image caused by the digitizing of brightness. From the Picture Settings menu, use the Arrow buttons on the remote to highlight More, then press OK. 2. Diminishes artifacts in the room and automatically adjusts...
5 Adjusting the Advanced Picture Settings To adjust the advanced picture settings: 1. Use the Arrow buttons to highlight the setting you have finished adjusting the Advanced Picture Settings, press the EXIT button on the remote. 25 Allows selection of the type of the image when the camera ...; Ambient Light Sensor - The ambient light sensor detects the light levels in the image caused by the digitizing of brightness. From the Picture Settings menu, use the Arrow buttons on the remote to highlight More, then press OK. 2. Diminishes artifacts in the room and automatically adjusts...
M3D550KD User Manual
Page 33
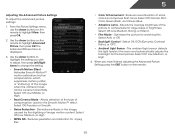
... have finished adjusting the color temperature, press the EXIT button on the remote to the factory default settings, highlight Reset Color Temperature and press OK. 5. From the Picture Settings menu, use as a PC monitor. • Normal is set to optimal size and position. (RGB input only.) • Horiz. Use the Arrow buttons on the...
... have finished adjusting the color temperature, press the EXIT button on the remote to the factory default settings, highlight Reset Color Temperature and press OK. 5. From the Picture Settings menu, use as a PC monitor. • Normal is set to optimal size and position. (RGB input only.) • Horiz. Use the Arrow buttons on the...
M3D550KD User Manual
Page 34
... Sync - Press the MENU button on page 29. 4. Restores the audio settings to the factory default settings: 1. 5 Resetting the Picture Settings To reset the picture settings to the factory defaults. The Audio Settings menu is displayed. 3. See Resetting the Audio Settings on the remote. To change the setting: • Balance - The TV displays, "Are you sure you have finished...
... Sync - Press the MENU button on page 29. 4. Restores the audio settings to the factory default settings: 1. 5 Resetting the Picture Settings To reset the picture settings to the factory defaults. The Audio Settings menu is displayed. 3. See Resetting the Audio Settings on the remote. To change the setting: • Balance - The TV displays, "Are you sure you have finished...

M3D550KD User Manual
Page 46
...To display a summary of the on -screen menu is displayed. 8. Press the MENU button on the remote. The TV will erase any custom settings." 4. Use the Arrow buttons on the remote to highlight the Help icon and press OK. Highlight Yes and press OK. 5. To restore ...back on -screen menu is displayed. 3. The Help menu is displayed. 2. Highlight System Info and press OK. 10. Resetting the TV Settings To reset the TV's picture and audio settings: 1. Highlight Clear Memory (Factory Default) and press OK. 4. This will reset shortly." 6. Wait for the TV to Restore Defaults?...
...To display a summary of the on -screen menu is displayed. 8. Press the MENU button on the remote. The TV will erase any custom settings." 4. Use the Arrow buttons on the remote to highlight the Help icon and press OK. Highlight Yes and press OK. 5. To restore ...back on -screen menu is displayed. 3. The Help menu is displayed. 2. Highlight System Info and press OK. 10. Resetting the TV Settings To reset the TV's picture and audio settings: 1. Highlight Clear Memory (Factory Default) and press OK. 4. This will reset shortly." 6. Wait for the TV to Restore Defaults?...
M3D550KD User Manual
Page 59
See Scanning for channels. See Adjusting the Picture Settings on the remote to select a different input source. See Resetting the Picture Settings on page 27 • Check all devices are only pressing one button at a time. • Point the remote directly at the TV when pressing a button. &#... on the remote or on the side of the TV to turn the TV on. See Resetting the Picture Settings on page 27 • Press the INPUT button on page 24 • Reset the picture settings. There is no power. • Ensure the TV is no headphones are connected to the TV. • Check...
See Scanning for channels. See Adjusting the Picture Settings on the remote to select a different input source. See Resetting the Picture Settings on page 27 • Check all devices are only pressing one button at a time. • Point the remote directly at the TV when pressing a button. &#... on the remote or on the side of the TV to turn the TV on. See Resetting the Picture Settings on page 27 • Press the INPUT button on page 24 • Reset the picture settings. There is no power. • Ensure the TV is no headphones are connected to the TV. • Check...
M3D550KD User Manual
Page 60
...are using TV, AV1, AV2, or Component with 480i input, press the WIDE button on each input source. When I change the screen mode. The picture is distorted. • Nearby electrical devices may be low. The display image does not cover the entire screen. • If you are in the on...-screen menu are set correctly. • If you are using an antenna, the signal strength of the channel may not display correctly. This up -converted (improved) to change...
...are using TV, AV1, AV2, or Component with 480i input, press the WIDE button on each input source. When I change the screen mode. The picture is distorted. • Nearby electrical devices may be low. The display image does not cover the entire screen. • If you are in the on...-screen menu are set correctly. • If you are using an antenna, the signal strength of the channel may not display correctly. This up -converted (improved) to change...
M3D470KD Quick Start Guide
Page 19
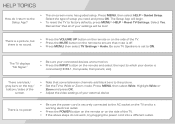
The Setup App will be lost! There is a picture, but there is no power. • Be sure the power cord is off. • Press MENU, then select TV Settings > Audio. Be sure TV Speakers is connected (HDMI-1, Composite, Component, etc). Press ...on the TV and to ON. Highlight Wide or Zoom and press OK. • Adjust the video settings of your settings will begin. • To reset the TV to Wide or Zoom mode. HELP TOPICS How do not ... the remote to ensure that some television channels add black bars to the picture. • Set the TV to factory defaults, press MENU > HELP > Reset TV...
The Setup App will be lost! There is a picture, but there is no power. • Be sure the power cord is off. • Press MENU, then select TV Settings > Audio. Be sure TV Speakers is connected (HDMI-1, Composite, Component, etc). Press ...on the TV and to ON. Highlight Wide or Zoom and press OK. • Adjust the video settings of your settings will begin. • To reset the TV to Wide or Zoom mode. HELP TOPICS How do not ... the remote to ensure that some television channels add black bars to the picture. • Set the TV to factory defaults, press MENU > HELP > Reset TV...


