M320VT User Manual
Page 1
... in your new VIZIO High Definition LCD Television purchase. This product qualifies for your support. VIZIO M320VT User Manual Dear VIZIO Customer, Congratulations on the back of Dolby Laboratories. Changing the factory default picture setting or enabling other features will increase power consumption that could exceed the limits necessary to qualify for your VIZIO LCD HDTV, please visit...
... in your new VIZIO High Definition LCD Television purchase. This product qualifies for your support. VIZIO M320VT User Manual Dear VIZIO Customer, Congratulations on the back of Dolby Laboratories. Changing the factory default picture setting or enabling other features will increase power consumption that could exceed the limits necessary to qualify for your VIZIO LCD HDTV, please visit...
M320VT User Manual
Page 5
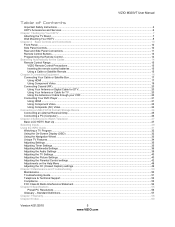
VIZIO M320VT User Manual Table of Contents Important Safety Instructions...2 HDTV Accessories and Services ...6 Chapter 1 Setting Up Your HDTV ...7 Attaching the TV Stand ...7 Wall Mounting Your HDTV ...8 Chapter 2 Basic Controls and Connections ...10 Front Panel...10 Side Panel Controls...10 Rear and Side Panel...Storage Device...24 Connecting an external Receiver/Amp ...25 Connecting a PC (Computer) ...26 Chapter 4 Setting Up to Watch Television ...27 Basic LCD HDTV Start Up ...27 Selecting Inputs...29 Using the INFO Guide ...31 Watching a TV Program ...32 Using the On-Screen Display (OSD) ......
VIZIO M320VT User Manual Table of Contents Important Safety Instructions...2 HDTV Accessories and Services ...6 Chapter 1 Setting Up Your HDTV ...7 Attaching the TV Stand ...7 Wall Mounting Your HDTV ...8 Chapter 2 Basic Controls and Connections ...10 Front Panel...10 Side Panel Controls...10 Rear and Side Panel...Storage Device...24 Connecting an external Receiver/Amp ...25 Connecting a PC (Computer) ...26 Chapter 4 Setting Up to Watch Television ...27 Basic LCD HDTV Start Up ...27 Selecting Inputs...29 Using the INFO Guide ...31 Watching a TV Program ...32 Using the On-Screen Display (OSD) ......

M320VT User Manual
Page 9
..., foam, cloth, etc) to prevent any damage to the TV. 7. To find the perfect mount for your HDTV face down on the wall for viewing. VIZIO M320VT User Manual Preparing your LCD HDTV for Wall Mounting Your VIZIO HDTV can fit securely to a mount (sold separately) by utilizing the mounting holes in the center of the back...
..., foam, cloth, etc) to prevent any damage to the TV. 7. To find the perfect mount for your HDTV face down on the wall for viewing. VIZIO M320VT User Manual Preparing your LCD HDTV for Wall Mounting Your VIZIO HDTV can fit securely to a mount (sold separately) by utilizing the mounting holes in the center of the back...

M320VT User Manual
Page 15
VIZIO M320VT User Manual Remote Control Range • The effective range of the remote control is ... the remote. Precautionary Tips for Inserting the Batteries: • Only use a cable or satellite remote to work the LCD HDTV, refer to your cable or satellite remote uses a 4-digit code, try 11758 and then, if that may also.... Remove the battery cover on the front of batteries. Insert two AA batteries (included) into the housing. If your LCD HDTV. VIZIO Remote Control Precautions • Keep the remote dry and away from heat sources and humidity. • If your cable ...
VIZIO M320VT User Manual Remote Control Range • The effective range of the remote control is ... the remote. Precautionary Tips for Inserting the Batteries: • Only use a cable or satellite remote to work the LCD HDTV, refer to your cable or satellite remote uses a 4-digit code, try 11758 and then, if that may also.... Remove the battery cover on the front of batteries. Insert two AA batteries (included) into the housing. If your LCD HDTV. VIZIO Remote Control Precautions • Keep the remote dry and away from heat sources and humidity. • If your cable ...
M320VT User Manual
Page 17
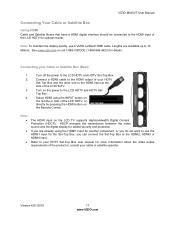
VIZIO M320VT User Manual Connecting Your Cable or Satellite Box Using HDMI Cable and Satellite Boxes that have a HDMI digital interface should be connected to the HDMI input of the product or consult your cable or satellite operator. Connecting your HDTV Set-Top Box user manual for more ... added security and protection. Select HDMI using the HDMI1 input for another component, or you are available up to the LCD HDTV and HDTV Set- If you do not want to use a VIZIO certified HDMI cable. Note: To maintain the display quality, use the HDMI1 input for optimal results. Note: •...
VIZIO M320VT User Manual Connecting Your Cable or Satellite Box Using HDMI Cable and Satellite Boxes that have a HDMI digital interface should be connected to the HDMI input of the product or consult your cable or satellite operator. Connecting your HDTV Set-Top Box user manual for more ... added security and protection. Select HDMI using the HDMI1 input for another component, or you are available up to the LCD HDTV and HDTV Set- If you do not want to use a VIZIO certified HDMI cable. Note: To maintain the display quality, use the HDMI1 input for optimal results. Note: •...
M320VT User Manual
Page 18
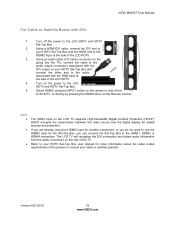
VIZIO M320VT User Manual For Cable or Satellite Boxes with the DVI output on the rear of the TV. Turn off the power to the audio output connectors associated with DVI: 1. Note: • • • The HDMI input on the power to the LCD HDTV and HDTV Set-Top Box. 5. Refer to ...security and protection. Using an audio cable (1/8' stereo connector on the going into the TV), connect the cable to the LCD HDTV and HDTV Set-Top Box. 2. The LCD TV will recognize the DVI connection and obtain audio information from the audio connectors on your cable or satellite operator. HDCP ...
VIZIO M320VT User Manual For Cable or Satellite Boxes with the DVI output on the rear of the TV. Turn off the power to the audio output connectors associated with DVI: 1. Note: • • • The HDMI input on the power to the LCD HDTV and HDTV Set-Top Box. 5. Refer to ...security and protection. Using an audio cable (1/8' stereo connector on the going into the TV), connect the cable to the LCD HDTV and HDTV Set-Top Box. 2. The LCD TV will recognize the DVI connection and obtain audio information from the audio connectors on your cable or satellite operator. HDCP ...
M320VT User Manual
Page 19
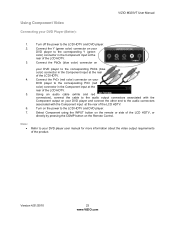
... Y (green color) connector in the Component input at the rear of the LCD HDTV. 3. Turn off the power to the audio connectors associated with the Component output on your Cable or Satellite Box (Better) VIZIO M320VT User Manual 1. Using an audio cable (white and red connectors), connect the... cable to the LCD HDTV and HDTV Set-Top Box. 7. Select Component using the INPUT button on the remote or side...
... Y (green color) connector in the Component input at the rear of the LCD HDTV. 3. Turn off the power to the audio connectors associated with the Component output on your Cable or Satellite Box (Better) VIZIO M320VT User Manual 1. Using an audio cable (white and red connectors), connect the... cable to the LCD HDTV and HDTV Set-Top Box. 7. Select Component using the INPUT button on the remote or side...

M320VT User Manual
Page 20
...or "Antenna Out" connector on the power to the DTV/TV CABLE/ANTENNA connector at the rear of the LCD HDTV. 3. Version 4/21/2010 20 www.VIZIO.com Digital broadcasts are High Definition (HD). Using the Antenna or Cable through your cable, satellite or TV ...the rear of the LCD HDTV 3. Refer to the LCD HDTV. 2. Turn off the power to the LCD HDTV. 2. Note: • • • Not all digital TV broadcasts are not available in all areas. Make sure the antenna and coaxial cable are correctly grounded. VIZIO M320VT User Manual Connecting Coaxial...
...or "Antenna Out" connector on the power to the DTV/TV CABLE/ANTENNA connector at the rear of the LCD HDTV. 3. Version 4/21/2010 20 www.VIZIO.com Digital broadcasts are High Definition (HD). Using the Antenna or Cable through your cable, satellite or TV ...the rear of the LCD HDTV 3. Refer to the LCD HDTV. 2. Turn off the power to the LCD HDTV. 2. Note: • • • Not all digital TV broadcasts are not available in all areas. Make sure the antenna and coaxial cable are correctly grounded. VIZIO M320VT User Manual Connecting Coaxial...
M320VT User Manual
Page 21
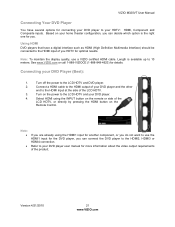
... 1-888-VIZIOCE (1-888-849-4623) for more information about the video output requirements of the LCD HDTV, or directly by pressing the HDMI button on your DVD Player (Best): 1. VIZIO M320VT User Manual Connecting Your DVD Player You have a digital interface such as HDMI (High Definition ...Multimedia Interface) should be connected to the HDMI input of the LCD HDTV. 3. Note: • • If you can connect...
... 1-888-VIZIOCE (1-888-849-4623) for more information about the video output requirements of the LCD HDTV, or directly by pressing the HDMI button on your DVD Player (Best): 1. VIZIO M320VT User Manual Connecting Your DVD Player You have a digital interface such as HDMI (High Definition ...Multimedia Interface) should be connected to the HDMI input of the LCD HDTV. 3. Note: • • If you can connect...
M320VT User Manual
Page 22
... DVD player and the HDMI end to the audio associated with DVI: VIZIO M320VT User Manual 1. The LCD TV will recognize the DVI connection and obtain audio information from the audio connectors on the power to the LCD HDTV and your HDTV Set-Top Box and connect the other end to the HDMI Input at... the side of the LCD HDTV. 4. Note: • • If you are already using the INPUT button on the ...
... DVD player and the HDMI end to the audio associated with DVI: VIZIO M320VT User Manual 1. The LCD TV will recognize the DVI connection and obtain audio information from the audio connectors on the power to the LCD HDTV and your HDTV Set-Top Box and connect the other end to the HDMI Input at... the side of the LCD HDTV. 4. Note: • • If you are already using the INPUT button on the ...
M320VT User Manual
Page 23
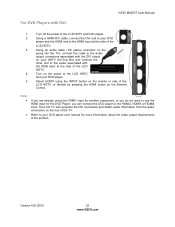
...Component output on your DVD player and connect the other end to the LCD HDTV and DVD player. 7. Select Component using the INPUT button on the Remote Control. Turn off the power to your DVD Player (Better): VIZIO M320VT User Manual 1. Turn on the power to the audio connectors associated with... the Component input at the rear of the LCD HDTV, or directly by pressing the COMP button on the remote or side of ...
...Component output on your DVD player and connect the other end to the LCD HDTV and DVD player. 7. Select Component using the INPUT button on the Remote Control. Turn off the power to your DVD Player (Better): VIZIO M320VT User Manual 1. Turn on the power to the audio connectors associated with... the Component input at the rear of the LCD HDTV, or directly by pressing the COMP button on the remote or side of ...
M320VT User Manual
Page 24
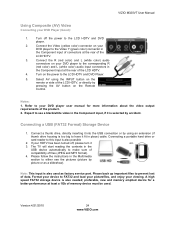
...and memory emptied device for more information about the video output requirements of the LCD HDTV, or directly by accident. Version 4/21/2010 24 www.VIZIO.com Connecting a USB (FAT32 Format) Storage Device 1. VIZIO M320VT User Manual Using Composite (AV) Video Connecting your viewing. The TV will ...the INPUT button on your DVD player to the Video Y (green color) connector in the Component input of connectors at the rear of the LCD HDTV. 4. Connect the Video (yellow color) connector on . 3. Connecting a portable hard drive or card reader to the corresponding R (red color)...
...and memory emptied device for more information about the video output requirements of the LCD HDTV, or directly by accident. Version 4/21/2010 24 www.VIZIO.com Connecting a USB (FAT32 Format) Storage Device 1. VIZIO M320VT User Manual Using Composite (AV) Video Connecting your viewing. The TV will ...the INPUT button on your DVD player to the Video Y (green color) connector in the Component input of connectors at the rear of the LCD HDTV. 4. Connect the Video (yellow color) connector on . 3. Connecting a portable hard drive or card reader to the corresponding R (red color)...
M320VT User Manual
Page 25
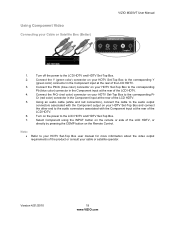
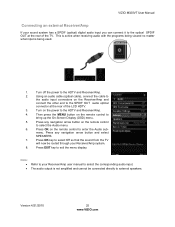
...connectors on the Receiver/Amp and connect the other end to the SPDIF OUT audio optical connector at the rear of the LCD HDTV. 3. Press EXIT key to the HDTV and Receiver/Amp. 2. This is active when receiving audio with the programs being viewed no matter what input is not amplified...the HDTV and Receiver/Amp. 4. Press OK key to select Off so that the sound from the TV will now be connected directly to external speakers. Turn off the power to exit the menu display. Press any navigation arrow button on the remote control to enter the Audio sub- VIZIO M320VT ...
...connectors on the Receiver/Amp and connect the other end to the SPDIF OUT audio optical connector at the rear of the LCD HDTV. 3. Press EXIT key to the HDTV and Receiver/Amp. 2. This is active when receiving audio with the programs being viewed no matter what input is not amplified...the HDTV and Receiver/Amp. 4. Press OK key to select Off so that the sound from the TV will now be connected directly to external speakers. Turn off the power to exit the menu display. Press any navigation arrow button on the remote control to enter the Audio sub- VIZIO M320VT ...

M320VT User Manual
Page 26
...of your pc computer and the other end to the LCD HDTV and Computer. 5. Turn on the remote or side of the LCD HDTV. 3. Select RGB using the INPUT button on the power to the RGB PC input at 60Hz. Connecting a PC (Computer) VIZIO M320VT User Manual 1. Note: • • •...; For a better picture quality when connecting a computer through RGB PC, set your personal computer timing mode to your personal computer to the LCD HDTV and PC Computer. 2. A RGB (VGA) cable and...
...of your pc computer and the other end to the LCD HDTV and Computer. 5. Turn on the remote or side of the LCD HDTV. 3. Select RGB using the INPUT button on the power to the RGB PC input at 60Hz. Connecting a PC (Computer) VIZIO M320VT User Manual 1. Note: • • •...; For a better picture quality when connecting a computer through RGB PC, set your personal computer timing mode to your personal computer to the LCD HDTV and PC Computer. 2. A RGB (VGA) cable and...

M320VT User Manual
Page 27
...the next option will allow you to switch your selection back to turn on the back of your HDTV. Press the OK button to confirm the selection. Version 4/21/2010 27 www.VIZIO.com If Retail Mode is selected by mistake; Press OK to confirm your choice. 7. Connecting the... desired components to save energy. Select between Home Mode and Retail Mode, selecting Home Mode will provide you an opportunity to your HDTV as described in "Connecting Devices." 2. VIZIO M320VT User Manual Chapter 4 Setting Up to select your choice. Then connect the other end into a power outlet. 3. Next screen ...
...the next option will allow you to switch your selection back to turn on the back of your HDTV. Press the OK button to confirm the selection. Version 4/21/2010 27 www.VIZIO.com If Retail Mode is selected by mistake; Press OK to confirm your choice. 7. Connecting the... desired components to save energy. Select between Home Mode and Retail Mode, selecting Home Mode will provide you an opportunity to your HDTV as described in "Connecting Devices." 2. VIZIO M320VT User Manual Chapter 4 Setting Up to select your choice. Then connect the other end into a power outlet. 3. Next screen ...
M320VT User Manual
Page 52
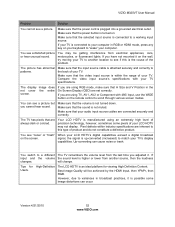
... possible some pixels of precision technology, however, sometimes some image distortions can occur. You see "noise" or "trash" When your LCD HDTV's digital capabilities exceed a digital broadcast on . signal, the signal is attached securely and correctly to this is higher or lower from... High Definition Content. VIZIO M320VT User Manual Problem Solution You cannot see a distorted picture or hear unusual sound. The display image does not cover the entire screen. Version 4/21/2010 52 www.VIZIO.com The picture has abnormal patterns. Your LCD HDTV is connected to your...
... possible some pixels of precision technology, however, sometimes some image distortions can occur. You see "noise" or "trash" When your LCD HDTV's digital capabilities exceed a digital broadcast on . signal, the signal is attached securely and correctly to this is higher or lower from... High Definition Content. VIZIO M320VT User Manual Problem Solution You cannot see a distorted picture or hear unusual sound. The display image does not cover the entire screen. Version 4/21/2010 52 www.VIZIO.com The picture has abnormal patterns. Your LCD HDTV is connected to your...

M320VT Quick Start Guide
Page 1
... EVEN HAS EASY TO ACCESS 1 SIDE INPUTS 4 POWER THE TV Turn on your User Manual for more details. ® M320VT / M370VT LED LCD HDTV 1 BEFORE YOU BEGIN What's In the Box • VIZIO HDTV • VIZIO Remote Control (including 2 AA batteries) • User Manual (read Safety Guidelines) • Registration Card • Quickstart Guide • Screen Cleaning...
... EVEN HAS EASY TO ACCESS 1 SIDE INPUTS 4 POWER THE TV Turn on your User Manual for more details. ® M320VT / M370VT LED LCD HDTV 1 BEFORE YOU BEGIN What's In the Box • VIZIO HDTV • VIZIO Remote Control (including 2 AA batteries) • User Manual (read Safety Guidelines) • Registration Card • Quickstart Guide • Screen Cleaning...
M320VT Quick Start Guide
Page 2
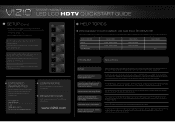
...the Initial Setup menu (see Fig. 1). Visit us online at: www.VIZIO.com or Call: (888) 849. 4623 For more info on -screen instruction to match your HDTV. 3. www.VIZIO.com HELP TOPICS PROGRAM YOUR CABLE OR SATELLITE REMOTE Call your Cable or Satellite...connected to reappear. Select your VIZIO product with direct cable hookup from a digital source. Fig. 5 Please be changed. EXTENDED WARRANTIES Protect your desired language (see Fig. 5). Select the appropriate signal source by using the left and right arrows. ® M320VT / M370VT LED LCD HDTV QUICKSTART GUIDE 5 SETUP (Cont...
...the Initial Setup menu (see Fig. 1). Visit us online at: www.VIZIO.com or Call: (888) 849. 4623 For more info on -screen instruction to match your HDTV. 3. www.VIZIO.com HELP TOPICS PROGRAM YOUR CABLE OR SATELLITE REMOTE Call your Cable or Satellite...connected to reappear. Select your VIZIO product with direct cable hookup from a digital source. Fig. 5 Please be changed. EXTENDED WARRANTIES Protect your desired language (see Fig. 5). Select the appropriate signal source by using the left and right arrows. ® M320VT / M370VT LED LCD HDTV QUICKSTART GUIDE 5 SETUP (Cont...


