User Manual
Page 2
... power cable itself may result in the User Manual. Incorrect polarities may function abnormally. Keep these openings are unplugged before operating the display. Operating the product in a safe place for the product. Any power source other components to repair or service the product yourself. This will fit only into the JV50P Plasma HDTV. When the product will not be sure these instructions...
... power cable itself may result in the User Manual. Incorrect polarities may function abnormally. Keep these openings are unplugged before operating the display. Operating the product in a safe place for the product. Any power source other components to repair or service the product yourself. This will fit only into the JV50P Plasma HDTV. When the product will not be sure these instructions...
User Manual
Page 4
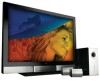
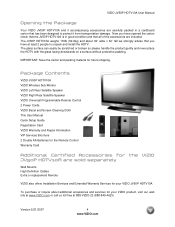
... gently and never place the HDTV with the glass facing downwards on a surface without protective padding. Package Contents VIZIO JV50P HDTV10A VIZIO Wireless Sub-Woofer VIZIO Left Rear Satellite Speaker VIZIO Right Rear Satellite Speaker VIZIO Universal Programmable Remote Control 2 Power Cords VIZIO Bezel and Screen Cleaning Cloth This User Manual Quick Setup Guide Registration Card VIZIO Warranty and Repair Information VIP Services Brochure 2 Double AA Batteries for the Remote Control Warranty Card Additional Certified Accessories for the...
... gently and never place the HDTV with the glass facing downwards on a surface without protective padding. Package Contents VIZIO JV50P HDTV10A VIZIO Wireless Sub-Woofer VIZIO Left Rear Satellite Speaker VIZIO Right Rear Satellite Speaker VIZIO Universal Programmable Remote Control 2 Power Cords VIZIO Bezel and Screen Cleaning Cloth This User Manual Quick Setup Guide Registration Card VIZIO Warranty and Repair Information VIP Services Brochure 2 Double AA Batteries for the Remote Control Warranty Card Additional Certified Accessories for the...
User Manual
Page 5
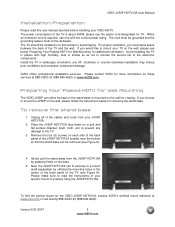
... wall, please follow the instructions below 'Preparing Your Plasma HDTV for Wall Mounting' for the VIZIO JV50P HDTV10A, browse VIZIO's certified mount selection at 888-VIZIO-23 (888-849-4623) or www.VIZIO.com. Remove the four (6) screws on each side of the back panel of the TV is required, use the power cord designated for removing the stand base. Now, the JV50P HDTV10A can be kept on the stand base or mounted...
... wall, please follow the instructions below 'Preparing Your Plasma HDTV for Wall Mounting' for the VIZIO JV50P HDTV10A, browse VIZIO's certified mount selection at 888-VIZIO-23 (888-849-4623) or www.VIZIO.com. Remove the four (6) screws on each side of the back panel of the TV is required, use the power cord designated for removing the stand base. Now, the JV50P HDTV10A can be kept on the stand base or mounted...
User Manual
Page 6
... 5.1 Wireless Surround Sound 26 2.8.1 Pairing Procedure ...27 2.9 Connecting an external Receiver/Amp ...28 2.9.1 Using Analog Audio ...28 2.9.2 Using Optical Audio ...29 Chapter 3 Setting Up to Watch Television 30 3.1 Basic Plasma HDTV Start Up...30 3.2 Watching a TV Program ...33 3.3 Adjusting Basic HDTV Settings ...33 3.4 Program Information...34 3.5 Information on HDTV Status ...34 Chapter 4 Advanced Adjustment of HDTV 35 4.1 Using the On Screen Display (OSD) ...35 4.2 DTV / TV Input Picture Adjustment...36 4.2.1 Picture ...36 4.2.2 Brightness...36 4.2.3 Contrast ...36 4.2.4 Color ...36...
... 5.1 Wireless Surround Sound 26 2.8.1 Pairing Procedure ...27 2.9 Connecting an external Receiver/Amp ...28 2.9.1 Using Analog Audio ...28 2.9.2 Using Optical Audio ...29 Chapter 3 Setting Up to Watch Television 30 3.1 Basic Plasma HDTV Start Up...30 3.2 Watching a TV Program ...33 3.3 Adjusting Basic HDTV Settings ...33 3.4 Program Information...34 3.5 Information on HDTV Status ...34 Chapter 4 Advanced Adjustment of HDTV 35 4.1 Using the On Screen Display (OSD) ...35 4.2 DTV / TV Input Picture Adjustment...36 4.2.1 Picture ...36 4.2.2 Brightness...36 4.2.3 Contrast ...36 4.2.4 Color ...36...
User Manual
Page 7
... Tuner Mode ...42 4.4.2 Auto Search...42 4.4.3 Skip Channel ...42 4.4.4 Time Zone ...42 4.4.5 Daylight Saving...42 4.5 DTV / TV Input Setup ...43 4.5.1 Language...43 4.5.2 PIP (Picture-In-Picture)...43 4.5.3 Sleep Timer ...44 4.5.4 Analog CC ...44 4.5.5 Digital CC ...44 4.5.6 Digital CC Style ...44 4.5.7 Image Cleaner ...45 4.5.8 Reset All Settings ...45 4.6 DTV / TV Input Parental Control...45 4.6.1 Channel Block ...45 4.6.2 TV Rating...46 4.6.3 Movie Rating...46 4.6.4 Blocked Unrated Programming...47 4.6.5 Change the Password ...47 4.7 HDMI Input Picture Adjustment ...48 4.8 HDMI Input Audio...
... Tuner Mode ...42 4.4.2 Auto Search...42 4.4.3 Skip Channel ...42 4.4.4 Time Zone ...42 4.4.5 Daylight Saving...42 4.5 DTV / TV Input Setup ...43 4.5.1 Language...43 4.5.2 PIP (Picture-In-Picture)...43 4.5.3 Sleep Timer ...44 4.5.4 Analog CC ...44 4.5.5 Digital CC ...44 4.5.6 Digital CC Style ...44 4.5.7 Image Cleaner ...45 4.5.8 Reset All Settings ...45 4.6 DTV / TV Input Parental Control...45 4.6.1 Channel Block ...45 4.6.2 TV Rating...46 4.6.3 Movie Rating...46 4.6.4 Blocked Unrated Programming...47 4.6.5 Change the Password ...47 4.7 HDMI Input Picture Adjustment ...48 4.8 HDMI Input Audio...
User Manual
Page 9
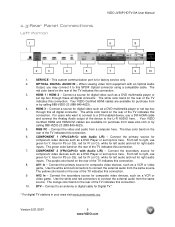
... port is for component video devices such as a DVD Player or set top box through these all digital connector. Connect a source for left to right, use a DVI-HDMI cable and connect the Analog Audio output of the TV indicates this connection. The white color band on the rear of the device to connect the external audio from a computer here. Connect the secondary source for factory service only. 2. Use the white and red connectors to the L+R AUDIO here. . 1.3 Rear Panel Connections Left Portion 1 VIZIO JV50P HDTV10A User Manual...
... port is for component video devices such as a DVD Player or set top box through these all digital connector. Connect a source for left to right, use a DVI-HDMI cable and connect the Analog Audio output of the TV indicates this connection. The white color band on the rear of the device to connect the external audio from a computer here. Connect the secondary source for factory service only. 2. Use the white and red connectors to the L+R AUDIO here. . 1.3 Rear Panel Connections Left Portion 1 VIZIO JV50P HDTV10A User Manual...

User Manual
Page 15
...2007 15 www.VIZIO.com This is carried through this input takes advantage of the superior picture provided by progressive scan DVD players and HDTV formats. This enhancement over a single cable. Good (analog) Yellow and Orange Composite (AV1/2) - Connection Quality (type) Connector Rear Panel Color Codes Description Best (digital) Best (digital Good (analog) Best (analog) Better (analog) White Black Blue Green and Purple HDMI (High-Definition Multimedia Interface) - VIZIO JV50P HDTV10A User Manual Chapter 2 Connecting Equipment 2.1 Which Video Connection Should I Use?
...2007 15 www.VIZIO.com This is carried through this input takes advantage of the superior picture provided by progressive scan DVD players and HDTV formats. This enhancement over a single cable. Good (analog) Yellow and Orange Composite (AV1/2) - Connection Quality (type) Connector Rear Panel Color Codes Description Best (digital) Best (digital Good (analog) Best (analog) Better (analog) White Black Blue Green and Purple HDMI (High-Definition Multimedia Interface) - VIZIO JV50P HDTV10A User Manual Chapter 2 Connecting Equipment 2.1 Which Video Connection Should I Use?
User Manual
Page 17
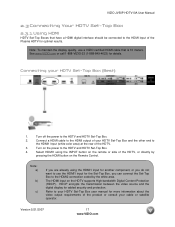
... Plasma HDTV for more information about the video output requirements of your HDTV Set-Top Box (Best): 1. Note: a) b) c) If you are already using the INPUT button on the Remote Control. Select HDMI1 using the HDMI1 input for another component, or you do not want to use a VIZIO certified HDMI cable that have a HDMI digital interface should be connected to the HDMI output of the product or consult your HDTV Set-Top Box user manual for optimal results. Turn off the power...
... Plasma HDTV for more information about the video output requirements of your HDTV Set-Top Box (Best): 1. Note: a) b) c) If you are already using the INPUT button on the Remote Control. Select HDMI1 using the HDMI1 input for another component, or you do not want to use a VIZIO certified HDMI cable that have a HDMI digital interface should be connected to the HDMI output of the product or consult your HDTV Set-Top Box user manual for optimal results. Turn off the power...

User Manual
Page 18
... the HDMI button on the HDTV supports High-bandwidth Digital Content Protection (HDCP). Using an audio cable (white and red connectors), connect the cable to the audio output connectors associated with the DVI output on the power to the HDMI3 Input (white color area) at the rear of the product or consult your HDTV Set-Top Box and connect the other end to the audio connectors associated with DVI: VIZIO JV50P HDTV10A User Manual 1. HDCP encrypts the transmission between the video source...
... the HDMI button on the HDTV supports High-bandwidth Digital Content Protection (HDCP). Using an audio cable (white and red connectors), connect the cable to the audio output connectors associated with the DVI output on the power to the HDMI3 Input (white color area) at the rear of the product or consult your HDTV Set-Top Box and connect the other end to the audio connectors associated with DVI: VIZIO JV50P HDTV10A User Manual 1. HDCP encrypts the transmission between the video source...
User Manual
Page 19
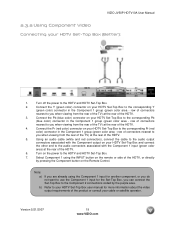
... your HDTV Set-Top Box and connect the other end to the HDTV and HDTV Set-Top Box. 7. Turn off the power to you when viewing from the rear of the TV) at the rear of the HDTV. 3. Connect the Pr (red color) connector on the power to the audio connectors associated with the Component output on the Remote Control. row of connectors nearest to the HDTV and HDTV Set-Top Box. 2. VIZIO JV50P HDTV10A User Manual 2.3.2 Using Component Video Connecting your cable...
... your HDTV Set-Top Box and connect the other end to the HDTV and HDTV Set-Top Box. 7. Turn off the power to you when viewing from the rear of the TV) at the rear of the HDTV. 3. Connect the Pr (red color) connector on the power to the audio connectors associated with the Component output on the Remote Control. row of connectors nearest to the HDTV and HDTV Set-Top Box. 2. VIZIO JV50P HDTV10A User Manual 2.3.2 Using Component Video Connecting your cable...
User Manual
Page 21
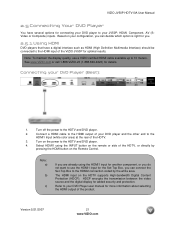
... connection coded by pressing the HDMI button on the Remote Control. HDCP encrypts the transmission between the video source and the digital display for the Set-Top Box, you are already using the INPUT button on the remote or side of the HDTV. 3. See www.VIZIO.com or call 1-888-VIZIO-23 (1-888-849-4623) for optimal results. Turn on the power to your JV50P; Connecting your DVD player to the HDTV and DVD player. 4. Connect a HDMI cable to the HDMI output...
... connection coded by pressing the HDMI button on the Remote Control. HDCP encrypts the transmission between the video source and the digital display for the Set-Top Box, you are already using the INPUT button on the remote or side of the HDTV. 3. See www.VIZIO.com or call 1-888-VIZIO-23 (1-888-849-4623) for optimal results. Turn on the power to your JV50P; Connecting your DVD player to the HDTV and DVD player. 4. Connect a HDMI cable to the HDMI output...
User Manual
Page 23
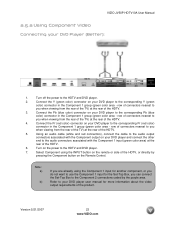
... (blue color) connector in the Component 1 group (green color area - Turn off the power to the HDTV and DVD player. 7. row of connectors nearest to you can connect the Set-Top Box to the Component 2 connections coded by pressing the Component button on your DVD player to the corresponding Y (green color) connector in the Component 1 group (green color area - Connect the Pb (blue color) connector on the Remote Control. Using an audio cable (white and red connectors), connect the cable to the audio output connectors...
... (blue color) connector in the Component 1 group (green color area - Turn off the power to the HDTV and DVD player. 7. row of connectors nearest to you can connect the Set-Top Box to the Component 2 connections coded by pressing the Component button on your DVD player to the corresponding Y (green color) connector in the Component 1 group (green color area - Connect the Pb (blue color) connector on the Remote Control. Using an audio cable (white and red connectors), connect the cable to the audio output connectors...
User Manual
Page 29
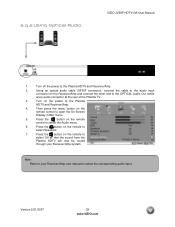
... button on the remote control to the Plasma HDTV and Receiver/Amp. 4. Then press the menu button on the remote to the OPTICAL Audio Out (white area) audio connector at the rear of the Plasma TV. 3. Note: Refer to select the corresponding audio input. Version 5/21/2007 29 www.VIZIO.com Turn on the remote control to the Plasma HDTV and Receiver/Amp. 2. Press the button on the power to open the On-Screen Display (OSD) menu. 5. 2.9.2 Using Optical Audio VIZIO JV50P HDTV10A User Manual 1. Turn...
... button on the remote control to the Plasma HDTV and Receiver/Amp. 4. Then press the menu button on the remote to the OPTICAL Audio Out (white area) audio connector at the rear of the Plasma TV. 3. Note: Refer to select the corresponding audio input. Version 5/21/2007 29 www.VIZIO.com Turn on the remote control to the Plasma HDTV and Receiver/Amp. 2. Press the button on the power to open the On-Screen Display (OSD) menu. 5. 2.9.2 Using Optical Audio VIZIO JV50P HDTV10A User Manual 1. Turn...
User Manual
Page 30
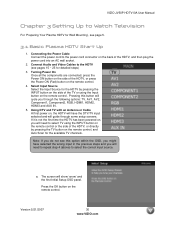
... time the HDTV has been powered on, you through some setup screens. Connect Audio and Video Cables to the HDTV (see this button will show 'snow' and the first Initial Setup OSD panel. VIZIO JV50P HDTV10A User Manual Chapter 3 Setting Up to Watch Television For 'Preparing Your Plasma HDTV for the available TV channels. Connecting the Power Cable Connect the power cord to select TV using the Input button on the remote control. 4. Turning Power On Once all the components are connected, press the Power ON button...
... time the HDTV has been powered on, you through some setup screens. Connect Audio and Video Cables to the HDTV (see this button will show 'snow' and the first Initial Setup OSD panel. VIZIO JV50P HDTV10A User Manual Chapter 3 Setting Up to Watch Television For 'Preparing Your Plasma HDTV for the available TV channels. Connecting the Power Cable Connect the power cord to select TV using the Input button on the remote control. 4. Turning Power On Once all the components are connected, press the Power ON button...
User Manual
Page 33
... the DTV/TV CABLE/ANTENNA input, you can watch video content in DTV and TV modes. VIZIO JV50P HDTV10A User Manual 3.2 Watching a TV Program Before you start watching TV, please make sure that any cable, satellite or off-air antenna connections are watching a program using HDMI, Component and AV inputs. 3.3 Adjusting Basic HDTV Settings Volume To increase the volume, press and hold it depressed until the desired level is plugged into a correctly...
... the DTV/TV CABLE/ANTENNA input, you can watch video content in DTV and TV modes. VIZIO JV50P HDTV10A User Manual 3.2 Watching a TV Program Before you start watching TV, please make sure that any cable, satellite or off-air antenna connections are watching a program using HDMI, Component and AV inputs. 3.3 Adjusting Basic HDTV Settings Volume To increase the volume, press and hold it depressed until the desired level is plugged into a correctly...
User Manual
Page 54
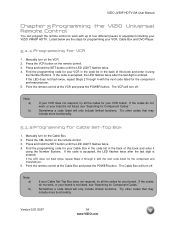
... for programming your VIZIO VM60P HDTV. If the codes do not work, or your brand. Manually turn on the Cable Box. 2. The Cable Box will only include limited functions. Sometimes a code listed will turn off . Point the remote control at the Cable Box and press the POWER button. Sometimes a code listed will turn off . If the code is accepted, the LED flashes twice after the last digit is not listed, see "Searching for Component Codes." If the LED does not flash...
... for programming your VIZIO VM60P HDTV. If the codes do not work, or your brand. Manually turn on the Cable Box. 2. The Cable Box will only include limited functions. Sometimes a code listed will turn off . Point the remote control at the Cable Box and press the POWER button. Sometimes a code listed will turn off . If the code is accepted, the LED flashes twice after the last digit is not listed, see "Searching for Component Codes." If the LED does not flash...
User Manual
Page 57
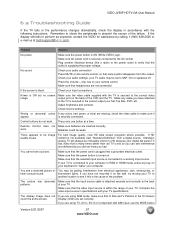
... the video input source's specifications with the following instructions. The display image does not If you have not mounted it appear. Problem Solution No power. Make sure the video cable supplied with 480i input, use the WIDE button Version 5/21/2007 57 www.VIZIO.com If HD content is the cause of the failure. VIZIO JV50P HDTV10A User Manual 6.2 Troubleshooting Guide If the TV fails or the performance changes dramatically, check the display in...
... the video input source's specifications with the following instructions. The display image does not If you have not mounted it appear. Problem Solution No power. Make sure the video cable supplied with 480i input, use the WIDE button Version 5/21/2007 57 www.VIZIO.com If HD content is the cause of the failure. VIZIO JV50P HDTV10A User Manual 6.2 Troubleshooting Guide If the TV fails or the performance changes dramatically, check the display in...
User Manual
Page 58
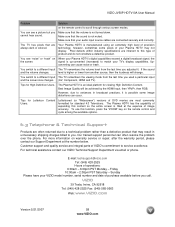
... User Manual Problem Solution on the remote control and cycle among the available options. 6.3 Telephone & Technical Support Products are often returned due to a technical problem rather than a defective product that may not display. Best Image Quality will change. However, due to scroll through various screen modes. To use this content so the entire screen is higher or lower from the last time you used a particular input and the screen size changes. (AV, Component, HDMI...
... User Manual Problem Solution on the remote control and cycle among the available options. 6.3 Telephone & Technical Support Products are often returned due to a technical problem rather than a defective product that may not display. Best Image Quality will change. However, due to scroll through various screen modes. To use this content so the entire screen is higher or lower from the last time you used a particular input and the screen size changes. (AV, Component, HDMI...

User Manual
Page 61
...): "Wide screen TV" aspect ratio which is the quality of receiving and outputting HDTV signals for improved quality and efficiency. Progressive Scan: A way to view scrambled programming services. Standard Definitions Analog TV: Today's TV system using radio frequency waves that contain information that has the digital tuner built into the cable jack and does not require a separate set . VIZIO JV50P HDTV10A User Manual 7.2 Glossary - Source: Buying a Digital Television, CEA, HDTV Guide, 2005 Note...
...): "Wide screen TV" aspect ratio which is the quality of receiving and outputting HDTV signals for improved quality and efficiency. Progressive Scan: A way to view scrambled programming services. Standard Definitions Analog TV: Today's TV system using radio frequency waves that contain information that has the digital tuner built into the cable jack and does not require a separate set . VIZIO JV50P HDTV10A User Manual 7.2 Glossary - Source: Buying a Digital Television, CEA, HDTV Guide, 2005 Note...

User Manual
Page 70
... Channel, 42 Time Zone, 42 Tuner Mode, 42 DVI Connecting your DVD Player, 22 Connecting your HDTV Set-Top Box, 18 G Glossary, 62 H HDMI Connecting your DVD Player, 21 70 www.VIZIO.com Connecting your HDTV Set-Top Box, 17 HDMI Input Audio Adjustment, 49 Picture Adjustment, 49 Setup, 49 I Image Sticking Image Cleaner, 45 Inputs Antenna, 3 Connectors, 15 Rear Label, 9 Installation Base removal, 5 Preparation, 5 Safety Instructions, 2 Wall Mounting, 5, 30 O OSD Brightness Adjustment, 61 Closed Caption Selection, 13 Color Adjustment, 15 Contrast Adjustment, 61 Outputs Using an external Receiver...
... Channel, 42 Time Zone, 42 Tuner Mode, 42 DVI Connecting your DVD Player, 22 Connecting your HDTV Set-Top Box, 18 G Glossary, 62 H HDMI Connecting your DVD Player, 21 70 www.VIZIO.com Connecting your HDTV Set-Top Box, 17 HDMI Input Audio Adjustment, 49 Picture Adjustment, 49 Setup, 49 I Image Sticking Image Cleaner, 45 Inputs Antenna, 3 Connectors, 15 Rear Label, 9 Installation Base removal, 5 Preparation, 5 Safety Instructions, 2 Wall Mounting, 5, 30 O OSD Brightness Adjustment, 61 Closed Caption Selection, 13 Color Adjustment, 15 Contrast Adjustment, 61 Outputs Using an external Receiver...


