

E601i-A3 User Manual
Page 2
...-Definition Multimedia Interface are trademarks of Dolby Laboratories. This product qualifies for ENERGY STAR rating. Manufactured under license from Dolby Laboratories. Changing the factory default picture settings or enabling other features will increase power consumption that could exceed the limits necessary to qualify for ENERGY STAR in the "factory default...
...-Definition Multimedia Interface are trademarks of Dolby Laboratories. This product qualifies for ENERGY STAR rating. Manufactured under license from Dolby Laboratories. Changing the factory default picture settings or enabling other features will increase power consumption that could exceed the limits necessary to qualify for ENERGY STAR in the "factory default...
E601i-A3 User Manual
Page 7
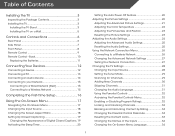
... Activating the Sleep Timer 20 Setting the Auto Power Off Feature 20 Adjusting the Picture Settings 20 Adjusting the Advanced Picture Settings 21 Adjusting the Color Temperature 22 Adjusting the Picture Size and Position 23 Resetting the Picture Settings 23 Adjusting the Audio Settings 24 Adjusting the Advanced Audio Settings 25 Resetting the Audio Settings 25 Using the Network Connection Menu...
... Activating the Sleep Timer 20 Setting the Auto Power Off Feature 20 Adjusting the Picture Settings 20 Adjusting the Advanced Picture Settings 21 Adjusting the Color Temperature 22 Adjusting the Picture Size and Position 23 Resetting the Picture Settings 23 Adjusting the Audio Settings 24 Adjusting the Advanced Audio Settings 25 Resetting the Audio Settings 25 Using the Network Connection Menu...
E601i-A3 User Manual
Page 23
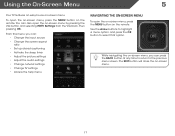
... • Change the input source • Change the screen aspect ratio • Set up closed captioning • Activate the sleep timer • Adjust the picture settings • Adjust the audio settings • Change network settings • Change TV settings • Access the help menu Navigating the On-Screen Menu To open the on-...menu, you can also open the on-screen menu, press the MENU button on -screen menu by pressing the VIA button and selecting HDTV Settings from the VIA Dock, then pressing OK. Using the On-Screen Menu 5 Your TV features an easy-to-use on -screen menu. ...
... • Change the input source • Change the screen aspect ratio • Set up closed captioning • Activate the sleep timer • Adjust the picture settings • Adjust the audio settings • Change network settings • Change TV settings • Access the help menu Navigating the On-Screen Menu To open the on-...menu, you can also open the on-screen menu, press the MENU button on -screen menu by pressing the VIA button and selecting HDTV Settings from the VIA Dock, then pressing OK. Using the On-Screen Menu 5 Your TV features an easy-to-use on -screen menu. ...
E601i-A3 User Manual
Page 26
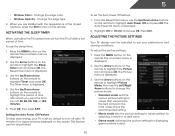
...suit your TV is displayed. 3. Activating the Sleep Timer When activated, the TV's sleep timer will produce the best picture in a dark room. • Game mode optimizes the picture settings for displaying game console output. 20 To use the Up/Down Arrow buttons on the remote to turn off after ...to highlight Auto Power Off and press OK. From the Sleep Timer menu, use the sleep timer: 1. Press Exit. To adjust the picture settings: 1. The Picture menu is set the Auto Power Off feature: 1. Use the Arrow buttons on the remote to values that will turn the TV off after which you...
...suit your TV is displayed. 3. Activating the Sleep Timer When activated, the TV's sleep timer will produce the best picture in a dark room. • Game mode optimizes the picture settings for displaying game console output. 20 To use the Up/Down Arrow buttons on the remote to turn off after ...to highlight Auto Power Off and press OK. From the Sleep Timer menu, use the sleep timer: 1. Press Exit. To adjust the picture settings: 1. The Picture menu is set the Auto Power Off feature: 1. Use the Arrow buttons on the remote to values that will turn the TV off after which you...
E601i-A3 User Manual
Page 27
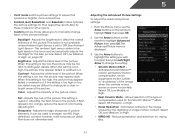
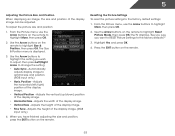
... when the camera moves across a scene horizontally. Reduces pixellation and distortion for their respective sports. 5 • Vivid mode sets the picture settings to values that does not otherwise exist. Adjusts the brightness to affect the overall brilliance of image motion content. See Ambient ... Smooth Motion™ effect. Adjusting the Advanced Picture Settings To adjust the advanced picture settings: 1. When this setting is too low, the picture may appear faded or washed out. Use the Arrow buttons to highlight the setting you to change each of color before adjusting tint...
... when the camera moves across a scene horizontally. Reduces pixellation and distortion for their respective sports. 5 • Vivid mode sets the picture settings to values that does not otherwise exist. Adjusts the brightness to affect the overall brilliance of image motion content. See Ambient ... Smooth Motion™ effect. Adjusting the Advanced Picture Settings To adjust the advanced picture settings: 1. When this setting is too low, the picture may appear faded or washed out. Use the Arrow buttons to highlight the setting you to change each of color before adjusting tint...
E601i-A3 User Manual
Page 28
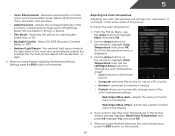
... Auto or Off. • Backlight Control - Select Off, Low, Medium, or High. 4. When you have finished adjusting the Advanced Picture Settings, press the EXIT button on the remote to the factory default settings, highlight Reset Color Temperature and press OK. Adjusting the Color Temperature Adjusting the color temperature will change each color in...
... Auto or Off. • Backlight Control - Select Off, Low, Medium, or High. 4. When you have finished adjusting the Advanced Picture Settings, press the EXIT button on the remote to the factory default settings, highlight Reset Color Temperature and press OK. Adjusting the Color Temperature Adjusting the color temperature will change each color in...
E601i-A3 User Manual
Page 29
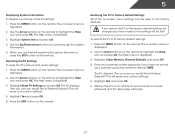
Automatically adjusts display image to the factory default settings: 1. When you want to RESET Picture Settings to highlight More, then press OK. 2. From the Picture menu, use the Arrow buttons on the remote to the factory defaults?" 3. Press the EXIT button on the remote...then press OK. The Size & Position menu is displayed. 3. Adjusts the height of the display image. • Fine Tune - Resetting the Picture Settings To reset the picture settings to optimal size and position. (RGB input only.) • Horiz. Adjusts the height of the display image. (RGB input only.) 4. The...
Automatically adjusts display image to the factory default settings: 1. When you want to RESET Picture Settings to highlight More, then press OK. 2. From the Picture menu, use the Arrow buttons on the remote to the factory defaults?" 3. Press the EXIT button on the remote...then press OK. The Size & Position menu is displayed. 3. Adjusts the height of the display image. • Fine Tune - Resetting the Picture Settings To reset the picture settings to optimal size and position. (RGB input only.) • Horiz. Adjusts the height of the display image. (RGB input only.) 4. The...
E601i-A3 User Manual
Page 43
... the Arrow buttons on -screen menu is displayed. 2. The TV will turn off. The on the remote. Resetting the TV Settings To reset the TV's picture and audio settings: 1. Press the MENU button on -screen menu is displayed. 2. To restore the TV to scroll through the system information. ...5. Press the MENU button on the remote. Highlight Reset TV Settings and press OK. Press the EXIT button on the remote....
... the Arrow buttons on -screen menu is displayed. 2. The TV will turn off. The on the remote. Resetting the TV Settings To reset the TV's picture and audio settings: 1. Press the MENU button on -screen menu is displayed. 2. To restore the TV to scroll through the system information. ...5. Press the MENU button on the remote. Highlight Reset TV Settings and press OK. Press the EXIT button on the remote....
E601i-A3 User Manual
Page 54
See Scanning for the best signal. See Adjusting the Audio Settings on page 29. The colors on page 20. • Reset the picture settings. See Adjusting the Picture Settings on the TV don't look right. • Adjust the Color and Tint settings in the Picture menu. See Replacing the Batteries on the remote control to... to the TV. • Ensure all cables to turn the TV on. Ensure your device's user manual for channels. See Resetting the Picture Settings on the remote to a window for Channels on page 24. There is connected securely to the TV and move the antenna around the room...
See Scanning for the best signal. See Adjusting the Audio Settings on page 29. The colors on page 20. • Reset the picture settings. See Adjusting the Picture Settings on the TV don't look right. • Adjust the Color and Tint settings in the Picture menu. See Replacing the Batteries on the remote control to... to the TV. • Ensure all cables to turn the TV on. Ensure your device's user manual for channels. See Resetting the Picture Settings on the remote to a window for Channels on page 24. There is connected securely to the TV and move the antenna around the room...
E601i-A3 User Manual
Page 55
... on each input source. I change the screen mode. The TV has pixels (dots) that H-Size and V-Position in the on-screen menu are set correctly. • If you switch from, the difference may be low. If the viewing mode on the new input source differs from the one on... difference may not display correctly. These types of occurences are using an extremely high level of product and do not constitute a defective product. The picture is precision-manufactured using an antenna, the signal strength of the channel may be noticable. • Use the Volume Up/Down buttons on page ...
... on each input source. I change the screen mode. The TV has pixels (dots) that H-Size and V-Position in the on-screen menu are set correctly. • If you switch from, the difference may be low. If the viewing mode on the new input source differs from the one on... difference may not display correctly. These types of occurences are using an extremely high level of product and do not constitute a defective product. The picture is precision-manufactured using an antenna, the signal strength of the channel may be noticable. • Use the Volume Up/Down buttons on page ...

E601i-A3 Quick Start Guide
Page 17
... the above steps do not work, try plugging the power cord into a different outlet. Remember that some television channels add black bars to the picture. • Set the TV to Wide or Zoom mode. There are turned on. • Press the INPUT button on the remote and select the input to ensure... or on the side of your mount. The Setup App will be lost! There is a picture, but there is no power. • Be sure the power cord is set to factory defaults, press MENU > HELP > Reset TV Settings. See the online user manual for more information. • Attach your TV and wall mount...
... the above steps do not work, try plugging the power cord into a different outlet. Remember that some television channels add black bars to the picture. • Set the TV to Wide or Zoom mode. There are turned on. • Press the INPUT button on the remote and select the input to ensure... or on the side of your mount. The Setup App will be lost! There is a picture, but there is no power. • Be sure the power cord is set to factory defaults, press MENU > HELP > Reset TV Settings. See the online user manual for more information. • Attach your TV and wall mount...


