E601i-A3 User Manual
Page 4
... or has been dropped. • Unplug the power cord before turning on the top of your TV. Overloading can be used for ventilation. Any other hazards. Do not install your TV close to smoke or moisture may expose you are not sure of the type of power supplied to smoke. Operating your TV close to your home, consult your dealer or...
... or has been dropped. • Unplug the power cord before turning on the top of your TV. Overloading can be used for ventilation. Any other hazards. Do not install your TV close to smoke or moisture may expose you are not sure of the type of power supplied to smoke. Operating your TV close to your home, consult your dealer or...
E601i-A3 User Manual
Page 5
.... Pulling on the apparatus. • The mains plug or appliance coupler is intended to alert the user to leak which can damage the remote control or injure the operator. The power cord fails or frays. - The performance of important operating and maintenance (servicing) instructions in environments with instructions. These servicing instructions are unplugged before moving your TV, hold the AC/DC power adapter, not the...
.... Pulling on the apparatus. • The mains plug or appliance coupler is intended to alert the user to leak which can damage the remote control or injure the operator. The power cord fails or frays. - The performance of important operating and maintenance (servicing) instructions in environments with instructions. These servicing instructions are unplugged before moving your TV, hold the AC/DC power adapter, not the...
E601i-A3 User Manual
Page 6
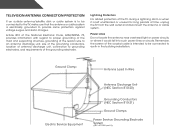
... ART 250, part H) Power Lines Do not locate the antenna near overhead light or power circuits, or where it is electrically grounded to provide some protection against voltage surges and static charges. Television Antenna Connection Protection If an outside antenna/satellite dish or cable system is to be connected to earth in the building installation. Article 810 of the National Electrical Code, ANSI...
... ART 250, part H) Power Lines Do not locate the antenna near overhead light or power circuits, or where it is electrically grounded to provide some protection against voltage surges and static charges. Television Antenna Connection Protection If an outside antenna/satellite dish or cable system is to be connected to earth in the building installation. Article 810 of the National Electrical Code, ANSI...
E601i-A3 User Manual
Page 7
...Wired Network (Best 15 Connecting to a Wireless Network 15 Completing the First-Time Setup 16 Using the On-Screen Menu 17 Navigating the On-Screen Menu 17 Changing the Input Source 18 Changing the Screen Aspect Ratio 18 Setting Up Closed Captioning 19 Changing the Appearance of Digital Closed Captions.. 19 Activating the Sleep Timer 20 Setting the Auto Power Off Feature 20 Adjusting the Picture Settings 20 Adjusting the Advanced Picture Settings 21 Adjusting the Color Temperature 22 Adjusting the Picture Size and Position 23 Resetting the Picture Settings 23 Adjusting the Audio...
...Wired Network (Best 15 Connecting to a Wireless Network 15 Completing the First-Time Setup 16 Using the On-Screen Menu 17 Navigating the On-Screen Menu 17 Changing the Input Source 18 Changing the Screen Aspect Ratio 18 Setting Up Closed Captioning 19 Changing the Appearance of Digital Closed Captions.. 19 Activating the Sleep Timer 20 Setting the Auto Power Off Feature 20 Adjusting the Picture Settings 20 Adjusting the Advanced Picture Settings 21 Adjusting the Color Temperature 22 Adjusting the Picture Size and Position 23 Resetting the Picture Settings 23 Adjusting the Audio...
E601i-A3 User Manual
Page 8
Setting the Time Zone 35 Adjusting the CEC Settings 35 Turning the indicator LED On or Off 36 Using the Help Menu 36 Displaying System Information 37 Resetting the TV Settings 37 Restoring the TV to Factory Default Settings 37 Using Guided Setup 38 Using the Info Window 39 Using the USB Media Player 40 Using the USB Media Player 40 Connecting a USB Thumb Drive to the TV 40 Playing USB Media 40 Using VIZIO Internet Apps 43 Using the VIA Shortcut Buttons 43 Using the VIA Dock...
Setting the Time Zone 35 Adjusting the CEC Settings 35 Turning the indicator LED On or Off 36 Using the Help Menu 36 Displaying System Information 37 Resetting the TV Settings 37 Restoring the TV to Factory Default Settings 37 Using Guided Setup 38 Using the Info Window 39 Using the USB Media Player 40 Using the USB Media Player 40 Connecting a USB Thumb Drive to the TV 40 Playing USB Media 40 Using VIZIO Internet Apps 43 Using the VIA Shortcut Buttons 43 Using the VIA Dock...
E601i-A3 User Manual
Page 11
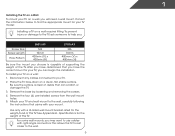
... the TV face-down on a wall: 1. Consult the information below to use cables with a UL-listed wall mount bracket rated for your TV on a clean, flat, stable surface. Be sure the surface is capable of supporting the weight of this TV. To prevent injury or damage to the TV, ask someone to your mount. E601i-A3 E701i-A3 Screw Size: Screw Length: Hole Pattern: M6 10mm 400mm (V) x 400mm...
... the TV face-down on a wall: 1. Consult the information below to use cables with a UL-listed wall mount bracket rated for your TV on a clean, flat, stable surface. Be sure the surface is capable of supporting the weight of this TV. To prevent injury or damage to the TV, ask someone to your mount. E601i-A3 E701i-A3 Screw Size: Screw Length: Hole Pattern: M6 10mm 400mm (V) x 400mm...
E601i-A3 User Manual
Page 18
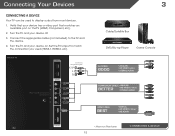
... used to colored ports. 3 Cable/Satellite Box DVD/Blu-ray Player Game Console AV CABLE GOOD • ANALOG • SD VIDEO (480i)* • STEREO AUDIO COMPONENT CABLE • ANALOG BETTER • HD VIDEO (1080i)* • STEREO AUDIO HDMI CABLE BEST • DIGITAL • HD VIDEO (1080p)* • HD AUDIO * Maximum Resolution 12 CONNECTING A DEVICE Connecting Your Devices Connecting A Device Your TV can be used (HDMI-1, HDMI-2, etc). Turn the TV and your device off. 3. BACK OF TV Connect to component inputs: Y/V L R Match colored connectors to display output...
... used to colored ports. 3 Cable/Satellite Box DVD/Blu-ray Player Game Console AV CABLE GOOD • ANALOG • SD VIDEO (480i)* • STEREO AUDIO COMPONENT CABLE • ANALOG BETTER • HD VIDEO (1080i)* • STEREO AUDIO HDMI CABLE BEST • DIGITAL • HD VIDEO (1080p)* • HD AUDIO * Maximum Resolution 12 CONNECTING A DEVICE Connecting Your Devices Connecting A Device Your TV can be used (HDMI-1, HDMI-2, etc). Turn the TV and your device off. 3. BACK OF TV Connect to component inputs: Y/V L R Match colored connectors to display output...
E601i-A3 User Manual
Page 26
... buttons to change the picture mode: • Standard mode sets the various picture settings to values perfect for displaying game console output. 20 To set by default to turn the TV off : 30, 60, 90, 120, or 180 minutes. 5. This is the recommended setting. • Movie mode sets the picture settings to values that will turn off after 10 minutes if no signal is displayed. 2. The Sleep Timer menu is displayed. 2. Use the Arrow buttons on -screen menu is being displayed...
... buttons to change the picture mode: • Standard mode sets the various picture settings to values perfect for displaying game console output. 20 To set by default to turn the TV off : 30, 60, 90, 120, or 180 minutes. 5. This is the recommended setting. • Movie mode sets the picture settings to values that will turn off after 10 minutes if no signal is displayed. 2. The Sleep Timer menu is displayed. 2. Use the Arrow buttons on -screen menu is being displayed...
E601i-A3 User Manual
Page 27
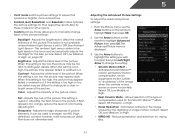
... affect the overall brilliance of the picture. The ambient light sensor detects the light levels in dark or bright areas of the picture. Adjusts the white level of color before adjusting tint. It can be too dark to distinguish details. Allows selection of the type of the picture settings: Backlight - Adjusts the brightness to change each of compensation used to sharpen non-HD (high definition...
... affect the overall brilliance of the picture. The ambient light sensor detects the light levels in dark or bright areas of the picture. Adjusts the white level of color before adjusting tint. It can be too dark to distinguish details. Allows selection of the type of the picture settings: Backlight - Adjusts the brightness to change each of compensation used to sharpen non-HD (high definition...
E601i-A3 User Manual
Page 30
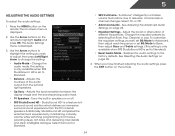
... TruVolume - Turns the built-in speakers on the remote to change the setting: • Audio Mode - The Audio Settings menu is set EQ Mode to Standard) • Reset Audio Mode - Change the audio mode. To customize the equalizer settings yourself, set EQ Mode to Advanced, then adjust each frequency or set to Basic, then adjust Bass and Treble settings. (This setting is only available when SRS StudioSound HD is displayed. 3. See Resetting the Audio Settings on page 25. 4. Adjusts the loudness...
... TruVolume - Turns the built-in speakers on the remote to change the setting: • Audio Mode - The Audio Settings menu is set EQ Mode to Standard) • Reset Audio Mode - Change the audio mode. To customize the equalizer settings yourself, set EQ Mode to Advanced, then adjust each frequency or set to Basic, then adjust Bass and Treble settings. (This setting is only available when SRS StudioSound HD is displayed. 3. See Resetting the Audio Settings on page 25. 4. Adjusts the loudness...
E601i-A3 User Manual
Page 31
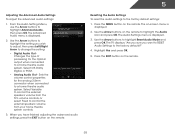
... Audio Settings Menu, use the Arrow buttons to a home theatre audio system. Select Off, Dolby Digital, or PCM. • Analog Audio Out - Sets the volume control properties for the Optical output when connected to the factory defaults?" 4. Press the MENU button on -screen menu is displayed. 2. The Advanced Audio menu is displayed. 3. The on the remote. The Audio Settings menu is displayed. 2. The TV displays, "Are you sure you wish to adjust, then press Left/Right Arrow to change the setting: • Digital Audio Out Changes the type...
... Audio Settings Menu, use the Arrow buttons to a home theatre audio system. Select Off, Dolby Digital, or PCM. • Analog Audio Out - Sets the volume control properties for the Optical output when connected to the factory defaults?" 4. Press the MENU button on -screen menu is displayed. 2. The Advanced Audio menu is displayed. 3. The on the remote. The Audio Settings menu is displayed. 2. The TV displays, "Are you sure you wish to adjust, then press Left/Right Arrow to change the setting: • Digital Audio Out Changes the type...
E601i-A3 User Manual
Page 37
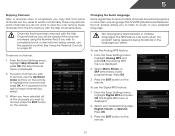
... parental controls. The MTS feature only works when the program being viewed is entered using the Number Pad. To remove a channel: 1. Press OK. 3. The Skip Channel menu is displayed. 2. From the Tuner Settings menu, highlight Digital MTS and press OK. Press OK. 3. If you wish to view. See Using the Parental Controls on the remote. 31 For each channel you do not want to remove, press the EXIT button on the remote. Changing the Audio Language Some digital free...
... parental controls. The MTS feature only works when the program being viewed is entered using the Number Pad. To remove a channel: 1. Press OK. 3. The Skip Channel menu is displayed. 2. From the Tuner Settings menu, highlight Digital MTS and press OK. Press OK. 3. If you wish to view. See Using the Parental Controls on the remote. 31 For each channel you do not want to remove, press the EXIT button on the remote. Changing the Audio Language Some digital free...

E601i-A3 User Manual
Page 41
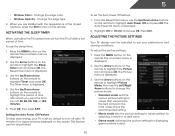
... OK. To enable, disable, or adjust CEC settings: 1. The on the remote to the internet via an Ethernet cable or a wireless network. The Settings menu is displayed. Use the Arrow buttons on -screen menu is displayed. 2. Use the Arrow buttons on the remote to highlight the Settings icon and press OK. Use the Arrow buttons on the remote to highlight CEC Settings and press OK. To use CEC, you the most accurate location-based information, such as...
... OK. To enable, disable, or adjust CEC settings: 1. The on the remote to the internet via an Ethernet cable or a wireless network. The Settings menu is displayed. Use the Arrow buttons on -screen menu is displayed. 2. Use the Arrow buttons on the remote to highlight the Settings icon and press OK. Use the Arrow buttons on the remote to highlight CEC Settings and press OK. To use CEC, you the most accurate location-based information, such as...
E601i-A3 User Manual
Page 54
...'t working electrical outlet. • Press the Power/Standby button on the remote or on the side of the TV to turn the TV on. Ensure the speakers are set to On. • Check the audio connections of external devices (Blu-ray player, game console, cable/satellite box) that are connected to the TV. • If you are using cable TV, satellite, or antenna connected directly to the TV, scan for the best signal...
...'t working electrical outlet. • Press the Power/Standby button on the remote or on the side of the TV to turn the TV on. Ensure the speakers are set to On. • Check the audio connections of external devices (Blu-ray player, game console, cable/satellite box) that are connected to the TV. • If you are using cable TV, satellite, or antenna connected directly to the TV, scan for the best signal...
E601i-A3 User Manual
Page 55
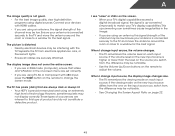
...-screen menu are set correctly. • If you switch from electrical appliances, cars, or flourescent lights. • Ensure all cables are using digital sources. When I change input source, the volume changes. • The TV remembers the volume level on page 22. 49 This up -converted (improved) to match your antenna is connected securely to the TV and move the antenna around the room or close to adjust the volume. If the viewing mode...
...-screen menu are set correctly. • If you switch from electrical appliances, cars, or flourescent lights. • Ensure all cables are using digital sources. When I change input source, the volume changes. • The TV remembers the volume level on page 22. 49 This up -converted (improved) to match your antenna is connected securely to the TV and move the antenna around the room or close to adjust the volume. If the viewing mode...
E601i-A3 User Manual
Page 58
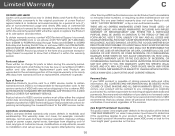
... operation, improper voltage supply or power surges, signal issues, damages from warranty service or replacement, whichever is within the warranty period,VIZIO will be restored to the "DETAILS" tab of customer misuse, modifications or adjustments, as well as installation and set-up issues or any type of the model's product information page (www.VIZIO.com) or look for the remaining portion of the servicer. THIS WARRANTY GIVES YOU SPECIFIC LEGAL...
... operation, improper voltage supply or power surges, signal issues, damages from warranty service or replacement, whichever is within the warranty period,VIZIO will be restored to the "DETAILS" tab of customer misuse, modifications or adjustments, as well as installation and set-up issues or any type of the model's product information page (www.VIZIO.com) or look for the remaining portion of the servicer. THIS WARRANTY GIVES YOU SPECIFIC LEGAL...
E601i-A3 Quick Start Guide
Page 2
... power-supply cord or plug is used for long period of at least three feet should be replaced when using dropped or damaged appliances. The power cord fails or frays. - To reduce the risk of time. • Refer all instructions. • Do not use attachments/accessories specified by the manufacturer. • Use only with the cart, stand, tripod, bracket, or table specified by qualified service personnel only. Install...
... power-supply cord or plug is used for long period of at least three feet should be replaced when using dropped or damaged appliances. The power cord fails or frays. - To reduce the risk of time. • Refer all instructions. • Do not use attachments/accessories specified by the manufacturer. • Use only with the cart, stand, tripod, bracket, or table specified by qualified service personnel only. Install...

E601i-A3 Quick Start Guide
Page 17
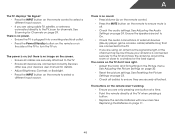
... base by loosening and removing the screws. • Remove the 4 pre-installed screws from the wall mount holes. Be sure the surface is connected (HDMI-1, Composite, Component, etc). There are turned on. • Press the INPUT button on the remote and select the input to which your external device There is no sound. • Press the VOLUME UP button on the remote or on the side of your mount. Press MENU, then select HELP > Guided Setup...
... base by loosening and removing the screws. • Remove the 4 pre-installed screws from the wall mount holes. Be sure the surface is connected (HDMI-1, Composite, Component, etc). There are turned on. • Press the INPUT button on the remote and select the input to which your external device There is no sound. • Press the VOLUME UP button on the remote or on the side of your mount. Press MENU, then select HELP > Guided Setup...
E601i-A3 Quick Start Guide
Page 19
... wear and tear, improper operation, improper voltage supply or power surges, signal issues, damages from warranty service or replacement, whichever is capable of storing personal data and other than by a non-authorized reseller. Replacement parts and Products may be sent to a VIZIO service center to VIZIO's service centers must be new or recertified at its sole option and discretion. Type of the model's product information page...
... wear and tear, improper operation, improper voltage supply or power surges, signal issues, damages from warranty service or replacement, whichever is capable of storing personal data and other than by a non-authorized reseller. Replacement parts and Products may be sent to a VIZIO service center to VIZIO's service centers must be new or recertified at its sole option and discretion. Type of the model's product information page...

E601i-A3 Data Sheet
Page 2
... VIZIO Inc. 60" CLASS LED SMART TV TV SPECIFICATIONS Screen Size Diagonal Viewable TV Type Smart TV Built-in WiFi Refresh Rate Maximum Resolution Remote Control Type Ambient Light Sensor Energy Star Qualified Power Wall Mount & Screw Size 60" Class 60.04" Razor LEDTM Yes Yes 120Hz 1080p XRT302 Yes ENERGY STAR® 5.3 83.46W 400mm (V) x 400mm (H), M6 x 1mm x 10mm WARRANTY 1 year CONNECTIONS HDMI Inputs Component Video Inputs Composite Inputs RF Antenna Input USB Ports PC Input Etherenet Stereo Audio (RCA) Number of Speakers...
... VIZIO Inc. 60" CLASS LED SMART TV TV SPECIFICATIONS Screen Size Diagonal Viewable TV Type Smart TV Built-in WiFi Refresh Rate Maximum Resolution Remote Control Type Ambient Light Sensor Energy Star Qualified Power Wall Mount & Screw Size 60" Class 60.04" Razor LEDTM Yes Yes 120Hz 1080p XRT302 Yes ENERGY STAR® 5.3 83.46W 400mm (V) x 400mm (H), M6 x 1mm x 10mm WARRANTY 1 year CONNECTIONS HDMI Inputs Component Video Inputs Composite Inputs RF Antenna Input USB Ports PC Input Etherenet Stereo Audio (RCA) Number of Speakers...


