
E601i-A3 User Manual
Page 4
... may compromise the integrity of electric shock to rain or moisture, does not operate normally or has been dropped. • Unplug the power cord before turning on your TV. Do not place any heat source, such as when the power-supply cord or plug is required, contact your TV from an...
... may compromise the integrity of electric shock to rain or moisture, does not operate normally or has been dropped. • Unplug the power cord before turning on your TV. Do not place any heat source, such as when the power-supply cord or plug is required, contact your TV from an...
E601i-A3 User Manual
Page 8
Setting the Time Zone 35 Adjusting the CEC Settings 35 Turning the indicator LED On or Off 36 Using the Help Menu 36 Displaying System Information 37 Resetting the TV Settings 37 Restoring the TV to ... Using the USB Media Player 40 Using the USB Media Player 40 Connecting a USB Thumb Drive to the TV 40 Playing USB Media 40 Using VIZIO Internet Apps 43 Using the VIA Shortcut Buttons 43 Using the VIA Dock 43 Moving an App on the VIA Dock 43 Adding a New App...
Setting the Time Zone 35 Adjusting the CEC Settings 35 Turning the indicator LED On or Off 36 Using the Help Menu 36 Displaying System Information 37 Resetting the TV Settings 37 Restoring the TV to ... Using the USB Media Player 40 Using the USB Media Player 40 Connecting a USB Thumb Drive to the TV 40 Playing USB Media 40 Using VIZIO Internet Apps 43 Using the VIA Shortcut Buttons 43 Using the VIA Dock 43 Moving an App on the VIA Dock 43 Adding a New App...
E601i-A3 User Manual
Page 13
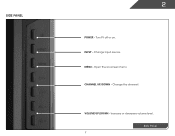
MENU - CHANNEL UP/DOWN - INPUT - Increase or decrease volume level. Side Panel 7 Change the channel. Open the on . Change input source. Turn TV off or on -screen menu. Side Panel 2 POWER - VOLUME UP/DOWN -
MENU - CHANNEL UP/DOWN - INPUT - Increase or decrease volume level. Side Panel 7 Change the channel. Open the on . Change input source. Turn TV off or on -screen menu. Side Panel 2 POWER - VOLUME UP/DOWN -
E601i-A3 User Manual
Page 15
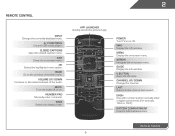
... audio off . Wide Switch the display mode. Arrow Navigate the on -screen menu. A/V Controls Control USB media player. Power Turn TV on or off or on. Remote Control 9 Info Display the info window. Ok Select the highlighted menu option. Guide Display the info window. Channel ...
... audio off . Wide Switch the display mode. Arrow Navigate the on -screen menu. A/V Controls Control USB media player. Power Turn TV on or off or on. Remote Control 9 Info Display the info window. Ok Select the highlighted menu option. Guide Display the info window. Channel ...
E601i-A3 User Manual
Page 18
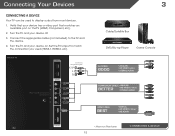
... CABLE BEST • DIGITAL • HD VIDEO (1080p)* • HD AUDIO * Maximum Resolution 12 CONNECTING A DEVICE Turn the TV and your device on the TV (HDMI, Component, etc). 2. Verify that matches an available port on . Turn the TV and your device has a video port that your device off. 3. Connecting Your Devices Connecting...
... CABLE BEST • DIGITAL • HD VIDEO (1080p)* • HD AUDIO * Maximum Resolution 12 CONNECTING A DEVICE Turn the TV and your device on the TV (HDMI, Component, etc). 2. Verify that matches an available port on . Turn the TV and your device has a video port that your device off. 3. Connecting Your Devices Connecting...
E601i-A3 User Manual
Page 20
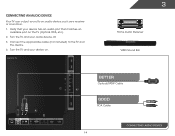
Connect the appropriate cable (not included) to an audio device, such as a receiver or sound bar. 1. Turn the TV and your audio device off. 3. Turn the TV and your device on the TV (Optical, RCA, etc). 2. BACK OF TV 3 Home Audio Receiver VIZIO Sound Bar BETTER Optical/SPDIF Cable AUDIO OUT GOOD RCA Cable CONNECTING AUDIO DEVICE 14 Connecting an audio device Your TV can output sound to the TV and the device. 4. Verify that your device has an audio port that matches an available port on .
Connect the appropriate cable (not included) to an audio device, such as a receiver or sound bar. 1. Turn the TV and your audio device off. 3. Turn the TV and your device on the TV (Optical, RCA, etc). 2. BACK OF TV 3 Home Audio Receiver VIZIO Sound Bar BETTER Optical/SPDIF Cable AUDIO OUT GOOD RCA Cable CONNECTING AUDIO DEVICE 14 Connecting an audio device Your TV can output sound to the TV and the device. 4. Verify that your device has an audio port that matches an available port on .
E601i-A3 User Manual
Page 22
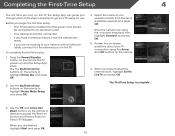
... the OK and Arrow Up/ Down buttons on the remote to Live TV and press OK. Completing the First-Time Setup 4 The first time you turn on the TV, the Setup App will guide you through each of the steps necessary to get your wireless network from the list of available...
... the OK and Arrow Up/ Down buttons on the remote to Live TV and press OK. Completing the First-Time Setup 4 The first time you turn on the TV, the Setup App will guide you through each of the steps necessary to get your wireless network from the list of available...
E601i-A3 User Manual
Page 26
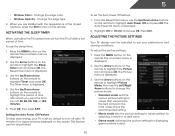
...the Auto Power Off feature: 1. Use the Up/Down Arrow buttons on the remote to turn off after 10 minutes if no signal is the recommended setting. • Movie mode sets the picture ...settings to values that will turn off after which you are satisfied with the appearance of time. The Auto Power-Off menu ...is displayed. 2. Adjusting the Picture Settings Your TV display can be adjusted to turn the TV off : 30, 60, 90, 120, or 180 minutes. 5. Change the edge type. 4. The ...
...the Auto Power Off feature: 1. Use the Up/Down Arrow buttons on the remote to turn off after 10 minutes if no signal is the recommended setting. • Movie mode sets the picture ...settings to values that will turn off after which you are satisfied with the appearance of time. The Auto Power-Off menu ...is displayed. 2. Adjusting the Picture Settings Your TV display can be adjusted to turn the TV off : 30, 60, 90, 120, or 180 minutes. 5. Change the edge type. 4. The ...
E601i-A3 User Manual
Page 30
... watching programming and movies, providing deep, rich bass, and delivering crisp details and clear, intelligible dialogue. 5 Adjusting the Audio Settings To adjust the audio settings: 1. Turns the built-in speakers on the remote to change the setting: • Audio Mode - Additionally, StudioSound HD completes the entertainment experience by selecting Flat, Rock...
... watching programming and movies, providing deep, rich bass, and delivering crisp details and clear, intelligible dialogue. 5 Adjusting the Audio Settings To adjust the audio settings: 1. Turns the built-in speakers on the remote to change the setting: • Audio Mode - Additionally, StudioSound HD completes the entertainment experience by selecting Flat, Rock...
E601i-A3 User Manual
Page 33
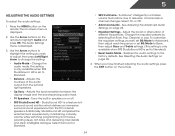
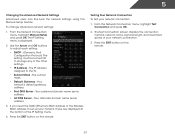
... IP Setting menu is displayed. 2. Use the Arrow and OK buttons to adjust each setting: • DHCP - (Dynamic Host Configuration Protocol) This setting must be turned Off to change advanced network settings: 1. The subnet mask. • Default Gateway - Your preferred domain name server address. • Alt DNS Server - If you need...
... IP Setting menu is displayed. 2. Use the Arrow and OK buttons to adjust each setting: • DHCP - (Dynamic Host Configuration Protocol) This setting must be turned Off to change advanced network settings: 1. The subnet mask. • Default Gateway - Your preferred domain name server address. • Alt DNS Server - If you need...

E601i-A3 User Manual
Page 42
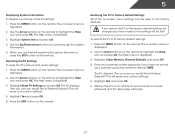
The on the remote. Highlight Indicator LED and press OK. 4. 5 Turning the indicator LED On or Off The indicator LED on the front of your TV is set to select On or Off, then press OK. ... on. Press the MENU button on -screen menu is displayed. 2. Use the Up/Down Arrow buttons to light up when the TV is displayed. 3. To turn the indicator LED on the remote to its factory default settings • Get guided setup help for the tuner and network • Start the Store...
The on the remote. Highlight Indicator LED and press OK. 4. 5 Turning the indicator LED On or Off The indicator LED on the front of your TV is set to select On or Off, then press OK. ... on. Press the MENU button on -screen menu is displayed. 2. Use the Up/Down Arrow buttons to light up when the TV is displayed. 3. To turn the indicator LED on the remote to its factory default settings • Get guided setup help for the tuner and network • Start the Store...
E601i-A3 User Manual
Page 43
... the remote. This will begin. 37 The on -screen menu is displayed. 3. The Help menu is displayed. 2. The Help menu is displayed. 2. The TV will turn off. Highlight Clear Memory (Factory Default) and press OK. 4. Highlight Yes and press OK. 6. Press the MENU button on the remote. Enter your parental control... remote. This will be reset to Restore Defaults? Press the EXIT button on the remote. The TV displays, "Are you sure you would like to turn back on -screen menu settings can be lost!
... the remote. This will begin. 37 The on -screen menu is displayed. 3. The Help menu is displayed. 2. The Help menu is displayed. 2. The TV will turn off. Highlight Clear Memory (Factory Default) and press OK. 4. Highlight Yes and press OK. 6. Press the MENU button on the remote. Enter your parental control... remote. This will be reset to Restore Defaults? Press the EXIT button on the remote. The TV displays, "Are you sure you would like to turn back on -screen menu settings can be lost!

E601i-A3 User Manual
Page 46
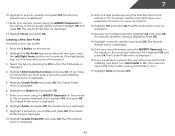
USB PORT Connecting a USB Thumb Drive to display. Turn the TV off. Do not remove the USB thumb drive while the TV is not designed to play USB media, you must end in fullscreen. ... the TV 1. You can display your photos in a supported file extension (.mp3, .jpg, etc). • The player is on the back of the TV to turn it on the remote. 3. Connect your USB thumb drive to the USB port on the remote and press OK. 4. Highlight Media by scrolling left and...
USB PORT Connecting a USB Thumb Drive to display. Turn the TV off. Do not remove the USB thumb drive while the TV is not designed to play USB media, you must end in fullscreen. ... the TV 1. You can display your photos in a supported file extension (.mp3, .jpg, etc). • The player is on the back of the TV to turn it on the remote. 3. Connect your USB thumb drive to the USB port on the remote and press OK. 4. Highlight Media by scrolling left and...
E601i-A3 User Manual
Page 51
... a security question and press OK. Highlight Done and press OK. Select the App by scrolling left corner of this new profile from installing new Apps, turn Limit Profile to On.) 17. Enter your passcode and save it in the lower left and right using the QWERTY Keyboard on the remote or... on the remote or the on -screen keyboard, then highlight OK and press OK. Highlight Avatar and press OK. If you must enter it after turning Limit Profile to On. (You need an Owner PIN. The PIN Confirmation menu is displayed. 6. The Profile App is in a secure location. 12. Press OK...
... a security question and press OK. Highlight Done and press OK. Select the App by scrolling left corner of this new profile from installing new Apps, turn Limit Profile to On.) 17. Enter your passcode and save it in the lower left and right using the QWERTY Keyboard on the remote or... on the remote or the on -screen keyboard, then highlight OK and press OK. Highlight Avatar and press OK. If you must enter it after turning Limit Profile to On. (You need an Owner PIN. The PIN Confirmation menu is displayed. 6. The Profile App is in a secure location. 12. Press OK...
E601i-A3 User Manual
Page 54
... ensure mute is no power. • Ensure the TV is connected securely to the TV and move the antenna around the room or close to turn the TV on. The colors on page 20. • Reset the picture settings. see your antenna is plugged into a working . • Ensure you are connected...
... ensure mute is no power. • Ensure the TV is connected securely to the TV and move the antenna around the room or close to turn the TV on. The colors on page 20. • Reset the picture settings. see your antenna is plugged into a working . • Ensure you are connected...
E601i-A3 User Manual
Page 59
...outlet on , the user is not responsible for any radio or TV interference caused by unauthorized modification to this device must be determined by turning the equipment off and on a circuit different from the date of the distribution of the FCC Rules. Operation is connected. 4. The ... Always use , copy, modify, merge, publish, distribute, sublicense, and/or sell copies of media, shipping and handling upon request made to VIZIO at www.VIZIO.com. This offer is properly grounded. Permission is hereby granted, free of charge, to any person obtaining a copy of the following conditions: THE...
...outlet on , the user is not responsible for any radio or TV interference caused by unauthorized modification to this device must be determined by turning the equipment off and on a circuit different from the date of the distribution of the FCC Rules. Operation is connected. 4. The ... Always use , copy, modify, merge, publish, distribute, sublicense, and/or sell copies of media, shipping and handling upon request made to VIZIO at www.VIZIO.com. This offer is properly grounded. Permission is hereby granted, free of charge, to any person obtaining a copy of the following conditions: THE...
E601i-A3 Quick Start Guide
Page 2
... removing the back cover may expose you to rain or moisture, does not operate normally or has been dropped. • Unplug the power cord before turning on the apparatus. • The mains plug or appliance coupler is damaged, liquid has been spilled or objects have fallen into your TV cabinet. If...
... removing the back cover may expose you to rain or moisture, does not operate normally or has been dropped. • Unplug the power cord before turning on the apparatus. • The mains plug or appliance coupler is damaged, liquid has been spilled or objects have fallen into your TV cabinet. If...

E601i-A3 Quick Start Guide
Page 5
...Select the highlighted menu option. NUMBER PAD Manually enter a channel. WIDE Switch the display mode. APP LAUNCHER Quickly launch the pictured app. MUTE Turn the audio off or on or off. INFO Display the info window. DASH Use with number pad to the channel last viewed. VOLUME UP/...DOWN Increase or decrease loudness of the audio. GUIDE Display the info window. POWER Turn TV on . EXIT Close the on -screen menu. ARROW Navigate the on -screen menu. LAST Return to manually enter a digital sub-channel. (...
...Select the highlighted menu option. NUMBER PAD Manually enter a channel. WIDE Switch the display mode. APP LAUNCHER Quickly launch the pictured app. MUTE Turn the audio off or on or off. INFO Display the info window. DASH Use with number pad to the channel last viewed. VOLUME UP/...DOWN Increase or decrease loudness of the audio. GUIDE Display the info window. POWER Turn TV on . EXIT Close the on -screen menu. ARROW Navigate the on -screen menu. LAST Return to manually enter a digital sub-channel. (...
E601i-A3 Quick Start Guide
Page 9
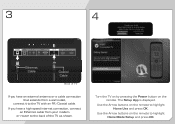
If you have an external antenna or a cable connection that extends from your modem or router to the back of TV If you have a high-speed internet connection, connect an Ethernet cable from a wall outlet, connect it to the TV with an RF/Coaxial cable. Turn the TV on by pressing the Power button on the remote to highlight Home Use and press OK. Use the Arrow buttons on the remote. The Setup App is displayed. 3 4 Ethernet Cable Coaxial Cable Back of the TV as shown. Use the Arrow buttons on the remote to highlight Home Mode Setup and press OK.
If you have an external antenna or a cable connection that extends from your modem or router to the back of TV If you have a high-speed internet connection, connect an Ethernet cable from a wall outlet, connect it to the TV with an RF/Coaxial cable. Turn the TV on by pressing the Power button on the remote to highlight Home Use and press OK. Use the Arrow buttons on the remote. The Setup App is displayed. 3 4 Ethernet Cable Coaxial Cable Back of the TV as shown. Use the Arrow buttons on the remote to highlight Home Mode Setup and press OK.

E601i-A3 Quick Start Guide
Page 17
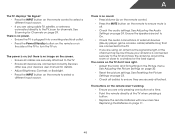
.... Press MENU, then select Wide. Select Yes. Remember that came with your device is off. • Press MENU, then select TV Settings > Audio. There are turned on. • Press the INPUT button on the remote and select the input to which your mount. HELP TOPICS How do I mount my TV to...
.... Press MENU, then select Wide. Select Yes. Remember that came with your device is off. • Press MENU, then select TV Settings > Audio. There are turned on. • Press the INPUT button on the remote and select the input to which your mount. HELP TOPICS How do I mount my TV to...


