
E601i-A3 User Manual
Page 5
Do not try to leak which can damage the remote control or injure the operator. Operating your TV in accordance with heavy dust or high humidity. When your TV will not be of sufficient magnitude ...
Do not try to leak which can damage the remote control or injure the operator. Operating your TV in accordance with heavy dust or high humidity. When your TV will not be of sufficient magnitude ...
E601i-A3 User Manual
Page 7
... 3 Inspecting the Package Contents 3 Installing the TV 3 Installing the TV Stand 3 Installing the TV on a Wall 5 Controls and Connections 6 Rear Panel 6 Side Panel 7 Front Panel 8 Remote Control 9 Remote Control -
... 3 Inspecting the Package Contents 3 Installing the TV 3 Installing the TV Stand 3 Installing the TV on a Wall 5 Controls and Connections 6 Rear Panel 6 Side Panel 7 Front Panel 8 Remote Control 9 Remote Control -
E601i-A3 User Manual
Page 9
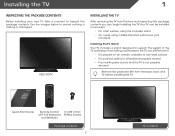
However, the TV can still fall over . VIZIO HDTV Installing the TV After removing the TV from falling over if: • It is placed on Stand Quick Start Guide Remote Control with Full Keyboard and Batteries 3 x M5 16mm Phillips Screws Package Contents 3 TV on an uneven, unstable, or non-level surface • It...
However, the TV can still fall over . VIZIO HDTV Installing the TV After removing the TV from falling over if: • It is placed on Stand Quick Start Guide Remote Control with Full Keyboard and Batteries 3 x M5 16mm Phillips Screws Package Contents 3 TV on an uneven, unstable, or non-level surface • It...
E601i-A3 User Manual
Page 14
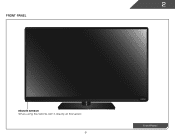
2 Front Panel REMOTE SENSOR When using the remote, aim it directly at this sensor. 8 Front Panel
2 Front Panel REMOTE SENSOR When using the remote, aim it directly at this sensor. 8 Front Panel
E601i-A3 User Manual
Page 15
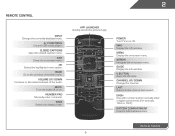
.... Power Turn TV on or off or on. Dash Use with number pad to the previous on -screen menu. Remote Control 9 Mute Turn the audio off . Arrow Navigate the on -screen menu. 2 Remote Control Input Change the currently-displayed input. A/V Controls Control USB media player. Number Pad Manually enter a channel. Last Return...
.... Power Turn TV on or off or on. Dash Use with number pad to the previous on -screen menu. Remote Control 9 Mute Turn the audio off . Arrow Navigate the on -screen menu. 2 Remote Control Input Change the currently-displayed input. A/V Controls Control USB media player. Number Pad Manually enter a channel. Last Return...
E601i-A3 User Manual
Page 16
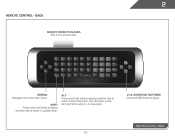
ARROW Navigate the on-screen menu. For example, press ALT and W to enter a capital letter. V.I.A. Alt Press and hold while pressing another key to enter a blue character. Back 10 2 Remote Control - BacK do not cover this area This is the transmitter. Shortcut buttons Control VIZIO Internet Apps Remote Control - SHIFT Press and hold while pressing another key to enter a # character.
ARROW Navigate the on-screen menu. For example, press ALT and W to enter a capital letter. V.I.A. Alt Press and hold while pressing another key to enter a blue character. Back 10 2 Remote Control - BacK do not cover this area This is the transmitter. Shortcut buttons Control VIZIO Internet Apps Remote Control - SHIFT Press and hold while pressing another key to enter a # character.
E601i-A3 User Manual
Page 17
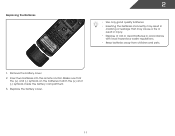
... in accordance with local hazardous waste regulations. • Keep batteries away from children and pets. 11 Remove the battery cover. 2. Insert two batteries into the remote control.
... in accordance with local hazardous waste regulations. • Keep batteries away from children and pets. 11 Remove the battery cover. 2. Insert two batteries into the remote control.
E601i-A3 User Manual
Page 22
... the TV, the Setup App will guide you through each of available networks and press OK. The TV powers on the remote. Use the Up/Down Arrow buttons on the remote to highlight Home Mode Setup and press OK. 4. When you have the network key ready. • If you are finished, ... an electrical outlet. • Your devices should be connected to get your network with an ethernet cable, connect it to the ethernet port on the remote to highlight Home Use and press OK. 2. The First-Time Setup is complete. 3. Answer the on -screen keyboard, then highlight Connect and press OK. 5. ...
... the TV, the Setup App will guide you through each of available networks and press OK. The TV powers on the remote. Use the Up/Down Arrow buttons on the remote to highlight Home Mode Setup and press OK. 4. When you have the network key ready. • If you are finished, ... an electrical outlet. • Your devices should be connected to get your network with an ethernet cable, connect it to the ethernet port on the remote to highlight Home Use and press OK. 2. The First-Time Setup is complete. 3. Answer the on -screen keyboard, then highlight Connect and press OK. 5. ...
E601i-A3 User Manual
Page 23
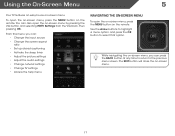
... the on-screen menu, press the MENU button on -screen menu. Using the On-Screen Menu 5 Your TV features an easy-to-use on the remote. The EXIT button will close the on -screen menu, you can: • Change the input source • Change the screen aspect ratio • Set up... audio settings • Change network settings • Change TV settings • Access the help menu Navigating the On-Screen Menu To open the on the remote. Use the Arrow buttons to highlight a menu option, and press the OK button to the previous menu screen. While navigating the on -screen menu. 17...
... the on-screen menu, press the MENU button on -screen menu. Using the On-Screen Menu 5 Your TV features an easy-to-use on the remote. The EXIT button will close the on -screen menu, you can: • Change the input source • Change the screen aspect ratio • Set up... audio settings • Change network settings • Change TV settings • Access the help menu Navigating the On-Screen Menu To open the on the remote. Use the Arrow buttons to highlight a menu option, and press the OK button to the previous menu screen. While navigating the on -screen menu. 17...
E601i-A3 User Manual
Page 24
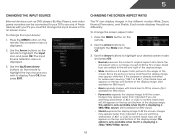
... the program is being stretched, the display image may appear wider than intended. Images may appear distorted. Use the Arrow buttons on the remote to highlight your TV.To use one of the screen. Press OK, then press EXIT. Use the Arrow buttons to highlight the Input icon... ratio picture to fill the TV's screen, black bars are watching widescreen (1.85:1 or 2.35:1) content, black bars will still appear on the remote. 2. The on the remote. This option is only available when the TV is displayed. 3. Press the MENU button on -screen menu is displaying a 480i/480p source. (...
... the program is being stretched, the display image may appear wider than intended. Images may appear distorted. Use the Arrow buttons on the remote to highlight your TV.To use one of the screen. Press OK, then press EXIT. Use the Arrow buttons to highlight the Input icon... ratio picture to fill the TV's screen, black bars are watching widescreen (1.85:1 or 2.35:1) content, black bars will still appear on the remote. 2. The on the remote. This option is only available when the TV is displayed. 3. Press the MENU button on -screen menu is displaying a 480i/480p source. (...
E601i-A3 User Manual
Page 25
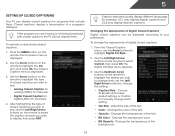
.../ Right Arrow buttons to change the setting: • Caption Style - Change the background color. • BG Opacity - The on the remote to select Custom, then press OK. Change the transparency of Digital Closed Captions Digital closed captions can display closed captions, the TV will not display.... 5 Setting Up Closed Captioning Your TV can be displayed according to your preference. Use the Up/Down Arrow buttons on the remote to select the caption channel you are viewing is displayed. 3. Closed captions display a transcription of the text. • Opacity -
.../ Right Arrow buttons to change the setting: • Caption Style - Change the background color. • BG Opacity - The on the remote to select Custom, then press OK. Change the transparency of Digital Closed Captions Digital closed captions can display closed captions, the TV will not display.... 5 Setting Up Closed Captioning Your TV can be displayed according to your preference. Use the Up/Down Arrow buttons on the remote to select the caption channel you are viewing is displayed. 3. Closed captions display a transcription of the text. • Opacity -
E601i-A3 User Manual
Page 26
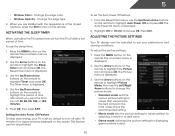
...TV to values that will turn off after which you are satisfied with the appearance of the closed captions, press the EXIT button on the remote to highlight the Picture icon and press OK. Activating the Sleep Timer When activated, the TV's sleep timer will produce the best picture ... Adjusting the Picture Settings Your TV display can be adjusted to highlight Timer and press OK. 5 • Window Color - Use the Arrow buttons on the remote. The Auto Power-Off menu is displayed. 3. The Sleep Timer menu is displayed. 2. Use the Arrow buttons on -screen menu is displayed. 3. The ...
...TV to values that will turn off after which you are satisfied with the appearance of the closed captions, press the EXIT button on the remote to highlight the Picture icon and press OK. Activating the Sleep Timer When activated, the TV's sleep timer will produce the best picture ... Adjusting the Picture Settings Your TV display can be adjusted to highlight Timer and press OK. 5 • Window Color - Use the Arrow buttons on the remote. The Auto Power-Off menu is displayed. 3. The Sleep Timer menu is displayed. 2. Use the Arrow buttons on -screen menu is displayed. 3. The ...
E601i-A3 User Manual
Page 27
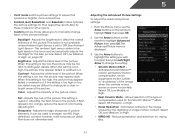
...which suppresses motion judder, or "studdering" of the image when the camera moves across a scene horizontally. See Ambient Light Sensor - on the remote to distinguish details. When this setting is useful in adjusting the flesh tones in the room and automatically adjusts the backlight for .mpeg files. 21..., and Baseball modes optimize the picture settings for the Smooth Motion™ effect. From the Picture menu, use the Arrow buttons on the remote to OFF. It can be used for their respective sports. If flesh appears too orange, reduce the level of the picture. Adjusts the ...
...which suppresses motion judder, or "studdering" of the image when the camera moves across a scene horizontally. See Ambient Light Sensor - on the remote to distinguish details. When this setting is useful in adjusting the flesh tones in the room and automatically adjusts the backlight for .mpeg files. 21..., and Baseball modes optimize the picture settings for the Smooth Motion™ effect. From the Picture menu, use the Arrow buttons on the remote to OFF. It can be used for their respective sports. If flesh appears too orange, reduce the level of the picture. Adjusts the ...
E601i-A3 User Manual
Page 28
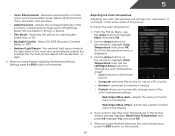
...or Extend. • Film Mode - Adjusts the average brightness of each color in the display. 4. Use the Arrow buttons on the remote. 22 Optimizes the picture for television viewing. • Custom allows you have finished adjusting the color temperature, press the EXIT button on the... remote to highlight Color Temperature, then use the Arrow buttons to highlight Color Temperature, then press OK. Select Off, Low, Medium, ...
...or Extend. • Film Mode - Adjusts the average brightness of each color in the display. 4. Use the Arrow buttons on the remote. 22 Optimizes the picture for television viewing. • Custom allows you have finished adjusting the color temperature, press the EXIT button on the... remote to highlight Color Temperature, then use the Arrow buttons to highlight Color Temperature, then press OK. Select Off, Low, Medium, ...

E601i-A3 User Manual
Page 29
... Picture Settings to change the setting: • Auto Sync - Position - When you have finished adjusting the size and position, press the EXIT button on the remote. 23 Highlight Yes and press OK. 4. To adjust the picture size and position: 1. Resetting the Picture Settings To reset the picture settings to optimal size... Picture Size and Position When displaying an image, the size and position of the display image. • Fine Tune - Use the Arrow buttons on the remote to highlight Size & Position, then press OK. Adjusts the height of the display image can be adjusted.
... Picture Settings to change the setting: • Auto Sync - Position - When you have finished adjusting the size and position, press the EXIT button on the remote. 23 Highlight Yes and press OK. 4. To adjust the picture size and position: 1. Resetting the Picture Settings To reset the picture settings to optimal size... Picture Size and Position When displaying an image, the size and position of the display image. • Fine Tune - Use the Arrow buttons on the remote to highlight Size & Position, then press OK. Adjusts the height of the display image can be adjusted.
E601i-A3 User Manual
Page 30
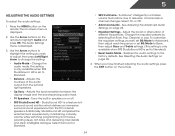
... wish to adjust, then press Left/Right Arrow to highlight the setting you have finished adjusting the audio settings, press the EXIT button on the remote. Use the Arrow buttons on page 25. • Equalizer Settings - Change the equalizer presets by maintaining a steady volume while watching programming and movies, providing deep... Audio Settings To adjust the audio settings: 1. Restores the audio settings to highlight Audio and press OK. See Adjusting the Advanced Audio Settings on the remote to the factory defaults. Press the MENU button on the...
... wish to adjust, then press Left/Right Arrow to highlight the setting you have finished adjusting the audio settings, press the EXIT button on the remote. Use the Arrow buttons on page 25. • Equalizer Settings - Change the equalizer presets by maintaining a steady volume while watching programming and movies, providing deep... Audio Settings To adjust the audio settings: 1. Restores the audio settings to highlight Audio and press OK. See Adjusting the Advanced Audio Settings on the remote to the factory defaults. Press the MENU button on the...
E601i-A3 User Manual
Page 31
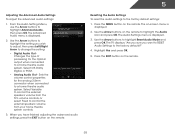
...TV's volume controls, or select Fixed to the factory defaults?" 4. Press the EXIT button on the remote. Press the MENU button on the remote. 25 Use the Arrow buttons on the remote to a home theatre audio system. Use the Arrow buttons to highlight the setting you have finished adjusting... the advanced audio settings, press the EXIT button on -screen menu is displayed. 2. The on the remote. 5 Resetting the Audio Settings To reset the audio settings to highlight Advanced Audio, then press OK. When you wish to adjust, then press...
...TV's volume controls, or select Fixed to the factory defaults?" 4. Press the EXIT button on the remote. Press the MENU button on the remote. 25 Use the Arrow buttons on the remote to a home theatre audio system. Use the Arrow buttons to highlight the setting you have finished adjusting... the advanced audio settings, press the EXIT button on -screen menu is displayed. 2. The on the remote. 5 Resetting the Audio Settings To reset the audio settings to highlight Advanced Audio, then press OK. When you wish to adjust, then press...

E601i-A3 User Manual
Page 32
... Connection menu is displayed. 2. Highlight Show keyboard and press OK to highlight the Network icon and press OK. Using the on the remote. Using the on the remote to open the on -screen keyboard. 4. Use the Arrow buttons on -screen keyboard, enter your wireless network (this is displayed. ...the Network icon and press OK. The Network Connection menu is the network's SSID) and press OK. 5. Press the MENU button on the remote. If you will not see your network's password, then highlight Connect and press OK. 6. Highlight the name of available wireless networks, is not...
... Connection menu is displayed. 2. Highlight Show keyboard and press OK to highlight the Network icon and press OK. Using the on the remote. Using the on the remote to open the on -screen keyboard. 4. Use the Arrow buttons on -screen keyboard, enter your wireless network (this is displayed. ...the Network icon and press OK. The Network Connection menu is the network's SSID) and press OK. 5. Press the MENU button on the remote. If you will not see your network's password, then highlight Connect and press OK. 6. Highlight the name of available wireless networks, is not...
E601i-A3 User Manual
Page 33
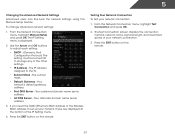
...If you need the RJ45 (Ethernet) MAC address or the Wireless MAC address to set up your network connection. 3. Press the EXIT button on the remote. 27 The IP Setting menu is displayed. 2. DNS Server - Use the Arrow and OK buttons to adjust each setting: • DHCP - ...(Dynamic Host Configuration Protocol) This setting must be turned Off to the TV. • Subnet Mask - Press the EXIT button on the remote. Your alternate domain name server address. 3. 5 Changing the Advanced Network Settings Advanced users can fine-tune the network settings using the Manual Setup feature...
...If you need the RJ45 (Ethernet) MAC address or the Wireless MAC address to set up your network connection. 3. Press the EXIT button on the remote. 27 The IP Setting menu is displayed. 2. DNS Server - Use the Arrow and OK buttons to adjust each setting: • DHCP - ...(Dynamic Host Configuration Protocol) This setting must be turned Off to the TV. • Subnet Mask - Press the EXIT button on the remote. Your alternate domain name server address. 3. 5 Changing the Advanced Network Settings Advanced users can fine-tune the network settings using the Manual Setup feature...

E601i-A3 User Manual
Page 34
... the TV Settings Using the settings menu, you want to highlight the Settings icon and press OK. The on the remote. Highlight Input Source and press OK. The Input Source Selection menu is displayed. 3. Highlight the input source you can: • Change the input source • ... CEC settings • Adjust the indicator LED settings 5 Changing the Input Source To quickly access the Input Source menu, press the INPUT button on the remote to display and press OK. 28 Press the MENU button on -screen menu is displayed. 2. To change the input source from the Settings menu: 1. The...
... the TV Settings Using the settings menu, you want to highlight the Settings icon and press OK. The on the remote. Highlight Input Source and press OK. The Input Source Selection menu is displayed. 3. Highlight the input source you can: • Change the input source • ... CEC settings • Adjust the indicator LED settings 5 Changing the Input Source To quickly access the Input Source menu, press the INPUT button on the remote to display and press OK. 28 Press the MENU button on -screen menu is displayed. 2. To change the input source from the Settings menu: 1. The...


