
User Manual (English)
Page 16
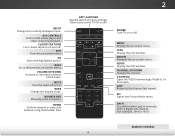
... previous on -screen menu. WIDE Change the display mode. MUTE Turn the audio off . ENTER Confirm channel or passcode entered using the Number Pad. V BUTTON Open the VIZIO Internet Apps Plus® (V.I.A. LAST Return to manually enter a digital sub-channel. (For example, 18-4 or 18-5.) REMOTE CONTROL 10 OK Select the highlighted...
... previous on -screen menu. WIDE Change the display mode. MUTE Turn the audio off . ENTER Confirm channel or passcode entered using the Number Pad. V BUTTON Open the VIZIO Internet Apps Plus® (V.I.A. LAST Return to manually enter a digital sub-channel. (For example, 18-4 or 18-5.) REMOTE CONTROL 10 OK Select the highlighted...
User Manual (English)
Page 25
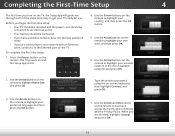
... ready. • If you are connecting to the Ethernet port on and the Setup App starts. 4. The TV powers on the TV. Use the Arrow buttons on the remote to highlight your network with an Ethernet cable, connect it to your preferred language, and then press the OK..." por Demostración de Tienda. Select Home Use for in-store display. When you are finished, highlight I Accept and press OK. 19 Use the Arrow buttons on the remote to get your mode. Select Store Demo for in the list of the steps necessary to highlight your country, and then press...
... ready. • If you are connecting to the Ethernet port on and the Setup App starts. 4. The TV powers on the TV. Use the Arrow buttons on the remote to highlight your network with an Ethernet cable, connect it to your preferred language, and then press the OK..." por Demostración de Tienda. Select Home Use for in-store display. When you are finished, highlight I Accept and press OK. 19 Use the Arrow buttons on the remote to get your mode. Select Store Demo for in the list of the steps necessary to highlight your country, and then press...
User Manual (English)
Page 26
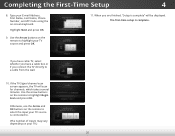
...TV, select whether you have a cable box or if you are finished, "Setup is complete. Use the arrow buttons on the remote to a cable from the wall. 10. Use the Arrow buttons on the remote to . (The number of inputs may vary depending on -screen keyboard. Completing the First-Time Setup... 4 8. The first-time setup is complete" will scan for channels, which takes several minutes. Otherwise, use the Arrow and OK buttons on the remote to select the input your TV source is connected to highlight your E-mail Address, First Name, Last Name, Phone Number, and ZIP...
...TV, select whether you have a cable box or if you are finished, "Setup is complete. Use the arrow buttons on the remote to a cable from the wall. 10. Use the Arrow buttons on the remote to . (The number of inputs may vary depending on -screen keyboard. Completing the First-Time Setup... 4 8. The first-time setup is complete" will scan for channels, which takes several minutes. Otherwise, use the Arrow and OK buttons on the remote to select the input your TV source is connected to highlight your E-mail Address, First Name, Last Name, Phone Number, and ZIP...
User Manual (English)
Page 27
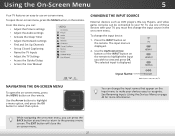
...up Closed Captioning • Name the TV Inputs • Adjust the TV Settings • Access the Guided Setup • Access the User Manual VIZIO TV SETTINGS Picture Audio Timers Network Channels CC Closed Captions Devices System Guided Setup User Manual CHANGING THE INPUT SOURCE External devices such as DVD... Sleep Timer Picture Audio TV HDMI-1 HDMI-2 HDMI-3 Network Settings Help Input Name COMP Note: Inputs may vary by TV. Press the INPUT button on Exitt he re2Dmote.3TD he input menu is displayed. While navigating the on the remote. To open the on-screen menu, press the ...
...up Closed Captioning • Name the TV Inputs • Adjust the TV Settings • Access the Guided Setup • Access the User Manual VIZIO TV SETTINGS Picture Audio Timers Network Channels CC Closed Captions Devices System Guided Setup User Manual CHANGING THE INPUT SOURCE External devices such as DVD... Sleep Timer Picture Audio TV HDMI-1 HDMI-2 HDMI-3 Network Settings Help Input Name COMP Note: Inputs may vary by TV. Press the INPUT button on Exitt he re2Dmote.3TD he input menu is displayed. While navigating the on the remote. To open the on-screen menu, press the ...
User Manual (English)
Page 28
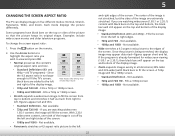
...4:3 aspect ratio picture to right edges. • 720p and 720i - Fills the screen from right to view and press OK. Not available. Use the Arrow buttons to fit the screen. Not available. • 720p and 720i HD - If the program is already formatted for widescreen viewing (1.85:1 or 2.35:1), then ...and right sides of the screen. If you wish to left 22 and right edges of the screen. • 1080p and 1080i - Press the button on the top and bottom of the display image. 5 CHANGING THE SCREEN ASPECT RATIO The TV can display images in all directions (33% taller ...
...4:3 aspect ratio picture to right edges. • 720p and 720i - Fills the screen from right to view and press OK. Not available. Use the Arrow buttons to fit the screen. Not available. • 720p and 720i HD - If the program is already formatted for widescreen viewing (1.85:1 or 2.35:1), then ...and right sides of the screen. If you wish to left 22 and right edges of the screen. • 1080p and 1080i - Press the button on the top and bottom of the display image. 5 CHANGING THE SCREEN ASPECT RATIO The TV can display images in all directions (33% taller ...

User Manual (English)
Page 29
...Timer Picture Audio Network Settings Help VIEWPORT ABC Input Sleep Timer VIZIO Wide CC PICTURE Picture Mode Standard Backlight - + 85 Brightness - + 50 Contrast - + 50 Color - + 59 Tint - +0 Sharpness - Press the Up Arrow button on the remote to the menu, so that the right...lag) when gaming, use Game mode. The picture is full-sized and centered in three different ways: • Overlay - Use the Arrow buttons on the remote to cycle through the three display methods. 3. Press OK to the menu. Contrast - Sharpness - No Tint Sharpness r m...
...Timer Picture Audio Network Settings Help VIEWPORT ABC Input Sleep Timer VIZIO Wide CC PICTURE Picture Mode Standard Backlight - + 85 Brightness - + 50 Contrast - + 50 Color - + 59 Tint - +0 Sharpness - Press the Up Arrow button on the remote to the menu, so that the right...lag) when gaming, use Game mode. The picture is full-sized and centered in three different ways: • Overlay - Use the Arrow buttons on the remote to cycle through the three display methods. 3. Press OK to the menu. Contrast - Sharpness - No Tint Sharpness r m...
User Manual (English)
Page 30
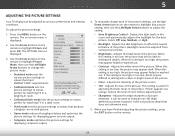
To adjust the picture settings: 1. VIZIO PICTURE Picture Mode Auto Brightness Control Backlight - Contrast - More Picture Picture Mode Edit...of the picture. It can be adjusted to suit your preferences and viewing conditions. Press the MENU button on the remote to highlight Picture and press OK. The on-screen menu is displayed. 3. Adjusts...Standard mode sets the various picture settings to values that picture setting, then use the Up/ Down Arrow buttons on the remote. 24 Wide Zoom Normal Panoramic • Backlight - When this setting is too high ...
To adjust the picture settings: 1. VIZIO PICTURE Picture Mode Auto Brightness Control Backlight - Contrast - More Picture Picture Mode Edit...of the picture. It can be adjusted to suit your preferences and viewing conditions. Press the MENU button on the remote to highlight Picture and press OK. The on-screen menu is displayed. 3. Adjusts...Standard mode sets the various picture settings to values that picture setting, then use the Up/ Down Arrow buttons on the remote. 24 Wide Zoom Normal Panoramic • Backlight - When this setting is too high ...

User Manual (English)
Page 31
.... Reduces blur in sharpness. Some sensitive viewers may notice flicker. Opens a sub-menu with fast action. Use the Left/Right Arrow buttons to adjust the horizontal position of the picture to Game Low Latency Off change Picture Size & Position the setting: Film Mode Auto &#... the screen. From the PICTURE menu, use the Arrow buttons on page 26. • Black Detail - Black Detail Low Active LED Zones On 2. Adjusts the average brightness of the picture to VIZIO highlight More Picture and press MORE PICTURE OK. Reduces pixelation and distortion for watching ...
.... Reduces blur in sharpness. Some sensitive viewers may notice flicker. Opens a sub-menu with fast action. Use the Left/Right Arrow buttons to adjust the horizontal position of the picture to Game Low Latency Off change Picture Size & Position the setting: Film Mode Auto &#... the screen. From the PICTURE menu, use the Arrow buttons on page 26. • Black Detail - Black Detail Low Active LED Zones On 2. Adjusts the average brightness of the picture to VIZIO highlight More Picture and press MORE PICTURE OK. Reduces pixelation and distortion for watching ...
User Manual (English)
Page 32
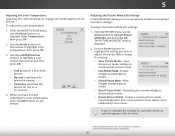
VIZIO COLOR TEMPERATURE Cool Normal Computer 3. Use the Left/Right Arrow buttons to highlight a color temperature preset and then press OK: • Cool produces a blue-hued picture. • Normal is optimized for television ... WiAderrowZobomuttonNsortmoahl igPhalniogrhamt iPcicture Mode Edit, and then press OK. To adjust the color temperature: 1. From the MORE PICTURE menu, use the Arrow buttons to change the setting: VIZIO PICTURE MODE EDIT - Allow changes to factory default values. • Delete Picture Mode - Calibrated* •Input SavWeidPe icturCeC Mode†...
VIZIO COLOR TEMPERATURE Cool Normal Computer 3. Use the Left/Right Arrow buttons to highlight a color temperature preset and then press OK: • Cool produces a blue-hued picture. • Normal is optimized for television ... WiAderrowZobomuttonNsortmoahl igPhalniogrhamt iPcicture Mode Edit, and then press OK. To adjust the color temperature: 1. From the MORE PICTURE menu, use the Arrow buttons to change the setting: VIZIO PICTURE MODE EDIT - Allow changes to factory default values. • Delete Picture Mode - Calibrated* •Input SavWeidPe icturCeC Mode†...
User Manual (English)
Page 33
...menu is displayed. 2. ExHit ighlig2hD t Save3Dand press OK. From the PICTURE MODE MANAGEMENT menu, use the Arrow buttons to highlight Save Picture Mode, and then press OK. VIZIO LOCK PICTURE MODE Create a picture control PIN to prevent change to all custom picture modes...the PICTURE MODE EDIT menu, use the STliAUm eeernprrloowcPkibcPtuuirtcettounrAseudtMoioohdigeh, laignhdt then press OK. From the PICTURE MODE MANAGEMENT menu, use the Arrow buttons to the picture modes. 4. The UNLOCK PICTURE MODE menu is not automatically saved. 5 Saving a Custom Picture Mode Custom picture modes...
...menu is displayed. 2. ExHit ighlig2hD t Save3Dand press OK. From the PICTURE MODE MANAGEMENT menu, use the Arrow buttons to highlight Save Picture Mode, and then press OK. VIZIO LOCK PICTURE MODE Create a picture control PIN to prevent change to all custom picture modes...the PICTURE MODE EDIT menu, use the STliAUm eeernprrloowcPkibcPtuuirtcettounrAseudtMoioohdigeh, laignhdt then press OK. From the PICTURE MODE MANAGEMENT menu, use the Arrow buttons to the picture modes. 4. The UNLOCK PICTURE MODE menu is not automatically saved. 5 Saving a Custom Picture Mode Custom picture modes...

User Manual (English)
Page 34
... custom picture mode become assigned to highlight Delete and press OK. 4. Use the Left/Right Arrow buttons to the Calibrated picture mode. From the PICTURE MODE MANAGEMENT menu, use the Arrow buttons to highlight Reset Picture Mode, and then press OK. Use the Up/Down Arrow... 1. Reset Cancel 2. The DELETE PICTURE MODE window is displayed. To reset a customized preset picture mode: 1. Delete Cancel 2. Press the EXIT button to exit the menu screens. 28 The RESET PICTURE MODE window is displayed. To delete the user created Custom 1 picture mode, select the Delete...
... custom picture mode become assigned to highlight Delete and press OK. 4. Use the Left/Right Arrow buttons to the Calibrated picture mode. From the PICTURE MODE MANAGEMENT menu, use the Arrow buttons to highlight Reset Picture Mode, and then press OK. Use the Up/Down Arrow... 1. Reset Cancel 2. The DELETE PICTURE MODE window is displayed. To reset a customized preset picture mode: 1. Delete Cancel 2. Press the EXIT button to exit the menu screens. 28 The RESET PICTURE MODE window is displayed. To delete the user created Custom 1 picture mode, select the Delete...

User Manual (English)
Page 35
The Color Tuner, 11 Point White Balance, and test patterns allow you wish to adjust, then press the OK button to change the setting: VIZIO COLOR CALIBRATION Picture Mode* Color Temperature* Color Tuner Reset Color Tuner • Picture Mode - To adjust the color calibration picture settings: 1. The COLOR CALIBRATION menu ...
The Color Tuner, 11 Point White Balance, and test patterns allow you wish to adjust, then press the OK button to change the setting: VIZIO COLOR CALIBRATION Picture Mode* Color Temperature* Color Tuner Reset Color Tuner • Picture Mode - To adjust the color calibration picture settings: 1. The COLOR CALIBRATION menu ...

User Manual (English)
Page 36
... can be turned off . 5. The Color Tuner menu is displayed. 2. Use the Left/Right Arrow buttons to highlight Color Calibration and press the OK button. The COLOR CALIBRATION menu is displayed. An X appears over a color channel that has been turned off... 0 0 25 -14 Saturation -1 5 -4 0 -2 0 Brightness -24 0 -22 0 0 0 Offset 0 0 0 Gain 0 0 0 3. Press the OK button. 4. To adjust the HSB color settings: 1. Use the Arrow buttons on the remote to adjust the Hue, Saturation, and Brightness (HSB) color and 11 point white balance, turn color channels off...
... can be turned off . 5. The Color Tuner menu is displayed. 2. Use the Left/Right Arrow buttons to highlight Color Calibration and press the OK button. The COLOR CALIBRATION menu is displayed. An X appears over a color channel that has been turned off... 0 0 25 -14 Saturation -1 5 -4 0 -2 0 Brightness -24 0 -22 0 0 0 Offset 0 0 0 Gain 0 0 0 3. Press the OK button. 4. To adjust the HSB color settings: 1. Use the Arrow buttons on the remote to adjust the Hue, Saturation, and Brightness (HSB) color and 11 point white balance, turn color channels off...

User Manual (English)
Page 37
... the remote to highlight Off. 3. From the Color Tuner menu, use the Left/Right Arrow buttons to highlight Off. When you are finished, press the BACK button to highlight Color Tuner, and then press the Left/Right Arrow buttons until the Color Bar Test Pattern menu is displaying active content. Use the Arrow... save the setting. 3. To adjust the 11 Point White Balance settings: 1. Ensure that is displayed. To hide the Color Bar Test Pattern, use the Arrow buttons to adjust additional settings or EXIT. 31 When you are on an input that you are finished press the OK...
... the remote to highlight Off. 3. From the Color Tuner menu, use the Left/Right Arrow buttons to highlight Off. When you are finished, press the BACK button to highlight Color Tuner, and then press the Left/Right Arrow buttons until the Color Bar Test Pattern menu is displaying active content. Use the Arrow... save the setting. 3. To adjust the 11 Point White Balance settings: 1. Ensure that is displayed. To hide the Color Bar Test Pattern, use the Arrow buttons to adjust additional settings or EXIT. 31 When you are on an input that you are finished press the OK...

User Manual (English)
Page 38
...To show or hide the Flat Test Pattern: 1. From the Color Tuner menu, use the Left/Right Arrow buttons to highlight Color Tuner, and then press the Left/Right Arrow buttons until the Flat Test Pattern menu is displayed. Selecting a percentage immediately shows the flat pattern at that color ...ramp. -or- Ensure that is displaying active content. Use the Arrow buttons on an input that you are finished, press the BACK button to highlight Off. When you are on the remote to adjust additional settings or EXIT. 2. Ensure that is ...
...To show or hide the Flat Test Pattern: 1. From the Color Tuner menu, use the Left/Right Arrow buttons to highlight Color Tuner, and then press the Left/Right Arrow buttons until the Flat Test Pattern menu is displayed. Selecting a percentage immediately shows the flat pattern at that color ...ramp. -or- Ensure that is displaying active content. Use the Arrow buttons on an input that you are finished, press the BACK button to highlight Off. When you are on the remote to adjust additional settings or EXIT. 2. Ensure that is ...

User Manual (English)
Page 39
VIZIO AUDIO TV Speakers Surround Sound Volume Leveling Balance - Surround ...bar. Restores audio equalizer settings to highlight the setting you have finished adjusting the audio settings, press the EXIT button on -screen menu is displayed. 3. The AUDIO menu is displayed. 2. Adjusts the boost or attenuation of... different Sleep Timer frePqicutuerencieAsuduiosing either preset or custom settings. Use the Arrow buttons to the factory defaults by delivering crisp details and clear, intelligible dialog. Select On or Off. When you...
VIZIO AUDIO TV Speakers Surround Sound Volume Leveling Balance - Surround ...bar. Restores audio equalizer settings to highlight the setting you have finished adjusting the audio settings, press the EXIT button on -screen menu is displayed. 3. The AUDIO menu is displayed. 2. Adjusts the boost or attenuation of... different Sleep Timer frePqicutuerencieAsuduiosing either preset or custom settings. Use the Arrow buttons to the factory defaults by delivering crisp details and clear, intelligible dialog. Select On or Off. When you...

User Manual (English)
Page 40
... starting point and press OK. 5. Use the Down, Left, and Right Arrow buttons to highlight Equalizer Settings and press OK. Press the EXIT button on the remote. The AUDIO menu is displayed. 3. Press the MENU button on the remote. The AUDIO menu is displayed. 3. The AUDIO MODE and equalizer ...4. A new audio mode called "Custom" is displayed. 3. The equalizer bars change to highlight Delete Audio Mode and press OK. Press the EXIT button on the remote. The AUDIO menu is created. 7. Deleting the Custom Audio Mode To delete the custom audio mode: 1. Use the Arrow...
... starting point and press OK. 5. Use the Down, Left, and Right Arrow buttons to highlight Equalizer Settings and press OK. Press the EXIT button on the remote. The AUDIO menu is displayed. 3. Press the MENU button on the remote. The AUDIO menu is displayed. 3. The AUDIO MODE and equalizer ...4. A new audio mode called "Custom" is displayed. 3. The equalizer bars change to highlight Delete Audio Mode and press OK. Press the EXIT button on the remote. The AUDIO menu is created. 7. Deleting the Custom Audio Mode To delete the custom audio mode: 1. Use the Arrow...

User Manual (English)
Page 41
... to highlight Sleep Timer. 4. You can set the Auto Power Off feature: 1. Exiting the Screen Saver Press any button other than the Volume and Mute buttons on STlitm eheeper rePmictoutree toAuhdiigohlight Screen Saver. 2. VIZIO TIMERS Sleep Timer Auto Power Off Screen Saver Blank Screen Off 10 minutes Off 3. If you want the Nestwcorrek...
... to highlight Sleep Timer. 4. You can set the Auto Power Off feature: 1. Exiting the Screen Saver Press any button other than the Volume and Mute buttons on STlitm eheeper rePmictoutree toAuhdiigohlight Screen Saver. 2. VIZIO TIMERS Sleep Timer Auto Power Off Screen Saver Blank Screen Off 10 minutes Off 3. If you want the Nestwcorrek...

User Manual (English)
Page 42
To blank the screen: • From the TIMERS menu, use the Up/Down Arrow buttons on the remote to highlight Blank Screen, and then press OK. 5 Blanking the Screen You can blank the screen while there is audio streaming. Bringing Back the Screen Image Press any button other than the Volume and Mute buttons on the remote to exit the screen saver. 36 This feature helps save energy and the life of the screen.
To blank the screen: • From the TIMERS menu, use the Up/Down Arrow buttons on the remote to highlight Blank Screen, and then press OK. 5 Blanking the Screen You can blank the screen while there is audio streaming. Bringing Back the Screen Image Press any button other than the Volume and Mute buttons on the remote to exit the screen saver. 36 This feature helps save energy and the life of the screen.

User Manual (English)
Page 43
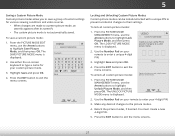
...you will not see your wireless network displayed, highlight More Access Points and press OK. From the NETWORK menu, highlight Manual Setup and VIZIO press OK. DNS Server Wireless MAC 0:0:0:0:0:0 Save Cancel • Subnet Mask - Your network's dAeBCfault gateway address. •Input PreWf.idDe...wireless network connection menu. To change the setting to highlight Network and press OK. To change the settings manually, use the Arrow buttons on the remote to Off. 3. DHCP Off 2. The MANUAL SETUP MANUAL SETUP menu is displayed. 3. IP Address Subnet Mask ...
...you will not see your wireless network displayed, highlight More Access Points and press OK. From the NETWORK menu, highlight Manual Setup and VIZIO press OK. DNS Server Wireless MAC 0:0:0:0:0:0 Save Cancel • Subnet Mask - Your network's dAeBCfault gateway address. •Input PreWf.idDe...wireless network connection menu. To change the setting to highlight Network and press OK. To change the settings manually, use the Arrow buttons on the remote to Off. 3. DHCP Off 2. The MANUAL SETUP MANUAL SETUP menu is displayed. 3. IP Address Subnet Mask ...


