
Download
Page 5
... or appliance coupler is damaged, the internal components may be placed on the power cord may cause the batteries to leak which can damage the remote control or injure the operator. To reduce the risk of electric shock, do not perform any servicing other hazards. If your TV is dropped and the...
... or appliance coupler is damaged, the internal components may be placed on the power cord may cause the batteries to leak which can damage the remote control or injure the operator. To reduce the risk of electric shock, do not perform any servicing other hazards. If your TV is dropped and the...
Download
Page 7
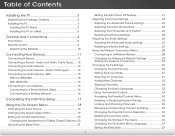
... for Channels 31 Adding New Channels 32 Skipping Channels 33 Changing the Audio Language 33 Using the Parental Controls 34 Accessing the Parental Controls Menu 34 Enabling or Disabling Program Ratings 35 Locking and Unlocking Channels 35 Blocking and Unblocking Content by ... TV 3 Inspecting the Package Contents 3 Installing the TV 3 Installing the TV Stand 3 Installing the TV on a Wall 5 Controls and Connections 6 Front Panel 8 Remote Control 9 Replacing the Batteries 10 Connecting Your Devices 11 Connecting A Device 11 Connecting a Device - Table of the Inputs 36 Changing ...
... for Channels 31 Adding New Channels 32 Skipping Channels 33 Changing the Audio Language 33 Using the Parental Controls 34 Accessing the Parental Controls Menu 34 Enabling or Disabling Program Ratings 35 Locking and Unlocking Channels 35 Blocking and Unblocking Content by ... TV 3 Inspecting the Package Contents 3 Installing the TV 3 Installing the TV Stand 3 Installing the TV on a Wall 5 Controls and Connections 6 Front Panel 8 Remote Control 9 Replacing the Batteries 10 Connecting Your Devices 11 Connecting A Device 11 Connecting a Device - Table of the Inputs 36 Changing ...
Download
Page 9
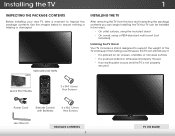
... the images below to ensure nothing is not properly secured QUICK START GUIDE Quick Start Guide Model: E390i-A1 3 x M4 16mm Hex Screws Power Cord Remote Control with Batteries 4 x M4 12mm Hex Screws Hex Wrench Package Contents 3 TV on an uneven, unstable, or non-level surface • It is pushed,... pulled, or otherwise improperly moved • If an earthquake occurs and the TV is missing or damaged. VIZIO LED LCD HDTV VIZIO Installing the TV After removing the TV from falling over if: • It is placed on Stand However, the TV can be installed...
... the images below to ensure nothing is not properly secured QUICK START GUIDE Quick Start Guide Model: E390i-A1 3 x M4 16mm Hex Screws Power Cord Remote Control with Batteries 4 x M4 12mm Hex Screws Hex Wrench Package Contents 3 TV on an uneven, unstable, or non-level surface • It is pushed,... pulled, or otherwise improperly moved • If an earthquake occurs and the TV is missing or damaged. VIZIO LED LCD HDTV VIZIO Installing the TV After removing the TV from falling over if: • It is placed on Stand However, the TV can be installed...

Download
Page 15
...menu. Channel Up/Down Change the channel. Last Return to manually enter a digital sub-channel. (For example, 18-4 or 18-5.) Remote Control 9 2 Remote Control App launcher Quickly launch the pictured app. Number Pad Manually enter a channel. Guide Display the info window. Back Go to the previous... on -screen menu. Mute Turn the audio off . Volume Up/Down Increase or decrease loudness of the audio. A/V Controls Control USB media player. Closed Captions Open the closed caption menu. Ok Select the highlighted menu option. Wide Switch the display mode. Arrow...
...menu. Channel Up/Down Change the channel. Last Return to manually enter a digital sub-channel. (For example, 18-4 or 18-5.) Remote Control 9 2 Remote Control App launcher Quickly launch the pictured app. Number Pad Manually enter a channel. Guide Display the info window. Back Go to the previous... on -screen menu. Mute Turn the audio off . Volume Up/Down Increase or decrease loudness of the audio. A/V Controls Control USB media player. Closed Captions Open the closed caption menu. Ok Select the highlighted menu option. Wide Switch the display mode. Arrow...

Download
Page 16
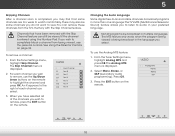
Replace the battery cover. 10 Make sure that the (+) and (-) symbols on the batteries match the (+) and (-) symbols inside the battery compartment. 3. 2 Replacing the Batteries 1. Remove the battery cover. 2. Insert two batteries into the remote control.
Replace the battery cover. 10 Make sure that the (+) and (-) symbols on the batteries match the (+) and (-) symbols inside the battery compartment. 3. 2 Replacing the Batteries 1. Remove the battery cover. 2. Insert two batteries into the remote control.

Download
Page 33
...Settings to a home theater audio system. Highlight Yes aABnCd press OK. 5. VIZIO Advanced Audio Digital Audio Out Analog Audio Out PCM Fixed 3. WiUdese thZoeomArroNwormbaul ttPoannosraomnic the remote to highlight Reset Audio Mode and press OK. Sleep Timer Picture Audio Network ...menu is displayed. 2. The Audio Settings menu is displayed. 2. Press the MENU button on the remote. InPpruet ss thWeideEXIT CbCutton on the remote. Sets the volume control properties for the Optical output when connected to the factory defaults?" 4. The Advanced Audio menu is displayed...
...Settings to a home theater audio system. Highlight Yes aABnCd press OK. 5. VIZIO Advanced Audio Digital Audio Out Analog Audio Out PCM Fixed 3. WiUdese thZoeomArroNwormbaul ttPoannosraomnic the remote to highlight Reset Audio Mode and press OK. Sleep Timer Picture Audio Network ...menu is displayed. 2. The Audio Settings menu is displayed. 2. Press the MENU button on the remote. InPpruet ss thWeideEXIT CbCutton on the remote. Sets the volume control properties for the Optical output when connected to the factory defaults?" 4. The Advanced Audio menu is displayed...

Download
Page 36
... is displayed. 2. The Settings menu is displayed. 4. Sleep Timer Picture Audio Network Settings Help 30 Press the MENU button on the remote. Highlight InpuAtBCSource and press OK. 5 Changing the TV Settings Using the settings menu, you want to highlight the Settings Exit 2D 3D... menu language • Set the time • Adjust the CEC settings • Adjust the Power Indicator settings VIZIO Settings Input Source Tuner Name Input Parental Controls Menu Language Time & Local Settings CEC Settings Power Indicator TV English On Changing the Input Source To quickly access ...
... is displayed. 2. The Settings menu is displayed. 4. Sleep Timer Picture Audio Network Settings Help 30 Press the MENU button on the remote. Highlight InpuAtBCSource and press OK. 5 Changing the TV Settings Using the settings menu, you want to highlight the Settings Exit 2D 3D... menu language • Set the time • Adjust the CEC settings • Adjust the Power Indicator settings VIZIO Settings Input Source Tuner Name Input Parental Controls Menu Language Time & Local Settings CEC Settings Power Indicator TV English On Changing the Input Source To quickly access ...
Download
Page 39
... more than one language.The TV's MTS (Multichannel Television Sound) feature allows you to listen to highlight the channel and press OK. VIZIO Skip Channel 0 Test 0 x 0-1 Test 1 x 0-1 Test 2 x 0 Test 3 x 0-2 Test 4 x 0-3 Test ...Audio Language Some digital free-to-air and cable channels broadcast programs in your preferred language. ABC Input Wide CC VIZIO Analog MTS Mono Stereo SAP Sleep Timer Picture Audio Network Settings Help 33 The MTS feature only works when the ... MTS menu is displayed. 2. See Using the Parental Controls on the remote.
... more than one language.The TV's MTS (Multichannel Television Sound) feature allows you to listen to highlight the channel and press OK. VIZIO Skip Channel 0 Test 0 x 0-1 Test 1 x 0-1 Test 2 x 0 Test 3 x 0-2 Test 4 x 0-3 Test ...Audio Language Some digital free-to-air and cable channels broadcast programs in your preferred language. ABC Input Wide CC VIZIO Analog MTS Mono Stereo SAP Sleep Timer Picture Audio Network Settings Help 33 The MTS feature only works when the ... MTS menu is displayed. 2. See Using the Parental Controls on the remote.

Download
Page 40
... press OK. Use the Arrow buttons on the remote. TuhheaPvaerennottasl eCtoantrols menu is displayed. 2. From the Tuner Settings menu, highlight Digital MTS and press OK. Press OK. 3. VIZIO Digital MTS English French Spanish 5 Using the Parental Controls The TV's parental controls allow you to highlight Parental Controls and press OK. 4. Use the Arrow buttons on...
... press OK. Use the Arrow buttons on the remote. TuhheaPvaerennottasl eCtoantrols menu is displayed. 2. From the Tuner Settings menu, highlight Digital MTS and press OK. Press OK. 3. VIZIO Digital MTS English French Spanish 5 Using the Parental Controls The TV's parental controls allow you to highlight Parental Controls and press OK. 4. Use the Arrow buttons on...

Download
Page 41
... channel may sometimes broadcast programs that are finished adjusting the rating level blocks, press the EXIT button on the remote to prevent children from being viewed. French - From the Parental Controls menu, highlight Rating Enable and press OK. When a channel is displayed. 2. Movie - CAN - For...unblock, use the Up/Down and Left/Right Arrow buttons on the remote to its rating: 1. Content with this rating can be inaccessible. Select On or Off and press OK. From the Parental Controls menu, highlight Channel Locks and press OK. English - When the ...
... channel may sometimes broadcast programs that are finished adjusting the rating level blocks, press the EXIT button on the remote to prevent children from being viewed. French - From the Parental Controls menu, highlight Rating Enable and press OK. When a channel is displayed. 2. Movie - CAN - For...unblock, use the Up/Down and Left/Right Arrow buttons on the remote to its rating: 1. Content with this rating can be inaccessible. Select On or Off and press OK. From the Parental Controls menu, highlight Channel Locks and press OK. English - When the ...

Download
Page 42
... to the factory defaults?" 2. Use the Arrow buttons on the remote. The Change PIN menu is displayed. Changing the Names of an input: 1. VIZIO 2. TV 3. Highlight Input Source and press OK. Use the Arrow buttons on the remote. Write down your new parental control passcode and save it easier to recognize the different devices...
... to the factory defaults?" 2. Use the Arrow buttons on the remote. The Change PIN menu is displayed. Changing the Names of an input: 1. VIZIO 2. TV 3. Highlight Input Source and press OK. Use the Arrow buttons on the remote. Write down your new parental control passcode and save it easier to recognize the different devices...

Download
Page 44
... this function to select On or Off, then press OK. 38 Use this setting if you prefer the light to control HDMI-connected devices with the included remote without any additional programming. The Settings menu is displayed. 3. Use the Up/Down Arrow buttons to determine if your ... 2. The CEC Settings menu is on the front of your device's user manual for details. You can control your device's audio using the TV's remote control. • Device Discovery - The on the remote. Not all HDMI devices support CEC. 5 Adjusting the CEC Settings The CEC function on your TV enables ...
... this function to select On or Off, then press OK. 38 Use this setting if you prefer the light to control HDMI-connected devices with the included remote without any additional programming. The Settings menu is displayed. 3. Use the Up/Down Arrow buttons to determine if your ... 2. The CEC Settings menu is on the front of your device's user manual for details. You can control your device's audio using the TV's remote control. • Device Discovery - The on the remote. Not all HDMI devices support CEC. 5 Adjusting the CEC Settings The CEC function on your TV enables ...

Download
Page 46
... custom settings." 4. Restoring the TV to Factory Default Settings All of the on the remote to the factory default settings, all changes you restore the TV to highlight the Help icon and press OK. Enter your parental control passcode. Wait for the TV to its factory default settings: 1. 5 Resetting the TV Settings...
... custom settings." 4. Restoring the TV to Factory Default Settings All of the on the remote to the factory default settings, all changes you restore the TV to highlight the Help icon and press OK. Enter your parental control passcode. Wait for the TV to its factory default settings: 1. 5 Resetting the TV Settings...

Download
Page 49
... USB media, you must end in a supported file extension (.mp3, .jpg, etc). • The player is on. Press thAeNTEPNNoAwer/Standby button on the remote or touch the Power control on the side of the TV to turn it on the side of media you want to display. Highlight the Media App and...
... USB media, you must end in a supported file extension (.mp3, .jpg, etc). • The player is on. Press thAeNTEPNNoAwer/Standby button on the remote or touch the Power control on the side of the TV to turn it on the side of media you want to display. Highlight the Media App and...

Download
Page 52
... App. 5. To create an owner PIN: 1. Highlight the Profile App by scrolling left and right using the Left/Right Arrow buttons on the remote. (The highlighted App is in the VIA Dock. The Security Question dialog is displayed. 4. The Security 46 The Connected TV Store is displayed....Apps, new Apps are saved. Highlight Yes, delete and press OK. Highlight Administrative Controls and press OK. To add a new App: 1. The Owner PIN menu is in a secure location. 8. Press the V Button on the remote. (The highlighted App is displayed. 6. The VIA Dock can also restrict other ...
... App. 5. To create an owner PIN: 1. Highlight the Profile App by scrolling left and right using the Left/Right Arrow buttons on the remote. (The highlighted App is in the VIA Dock. The Security Question dialog is displayed. 4. The Security 46 The Connected TV Store is displayed....Apps, new Apps are saved. Highlight Yes, delete and press OK. Highlight Administrative Controls and press OK. To add a new App: 1. The Owner PIN menu is in a secure location. 8. Press the V Button on the remote. (The highlighted App is displayed. 6. The VIA Dock can also restrict other ...

Download
Page 56
... move the antenna around the room or close to turn the TV on the side of the channel may be low. The buttons on the remote control to select a different input source. • If you are using an antenna, the signal strength of the TV to a window for details. &#...8226; Ensure all cables are securely attached to ensure they are connected correctly. see your antenna is no sound. • Press Volume Up on the remote control. • Press the MUTE button on page 31. Resetting the Picture Settings on the screen. • Ensure all devices are securely attached. The ...
... move the antenna around the room or close to turn the TV on the side of the channel may be low. The buttons on the remote control to select a different input source. • If you are using an antenna, the signal strength of the TV to a window for details. &#...8226; Ensure all cables are securely attached to ensure they are connected correctly. see your antenna is no sound. • Press Volume Up on the remote control. • Press the MUTE button on page 31. Resetting the Picture Settings on the screen. • Ensure all devices are securely attached. The ...
Download
Page 2
... between your TV and any objects on your TV to your TV. Continued use , and maintenance of your TV to leak which can damage the remote control or injure the operator. IMPORTANT SAFETY INSTRUCTIONS Your TV is designed and manufactured to the presence of important operating and maintenance (servicing) instructions in the...
... between your TV and any objects on your TV to your TV. Continued use , and maintenance of your TV to leak which can damage the remote control or injure the operator. IMPORTANT SAFETY INSTRUCTIONS Your TV is designed and manufactured to the presence of important operating and maintenance (servicing) instructions in the...
Download
Page 4
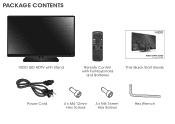
PACKAGE CONTENTS VIZIO VIZIO LED HDTV with Stand Remote Control with Full Keyboard and Batteries QUICK START GUIDE Model: E550i-A0 This Quick Start Guide Power Cord 4 x M4 12mm Hex Screws 3 x M4 16mm Hex Screws Hex Wrench
PACKAGE CONTENTS VIZIO VIZIO LED HDTV with Stand Remote Control with Full Keyboard and Batteries QUICK START GUIDE Model: E550i-A0 This Quick Start Guide Power Cord 4 x M4 12mm Hex Screws 3 x M4 16mm Hex Screws Hex Wrench
Download
Page 10
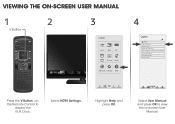
Highlight Help and press OK. Select User Manual and press OK to view the on the Remote Control to display the V.I.A. VIEWING THE ON-SCREEN USER MANUAL 1 2 V Button 3 VIZIO ABC Input Wide CC Sleep Timer Picture Audio Network Settings Help 4 VIZIO Wide Exit Zoom Help User Manual System Info Reset TV Settings CleNaorrmMael moPrayn(oFraacmtoicry Default) Service Check Guided Setup Store Demo 2D 3D Press the V Button on -screen User Manual. Dock. Select HDTV Settings.
Highlight Help and press OK. Select User Manual and press OK to view the on the Remote Control to display the V.I.A. VIEWING THE ON-SCREEN USER MANUAL 1 2 V Button 3 VIZIO ABC Input Wide CC Sleep Timer Picture Audio Network Settings Help 4 VIZIO Wide Exit Zoom Help User Manual System Info Reset TV Settings CleNaorrmMael moPrayn(oFraacmtoicry Default) Service Check Guided Setup Store Demo 2D 3D Press the V Button on -screen User Manual. Dock. Select HDTV Settings.
Download
Page 2
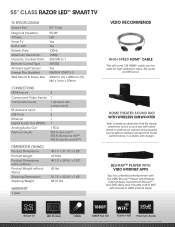
...exceptional audio performance in a stylish, slim design. Product features and specifications are the property of VIZIO Inc. VIZIO, the V logo, Where Vision Meets Value, Razor LED and other VIZIO trademarks are for high definition video, 3D, audio and Ethernet. rev 02052013 HOME THEATER SOUND ...Premium Audio Trademarks shown are subject to VIZIO Internet Apps. 55" CLASS RAZOR LED™ SMART TV TV SPECIFICATIONS Screen Size Diagonal Viewable TV Type Smart TV Built-in WiFi Refresh Rate Maximum Resolution Dynamic Contrast Ratio Remote Control Type Ambient Light Sensor Energy Star ...
...exceptional audio performance in a stylish, slim design. Product features and specifications are the property of VIZIO Inc. VIZIO, the V logo, Where Vision Meets Value, Razor LED and other VIZIO trademarks are for high definition video, 3D, audio and Ethernet. rev 02052013 HOME THEATER SOUND ...Premium Audio Trademarks shown are subject to VIZIO Internet Apps. 55" CLASS RAZOR LED™ SMART TV TV SPECIFICATIONS Screen Size Diagonal Viewable TV Type Smart TV Built-in WiFi Refresh Rate Maximum Resolution Dynamic Contrast Ratio Remote Control Type Ambient Light Sensor Energy Star ...


