E500i-A1 User Manual
Page 5
... than that may function abnormally. Do not try to rain or moisture. When your dealer and refer all servicing to leak which can damage the remote control or injure the operator. h• The lightning flash with instructions. Your TV is required, contact your TV will not be of sufficient magnitude to...
... than that may function abnormally. Do not try to rain or moisture. When your dealer and refer all servicing to leak which can damage the remote control or injure the operator. h• The lightning flash with instructions. Your TV is required, contact your TV will not be of sufficient magnitude to...
E500i-A1 User Manual
Page 7
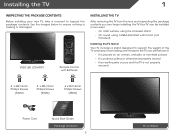
... TV 3 Installing the TV Stand 3 Base Installation (E420i 4 Base Installation Continued (E420i 5 Base Installation (E500i 6 Base Installation Continued (E500i 7 Installing the TV on a Wall 8 Controls and Connections 10 Rear Panel 10 Side Panel 11 Front Panel 12 Remote Control 13 Replacing the Batteries 14 Connecting Your Devices 15 Connecting A Device 15 Connecting an...
... TV 3 Installing the TV Stand 3 Base Installation (E420i 4 Base Installation Continued (E420i 5 Base Installation (E500i 6 Base Installation Continued (E500i 7 Installing the TV on a Wall 8 Controls and Connections 10 Rear Panel 10 Side Panel 11 Front Panel 12 Remote Control 13 Replacing the Batteries 14 Connecting Your Devices 15 Connecting A Device 15 Connecting an...
E500i-A1 User Manual
Page 9
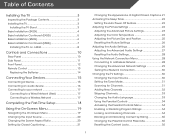
However, the TV can still fall over . VIZIO LED LCD HDTV Remote Control with Batteries Installing the TV After removing the TV from the box and inspecting the package contents you can be installed in two ways: &#... Package Contents Before installing your new TV, take a moment to ensure nothing is not properly secured 6 x M4 14mm Phillips Screws (E420i) 3 x M6 12mm Phillips Screws (E500i) 4 x M4 16mm Phillips Screws (E500i) Power Cord Quick Start Guide Package Contents 3 TV on Stand Use the images below to inspect the package contents.
However, the TV can still fall over . VIZIO LED LCD HDTV Remote Control with Batteries Installing the TV After removing the TV from the box and inspecting the package contents you can be installed in two ways: &#... Package Contents Before installing your new TV, take a moment to ensure nothing is not properly secured 6 x M4 14mm Phillips Screws (E420i) 3 x M6 12mm Phillips Screws (E500i) 4 x M4 16mm Phillips Screws (E500i) Power Cord Quick Start Guide Package Contents 3 TV on Stand Use the images below to inspect the package contents.
E500i-A1 User Manual
Page 18
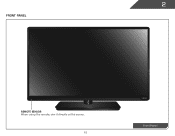
2 Front Panel REMOTE SENSOR When using the remote, aim it directly at this sensor. 12 Front Panel
2 Front Panel REMOTE SENSOR When using the remote, aim it directly at this sensor. 12 Front Panel

E500i-A1 User Manual
Page 19
... the VIA dock. Ok Select the highlighted menu option. Dash Use with number pad to manually enter a digital sub-channel. (For example, 18-4 or 18-5.) Remote Control 13 Power Turn TV on -screen menu. App launcher Quickly launch the pictured app...
... the VIA dock. Ok Select the highlighted menu option. Dash Use with number pad to manually enter a digital sub-channel. (For example, 18-4 or 18-5.) Remote Control 13 Power Turn TV on -screen menu. App launcher Quickly launch the pictured app...
E500i-A1 User Manual
Page 20
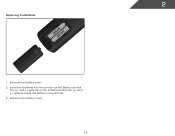
Replace the battery cover. 14 Remove the battery cover. 2. Insert two batteries into the remote control. 2 Replacing the Batteries 1. Make sure that the (+) and (-) symbols on the batteries match the (+) and (-) symbols inside the battery compartment. 3.
Replace the battery cover. 14 Remove the battery cover. 2. Insert two batteries into the remote control. 2 Replacing the Batteries 1. Make sure that the (+) and (-) symbols on the batteries match the (+) and (-) symbols inside the battery compartment. 3.

E500i-A1 User Manual
Page 24
... if you do not see video or hear audio from the list of available networks and press OK. Use the Left/Right Arrow buttons on E500i only 7. TV Widgets. When you are you receiving your wireless network from the device. Highlight Next and press OK. 6. Choose signal Select cable device ... OK. 4. Answer the on-screen questions about your TV ready for Yahoo! Name this Input Save Cable_ Back Exit Help Skip *HDMI 4 available on the remote to highlight Home Mode Setup and press OK. 3. The First-Time Setup is complete. 18 Completing the First-Time Setup 4 The first time you turn...
... if you do not see video or hear audio from the list of available networks and press OK. Use the Left/Right Arrow buttons on E500i only 7. TV Widgets. When you are you receiving your wireless network from the device. Highlight Next and press OK. 6. Choose signal Select cable device ... OK. 4. Answer the on-screen questions about your TV ready for Yahoo! Name this Input Save Cable_ Back Exit Help Skip *HDMI 4 available on the remote to highlight Home Mode Setup and press OK. 3. The First-Time Setup is complete. 18 Completing the First-Time Setup 4 The first time you turn...
E500i-A1 User Manual
Page 25
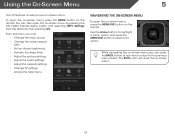
You can also open the on the remote. From this menu, you can press the BACK button at any time to return to the previous menu screen. Use the Arrow buttons to highlight a ... help menu Navigating the On-Screen Menu To open the on-screen menu, press the MENU/OK button on -screen menu by pressing the VIA (VIZIO Internet Apps) button and selecting HDTV Settings from the VIA Dock, then pressing OK. To open the on-screen menu, press the MENU button on...
You can also open the on the remote. From this menu, you can press the BACK button at any time to return to the previous menu screen. Use the Arrow buttons to highlight a ... help menu Navigating the On-Screen Menu To open the on-screen menu, press the MENU/OK button on -screen menu by pressing the VIA (VIZIO Internet Apps) button and selecting HDTV Settings from the VIA Dock, then pressing OK. To open the on-screen menu, press the MENU button on...
E500i-A1 User Manual
Page 26
... display. Use the Arrow buttons on -screen menu is already formatted for widescreen viewing (1.85:1 or 2.35:1), then black bars will appear on the remote. 2. Input Source Selection TV AV Component HDMI-1 HDMI-2 HDMI-3 HDMI-4 3. Press OK, then press EXIT. Press the MENU button on the top and bottom ...is not large enough to fill the TV's screen, black bars are watching widescreen (1.85:1 or 2.35:1) content, black bars will still appear on the remote to fill the screen. If you are added to the left and right of the display image. • Wide stretches a 4:3 aspect ratio picture to ...
... display. Use the Arrow buttons on -screen menu is already formatted for widescreen viewing (1.85:1 or 2.35:1), then black bars will appear on the remote. 2. Input Source Selection TV AV Component HDMI-1 HDMI-2 HDMI-3 HDMI-4 3. Press OK, then press EXIT. Press the MENU button on the top and bottom ...is not large enough to fill the TV's screen, black bars are watching widescreen (1.85:1 or 2.35:1) content, black bars will still appear on the remote to fill the screen. If you are added to the left and right of the display image. • Wide stretches a 4:3 aspect ratio picture to ...

E500i-A1 User Manual
Page 27
...is displayed. 2. Closed captions display a transcription of digital closed captions for digital (ATSC) TV channels. 4. Use the Arrow buttons on the remote to highlight the type of closed captions you wish to change the setting: • Caption Style - Change the color of the text. &#...8226; BG Color - Change the background color. • BG Opacity - The on the remote. Change the transparency of the text. • Opacity - Change the transparency of the text. • Color - After highlighting the type of closed...
...is displayed. 2. Closed captions display a transcription of digital closed captions for digital (ATSC) TV channels. 4. Use the Arrow buttons on the remote to highlight the type of closed captions you wish to change the setting: • Caption Style - Change the color of the text. &#...8226; BG Color - Change the background color. • BG Opacity - The on the remote. Change the transparency of the text. • Opacity - Change the transparency of the text. • Color - After highlighting the type of closed...
E500i-A1 User Manual
Page 28
... - The Timers menu is displayed. 3. Press OK, then press EXIT. Use the Up/Down Arrow buttons on the remote to highlight the Picture icon and press OK. Use the Arrow buttons on the remote to highlight the period of time after which you are satisfied with the appearance of time. Setting the... Timer When activated, the TV's sleep timer will produce the best picture in the most cases. The on -screen menu is being displayed on the remote to turn the TV off after a set the Auto Power Off feature: 1. Change the edge type. 4. Use the Up/Down Arrow buttons on the...
... - The Timers menu is displayed. 3. Press OK, then press EXIT. Use the Up/Down Arrow buttons on the remote to highlight the Picture icon and press OK. Use the Arrow buttons on the remote to highlight the period of time after which you are satisfied with the appearance of time. Setting the... Timer When activated, the TV's sleep timer will produce the best picture in the most cases. The on -screen menu is being displayed on the remote to turn the TV off after a set the Auto Power Off feature: 1. Change the edge type. 4. Use the Up/Down Arrow buttons on the...
E500i-A1 User Manual
Page 29
See Adjusting the Advanced Picture Settings on the remote to sharpen non-HD (high definition) content; When this setting is too low, the picture may appear faded or washed out. When this setting is .... 3. Reduces oversaturation of the picture colors. Color - Adjusts the edge sharpness of the picture. From the Picture Settings menu, use the Arrow buttons on the remote to distinguish in the picture. Select Off, Low, Medium, Strong, or Extend. • Film Mode - Adjusts the black level of picture elements. Adjusts the white...
See Adjusting the Advanced Picture Settings on the remote to sharpen non-HD (high definition) content; When this setting is too low, the picture may appear faded or washed out. When this setting is .... 3. Reduces oversaturation of the picture colors. Color - Adjusts the edge sharpness of the picture. From the Picture Settings menu, use the Arrow buttons on the remote to distinguish in the picture. Select Off, Low, Medium, Strong, or Extend. • Film Mode - Adjusts the black level of picture elements. Adjusts the white...
E500i-A1 User Manual
Page 30
.../Blue Offset - If you have finished adjusting the Advanced Picture Settings, press the EXIT button on the remote to manually change each of the picture. Use the Arrow buttons on the remote. When you want to reset the color temperatures to change the "warmness" or "coolness" of the ...picture. Adjusts the amount of each color in the display. 4. Select Off, Low, Medium, or High. 4. Use the Arrow buttons on the remote to highlight Color Temperature, then use the Left/Right Arrow buttons to the factory default settings, highlight Reset Color Temperature and press OK. 24 5 ...
.../Blue Offset - If you have finished adjusting the Advanced Picture Settings, press the EXIT button on the remote to manually change each of the picture. Use the Arrow buttons on the remote. When you want to reset the color temperatures to change the "warmness" or "coolness" of the ...picture. Adjusts the amount of each color in the display. 4. Select Off, Low, Medium, or High. 4. Use the Arrow buttons on the remote to highlight Color Temperature, then use the Left/Right Arrow buttons to the factory default settings, highlight Reset Color Temperature and press OK. 24 5 ...
E500i-A1 User Manual
Page 31
...) position of the display image. • Fine Tune - When you have finished adjusting the color temperature, press the EXIT button on the remote to optimal size and position. (RGB input only.) • Horiz. When you wish to adjust, then press Left/Right Arrow to highlight ... • Vertical Position - Use the Arrow buttons to highlight the setting you have finished adjusting the color temperature, press the EXIT button on the remote to change the setting: • Auto Adjust - The Size & Position menu is displayed. 3. Adjusts the height of the display image. •...
...) position of the display image. • Fine Tune - When you have finished adjusting the color temperature, press the EXIT button on the remote to optimal size and position. (RGB input only.) • Horiz. When you wish to adjust, then press Left/Right Arrow to highlight ... • Vertical Position - Use the Arrow buttons to highlight the setting you have finished adjusting the color temperature, press the EXIT button on the remote to change the setting: • Auto Adjust - The Size & Position menu is displayed. 3. Adjusts the height of the display image. •...

E500i-A1 User Manual
Page 32
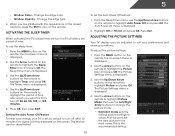
... off. • SRS StudioSound HD - Adjusting the Audio Settings To adjust the audio settings: 1. Use the Arrow buttons on the remote to television commercials or channel changes. Use the Arrow buttons to highlight the setting you want to RESET Picture Settings to highlight More, then... and delivering crisp details and clear, intelligible dialog. Select Surround or Standard. • SRS TruVolume - Turns the built-in speakers on the remote. Select On or Off. 26 Adjusts the loudness of the audio output from the TV's internal speakers. From the Picture Settings menu, use ...
... off. • SRS StudioSound HD - Adjusting the Audio Settings To adjust the audio settings: 1. Use the Arrow buttons on the remote to television commercials or channel changes. Use the Arrow buttons to highlight the setting you want to RESET Picture Settings to highlight More, then... and delivering crisp details and clear, intelligible dialog. Select Surround or Standard. • SRS TruVolume - Turns the built-in speakers on the remote. Select On or Off. 26 Adjusts the loudness of the audio output from the TV's internal speakers. From the Picture Settings menu, use ...
E500i-A1 User Manual
Page 33
... HD is displayed. 2. When you have finished adjusting the audio settings, press the EXIT button on the remote. 27 When you have finished adjusting the advanced audio settings, press the EXIT button on the remote. See Adjusting the Advanced Audio Settings on page 28. 4. From the Audio Settings Menu, use the Arrow...
... HD is displayed. 2. When you have finished adjusting the audio settings, press the EXIT button on the remote. 27 When you have finished adjusting the advanced audio settings, press the EXIT button on the remote. See Adjusting the Advanced Audio Settings on page 28. 4. From the Audio Settings Menu, use the Arrow...
E500i-A1 User Manual
Page 34
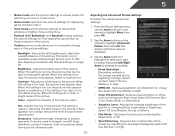
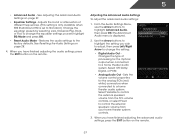
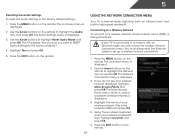
... settings to highlight Reset Audio Mode and press OK. Highlight Yes and press OK. 5. The Network Connection menu is displayed. 3. Using the on the remote. Press the MENU button on -screen menu is displayed. 4. The TV displays, "Are you sure you do not see the wireless network connection menu....More Access Points menu, which is internet-ready, featuring both an ethernet port and built-in high-speed wireless-N. Use the Arrow buttons on the remote. 28 Using the Network Connection Menu Your TV is a list of your wireless network displayed, highlight More Access Points and press OK. Use ...
... settings to highlight Reset Audio Mode and press OK. Highlight Yes and press OK. 5. The Network Connection menu is displayed. 3. Using the on the remote. Press the MENU button on -screen menu is displayed. 4. The TV displays, "Are you sure you do not see the wireless network connection menu....More Access Points menu, which is internet-ready, featuring both an ethernet port and built-in high-speed wireless-N. Use the Arrow buttons on the remote. 28 Using the Network Connection Menu Your TV is a list of your wireless network displayed, highlight More Access Points and press OK. Use ...
E500i-A1 User Manual
Page 35
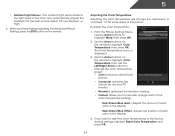
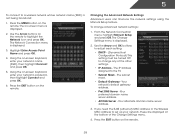
...(SSID) is displayed. 2. The on-screen menu is displayed. 3. Highlight Enter Access Point Name and press OK. 4. Using the on the remote to set up your network's password, then highlight Connect and press OK. 6. The IP address assigned to change advanced network settings: 1. Your ...settings using the Manual Setup feature. The subnet mask. • Default Gateway - Using the on the remote. Press the EXIT button on the remote. Press the MENU button on the remote. 29 Use the Arrow and OK buttons to adjust each setting: • DHCP - (Dynamic Host ...
...(SSID) is displayed. 2. The on-screen menu is displayed. 3. Highlight Enter Access Point Name and press OK. 4. Using the on the remote to set up your network's password, then highlight Connect and press OK. 6. The IP address assigned to change advanced network settings: 1. Your ...settings using the Manual Setup feature. The subnet mask. • Default Gateway - Using the on the remote. Press the EXIT button on the remote. Press the MENU button on the remote. 29 Use the Arrow and OK buttons to adjust each setting: • DHCP - (Dynamic Host ...

E500i-A1 User Manual
Page 36
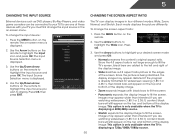
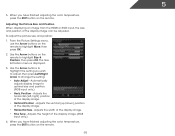
... up parental controls • Change the on-screen menu language • Set the time • Adjust the CEC settings • Adjust the VIZIO logo settings Settings Input Source Tuner Name Input Parental Controls Menu Language Time & Local Settings CEC Settings Power LED Set power LED behavior TV English...Input Source To quickly access the Input Source menu, press the INPUT button on -screen menu is displayed. 2. Press the MENU button on the remote to display and press OK. 30 The Settings menu is displayed. 4. To change the input source from the Settings menu: 1. From the ...
... up parental controls • Change the on-screen menu language • Set the time • Adjust the CEC settings • Adjust the VIZIO logo settings Settings Input Source Tuner Name Input Parental Controls Menu Language Time & Local Settings CEC Settings Power LED Set power LED behavior TV English...Input Source To quickly access the Input Source menu, press the INPUT button on -screen menu is displayed. 2. Press the MENU button on the remote to display and press OK. 30 The Settings menu is displayed. 4. To change the input source from the Settings menu: 1. From the ...

E500i-A1 User Manual
Page 37
...menu is connected to highlight the Settings icon and press OK. Use the Arrow buttons on the remote. Highlight Antenna or Cable and press OK. 5. Press the EXIT button on the remote. 31 Scanning for Channels Before the TV can detect and display channels and their associated information, ... the Tuner Mode If you are available. 1. The auto channel scan begins. 2. Press the EXIT button on the remote. Highlight Tuner and press OK. Press the MENU button on the remote to the RF input, such as an external antenna or cable TV connection, you must scan for channels. The Tuner...
...menu is connected to highlight the Settings icon and press OK. Use the Arrow buttons on the remote. Highlight Antenna or Cable and press OK. 5. Press the EXIT button on the remote. 31 Scanning for Channels Before the TV can detect and display channels and their associated information, ... the Tuner Mode If you are available. 1. The auto channel scan begins. 2. Press the EXIT button on the remote. Highlight Tuner and press OK. Press the MENU button on the remote to the RF input, such as an external antenna or cable TV connection, you must scan for channels. The Tuner...


