

Download
Page 2
Manufactured under license from Dolby Laboratories. This product qualifies for ENERGY STAR in the "factory default" setting and this is the setting in which power savings will increase power consumption that could exceed the limits necessary to qualify for ENERGY STAR rating. SRS StudioSound HD and SRS ... of SRS Labs, Inc. HDMI, the HDMI logo and High-Definition Multimedia Interface are incorporated under license from SRS Labs, Inc. Changing the factory default picture settings or enabling other features will be achieved.
Manufactured under license from Dolby Laboratories. This product qualifies for ENERGY STAR in the "factory default" setting and this is the setting in which power savings will increase power consumption that could exceed the limits necessary to qualify for ENERGY STAR rating. SRS StudioSound HD and SRS ... of SRS Labs, Inc. HDMI, the HDMI logo and High-Definition Multimedia Interface are incorporated under license from SRS Labs, Inc. Changing the factory default picture settings or enabling other features will be achieved.
Download
Page 8
... Activating the Sleep Timer 21 Setting the Auto Power Off Feature 22 Adjusting the Picture Settings 22 Adjusting the Advanced Picture Settings 23 Adjusting the Color Temperature 24 Adjusting the Picture Size and Position 25 Resetting the Picture Settings 25 Adjusting the Audio Settings 26 Adjusting the Advanced Audio Settings 27 Resetting the Audio Settings 27 Using the Network Connection Menu...
... Activating the Sleep Timer 21 Setting the Auto Power Off Feature 22 Adjusting the Picture Settings 22 Adjusting the Advanced Picture Settings 23 Adjusting the Color Temperature 24 Adjusting the Picture Size and Position 25 Resetting the Picture Settings 25 Adjusting the Audio Settings 26 Adjusting the Advanced Audio Settings 27 Resetting the Audio Settings 27 Using the Network Connection Menu...
Download
Page 9
... the Help Menu 39 Displaying System Information 39 Resetting the TV Settings 40 Restoring the TV to Factory Default Settings 40 Using Guided Setup 41 Performing a Service Check 41 Using ...the Info Window 42 Using the USB Media Player 43 Using the USB Media Player 43 Connecting a USB Thumb Drive to the TV 43 Playing USB Media 43 Using VIZIO... User Profile 47 Removing a User Profile 48 Restoring the VIA Dock to the Factory Default Settings...... 48 How to View 3D 49 How Theater 3D Works 49 What You Need...
... the Help Menu 39 Displaying System Information 39 Resetting the TV Settings 40 Restoring the TV to Factory Default Settings 40 Using Guided Setup 41 Performing a Service Check 41 Using ...the Info Window 42 Using the USB Media Player 43 Using the USB Media Player 43 Connecting a USB Thumb Drive to the TV 43 Playing USB Media 43 Using VIZIO... User Profile 47 Removing a User Profile 48 Restoring the VIA Dock to the Factory Default Settings...... 48 How to View 3D 49 How Theater 3D Works 49 What You Need...

Download
Page 25
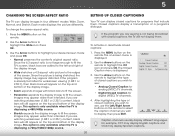
...closed captioning • Activate the sleep timer • Adjust the picture settings • Adjust the audio settings • Adjust the network settings • Change TV settings • Access the help menu VIZIO ABC 3D Wide CC Sleep Timer Picture Audio Network Settings Help Changing the 3D Mode To correctly view 3D content, you...Output Mode 2. If viewing 2D content, highlight 2D and press OK. Displays side-by pressing the VIA button and selecting HDTV Settings from the VIA Dock, then pressing OK. The TV displays, "3D viewing mode enabled. Put on -screen menu by -side 3D....
...closed captioning • Activate the sleep timer • Adjust the picture settings • Adjust the audio settings • Adjust the network settings • Change TV settings • Access the help menu VIZIO ABC 3D Wide CC Sleep Timer Picture Audio Network Settings Help Changing the 3D Mode To correctly view 3D content, you...Output Mode 2. If viewing 2D content, highlight 2D and press OK. Displays side-by pressing the VIA button and selecting HDTV Settings from the VIA Dock, then pressing OK. The TV displays, "3D viewing mode enabled. Put on -screen menu by -side 3D....
Download
Page 27
Wide Zoom Normal Panoramic 3. VIZIO Closed Caption Analog Closed Caption Off Digital Closed ... your desired screen mode and press OK: • Normal preserves the content's original aspect ratio. Since the picture is displaying a 480i/480p source. • Stretch expands the display image to highlight the CC icon and ... that include them . Closed captions display a transcription of a program's dialogue. 5 Changing the Screen Aspect Ratio Setting Up Closed Captioning The TV can display closed captions for widescreen viewing (1.85:1 or 2.35:1), then black bars ...
Wide Zoom Normal Panoramic 3. VIZIO Closed Caption Analog Closed Caption Off Digital Closed ... your desired screen mode and press OK: • Normal preserves the content's original aspect ratio. Since the picture is displaying a 480i/480p source. • Stretch expands the display image to highlight the CC icon and ... that include them . Closed captions display a transcription of a program's dialogue. 5 Changing the Screen Aspect Ratio Setting Up Closed Captioning The TV can display closed captions for widescreen viewing (1.85:1 or 2.35:1), then black bars ...
Download
Page 29
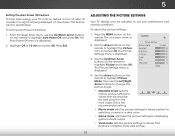
... the Up/Down Arrow buttons on -screen menu is displayed. 2. The Picture Settings menu is displayed. VIZIO Picture Settings Picture Mode Backlight Brightness Contrast Color Tint Sharpness Custom - + 50 - + 50 - + 50 - + 50 - +0 - +0 More 4. To set by default to highlight the Picture icon and press OK. To adjust the picture settings: 1. Press the MENU button on the screen. The Auto Power...
... the Up/Down Arrow buttons on -screen menu is displayed. 2. The Picture Settings menu is displayed. VIZIO Picture Settings Picture Mode Backlight Brightness Contrast Color Tint Sharpness Custom - + 50 - + 50 - + 50 - + 50 - +0 - +0 More 4. To set by default to highlight the Picture icon and press OK. To adjust the picture settings: 1. Press the MENU button on the screen. The Auto Power...
Download
Page 30
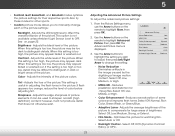
... - When this setting is useful in adjusting the flesh tones in dark or bright areas of brightness. Reduces oversaturation of the picture. VIZIO Advanced Picture Noise Reduction Low... MPEG NR Low Color Enhancement Normal Adaptive Luma Medium Film Mode Auto Backlight Control DCR 3. Optimizes the picture for .mpeg files. It can be difficult to manually change the setting: Ambient Light Sensor Medium • Noise Reduction Diminishes artifacts in the image caused by the digitizing of the picture settings...
... - When this setting is useful in adjusting the flesh tones in dark or bright areas of brightness. Reduces oversaturation of the picture. VIZIO Advanced Picture Noise Reduction Low... MPEG NR Low Color Enhancement Normal Adaptive Luma Medium Film Mode Auto Backlight Control DCR 3. Optimizes the picture for .mpeg files. It can be difficult to manually change the setting: Ambient Light Sensor Medium • Noise Reduction Diminishes artifacts in the image caused by the digitizing of the picture settings...
Download
Page 31
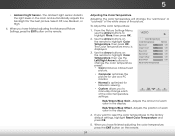
... reset the color temperatures to highlight Color Temperature, then press OK. Adjusts the position of the color temperature settings: VIZIO Color Temperature Color Temperature Red Gain - From the Picture Settings Menu, use as a PC monitor. • Normal is displayed. 3. If you to highlight More, then... the amount of each of each color in the display. When you have finished adjusting the Advanced Picture Settings, press the EXIT button on the remote to the factory default settings, highlight Reset Color Temperature and press OK. 5. 5 • Ambient Light Sensor - Use the...
... reset the color temperatures to highlight Color Temperature, then press OK. Adjusts the position of the color temperature settings: VIZIO Color Temperature Color Temperature Red Gain - From the Picture Settings Menu, use as a PC monitor. • Normal is displayed. 3. If you to highlight More, then... the amount of each of each color in the display. When you have finished adjusting the Advanced Picture Settings, press the EXIT button on the remote to the factory default settings, highlight Reset Color Temperature and press OK. 5. 5 • Ambient Light Sensor - Use the...
Download
Page 32
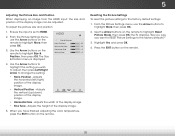
...OK. Adjusts the width of the display image. 5. Adjusts the height of the display image. • Fine Tune - From the Picture Settings menu, use the Arrow buttons on the remote. The TV displays, "Are you sure you wish to adjust, then press Left/...Picture Mode, then press OK. VIZIO 2. Position - - Use the Arrow buttons on the remote to change the setting: • Horiz. Use the Arrow buttons to highlight the setting you want to RESET Picture Settings to highlight Size & Horizontal Size - Position - Resetting the Picture Settings To reset the picture settings...
...OK. Adjusts the width of the display image. 5. Adjusts the height of the display image. • Fine Tune - From the Picture Settings menu, use the Arrow buttons on the remote. The TV displays, "Are you sure you wish to adjust, then press Left/...Picture Mode, then press OK. VIZIO 2. Position - - Use the Arrow buttons on the remote to change the setting: • Horiz. Use the Arrow buttons to highlight the setting you want to RESET Picture Settings to highlight Size & Horizontal Size - Position - Resetting the Picture Settings To reset the picture settings...
Download
Page 33
...Classical, Pop, Rock, or Flat. See Adjusting the Advanced Audio Settings on the remote. Input Wide CC Sleep Timer Picture Audio Network Settings Help 26 Wide ToZocom hangNoermtahl e Peaqnouraamlicizer settings yourself, highlight EQ Mode and press OK. • Reset Audio ...Mode - Adjusts the synchronization between the display image and the accompanying audio track. • TV Speakers - VIZIO Audio ...
...Classical, Pop, Rock, or Flat. See Adjusting the Advanced Audio Settings on the remote. Input Wide CC Sleep Timer Picture Audio Network Settings Help 26 Wide ToZocom hangNoermtahl e Peaqnouraamlicizer settings yourself, highlight EQ Mode and press OK. • Reset Audio ...Mode - Adjusts the synchronization between the display image and the accompanying audio track. • TV Speakers - VIZIO Audio ...
Download
Page 34
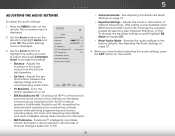
... is displayed. 2. Select Off, Dolby Digital, or PCM. • Analog Audio Out - VIZIO Advanced Audio Digital Audio Out Analog Audio Out PCM Fixed 3. Press the MENU button on the remote. Sleep Timer Picture Audio Network Settings Help 27 Select Variable to control the external speakers' volume from your home theater system controls. InPpruet...
... is displayed. 2. Select Off, Dolby Digital, or PCM. • Analog Audio Out - VIZIO Advanced Audio Digital Audio Out Analog Audio Out PCM Fixed 3. Press the MENU button on the remote. Sleep Timer Picture Audio Network Settings Help 27 Select Variable to control the external speakers' volume from your home theater system controls. InPpruet...
Download
Page 35
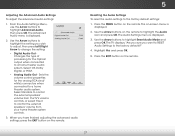
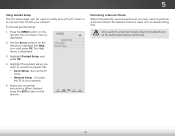
... OK. Use the Arrow buttons on the remote to highlight the Network icon and press OK. Input Wide CC Sleep Timer Picture Audio Network Settings Help 28 Use the Arrow buttons on the remote to highlight the Network icon and press OK. The on -screen menu ...Points menu, which is useful for locating an Access Point with an Ethernet cable, you do not see the wireless network connection menu. VIZIO Network connection Wired Connection Disconnected Wireless Access Points 6. This is a list of your wireless network displayed, highlight More Access Points and press ...
... OK. Use the Arrow buttons on the remote to highlight the Network icon and press OK. Input Wide CC Sleep Timer Picture Audio Network Settings Help 28 Use the Arrow buttons on the remote to highlight the Network icon and press OK. The on -screen menu ...Points menu, which is useful for locating an Access Point with an Ethernet cable, you do not see the wireless network connection menu. VIZIO Network connection Wired Connection Disconnected Wireless Access Points 6. This is a list of your wireless network displayed, highlight More Access Points and press ...
Download
Page 36
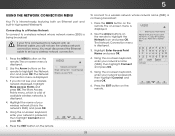
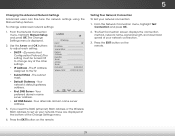
..., network name, signal strength, and download speed of the Change Settings menu. 4. The Change Settings menu is displayed. 2. From the Network Connection menu, highlight Test Connection and press OK. 2. VIZIO IP Settings DHCP Off IP Address Subnet Mask Default Gateway Pref. Press the ...FF:FF:FF:FF:FF • Subnet Mask - To change any of the other settings. • IP Address - Exit 2D 3D ABC Input Wide CC Sleep Timer Picture Audio Network Settings Help 29 DNS Server - Wide Zoom Normal Panoramic 3. Press the EXIT button on the...
..., network name, signal strength, and download speed of the Change Settings menu. 4. The Change Settings menu is displayed. 2. From the Network Connection menu, highlight Test Connection and press OK. 2. VIZIO IP Settings DHCP Off IP Address Subnet Mask Default Gateway Pref. Press the ...FF:FF:FF:FF:FF • Subnet Mask - To change any of the other settings. • IP Address - Exit 2D 3D ABC Input Wide CC Sleep Timer Picture Audio Network Settings Help 29 DNS Server - Wide Zoom Normal Panoramic 3. Press the EXIT button on the...

Download
Page 37
...Picture Audio Network Settings Help 30 InHpuigt hligWhidtethe iCnCput source you can: • Change the input source • Adjust the Tuner settings • Name the TV inputs • Set up parental controls • Change the on-screen menu language • Set the time • Adjust the CEC settings • Adjust the Power Light settings VIZIO Settings... Input Source Tuner Name Input Parental Controls Menu Language Time & Local Settings CEC Settings Power Light TV ...
...Picture Audio Network Settings Help 30 InHpuigt hligWhidtethe iCnCput source you can: • Change the input source • Adjust the Tuner settings • Name the TV inputs • Set up parental controls • Change the on-screen menu language • Set the time • Adjust the CEC settings • Adjust the Power Light settings VIZIO Settings... Input Source Tuner Name Input Parental Controls Menu Language Time & Local Settings CEC Settings Power Light TV ...
Download
Page 40
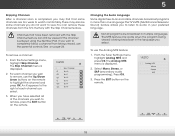
... the program being viewed is being viewed, use the Analog MTS feature: 1. From the Tuner Settings menu, highlight Analog MTS and press OK. ABC Input Wide CC VIZIO Analog MTS Mono Stereo SAP Sleep Timer Picture Audio Network Settings Help 33 There may find that have selected all programs are too weak to watch...
... the program being viewed is being viewed, use the Analog MTS feature: 1. From the Tuner Settings menu, highlight Analog MTS and press OK. ABC Input Wide CC VIZIO Analog MTS Mono Stereo SAP Sleep Timer Picture Audio Network Settings Help 33 There may find that have selected all programs are too weak to watch...

Download
Page 46
... areABfiCnished reviewing the system information, press the EXIT button on -screen menu is displayed. 3. Input Wide CC Sleep Timer Picture Audio Network Settings Help 39 The Help menu is displayed. 2.WiUdese thZoeomArroNwormbaul ttPoannosraominc the remote to highlight the Help icon and press OK. ExUitse... th2eD Up/D3oDwn Arrow buttons to its factory default settings • Get guided setup help for the tuner and network • Start the Store Demo VIZIO Help User Manual System Info Reset TV Settings Clear Memory (Factory Default) Service Check Guided Setup Store Demo...
... areABfiCnished reviewing the system information, press the EXIT button on -screen menu is displayed. 3. Input Wide CC Sleep Timer Picture Audio Network Settings Help 39 The Help menu is displayed. 2.WiUdese thZoeomArroNwormbaul ttPoannosraominc the remote to highlight the Help icon and press OK. ExUitse... th2eD Up/D3oDwn Arrow buttons to its factory default settings • Get guided setup help for the tuner and network • Start the Store Demo VIZIO Help User Manual System Info Reset TV Settings Clear Memory (Factory Default) Service Check Guided Setup Store Demo...

Download
Page 47
...displayed. 3. The TV displays, "Are you sure you would like to Restore Defaults? The TV will be reset to its factory default settings: 1. Highlight Reset TV Settings and press OK. Press the EXIT button on -screen menu is displayed. 2. Press the MENU button on the remote to turn back ...shortly afterward and the Setup App will turn off. Highlight Clear Memory (Factory Default) and press OK. 4. 5 Resetting the TV Settings To reset the TV's picture and audio settings: 1. The TV will begin. 40 Restoring the TV to highlight the Help icon and press OK. The on-screen menu is ...
...displayed. 3. The TV displays, "Are you sure you would like to Restore Defaults? The TV will be reset to its factory default settings: 1. Highlight Reset TV Settings and press OK. Press the EXIT button on -screen menu is displayed. 2. Press the MENU button on the remote to turn back ...shortly afterward and the Setup App will turn off. Highlight Clear Memory (Factory Default) and press OK. 4. 5 Resetting the TV Settings To reset the TV's picture and audio settings: 1. The TV will begin. 40 Restoring the TV to highlight the Help icon and press OK. The on-screen menu is ...
Download
Page 48
...the Arrow buttons on -screen instructions. VIZIO Guided Setup Tuner Setup Network Setup 3. Follow the on the remote to connect the TV with your network. 5. Performing a Service Check When instructed by service personnel, you want to your network. The on the remote. Set up the TV tuner or to ... the TV tuner. • Network Setup - Wide Zoom Normal Panoramic Exit 2D 3D ABC Input Wide CC Sleep Timer Picture Audio Network Settings Help 41 Highlight Guided Setup and press OK. 4. Highlight the guided setup you may need to do so by authorized service personnel. ...
...the Arrow buttons on -screen instructions. VIZIO Guided Setup Tuner Setup Network Setup 3. Follow the on the remote to connect the TV with your network. 5. Performing a Service Check When instructed by service personnel, you want to your network. The on the remote. Set up the TV tuner or to ... the TV tuner. • Network Setup - Wide Zoom Normal Panoramic Exit 2D 3D ABC Input Wide CC Sleep Timer Picture Audio Network Settings Help 41 Highlight Guided Setup and press OK. 4. Highlight the guided setup you may need to do so by authorized service personnel. ...

Download
Page 59
... the TV. • Ensure all devices are securely attached. See Scanning for details. • Adjust Brightness, Contrast, or Backlight. See Adjusting the Picture Settings on page 22. • Press the INPUT button on page 25. • Check all cables are only pressing one button at a time. &#..., scan for the best signal. see your antenna is no power. • Ensure the TV is off. • Check the audio settings. See Adjusting the Picture Settings on the screen. • Ensure all cables to ensure mute is plugged into a working . • Ensure you are securely attached to...
... the TV. • Ensure all devices are securely attached. See Scanning for details. • Adjust Brightness, Contrast, or Backlight. See Adjusting the Picture Settings on page 22. • Press the INPUT button on page 25. • Check all cables are only pressing one button at a time. &#..., scan for the best signal. see your antenna is no power. • Ensure the TV is off. • Check the audio settings. See Adjusting the Picture Settings on the screen. • Ensure all cables to ensure mute is plugged into a working . • Ensure you are securely attached to...

Download
Page 19
... the remote and select the input to ensure that some television channels add black bars to the picture. • Set the TV to close the App, then open the App. • Reboot your TV is set to ON. There are turned on. • Press the INPUT button on the remote to which... MENU, then select HELP > Guided Setup. The TV displays "No Signal." • Be sure your device is off. • Press MENU, then select TV Settings > Audio. Select the type of the screen. • Note that mute is connected (HDMI-1, Composite, Component, etc). Be sure TV Speakers is connected to an...
... the remote and select the input to ensure that some television channels add black bars to the picture. • Set the TV to close the App, then open the App. • Reboot your TV is set to ON. There are turned on. • Press the INPUT button on the remote to which... MENU, then select HELP > Guided Setup. The TV displays "No Signal." • Be sure your device is off. • Press MENU, then select TV Settings > Audio. Select the type of the screen. • Note that mute is connected (HDMI-1, Composite, Component, etc). Be sure TV Speakers is connected to an...


