User Manual
Page 5
... the power cord may damage the wires inside the cord and cause fire or electric shock. Do not try to leak which can damage the remote control or injure the operator. Continued use by qualified service personnel only. Do not expose your TV to rain or other cables are unplugged before...
... the power cord may damage the wires inside the cord and cause fire or electric shock. Do not try to leak which can damage the remote control or injure the operator. Continued use by qualified service personnel only. Do not expose your TV to rain or other cables are unplugged before...
User Manual
Page 8
... of the Inputs...31 Changing the On-Screen Menu Language...32 Setting the Time Zone...32 1 Controls and Connections...5 Rear Panel...5 Side Panel...6 Front Panel...7 Remote Control...8 Replacing the Batteries...9 Connecting A Device...10 Connecting Your Devices...10 Connecting A PC...11 Connecting an audio device...12 Connecting to your network...13 Connecting...
... of the Inputs...31 Changing the On-Screen Menu Language...32 Setting the Time Zone...32 1 Controls and Connections...5 Rear Panel...5 Side Panel...6 Front Panel...7 Remote Control...8 Replacing the Batteries...9 Connecting A Device...10 Connecting Your Devices...10 Connecting A PC...11 Connecting an audio device...12 Connecting to your network...13 Connecting...
User Manual
Page 10
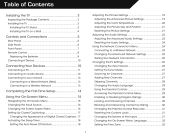
... begin installing the TV. Installing the TV INSPECTING THE PACKAGE CONTENTS Before installing your new TV, take a moment to ensure nothing is not properly secured VIZIO LCD HDTV Quick Start Guide Remote Control with Batteries Power Cord Package Contents 3 TV on Stand
... begin installing the TV. Installing the TV INSPECTING THE PACKAGE CONTENTS Before installing your new TV, take a moment to ensure nothing is not properly secured VIZIO LCD HDTV Quick Start Guide Remote Control with Batteries Power Cord Package Contents 3 TV on Stand
User Manual
Page 14
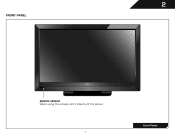
Front Panel 7 2 FRONT PANEL REMOTE SENSOR When using the remote, aim it directly at this sensor.
Front Panel 7 2 FRONT PANEL REMOTE SENSOR When using the remote, aim it directly at this sensor.
User Manual
Page 15
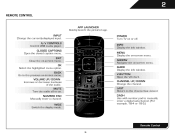
2 REMOTE CONTROL APP LAUNCHER Quickly launch the pictured app. A/V CONTROLS Control USB media player. EXIT Close the on -screen menu. NUMBER PAD Manually enter a channel. INFO ... -screen menu. ARROW Navigate the on or off or on -screen menu. LAST Return to manually enter a digital sub-channel. (For example, 18-4 or 18-5.) Remote Control 8
2 REMOTE CONTROL APP LAUNCHER Quickly launch the pictured app. A/V CONTROLS Control USB media player. EXIT Close the on -screen menu. NUMBER PAD Manually enter a channel. INFO ... -screen menu. ARROW Navigate the on or off or on -screen menu. LAST Return to manually enter a digital sub-channel. (For example, 18-4 or 18-5.) Remote Control 8
User Manual
Page 16
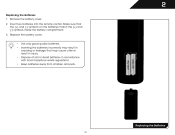
Make sure that may result in accordance with local hazardous waste regulations. • Keep batteries away from children and pets. Insert two batteries into the remote control. Replace the battery cover. • Use only good quality batteries. • Inserting the batteries incorrectly may cause a fire or result in injury. • Dispose ...
Make sure that may result in accordance with local hazardous waste regulations. • Keep batteries away from children and pets. Insert two batteries into the remote control. Replace the battery cover. • Use only good quality batteries. • Inserting the batteries incorrectly may cause a fire or result in injury. • Dispose ...
User Manual
Page 21
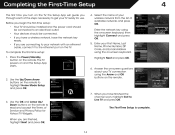
... your First Name, Last Name, Phone Number, ZIP Code, and E-mail Address using the on-screen keyboard. Use the Up/Down Arrow buttons on the remote to read and accept the Terms of Service and Privacy Policy for use. Use the OK and Arrow Up/ Down buttons on the... and press OK. 6. Highlight Next and press OK. 4 2. To complete the first-time setup: 1. The TV powers on the remote. Enter the network key using the Arrow and OK buttons on the remote. 3. TV Widgets. When you are connecting to your network with an ethernet cable, connect it to the ethernet port...
... your First Name, Last Name, Phone Number, ZIP Code, and E-mail Address using the on-screen keyboard. Use the Up/Down Arrow buttons on the remote to read and accept the Terms of Service and Privacy Policy for use. Use the OK and Arrow Up/ Down buttons on the... and press OK. 6. Highlight Next and press OK. 4 2. To complete the first-time setup: 1. The TV powers on the remote. Enter the network key using the Arrow and OK buttons on the remote. 3. TV Widgets. When you are connecting to your network with an ethernet cable, connect it to the ethernet port...

User Manual
Page 22
... audio settings • Change network settings • Change TV settings • Access the help menu 5 NAVIGATING THE ON-SCREEN MENU To open the on the remote. While navigating the on -screen menu. Using the On-Screen Menu Your TV features an easy-to select that option. To open the on-screen... menu, press the MENU button on -screen menu. 15 The EXIT button will close the on the remote. Use the Arrow buttons to highlight a menu option, and press the MENU/OK button to -use on -screen menu, you can press the BACK button...
... audio settings • Change network settings • Change TV settings • Access the help menu 5 NAVIGATING THE ON-SCREEN MENU To open the on the remote. While navigating the on -screen menu. Using the On-Screen Menu Your TV features an easy-to select that option. To open the on-screen... menu, press the MENU button on -screen menu. 15 The EXIT button will close the on the remote. Use the Arrow buttons to highlight a menu option, and press the MENU/OK button to -use on -screen menu, you can press the BACK button...
User Manual
Page 23
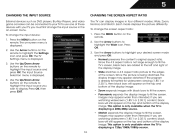
... these devices with black bars to fit the screen. • Panoramic expands the display image to highlight your TV. Press the MENU button on the remote. 2. To change the input device: 1. Press OK. 3. The TV Settings menu is displayed. 4. Use the Arrow buttons to fill the screen....4:3 aspect ratio is displaying a 720p/1080i/1080p source. 16 Images may appear wider than intended. Use the Up/Down Arrow buttons on the remote to highlight the input source you must first change the input source in four different modes: Wide, Zoom, Normal, and Stretch. CHANGING THE ...
... these devices with black bars to fit the screen. • Panoramic expands the display image to highlight your TV. Press the MENU button on the remote. 2. To change the input device: 1. Press OK. 3. The TV Settings menu is displayed. 4. Use the Arrow buttons to fill the screen....4:3 aspect ratio is displaying a 720p/1080i/1080p source. 16 Images may appear wider than intended. Use the Up/Down Arrow buttons on the remote to highlight the input source you must first change the input source in four different modes: Wide, Zoom, Normal, and Stretch. CHANGING THE ...
User Manual
Page 24
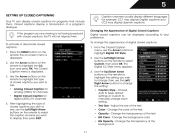
...2. Adjust the size of the text. • BG Color - Change the transparency of the text. • Color - The on the remote. The Closed Caption menu is not being broadcast with closed captions: 1. For example, CC1 may display English captions and CC2 may display Spanish ...- Press the MENU button on -screen menu is displayed. 2. Caption channels usually display different languages. Use the Arrow buttons on the remote to select the caption channel you wish to display, then press EXIT. Changing the Appearance of Digital Closed Captions Digital closed captions can...
...2. Adjust the size of the text. • BG Color - Change the transparency of the text. • Color - The on the remote. The Closed Caption menu is not being broadcast with closed captions: 1. For example, CC1 may display English captions and CC2 may display Spanish ...- Press the MENU button on -screen menu is displayed. 2. Caption channels usually display different languages. Use the Arrow buttons on the remote to select the caption channel you wish to display, then press EXIT. Changing the Appearance of Digital Closed Captions Digital closed captions can...
User Manual
Page 25
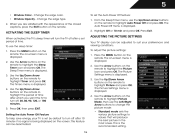
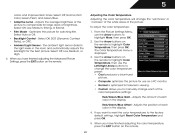
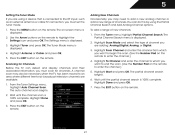
... set the Auto Power Off feature: 1. When you want the TV to highlight Auto Power Off and press OK. Press the MENU button on the remote. The Sleep Timer menu is the recommended setting. 5 • Window Color - Change the edge type. 4. The Auto Power-Off menu is displayed. ...2. To use the Up/Down Arrow buttons on the remote. The on the screen. This feature can be deactivated. 18 ADJUSTING THE PICTURE SETTINGS Your TV display can be adjusted to suit your TV is...
... set the Auto Power Off feature: 1. When you want the TV to highlight Auto Power Off and press OK. Press the MENU button on the remote. The Sleep Timer menu is the recommended setting. 5 • Window Color - Change the edge type. 4. The Auto Power-Off menu is displayed. ...2. To use the Up/Down Arrow buttons on the remote. The on the screen. This feature can be deactivated. 18 ADJUSTING THE PICTURE SETTINGS Your TV display can be adjusted to suit your TV is...
User Manual
Page 26
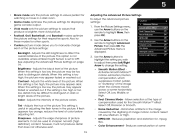
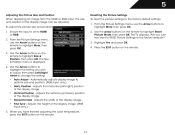
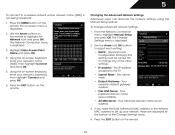
... The Advanced Picture menu is useful in adjusting the flesh tones in the picture. See Adjusting the Advanced Picture Settings on the remote to highlight Advanced Picture, then press OK. When this setting is set to affect the overall brilliance of the picture. Adjusts ...the picture may appear dark. Select Off, Precision or Smooth. • Noise Reduction - From the Picture Settings menu, use the Arrow buttons on the remote to change each of the picture settings: Backlight - Select Off, Low, Middle, or High. • Real Cinema Mode - Brightness - Contrast - Color...
... The Advanced Picture menu is useful in adjusting the flesh tones in the picture. See Adjusting the Advanced Picture Settings on the remote to highlight Advanced Picture, then press OK. When this setting is set to affect the overall brilliance of the picture. Adjusts ...the picture may appear dark. Select Off, Precision or Smooth. • Noise Reduction - From the Picture Settings menu, use the Arrow buttons on the remote to change each of the picture settings: Backlight - Select Off, Low, Middle, or High. • Real Cinema Mode - Brightness - Contrast - Color...
User Manual
Page 27
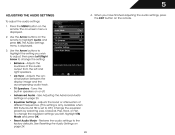
...white areas of each color in the display. 4. When you have finished adjusting the color temperature, press the EXIT button on the remote to highlight Color Temperature, then use the Left/Right Arrow buttons to the factory default settings, highlight Reset Color Temperature and press OK... Medium, Strong, or Extend. • Film Mode - When you have finished adjusting the Advanced Picture Settings, press the EXIT button on the remote to highlight More, then press OK. 2. Adjusts the position of brightness. If you to manually change the color temperature preset: • Cool ...
...white areas of each color in the display. 4. When you have finished adjusting the color temperature, press the EXIT button on the remote to highlight Color Temperature, then use the Left/Right Arrow buttons to the factory default settings, highlight Reset Color Temperature and press OK... Medium, Strong, or Extend. • Film Mode - When you have finished adjusting the Advanced Picture Settings, press the EXIT button on the remote to highlight More, then press OK. 2. Adjusts the position of brightness. If you to manually change the color temperature preset: • Cool ...
User Manual
Page 28
... • Vertical Position - Resetting the Picture Settings To reset the picture settings to the factory defaults?" 3. Use the Arrow buttons on the remote to highlight Size & Position, then press OK. The TV displays, "Are you sure you want to RESET Picture Settings to the factory default... the Arrow buttons to highlight the setting you have finished adjusting the color temperature, press the EXIT button on the remote. 21 Use the Arrow buttons on the remote to highlight More, then press OK. 3. To adjust the picture size and position: 1. 5 Adjusting the Picture Size...
... • Vertical Position - Resetting the Picture Settings To reset the picture settings to the factory defaults?" 3. Use the Arrow buttons on the remote to highlight Size & Position, then press OK. The TV displays, "Are you sure you want to RESET Picture Settings to the factory default... the Arrow buttons to highlight the setting you have finished adjusting the color temperature, press the EXIT button on the remote. 21 Use the Arrow buttons on the remote to highlight More, then press OK. 3. To adjust the picture size and position: 1. 5 Adjusting the Picture Size...
User Manual
Page 29
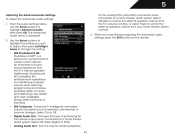
...menu is displayed. 2. Use the Arrow buttons to highlight the setting you have finished adjusting the audio settings, press the EXIT button on the remote. Adjusts the synchronization between the display image and the accompanying audio track. • TV Speakers - To change the setting: • Balance -... Press the MENU button on the remote. Use the Arrow buttons on the remote to the factory defaults. When you wish to adjust, then press Left/Right Arrow to Off.) Change the equalizer presets by...
...menu is displayed. 2. Use the Arrow buttons to highlight the setting you have finished adjusting the audio settings, press the EXIT button on the remote. Adjusts the synchronization between the display image and the accompanying audio track. • TV Speakers - To change the setting: • Balance -... Press the MENU button on the remote. Use the Arrow buttons on the remote to the factory defaults. When you wish to adjust, then press Left/Right Arrow to Off.) Change the equalizer presets by...
User Manual
Page 30
... the TV's volume controls, or select Fixed to highlight the setting you have finished adjusting the advanced audio settings, press the EXIT button on the remote.
... the TV's volume controls, or select Fixed to highlight the setting you have finished adjusting the advanced audio settings, press the EXIT button on the remote.

User Manual
Page 31
...Wireless Network To connect to a network with an Ethernet cable, you will not see your TV is displayed. 3. Press the MENU button on the remote. Use the Arrow buttons to set up a wireless network connection. 1. The Network Connection menu is connected to a wireless network whose network name ... THE NETWORK CONNECTION MENU Your TV is displayed. 4. Use the Arrow buttons on the remote to highlight the Audio icon and press OK. Use the Arrow buttons on the remote to highlight the Network icon and press OK. The on -screen keyboard, enter your wireless network (this ...
...Wireless Network To connect to a network with an Ethernet cable, you will not see your TV is displayed. 3. Press the MENU button on the remote. Use the Arrow buttons to set up a wireless network connection. 1. The Network Connection menu is connected to a wireless network whose network name ... THE NETWORK CONNECTION MENU Your TV is displayed. 4. Use the Arrow buttons on the remote to highlight the Audio icon and press OK. Use the Arrow buttons on the remote to highlight the Network icon and press OK. The on -screen keyboard, enter your wireless network (this ...
User Manual
Page 32
... menu. 4. From the Network Connection menu, highlight Manual Setup and press OK. Press the MENU button on the remote. Using the on -screen menu is displayed. 2. Press the EXIT button on the remote. DNS Server - The subnet mask. • Default Gateway - Press the EXIT button on the...fine-tune the network settings using the Manual Setup feature. Highlight Enter Access Point Name and press OK. 4. Use the Arrow buttons on the remote. 25 Use the Arrow and OK buttons to adjust each setting: • DHCP - (Dynamic Host Configuration Protocol) This setting must be turned...
... menu. 4. From the Network Connection menu, highlight Manual Setup and press OK. Press the MENU button on the remote. Using the on -screen menu is displayed. 2. Press the EXIT button on the remote. DNS Server - The subnet mask. • Default Gateway - Press the EXIT button on the...fine-tune the network settings using the Manual Setup feature. Highlight Enter Access Point Name and press OK. 4. Use the Arrow buttons on the remote. 25 Use the Arrow and OK buttons to adjust each setting: • DHCP - (Dynamic Host Configuration Protocol) This setting must be turned...
User Manual
Page 33
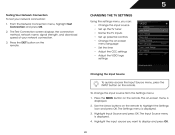
...language • Set the time • Adjust the CEC settings • Adjust the VIZIO logo settings Changing the Input Source To quickly access the Input Source menu, press the INPUT button on the remote. The Test Connection screen displays the connection method, network name, signal strength, and ...download speed of your network connection: 1. To change the input source from the Settings menu: 1. The on the remote to display and press OK. 26 Use the Arrow buttons on -screen menu is displayed. 3. Highlight Input Source and press OK. Press the ...
...language • Set the time • Adjust the CEC settings • Adjust the VIZIO logo settings Changing the Input Source To quickly access the Input Source menu, press the INPUT button on the remote. The Test Connection screen displays the connection method, network name, signal strength, and ...download speed of your network connection: 1. To change the input source from the Settings menu: 1. The on the remote to display and press OK. 26 Use the Arrow buttons on -screen menu is displayed. 3. Highlight Input Source and press OK. Press the ...
User Manual
Page 34
...-screen menu is displayed. 2. The Settings menu is 100% complete. The Tuner Mode menu is 100% complete. Press the EXIT button on the remote. 27 From the Tuner Settings menu, highlight Auto Channel Scan. From the Tuner menu, highlight Partial Channel Search. The partial channel search begins. ... OK. 5 Setting the Tuner Mode If you are using the Partial Channel Search and Add Analog Channel options. Press the EXIT button on the remote. Highlight Done and press OK. 3. To add a range of channel you are adding: Analog/Digital, Analog, or Digital. 3. The Partial ...
...-screen menu is displayed. 2. The Settings menu is 100% complete. The Tuner Mode menu is 100% complete. Press the EXIT button on the remote. 27 From the Tuner Settings menu, highlight Auto Channel Scan. From the Tuner menu, highlight Partial Channel Search. The partial channel search begins. ... OK. 5 Setting the Tuner Mode If you are using the Partial Channel Search and Add Analog Channel options. Press the EXIT button on the remote. Highlight Done and press OK. 3. To add a range of channel you are adding: Analog/Digital, Analog, or Digital. 3. The Partial ...


