User Manual
Page 2
... and High-Definition Multimedia Interface are incorporated under license from SRS Labs, Inc. Changing the factory default picture settings or enabling other features will increase power consumption that could exceed the limits necessary to qualify for ENERGY STAR in the "factory default" setting and this is the setting in which...
... and High-Definition Multimedia Interface are incorporated under license from SRS Labs, Inc. Changing the factory default picture settings or enabling other features will increase power consumption that could exceed the limits necessary to qualify for ENERGY STAR in the "factory default" setting and this is the setting in which...
User Manual
Page 3
... accompanying helpful tip. When you see this symbol, please read these instructions in electric shock or fire. Welcome THANK YOU FOR CHOOSING VIZIO And congratulations on or pinched, particularly at plugs, convenience receptacles, and the point where they exit from the apparatus. • Only... apparatus near any ventilation openings. To get the most out of electric shock or component damage, switch off the power before using your new VIZIO HDTV. To prevent your TV from being walked on your product and retain them for future reference. Keep these instructions...
... accompanying helpful tip. When you see this symbol, please read these instructions in electric shock or fire. Welcome THANK YOU FOR CHOOSING VIZIO And congratulations on or pinched, particularly at plugs, convenience receptacles, and the point where they exit from the apparatus. • Only... apparatus near any ventilation openings. To get the most out of electric shock or component damage, switch off the power before using your new VIZIO HDTV. To prevent your TV from being walked on your product and retain them for future reference. Keep these instructions...
User Manual
Page 5
... in environments with heavy dust or high humidity may cause fire or electric shock. • Follow instructions for an extended period of time, unplug the power cord. • To reduce risk of electric shock, do so. • T he lightning flash with instructions. If any way. - Do not ... enclosure that may cause fire or electric shock. • Do not install your TV in any smoke or odor becomes apparent, unplug the power cord and contact your dealer. Continued use your TV changes substantially. • This apparatus shall not be exposed to excessive heat such as the...
... in environments with heavy dust or high humidity may cause fire or electric shock. • Follow instructions for an extended period of time, unplug the power cord. • To reduce risk of electric shock, do so. • T he lightning flash with instructions. If any way. - Do not ... enclosure that may cause fire or electric shock. • Do not install your TV in any smoke or odor becomes apparent, unplug the power cord and contact your dealer. Continued use your TV changes substantially. • This apparatus shall not be exposed to excessive heat such as the...
User Manual
Page 6
... complete on June 12, 2009. Analog-only television sets that receive TV programming through an antenna now need a converter box to continue to receive low power, Class A or translator television stations and with a built-in tuner capable of processing digital broadcasts.
... complete on June 12, 2009. Analog-only television sets that receive TV programming through an antenna now need a converter box to continue to receive low power, Class A or translator television stations and with a built-in tuner capable of processing digital broadcasts.
User Manual
Page 7
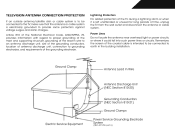
...to proper grounding of the mast and supporting structure, grounding of the lead-in the building installation. Power Lines Do not locate the antenna near overhead light or power circuits, or where it is left unattended or unused for long periods of the coaxial cable is ... charges. Ground Clamp Antenna Lead In Wire Antenna Discharge Unit (NEC Section 810-20) Grounding Conductors (NEC Section 810-21) Ground Clamps Power Service Grounding Electrode System (NEC ART 250, part H) Electric Service Equipment TELEVISION ANTENNA CONNECTION PROTECTION If an outside antenna/satellite dish...
...to proper grounding of the mast and supporting structure, grounding of the lead-in the building installation. Power Lines Do not locate the antenna near overhead light or power circuits, or where it is left unattended or unused for long periods of the coaxial cable is ... charges. Ground Clamp Antenna Lead In Wire Antenna Discharge Unit (NEC Section 810-20) Grounding Conductors (NEC Section 810-21) Ground Clamps Power Service Grounding Electrode System (NEC ART 250, part H) Electric Service Equipment TELEVISION ANTENNA CONNECTION PROTECTION If an outside antenna/satellite dish...
User Manual
Page 8
... Screen Aspect Ratio...16 Setting Up Closed Captioning...17 Changing the Appearance of Digital Closed Captions.. 17 Activating the Sleep Timer...18 Setting the Auto Power Off Feature...18
... Screen Aspect Ratio...16 Setting Up Closed Captioning...17 Changing the Appearance of Digital Closed Captions.. 17 Activating the Sleep Timer...18 Setting the Auto Power Off Feature...18
User Manual
Page 10
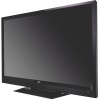
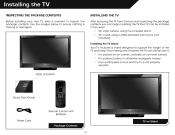
Installing the TV INSPECTING THE PACKAGE CONTENTS Before installing your new TV, take a moment to ensure nothing is not properly secured VIZIO LCD HDTV Quick Start Guide Remote Control with Batteries Power Cord Package Contents 3 TV on an uneven, unstable, or non-level surface • It is pushed, pulled, or otherwise improperly moved...
Installing the TV INSPECTING THE PACKAGE CONTENTS Before installing your new TV, take a moment to ensure nothing is not properly secured VIZIO LCD HDTV Quick Start Guide Remote Control with Batteries Power Cord Package Contents 3 TV on an uneven, unstable, or non-level surface • It is pushed, pulled, or otherwise improperly moved...

User Manual
Page 13
Change the channel. Connect USB thumb drive for photo or music playback. HDMI Side - 2 SIDE PANEL POWER - VOLUME UP/DOWN - Connect HDMI device. CHANNEL UP/DOWN - Increase or decrease volume level INPUT - USB - Turn TV off or on -screen menu. Side Panel 6 MENU - Change input source. Open the on .
Change the channel. Connect USB thumb drive for photo or music playback. HDMI Side - 2 SIDE PANEL POWER - VOLUME UP/DOWN - Connect HDMI device. CHANNEL UP/DOWN - Increase or decrease volume level INPUT - USB - Turn TV off or on -screen menu. Side Panel 6 MENU - Change input source. Open the on .
User Manual
Page 15
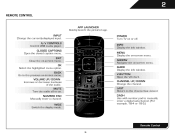
...-4 or 18-5.) Remote Control 8 EXIT Close the on -screen menu. WIDE Switch the display mode. MENU Display the on or off or on -screen menu. POWER Turn TV on -screen menu. DASH Use with number pad to the channel last viewed. NUMBER PAD Manually enter a channel. CHANNEL UP/DOWN Change the...
...-4 or 18-5.) Remote Control 8 EXIT Close the on -screen menu. WIDE Switch the display mode. MENU Display the on or off or on -screen menu. POWER Turn TV on -screen menu. DASH Use with number pad to the channel last viewed. NUMBER PAD Manually enter a channel. CHANNEL UP/DOWN Change the...
User Manual
Page 21
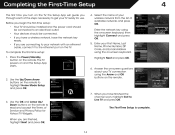
...you turn on the remote to read and accept the Terms of Service and Privacy Policy for use. Press the Power/Standby button on and the Setup App starts. 4. The TV powers on the remote. Use the Up/Down Arrow buttons on the TV. When you have the network key ready. ...8226; If you are finished, highlight Next and press OK. 7. Before you begin the first-time setup: • Your TV should be installed and the power cord should be connected to an electrical outlet. • Your devices should be connected. • If you have a wireless network, have finished the channel scan...
...you turn on the remote to read and accept the Terms of Service and Privacy Policy for use. Press the Power/Standby button on and the Setup App starts. 4. The TV powers on the remote. Use the Up/Down Arrow buttons on the TV. When you have the network key ready. ...8226; If you are finished, highlight Next and press OK. 7. Before you begin the first-time setup: • Your TV should be installed and the power cord should be connected to an electrical outlet. • Your devices should be connected. • If you have a wireless network, have finished the channel scan...
User Manual
Page 25
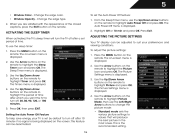
... mode: • Standard mode sets the various picture settings to suit your TV is displayed. 2. Change the edge type. 4. Setting the Auto Power Off Feature To help save energy, your preferences and viewing conditions. Press the MENU button on -screen menu is being displayed on the remote to... no signal is displayed. 2. The Picture Settings menu is displayed. 3. 5 • Window Color - Change the edge color. • Window Opacity - The Auto Power-Off menu is the recommended setting. Highlight Off or 10 min and press OK. To use the Up/Down Arrow buttons on the remote to...
... mode: • Standard mode sets the various picture settings to suit your TV is displayed. 2. Change the edge type. 4. Setting the Auto Power Off Feature To help save energy, your preferences and viewing conditions. Press the MENU button on -screen menu is being displayed on the remote to... no signal is displayed. 2. The Picture Settings menu is displayed. 3. 5 • Window Color - Change the edge color. • Window Opacity - The Auto Power-Off menu is the recommended setting. Highlight Off or 10 min and press OK. To use the Up/Down Arrow buttons on the remote to...
User Manual
Page 44
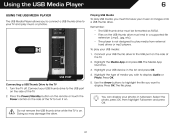
Connect your music or images onto a USB thumb drive. Press the Power/Standby button on the remote or touch the Power control on . 4. Press OK. 5. The file plays. Doing so may damage the drive. 37 Highlight the Media App and press OK. Highlight your photos in ...
Connect your music or images onto a USB thumb drive. Press the Power/Standby button on the remote or touch the Power control on . 4. Press OK. 5. The file plays. Doing so may damage the drive. 37 Highlight the Media App and press OK. Highlight your photos in ...
User Manual
Page 52
... Brightness, Contrast, or Backlight. See Replacing the Batteries on the remote to ensure mute is securely attached to the TV. • Press the Power/Standby button on the remote or on the screen. • Ensure all cables are securely attached to the TV. • Ensure all cables to...right. • Adust the Color and Tint settings in the Picture menu. The buttons on the remote aren't working electrical outlet. • Ensure the power cable is off. • Check the audio settings. A The TV displays "No Signal." • Press the INPUT button on the remote control to ...
... Brightness, Contrast, or Backlight. See Replacing the Batteries on the remote to ensure mute is securely attached to the TV. • Press the Power/Standby button on the remote or on the screen. • Ensure all cables are securely attached to the TV. • Ensure all cables to...right. • Adust the Color and Tint settings in the Picture menu. The buttons on the remote aren't working electrical outlet. • Ensure the power cable is off. • Check the audio settings. A The TV displays "No Signal." • Press the INPUT button on the remote control to ...
User Manual
Page 56
...4:00PM Saturday and Sunday, Pacific Time, or visit www.VIZIO.com. Type of protection. This warranty does not cover, for example: cosmetic damage, normal wear and tear, improper operation, improper voltage supply or power surges, signal issues, damages from warranty service or replacement..., whichever is not covered under this guarantee applies to your personal information, VIZIO recommends that affords an equal degree of Service Defective Products must...
...4:00PM Saturday and Sunday, Pacific Time, or visit www.VIZIO.com. Type of protection. This warranty does not cover, for example: cosmetic damage, normal wear and tear, improper operation, improper voltage supply or power surges, signal issues, damages from warranty service or replacement..., whichever is not covered under this guarantee applies to your personal information, VIZIO recommends that affords an equal degree of Service Defective Products must...
User Manual
Page 57
...three (3) years from : http://www.cs.fsu.edu/~engelen/license.html Please visit www.VIZIO.com for any interference received, including interference that are designed to use an AC/DC power adapter that interference will not occur in a residential installation. Connect the equipment into an... Changes or modifications not expressly approved by turning the equipment off and on your VIZIO VIA device. Increase the separation between the equipment and receiver. 3. Shielded interface cables and AC power cord, if any, must accept any radio or TV interference caused by one or...
...three (3) years from : http://www.cs.fsu.edu/~engelen/license.html Please visit www.VIZIO.com for any interference received, including interference that are designed to use an AC/DC power adapter that interference will not occur in a residential installation. Connect the equipment into an... Changes or modifications not expressly approved by turning the equipment off and on your VIZIO VIA device. Increase the separation between the equipment and receiver. 3. Shielded interface cables and AC power cord, if any, must accept any radio or TV interference caused by one or...
Download
Page 2
...or throw objects at least three feet should be sure these instructions. • Heed all warnings. • Follow all servicing to a power outlet, power is exposed to leak which can be used , use of your TV and to protect it will fit only into your dealer immediately. ...INSTRUCTIONS Your TV is designed and manufactured to operate within the inside the cord and cause fire or electric shock. To totally disconnect power, unplug the power cord. • The lightning flash with heavy dust or high humidity may cause fire or electric shock. • Follow instructions for...
...or throw objects at least three feet should be sure these instructions. • Heed all warnings. • Follow all servicing to a power outlet, power is exposed to leak which can be used , use of your TV and to protect it will fit only into your dealer immediately. ...INSTRUCTIONS Your TV is designed and manufactured to operate within the inside the cord and cause fire or electric shock. To totally disconnect power, unplug the power cord. • The lightning flash with heavy dust or high humidity may cause fire or electric shock. • Follow instructions for...
Download
Page 4
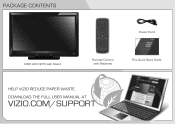
PACKAGE CONTENTS Power Cord VIZIO LCD HDTV with Stand Remote Control with Batteries This Quick Start Guide HELP VIZIO REDUCE PAPER WASTE. DOWNLOAD THE FULL USER MANUAL AT VIZIO.COM/SUPPORT
PACKAGE CONTENTS Power Cord VIZIO LCD HDTV with Stand Remote Control with Batteries This Quick Start Guide HELP VIZIO REDUCE PAPER WASTE. DOWNLOAD THE FULL USER MANUAL AT VIZIO.COM/SUPPORT
Download
Page 5
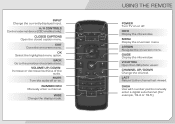
... to the channel last viewed. WIDE Change the display mode. EXIT Close the on -screen menu. CHANNEL UP/DOWN Change the channel. USING THE REMOTE POWER Turn TV on or off or on -screen menu. MENU Display the on . A/V CONTROLS Control external device (CEC-enabled only).
... to the channel last viewed. WIDE Change the display mode. EXIT Close the on -screen menu. CHANNEL UP/DOWN Change the channel. USING THE REMOTE POWER Turn TV on or off or on -screen menu. MENU Display the on . A/V CONTROLS Control external device (CEC-enabled only).

Download
Page 8
Plug the power cord into place. FIRST-TIME SETUP 1 2 Remove the battery cover by pressing gently on the arrow and sliding away from the remote. Connect the power cord to the back of the TV. Gently slide the battery cover back into an electrical outlet. Insert the included batteries.
Plug the power cord into place. FIRST-TIME SETUP 1 2 Remove the battery cover by pressing gently on the arrow and sliding away from the remote. Connect the power cord to the back of the TV. Gently slide the battery cover back into an electrical outlet. Insert the included batteries.

Download
Page 9
3 4 Coaxial Cable If you have an external antenna or a cable connection that extends from your router or modem. The Setup App is displayed. Use the Arrow buttons on the remote. Connect an Ethernet cable from a wall outlet, connect it to highlight Home Mode Setup and press OK. Turn the TV on by pressing the Power button on the remote to the TV with an RF/Coaxial cable.
3 4 Coaxial Cable If you have an external antenna or a cable connection that extends from your router or modem. The Setup App is displayed. Use the Arrow buttons on the remote. Connect an Ethernet cable from a wall outlet, connect it to highlight Home Mode Setup and press OK. Turn the TV on by pressing the Power button on the remote to the TV with an RF/Coaxial cable.


