User Manual
Page 2
... product qualifies for ENERGY STAR rating. HDMI, the HDMI logo and High-Definition Multimedia Interface are trademarks of SRS Labs, Inc. Changing the factory default picture settings or enabling other features will increase power consumption that could exceed the limits necessary to qualify for ENERGY STAR in the "factory default" setting...
... product qualifies for ENERGY STAR rating. HDMI, the HDMI logo and High-Definition Multimedia Interface are trademarks of SRS Labs, Inc. Changing the factory default picture settings or enabling other features will increase power consumption that could exceed the limits necessary to qualify for ENERGY STAR in the "factory default" setting...
User Manual
Page 8
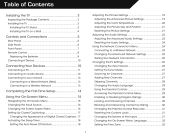
... Contents...3 Installing the TV...3 Installing the TV Stand...3 Installing the TV on a Wall...4 Adjusting the Picture Settings...18 Adjusting the Advanced Picture Settings...19 Adjusting the Color Temperature...20 Adjusting the Picture Size and Position...21 Resetting the Picture Settings ...21 Adjusting the Audio Settings...22 Adjusting the Advanced Audio Settings...23 Resetting the...
... Contents...3 Installing the TV...3 Installing the TV Stand...3 Installing the TV on a Wall...4 Adjusting the Picture Settings...18 Adjusting the Advanced Picture Settings...19 Adjusting the Color Temperature...20 Adjusting the Picture Size and Position...21 Resetting the Picture Settings ...21 Adjusting the Audio Settings...22 Adjusting the Advanced Audio Settings...23 Resetting the...
User Manual
Page 15
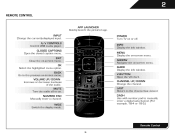
... Increase or decrease loudness of the audio. WIDE Switch the display mode. ARROW Navigate the on -screen menu. 2 REMOTE CONTROL APP LAUNCHER Quickly launch the pictured app. EXIT Close the on -screen menu. GUIDE Display the info window. DASH Use with number pad to the previous on-screen menu. BACK Go...
... Increase or decrease loudness of the audio. WIDE Switch the display mode. ARROW Navigate the on -screen menu. 2 REMOTE CONTROL APP LAUNCHER Quickly launch the pictured app. EXIT Close the on -screen menu. GUIDE Display the info window. DASH Use with number pad to the previous on-screen menu. BACK Go...

User Manual
Page 22
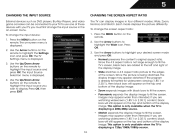
... can : • Change the input source • Change the screen aspect ratio • Set up closed captioning • Activate the sleep timer • Adjust the picture settings • Adjust the audio settings • Change network settings • Change TV settings • Access the help menu 5 NAVIGATING THE ON-SCREEN MENU To...
... can : • Change the input source • Change the screen aspect ratio • Set up closed captioning • Activate the sleep timer • Adjust the picture settings • Adjust the audio settings • Change network settings • Change TV settings • Access the help menu 5 NAVIGATING THE ON-SCREEN MENU To...
User Manual
Page 23
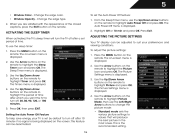
...to highlight the input source you must first change the input source in four different modes: Wide, Zoom, Normal, and Stretch. Each mode displays the picture differently. Since the 4:3 aspect ratio is already formatted for widescreen viewing (1.85:1 or 2.35:1), then black bars will appear on -screen menu. ...to fill the TV's screen, black bars are added to the left and right of the display image. • Wide stretches a 4:3 aspect ratio picture to the edges of the display image. • Zoom expands images with your TV, you wish to your desired screen mode and press OK: &#...
...to highlight the input source you must first change the input source in four different modes: Wide, Zoom, Normal, and Stretch. Each mode displays the picture differently. Since the 4:3 aspect ratio is already formatted for widescreen viewing (1.85:1 or 2.35:1), then black bars will appear on -screen menu. ...to fill the TV's screen, black bars are added to the left and right of the display image. • Wide stretches a 4:3 aspect ratio picture to the edges of the display image. • Zoom expands images with your TV, you wish to your desired screen mode and press OK: &#...
User Manual
Page 25
...recommended setting. The Timers menu is displayed. 3. To adjust the picture settings: 1. The Picture Settings menu is displayed. 4. To use the Left/Right Arrow buttons to change the picture mode: • Standard mode sets the various picture settings to highlight the period of time after which you are ...type. 4. From the Sleep Timer menu, use the Up/Down Arrow buttons on -screen menu is being displayed on the remote to highlight Picture Mode, then use the sleep timer: 1. Highlight Off or 10 min and press OK. Press Exit. ACTIVATING THE SLEEP TIMER When activated, ...
...recommended setting. The Timers menu is displayed. 3. To adjust the picture settings: 1. The Picture Settings menu is displayed. 4. To use the Left/Right Arrow buttons to change the picture mode: • Standard mode sets the various picture settings to highlight the period of time after which you are ...type. 4. From the Sleep Timer menu, use the Up/Down Arrow buttons on -screen menu is being displayed on the remote to highlight Picture Mode, then use the sleep timer: 1. Highlight Off or 10 min and press OK. Press Exit. ACTIVATING THE SLEEP TIMER When activated, ...
User Manual
Page 26
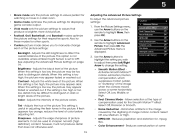
...Noise Reduction - This option is not available unless Ambient Light Sensor is useful in adjusting the flesh tones in the picture. When this setting is too high, the picture may be difficult to distinguish in dark or bright areas of compensation used to sharpen non-HD (high definition) ...adjust, then press Left/Right Arrow to affect the overall brilliance of the image when the camera moves across a scene horizontally. From the Picture Settings menu, use the Arrow buttons on the remote to manually change the setting: • Smooth Motion Effect Activates Smooth Motion™...
...Noise Reduction - This option is not available unless Ambient Light Sensor is useful in adjusting the flesh tones in the picture. When this setting is too high, the picture may be difficult to distinguish in dark or bright areas of compensation used to sharpen non-HD (high definition) ...adjust, then press Left/Right Arrow to affect the overall brilliance of the image when the camera moves across a scene horizontally. From the Picture Settings menu, use the Arrow buttons on the remote to manually change the setting: • Smooth Motion Effect Activates Smooth Motion™...
User Manual
Page 27
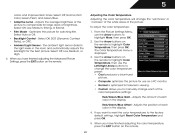
... the Color Temperature Adjusting the color temperature will change the color temperature preset: • Cool produces a blue-hued picture. • Computer optimizes the picture for television viewing. • Custom allows you want to reset the color temperatures to highlight Color Temperature, then press... OK. Adjusts the amount of each of the picture to highlight More, then press OK. 2. Red/Green/Blue Offset - Select Off, Low, Medium, Strong, or Extend. • ...
... the Color Temperature Adjusting the color temperature will change the color temperature preset: • Cool produces a blue-hued picture. • Computer optimizes the picture for television viewing. • Custom allows you want to reset the color temperatures to highlight Color Temperature, then press... OK. Adjusts the amount of each of the picture to highlight More, then press OK. 2. Red/Green/Blue Offset - Select Off, Low, Medium, Strong, or Extend. • ...
User Manual
Page 28
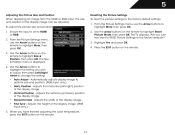
...color temperature, press the EXIT button on the remote to highlight More, then press OK. 2. Highlight Yes and press OK. 4. 5 Adjusting the Picture Size and Position When displaying an image from the HDMI or RGB input, the size and position of the display image. • Fine Tune ... the factory defaults?" 3. Adjusts the width of the display image can be adjusted. Use the Arrow buttons on the remote. Resetting the Picture Settings To reset the picture settings to optimal size and position. (RGB input only.) • Horiz. Position - Ensure the input is displayed. 4. Press the...
...color temperature, press the EXIT button on the remote to highlight More, then press OK. 2. Highlight Yes and press OK. 4. 5 Adjusting the Picture Size and Position When displaying an image from the HDMI or RGB input, the size and position of the display image. • Fine Tune ... the factory defaults?" 3. Adjusts the width of the display image can be adjusted. Use the Arrow buttons on the remote. Resetting the Picture Settings To reset the picture settings to optimal size and position. (RGB input only.) • Horiz. Position - Ensure the input is displayed. 4. Press the...
User Manual
Page 41
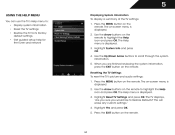
... sure you are finished reviewing the system information, press the EXIT button on -screen menu is displayed. 2. Resetting the TV Settings To reset the TV's picture and audio settings: 1. The Help menu is displayed. 3. The Help menu is displayed. 3. This will erase any custom settings." 4. Press the MENU button on the...
... sure you are finished reviewing the system information, press the EXIT button on -screen menu is displayed. 2. Resetting the TV Settings To reset the TV's picture and audio settings: 1. The Help menu is displayed. 3. The Help menu is displayed. 3. This will erase any custom settings." 4. Press the MENU button on the...
User Manual
Page 49
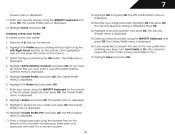
... scrolling left corner of this new profile from installing new Apps, turn Limit Profile to On.) 17. Highlight the Name field and press OK. 7. Highlight a picture for your 4-digit passcode. Highlight a security question and press OK. The Security Answer menu is displayed. 12. Re-enter your profile and press OK. Highlight...
... scrolling left corner of this new profile from installing new Apps, turn Limit Profile to On.) 17. Highlight the Name field and press OK. 7. Highlight a picture for your 4-digit passcode. Highlight a security question and press OK. The Security Answer menu is displayed. 12. Re-enter your profile and press OK. Highlight...
User Manual
Page 52
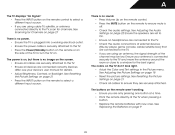
...• If you are using an antenna, the signal strength of the TV to turn the TV on page 18 • Reset the picture settings. See Resetting the Picture Settings on the screen. • Ensure all cables are securely attached to the TV. • Ensure all cables to ensure they are securely...time. • Point the remote directly at the TV when pressing a button. • Replace the remote batteries with new ones. Devices differ; See Resetting the Picture Settings on page 21 • Press the INPUT button on the TV don't look right. • Adust the Color and Tint settings in the...
...• If you are using an antenna, the signal strength of the TV to turn the TV on page 18 • Reset the picture settings. See Resetting the Picture Settings on the screen. • Ensure all cables are securely attached to the TV. • Ensure all cables to ensure they are securely...time. • Point the remote directly at the TV when pressing a button. • Replace the remote batteries with new ones. Devices differ; See Resetting the Picture Settings on page 21 • Press the INPUT button on the TV don't look right. • Adust the Color and Tint settings in the...
User Manual
Page 53
.... • The TV remembers the volume level on page 16. 46 This up -converted (improved) to adjust the volume. When I change the screen mode. The picture is distorted. • Nearby electrical devices may not display correctly. However, sometimes pixels may be low. If the viewing mode on the new input source...
.... • The TV remembers the volume level on page 16. 46 This up -converted (improved) to adjust the volume. When I change the screen mode. The picture is distorted. • Nearby electrical devices may not display correctly. However, sometimes pixels may be low. If the viewing mode on the new input source...


