
E470-A0 User Manual
Page 1
USER GUIDE MMOODDEELLS // E3D320VX // E3ED44270V0X -A0 // E3D470VX Installing your new tv CONTROLS & CONNECTIONS connecting your devices using the on-screen menu using the usb media player TROUBLESHOOTING & SUPPORT Help, SPECs, warranty & LEGAL
USER GUIDE MMOODDEELLS // E3D320VX // E3ED44270V0X -A0 // E3D470VX Installing your new tv CONTROLS & CONNECTIONS connecting your devices using the on-screen menu using the usb media player TROUBLESHOOTING & SUPPORT Help, SPECs, warranty & LEGAL

E470-A0 User Manual
Page 3
...or component damage, switch off the power before using your TV. To get the most out of your new VIZIO product, read these instructions before connecting other apparatus (including amplifiers) that you see this apparatus near any ventilation openings. When a cart is intended to...heat. • Protect the power cord from being damaged, the following safety instructions before operating your investment beyond the standard warranty, VIZIO offers on or pinched, particularly at plugs, convenience receptacles, and the point where they exit from being walked on -site extended ...
...or component damage, switch off the power before using your TV. To get the most out of your new VIZIO product, read these instructions before connecting other apparatus (including amplifiers) that you see this apparatus near any ventilation openings. When a cart is intended to...heat. • Protect the power cord from being damaged, the following safety instructions before operating your investment beyond the standard warranty, VIZIO offers on or pinched, particularly at plugs, convenience receptacles, and the point where they exit from being walked on -site extended ...
E470-A0 User Manual
Page 4
... you to smoke or moisture may compromise the integrity of the cabinet are not blocked or covered. For more information, contact your dealer. • When connected to a power outlet, power is provided. • Never push any heat source, such as when the power-supply cord or plug is intended to alert...
... you to smoke or moisture may compromise the integrity of the cabinet are not blocked or covered. For more information, contact your dealer. • When connected to a power outlet, power is provided. • Never push any heat source, such as when the power-supply cord or plug is intended to alert...
E470-A0 User Manual
Page 6
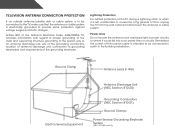
... earth in wire to an antenna discharge unit, size of the grounding conductors, location of antenna discharge unit, connection to grounding electrodes, and requirements of the grounding electrode. Remember, the screen of the TV during a lightning storm or when it could fall into such ...power lines or circuits. Lightning Protection For added protection of the coaxial cable is intended to be connected to the TV, make sure that the antenna or cable system is left unattended or unused for long periods of the lead-in the building...
... earth in wire to an antenna discharge unit, size of the grounding conductors, location of antenna discharge unit, connection to grounding electrodes, and requirements of the grounding electrode. Remember, the screen of the TV during a lightning storm or when it could fall into such ...power lines or circuits. Lightning Protection For added protection of the coaxial cable is intended to be connected to the TV, make sure that the antenna or cable system is left unattended or unused for long periods of the lead-in the building...
E470-A0 User Manual
Page 7
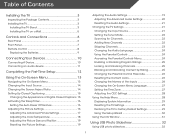
... 3 Inspecting the Package Contents 3 Installing the TV 3 Installing the TV Stand 3 Installing the TV on a Wall 5 Controls and Connections 6 Rear Panel 6 Front Panel 7 Remote Control 8 Replacing the Batteries 9 Connecting Your Devices 10 Connecting A Device 10 Connecting an audio device 11 Completing the First-Time Setup 12 Using the On-Screen Menu 13 Navigating the...
... 3 Inspecting the Package Contents 3 Installing the TV 3 Installing the TV Stand 3 Installing the TV on a Wall 5 Controls and Connections 6 Rear Panel 6 Front Panel 7 Remote Control 8 Replacing the Batteries 9 Connecting Your Devices 10 Connecting A Device 10 Connecting an audio device 11 Completing the First-Time Setup 12 Using the On-Screen Menu 13 Navigating the...
E470-A0 User Manual
Page 8
Connecting a USB Thumb Drive to the TV 32 Playing USB Media 32 Troubleshooting & Technical Support 34 Specifications 37 Limited Warranty 38 Legal & Compliance 39 2
Connecting a USB Thumb Drive to the TV 32 Playing USB Media 32 Troubleshooting & Technical Support 34 Specifications 37 Limited Warranty 38 Legal & Compliance 39 2
E470-A0 User Manual
Page 11
Screw Size: Screw Length: Screw Pitch: Hole Pattern: E470-A0 M6 20mm 1.0mm 400mm (V) x 400mm (H) Be sure the mount you choose is clear of debris that came with a UL-listed wall mount bracket rated for ... TV, ask someone to find the appropriate mount for the weight/load of the TV. Place the TV face-down on a wall: 1. Disconnect any cables connected to the wall, carefully following the instructions that can begin the installation. Remove the base by loosening and removing the screws. 4. Be sure the surface...
Screw Size: Screw Length: Screw Pitch: Hole Pattern: E470-A0 M6 20mm 1.0mm 400mm (V) x 400mm (H) Be sure the mount you choose is clear of debris that came with a UL-listed wall mount bracket rated for ... TV, ask someone to find the appropriate mount for the weight/load of the TV. Place the TV face-down on a wall: 1. Disconnect any cables connected to the wall, carefully following the instructions that can begin the installation. Remove the base by loosening and removing the screws. 4. Be sure the surface...

E470-A0 User Manual
Page 12
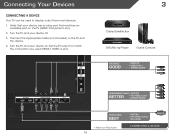
...) DTV / TV CABLE / ANTENNA USB OPTICAL OUT SIDE HDMI (BEST) HDMI (BEST) 1 3 2AUDIO OUT 3 PCOAPUTDICIOAL 6 USB - Stereo Audio Out - Connect RCA audio cable to view photo slideshow. Optical Audio Out - Connect HDMI device. Coaxial - Connect component and composite devices. HDMI - Component/Composite - Connect optical/SPDIF audio device, such as home audio receiver. Rear Panel...
...) DTV / TV CABLE / ANTENNA USB OPTICAL OUT SIDE HDMI (BEST) HDMI (BEST) 1 3 2AUDIO OUT 3 PCOAPUTDICIOAL 6 USB - Stereo Audio Out - Connect RCA audio cable to view photo slideshow. Optical Audio Out - Connect HDMI device. Coaxial - Connect component and composite devices. HDMI - Component/Composite - Connect optical/SPDIF audio device, such as home audio receiver. Rear Panel...
E470-A0 User Manual
Page 16
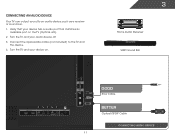
... appropriate cable (not included) to display output from most devices. 1. Set the TV's input to match the connection you used to the TV and the device. 4. Verify that your device has a video port that matches an available port on . USB 3. Turn the TV ... • ANALOG BETTER • HD VIDEO (1080i)* • STEREO AUDIO HDMI CABLE BEST * Maximum Resolution 10 • DIGITAL • HD VIDEO (1080p)* • HD AUDIO CONNECTING A DEVICE Connecting Your Devices Connecting A Device Your TV can be used (HDMI-1, HDM1-2, etc).
... appropriate cable (not included) to display output from most devices. 1. Set the TV's input to match the connection you used to the TV and the device. 4. Verify that your device has a video port that matches an available port on . USB 3. Turn the TV ... • ANALOG BETTER • HD VIDEO (1080i)* • STEREO AUDIO HDMI CABLE BEST * Maximum Resolution 10 • DIGITAL • HD VIDEO (1080p)* • HD AUDIO CONNECTING A DEVICE Connecting Your Devices Connecting A Device Your TV can be used (HDMI-1, HDM1-2, etc).
E470-A0 User Manual
Page 17
Turn the TV and your audio device off. 3. Turn the TV and your device on the TV (Optical, etc). 2. Connecting an audio device Your TV can output sound to the TV and the device. 4. USB HDMI (BEST) 1 2 (ARC) COMPONENT (BETTER) Y V COMPOSITE (GOOD) DTV... / ANTENNA USB OPTICAL OUT SIDE HDMI (BEST) HDMI (BEST) 1 3 2AUDIO OUT 3 PCOAPUTDICIOAL 11 3 Home Audio Receiver VIZIO Sound Bar GOOD RCA Cable BETTER Optical/SPDIF Cable CONNECTING AUDIO DEVICE Connect the appropriate cable (not included) to an audio device, such as a receiver or sound bar. 1. Verify that your device has...
Turn the TV and your audio device off. 3. Turn the TV and your device on the TV (Optical, etc). 2. Connecting an audio device Your TV can output sound to the TV and the device. 4. USB HDMI (BEST) 1 2 (ARC) COMPONENT (BETTER) Y V COMPOSITE (GOOD) DTV... / ANTENNA USB OPTICAL OUT SIDE HDMI (BEST) HDMI (BEST) 1 3 2AUDIO OUT 3 PCOAPUTDICIOAL 11 3 Home Audio Receiver VIZIO Sound Bar GOOD RCA Cable BETTER Optical/SPDIF Cable CONNECTING AUDIO DEVICE Connect the appropriate cable (not included) to an audio device, such as a receiver or sound bar. 1. Verify that your device has...
E470-A0 User Manual
Page 18
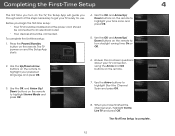
... press OK. 5. Use the Arrow buttons to an electrical outlet. • Your devices should be connected. Answer the on the remote. 3. Press the Power/Standby button on the remote to get your TV connection using the Arrow and OK buttons on -screen questions about your TV ready for use. When you... To complete the first-time setup: 1. Before you begin the first-time setup: • Your TV should be installed and the power cord should be connected to highlight Start the Channel Scan and press OK. 8. The TV powers on the TV, the Setup App will guide you have finished the channel...
... press OK. 5. Use the Arrow buttons to an electrical outlet. • Your devices should be connected. Answer the on the remote. 3. Press the Power/Standby button on the remote to get your TV connection using the Arrow and OK buttons on -screen questions about your TV ready for use. When you... To complete the first-time setup: 1. Before you begin the first-time setup: • Your TV should be installed and the power cord should be connected to highlight Start the Channel Scan and press OK. 8. The TV powers on the TV, the Setup App will guide you have finished the channel...
E470-A0 User Manual
Page 20
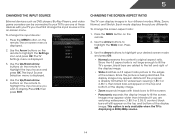
... with your desired screen mode and press OK: • Normal preserves the content's original aspect ratio. Changing the Screen Aspect Ratio The TV can be connected to fill the screen. Use the Arrow buttons to highlight the Settings icon and press OK. Since the 4:3 aspect ratio is displaying a 480i/480p source...
... with your desired screen mode and press OK: • Normal preserves the content's original aspect ratio. Changing the Screen Aspect Ratio The TV can be connected to fill the screen. Use the Arrow buttons to highlight the Settings icon and press OK. Since the 4:3 aspect ratio is displaying a 480i/480p source...

E470-A0 User Manual
Page 26
... setting: • Digital Audio Out Changes the type of processing for the analog RCA (red/ white) connectors when connected to a home theater audio system. Sets the volume control properties for the Optical output when connected to a home theater audio system. 5 • TV Speakers - StudioSound HD™ is displayed. 2. Select On or Off...
... setting: • Digital Audio Out Changes the type of processing for the analog RCA (red/ white) connectors when connected to a home theater audio system. Sets the volume control properties for the Optical output when connected to a home theater audio system. 5 • TV Speakers - StudioSound HD™ is displayed. 2. Select On or Off...
E470-A0 User Manual
Page 28
...necessary when the TV has been moved to an area where different free-to the RF input, such as an external antenna or cable TV connection, you must scan for channels. The partial channel search begins. 6. Press the EXIT button on the remote. Scanning for Channels Before the ...TV can do this by using a device that is connected to -air broadcast television channels are available. 1. From the Tuner Settings menu, highlight Auto Channel Scan. Highlight Done and press OK. 3. Press the...
...necessary when the TV has been moved to an area where different free-to the RF input, such as an external antenna or cable TV connection, you must scan for channels. The partial channel search begins. 6. Press the EXIT button on the remote. Scanning for Channels Before the ...TV can do this by using a device that is connected to -air broadcast television channels are available. 1. From the Tuner Settings menu, highlight Auto Channel Scan. Highlight Done and press OK. 3. Press the...

E470-A0 User Manual
Page 32
... Press the EXIT button on the remote. The Settings menu is displayed. 4. If you would like to display "DVD Player". When you have a DVD player connected to the Component input, you have finished naming your custom label using the on the remote to the factory defaults?" 2. From the Parental Controls menu...
... Press the EXIT button on the remote. The Settings menu is displayed. 4. If you would like to display "DVD Player". When you have a DVD player connected to the Component input, you have finished naming your custom label using the on the remote to the factory defaults?" 2. From the Parental Controls menu...

E470-A0 User Manual
Page 33
... information is displayed when you press the INFO button, set the TV's time zone: To have the TV display the correct time, you must be connected to give you the most accurate location-based information, such as weather or news. 8. Choose On if daylight savings is in different languages. To change...
... information is displayed when you press the INFO button, set the TV's time zone: To have the TV display the correct time, you must be connected to give you the most accurate location-based information, such as weather or news. 8. Choose On if daylight savings is in different languages. To change...
E470-A0 User Manual
Page 34
...'s remote control. • Device Discovery - To enable, disable, or adjust CEC settings: 1. Use the Arrow buttons on -screen menu is connected and supports CEC. 5. Use the Arrow and OK buttons to highlight CEC Settings and press OK. The on the remote to its factory default ... Wizard 28 Use the Arrow buttons on the remote to adjust each setting: • CEC Function - Use this function to control HDMI-connected devices with the included remote without any additional programming. The Settings menu is displayed. 4. Using the Help Menu You can control your device...
...'s remote control. • Device Discovery - To enable, disable, or adjust CEC settings: 1. Use the Arrow buttons on -screen menu is connected and supports CEC. 5. Use the Arrow and OK buttons to highlight CEC Settings and press OK. The on the remote to its factory default ... Wizard 28 Use the Arrow buttons on the remote to adjust each setting: • CEC Function - Use this function to control HDMI-connected devices with the included remote without any additional programming. The Settings menu is displayed. 4. Using the Help Menu You can control your device...

E470-A0 User Manual
Page 38
... it on. Select the photo, press OK, then highlight Fullscreen and press OK. 32 OPTICAL OUT SIDE HDMI (BEST) HDMI (BEST) 1 3 2AUDIO OUT 3 USB PORT Connecting a USB Thumb Drive to display. Highlight the Media App and press OK. Use the Arrow buttons to highlight the file you want to the TV... drive while the TV is not designed to the USB port on the side of the TV. 2. Connect your USB thumb drive to play your photos onto a USB thumb drive. Connect your USB thumb drive to connect a USB thumb drive and view a photo slideshow. Doing so may damage the drive. The file plays...
... it on. Select the photo, press OK, then highlight Fullscreen and press OK. 32 OPTICAL OUT SIDE HDMI (BEST) HDMI (BEST) 1 3 2AUDIO OUT 3 USB PORT Connecting a USB Thumb Drive to display. Highlight the Media App and press OK. Use the Arrow buttons to highlight the file you want to the TV... drive while the TV is not designed to the USB port on the side of the TV. 2. Connect your USB thumb drive to play your photos onto a USB thumb drive. Connect your USB thumb drive to connect a USB thumb drive and view a photo slideshow. Doing so may damage the drive. The file plays...
E470-A0 User Manual
Page 39
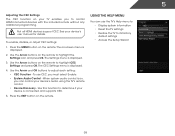
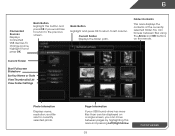
Folder Contents This area displays the contents of the currently selected folder. Current Folder Displays the folder path. 6 Connected Sources Displays connected USB devices. To change source, highlight it and press OK. You can move between pages by Name or Date View Thumbnails/List View Folder Settings ...
Folder Contents This area displays the contents of the currently selected folder. Current Folder Displays the folder path. 6 Connected Sources Displays connected USB devices. To change source, highlight it and press OK. You can move between pages by Name or Date View Thumbnails/List View Folder Settings ...

E470-A0 User Manual
Page 40
We can help with: • New Product Setup • Connecting Your Devices • Technical Problems • And More Phone: (877) 878-4946 (TOLL-FREE) Email: techsupport@VIZIO.com Web: www.VIZIO.com/support Hours of operation: Monday - Sunday: 8 am to 4 pm (PST) We speak English • Se habla Espa...ñol • Nous parlons Français 34 YOUR PRODUCT INCLUDES FREE LIFETIME TECH SUPPORT The VIZIO support team is highly trained and is based in the United States. LET US HELP! Friday: 5 am to 9 pm (PST) Saturday - Troubleshooting...
We can help with: • New Product Setup • Connecting Your Devices • Technical Problems • And More Phone: (877) 878-4946 (TOLL-FREE) Email: techsupport@VIZIO.com Web: www.VIZIO.com/support Hours of operation: Monday - Sunday: 8 am to 4 pm (PST) We speak English • Se habla Espa...ñol • Nous parlons Français 34 YOUR PRODUCT INCLUDES FREE LIFETIME TECH SUPPORT The VIZIO support team is highly trained and is based in the United States. LET US HELP! Friday: 5 am to 9 pm (PST) Saturday - Troubleshooting...


