
Download
Page 2
... registered trademarks of HDMI Licensing LLC. HDMI, the HDMI logo and High-Definition Multimedia Interface are trademarks of SRS Labs, Inc. Changing the factory default picture settings or enabling other features will be achieved. StudioSound HD technology is a trademark of Dolby Laboratories. This product qualifies for ENERGY STAR in the "factory...
... registered trademarks of HDMI Licensing LLC. HDMI, the HDMI logo and High-Definition Multimedia Interface are trademarks of SRS Labs, Inc. Changing the factory default picture settings or enabling other features will be achieved. StudioSound HD technology is a trademark of Dolby Laboratories. This product qualifies for ENERGY STAR in the "factory...

Download
Page 7
..... 17 Activating the Sleep Timer 18 Setting the Auto Power Off Feature 18 Adjusting the Picture Settings 18 Adjusting the Advanced Picture Settings 19 Adjusting the Color Temperature 20 Adjusting the Picture Size and Position 21 Resetting the Picture Settings 21 Adjusting the Audio Settings 22 Adjusting the Advanced Audio Settings 23 Resetting the...
..... 17 Activating the Sleep Timer 18 Setting the Auto Power Off Feature 18 Adjusting the Picture Settings 18 Adjusting the Advanced Picture Settings 19 Adjusting the Color Temperature 20 Adjusting the Picture Size and Position 21 Resetting the Picture Settings 21 Adjusting the Audio Settings 22 Adjusting the Advanced Audio Settings 23 Resetting the...

Download
Page 15
... the audio off . Power Turn TV on -screen menu. V Button Open the VIA dock. Ok Select the highlighted menu option. App launcher Quickly launch the pictured app. Channel Up/Down Change the channel. Volume Up/Down Increase or decrease loudness of the audio. Wide Switch the display mode. Arrow Navigate the...
... the audio off . Power Turn TV on -screen menu. V Button Open the VIA dock. Ok Select the highlighted menu option. App launcher Quickly launch the pictured app. Channel Up/Down Change the channel. Volume Up/Down Increase or decrease loudness of the audio. Wide Switch the display mode. Arrow Navigate the...

Download
Page 21
... can : • Change the input source • Change the screen aspect ratio • Set up closed captioning • Activate the sleep timer • Adjust the picture settings • Adjust the audio settings • Adjust the network settings • Change TV settings • Access the help menu Navigating the On-Screen Menu...
... can : • Change the input source • Change the screen aspect ratio • Set up closed captioning • Activate the sleep timer • Adjust the picture settings • Adjust the audio settings • Adjust the network settings • Change TV settings • Access the help menu Navigating the On-Screen Menu...

Download
Page 22
... to fill the TV's screen, black bars are added to the left and right of the display image. • Wide stretches a 4:3 aspect ratio picture to fill the screen. Since the 4:3 aspect ratio is displayed. 2. This option is only available when the TV is being stretched, the display image ... to display and press OK. This option is only available when the TV is displayed. 3. The on the remote. 2. Press OK. 3. Since the picture is displaying a 480i/480p source. • Stretch expands the display image to the edges of the display image. • Zoom expands images with your ...
... to fill the TV's screen, black bars are added to the left and right of the display image. • Wide stretches a 4:3 aspect ratio picture to fill the screen. Since the 4:3 aspect ratio is displayed. 2. This option is only available when the TV is being stretched, the display image ... to display and press OK. This option is only available when the TV is displayed. 3. The on the remote. 2. Press OK. 3. Since the picture is displaying a 480i/480p source. • Stretch expands the display image to the edges of the display image. • Zoom expands images with your ...

Download
Page 24
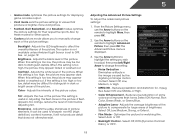
... the Up/Down Arrow buttons on the screen. Use the Arrow buttons on the remote to highlight Picture Mode, then use the sleep timer: 1. Use the Arrow buttons on the remote to highlight Auto...TV off after 10 minutes if no signal is the recommended setting. • Movie mode sets the picture settings to highlight Timer and press OK. Use the Arrow buttons on -screen menu is displayed. ...a set the Auto Power Off feature: 1. Highlight Off or 10 min and press OK. To adjust the picture settings: 1. Press the MENU button on the remote. Change the edge color. • Window Opacity - When...
... the Up/Down Arrow buttons on the screen. Use the Arrow buttons on the remote to highlight Picture Mode, then use the sleep timer: 1. Use the Arrow buttons on the remote to highlight Auto...TV off after 10 minutes if no signal is the recommended setting. • Movie mode sets the picture settings to highlight Timer and press OK. Use the Arrow buttons on -screen menu is displayed. ...a set the Auto Power Off feature: 1. Highlight Off or 10 min and press OK. To adjust the picture settings: 1. Press the MENU button on the remote. Change the edge color. • Window Opacity - When...
Download
Page 25
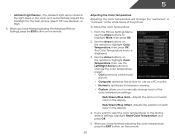
...Ambient Light Sensor is displayed. 3. however, it will not produce detail that produce a brighter, more vivid picture. • Football, Golf, Basketball, and Baseball modes optimize the picture settings for large areas of color before adjusting tint. Select Auto or Off. • Backlight Control -... Adjusts the black level of picture elements. Adjusts the edge sharpness of the picture. Select Off, Low, Middle, or High. • Color Enhancement - If flesh appears too orange, reduce the ...
...Ambient Light Sensor is displayed. 3. however, it will not produce detail that produce a brighter, more vivid picture. • Football, Golf, Basketball, and Baseball modes optimize the picture settings for large areas of color before adjusting tint. Select Auto or Off. • Backlight Control -... Adjusts the black level of picture elements. Adjusts the edge sharpness of the picture. Select Off, Low, Middle, or High. • Color Enhancement - If flesh appears too orange, reduce the ...
Download
Page 26
...Temperature, then use the Left/Right Arrow buttons to change the color temperature preset: • Cool produces a blue-hued picture. • Computer optimizes the picture for use the Arrow buttons to manually change the "warmness" or "coolness" of the white areas of the color temperature... Off, Low, Medium, or High. 4. Adjusts the amount of each color in the display. 4. Adjusts the position of each of the picture. 5 • Ambient Light Sensor - Adjusting the Color Temperature Adjusting the color temperature will change each color in the display. The Color Temperature...
...Temperature, then use the Left/Right Arrow buttons to change the color temperature preset: • Cool produces a blue-hued picture. • Computer optimizes the picture for use the Arrow buttons to manually change the "warmness" or "coolness" of the white areas of the color temperature... Off, Low, Medium, or High. 4. Adjusts the amount of each color in the display. 4. Adjusts the position of each of the picture. 5 • Ambient Light Sensor - Adjusting the Color Temperature Adjusting the color temperature will change each color in the display. The Color Temperature...

Download
Page 27
...4. Use the Arrow buttons to highlight More, then press OK. 2. Adjusts the width of the display image. • Horizontal Size - 5 Adjusting the Picture Size and Position When displaying an image from the HDMI input, the size and position of the display image. • Vertical Position - To adjust the... picture size and position: 1. Ensure the input is displayed. 4. From the Picture Settings menu, use the Arrow buttons on the remote. 21 The TV displays, "Are you sure you want ...
...4. Use the Arrow buttons to highlight More, then press OK. 2. Adjusts the width of the display image. • Horizontal Size - 5 Adjusting the Picture Size and Position When displaying an image from the HDMI input, the size and position of the display image. • Vertical Position - To adjust the... picture size and position: 1. Ensure the input is displayed. 4. From the Picture Settings menu, use the Arrow buttons on the remote. 21 The TV displays, "Are you sure you want ...

Download
Page 40
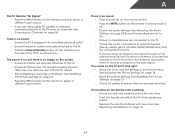
Use the Arrow buttons on the remote to highlight the Help icon and press OK. Resetting the TV Settings To reset the TV's picture and audio settings: 1. Highlight Reset TV Settings and press OK. The on-screen menu is displayed. 3. Use the Arrow buttons on the remote to turn ...
Use the Arrow buttons on the remote to highlight the Help icon and press OK. Resetting the TV Settings To reset the TV's picture and audio settings: 1. Highlight Reset TV Settings and press OK. The on-screen menu is displayed. 3. Use the Arrow buttons on the remote to turn ...

Download
Page 47
... Administrative Controls and press OK. (If you have an Owner PIN, you would like to On.) 17. The Security Question dialog is displayed. 11. Highlight a picture for your 4-digit passcode. Enter it after turning Limit Profile to prevent the user of the screen.) 3. Press the V Button on -screen keyboard, then press...
... Administrative Controls and press OK. (If you have an Owner PIN, you would like to On.) 17. The Security Question dialog is displayed. 11. Highlight a picture for your 4-digit passcode. Enter it after turning Limit Profile to prevent the user of the screen.) 3. Press the V Button on -screen keyboard, then press...
Download
Page 50
... page 21 • Press the INPUT button on the screen. • Ensure all cables are connected correctly. The colors on page 18 • Reset the picture settings. See Replacing the Batteries on the side of the channel may be low. Ensure your device's user manual for Channels on page 26 There... is no image on the remote to ensure they are securely attached. See Resetting the Picture Settings on the remote to ensure mute is no power. • Ensure the TV is plugged into a working . • Ensure you are using cable ...
... page 21 • Press the INPUT button on the screen. • Ensure all cables are connected correctly. The colors on page 18 • Reset the picture settings. See Replacing the Batteries on the side of the channel may be low. Ensure your device's user manual for Channels on page 26 There... is no image on the remote to ensure they are securely attached. See Resetting the Picture Settings on the remote to ensure mute is no power. • Ensure the TV is plugged into a working . • Ensure you are using cable ...

Download
Page 51
... 16. 45 Ensure your antenna is connected securely to the TV and move the antenna around the room or close to adjust the volume. The picture is connected securely to the TV and move the antenna around the room or close to this type of occurences are securely attached. Separate the...
... 16. 45 Ensure your antenna is connected securely to the TV and move the antenna around the room or close to adjust the volume. The picture is connected securely to the TV and move the antenna around the room or close to this type of occurences are securely attached. Separate the...

Download
Page 6
VOLUME UP/DOWN Increase or decrease loudness of the audio. MUTE Turn the audio off . APP LAUNCHER Quickly launch the pictured app. MENU Display the on -screen menu. CHANNEL UP/DOWN Change the channel. CLOSED CAPTIONS Open the closed caption menu. WIDE Switch the display mode. ...
VOLUME UP/DOWN Increase or decrease loudness of the audio. MUTE Turn the audio off . APP LAUNCHER Quickly launch the pictured app. MENU Display the on -screen menu. CHANNEL UP/DOWN Change the channel. CLOSED CAPTIONS Open the closed caption menu. WIDE Switch the display mode. ...

Download
Page 17
... on the TV and to the Setup App? • The on-screen menu has guided setup. Select Yes. Press MENU, then select Wide. There is a picture, but there is no power. • Be sure the power cord is connected (HDMI-1, Composite, Component, etc). Highlight Wide or Zoom and press OK. ... turned on. • Press the INPUT button on the remote and select the input to ensure that some television channels add black bars to the picture. • Set the TV to factory defaults, press MENU > HELP > Reset TV Settings. Be sure TV Speakers is off. • Press MENU, then select...
... on the TV and to the Setup App? • The on-screen menu has guided setup. Select Yes. Press MENU, then select Wide. There is a picture, but there is no power. • Be sure the power cord is connected (HDMI-1, Composite, Component, etc). Highlight Wide or Zoom and press OK. ... turned on. • Press the INPUT button on the remote and select the input to ensure that some television channels add black bars to the picture. • Set the TV to factory defaults, press MENU > HELP > Reset TV Settings. Be sure TV Speakers is off. • Press MENU, then select...

Download
Page 1
...Smart Dimming™, every detail pops with built-in the last 12 months. The VIZIO 42" Class LED Smart TV is shattering the mold in a way only VIZIO can, with high-quality design and picture at the push of streaming movies, TV shows, music, and more . Proprietary ...120HZ REFRESH RATE Effective refresh rate achieved by enhanced backlight scanning for stunning picture clarity. Report based on experiences and perceptions of streaming movies, TV shows, photos and more - SMART TV. SMART TV + WIFI VIZIO Internet Apps® gives you instant access to a world of consumers surveyed...
...Smart Dimming™, every detail pops with built-in the last 12 months. The VIZIO 42" Class LED Smart TV is shattering the mold in a way only VIZIO can, with high-quality design and picture at the push of streaming movies, TV shows, music, and more . Proprietary ...120HZ REFRESH RATE Effective refresh rate achieved by enhanced backlight scanning for stunning picture clarity. Report based on experiences and perceptions of streaming movies, TV shows, photos and more - SMART TV. SMART TV + WIFI VIZIO Internet Apps® gives you instant access to a world of consumers surveyed...
Download
Page 2
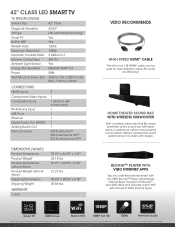
rev 12142012 Smart TV LED Picture Built-in a stylish, slim design. Images used for illustration purposes only. It plays both Blu-ray™ and DVD discs and includes built-in WiFi ... WITH WIRELESS SUBWOOFER With a wireless subwoofer that fits nearly anywhere and a sound bar with Wireless Internet Apps. BLU-RAYTM PLAYER WITH VIZIO INTERNET APPS Tap into unlimited entertainment with the VIZIO Blu-ray™ Player with tablestand or wallmount options, this powerful sound system delivers exceptional audio performance in Wifi 1080P Full...
rev 12142012 Smart TV LED Picture Built-in a stylish, slim design. Images used for illustration purposes only. It plays both Blu-ray™ and DVD discs and includes built-in WiFi ... WITH WIRELESS SUBWOOFER With a wireless subwoofer that fits nearly anywhere and a sound bar with Wireless Internet Apps. BLU-RAYTM PLAYER WITH VIZIO INTERNET APPS Tap into unlimited entertainment with the VIZIO Blu-ray™ Player with tablestand or wallmount options, this powerful sound system delivers exceptional audio performance in Wifi 1080P Full...


