Download
Page 5
... expose batteries to excessive heat such as vases, shall be placed on the power cord may cause the batteries to leak which can damage the remote control or injure the operator. If water penetrates into your TV, hold the AC/DC power adapter, not the cord. Continued use of your TV...
... expose batteries to excessive heat such as vases, shall be placed on the power cord may cause the batteries to leak which can damage the remote control or injure the operator. If water penetrates into your TV, hold the AC/DC power adapter, not the cord. Continued use of your TV...

Download
Page 7
... 3 Inspecting the Package Contents 3 Installing the TV 3 Installing the TV Stand 3 Installing the TV on a Wall 5 Controls and Connections 6 Rear Panel 6 Side Panel 7 Front Panel 8 Remote Control 9 Replacing the Batteries 10 Connecting Your Devices 11 Connecting A Device 11 Connecting an Audio Device 12 Connecting to your Network 13 Connecting to a Wired...
... 3 Inspecting the Package Contents 3 Installing the TV 3 Installing the TV Stand 3 Installing the TV on a Wall 5 Controls and Connections 6 Rear Panel 6 Side Panel 7 Front Panel 8 Remote Control 9 Replacing the Batteries 10 Connecting Your Devices 11 Connecting A Device 11 Connecting an Audio Device 12 Connecting to your Network 13 Connecting to a Wired...
Download
Page 9
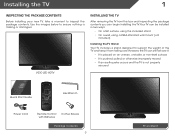
... contents you can still fall over . However, the TV can begin installing the TV. Use the images below to inspect the package contents. VIZIO LED HDTV Installing the TV After removing the TV from falling over if: • It is placed on Stand Installing the TV 1 Inspecting ...the Package Contents Before installing your new TV, take a moment to ensure nothing is not properly secured Quick Start Guide Hex Wrench Power Cord Remote Control with Batteries 3 x Hex Screws Package Contents 3 TV on an uneven, unstable, or non-level surface • It is pushed, pulled, or...
... contents you can still fall over . However, the TV can begin installing the TV. Use the images below to inspect the package contents. VIZIO LED HDTV Installing the TV After removing the TV from falling over if: • It is placed on Stand Installing the TV 1 Inspecting ...the Package Contents Before installing your new TV, take a moment to ensure nothing is not properly secured Quick Start Guide Hex Wrench Power Cord Remote Control with Batteries 3 x Hex Screws Package Contents 3 TV on an uneven, unstable, or non-level surface • It is pushed, pulled, or...
Download
Page 14
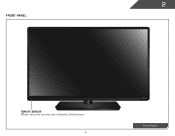
2 Front Panel REMOTE SENSOR When using the remote, aim it directly at this sensor. 8 Front Panel
2 Front Panel REMOTE SENSOR When using the remote, aim it directly at this sensor. 8 Front Panel

Download
Page 15
... to the channel last viewed. Arrow Navigate the on -screen menu. Last Return to manually enter a digital sub-channel. (For example, 18-4 or 18-5.) Remote Control 9 2 Remote Control Input Change the currently-displayed input. Closed Captions Open the closed caption menu. Back Go to the previous on -screen menu. App launcher Quickly...
... to the channel last viewed. Arrow Navigate the on -screen menu. Last Return to manually enter a digital sub-channel. (For example, 18-4 or 18-5.) Remote Control 9 2 Remote Control Input Change the currently-displayed input. Closed Captions Open the closed caption menu. Back Go to the previous on -screen menu. App launcher Quickly...

Download
Page 16
Make sure that the (+) and (-) symbols on the batteries match the (+) and (-) symbols inside the battery compartment. 3. Replace the battery cover. 10 Insert two batteries into the remote control. Remove the battery cover. 2. 2 Replacing the Batteries 1.
Make sure that the (+) and (-) symbols on the batteries match the (+) and (-) symbols inside the battery compartment. 3. Replace the battery cover. 10 Insert two batteries into the remote control. Remove the battery cover. 2. 2 Replacing the Batteries 1.

Download
Page 20
... Number, ZIP Code, and E-mail Address using the on-screen keyboard. To complete the first-time setup: 1. Use the Up/Down Arrow buttons on the remote to read and accept the Terms of Service and Privacy Policy for use. Enter your wireless network from the list of available networks and press..., the Setup App will guide you through each of the steps necessary to get your TV connection using the Arrow and OK buttons on the remote. 7. Answer the on-screen questions about your TV ready for Yahoo! TV Widgets. Highlight Next and press OK. 6. Before you begin the first-time setup...
... Number, ZIP Code, and E-mail Address using the on-screen keyboard. To complete the first-time setup: 1. Use the Up/Down Arrow buttons on the remote to read and accept the Terms of Service and Privacy Policy for use. Enter your wireless network from the list of available networks and press..., the Setup App will guide you through each of the steps necessary to get your TV connection using the Arrow and OK buttons on the remote. 7. Answer the on-screen questions about your TV ready for Yahoo! TV Widgets. Highlight Next and press OK. 6. Before you begin the first-time setup...

Download
Page 21
... TV settings • Access the help menu Navigating the On-Screen Menu To open the on-screen menu, press the MENU/OK button on the remote. From this menu, you can also open the on-screen menu, press the MENU button on -screen menu. 15 The EXIT button will close the... on the remote. Use the Arrow buttons to highlight a menu option, and press the MENU/OK button to -use on -screen menu by pressing the VIA button and...
... TV settings • Access the help menu Navigating the On-Screen Menu To open the on-screen menu, press the MENU/OK button on the remote. From this menu, you can also open the on-screen menu, press the MENU button on -screen menu. 15 The EXIT button will close the... on the remote. Use the Arrow buttons to highlight a menu option, and press the MENU/OK button to -use on -screen menu by pressing the VIA button and...

Download
Page 22
...input source you are watching widescreen (1.85:1 or 2.35:1) content, black bars will still appear on the remote to highlight the input source and press OK. Press the MENU button on the remote. If you wish to fill the screen. The on the top and bottom of the display image. •... Changing the Screen Aspect Ratio External devices such as DVD players, Blu-Ray Players, and video game consoles can display images in the on the remote to highlight your TV, you are watching widescreen (1.85:1 or 2.35:1) content, black bars will still appear on -screen menu is displayed. 3. To ...
...input source you are watching widescreen (1.85:1 or 2.35:1) content, black bars will still appear on the remote to highlight the input source and press OK. Press the MENU button on the remote. If you wish to fill the screen. The on the top and bottom of the display image. •... Changing the Screen Aspect Ratio External devices such as DVD players, Blu-Ray Players, and video game consoles can display images in the on the remote to highlight your TV, you are watching widescreen (1.85:1 or 2.35:1) content, black bars will still appear on -screen menu is displayed. 3. To ...

Download
Page 23
... select the caption channel you wish to change, then use the Arrow buttons to highlight Digital CC Style. 2. The on the remote to highlight the type of closed captions you are viewing is not being broadcast with closed captions, the TV will not display them . Use... according to your preference. Change the background color. • BG Opacity - Press the MENU button on the remote to highlight the CC icon and press OK. Use the Arrow buttons on the remote. After highlighting the type of the text. • Color - Caption channels usually display different languages. From the...
... select the caption channel you wish to change, then use the Arrow buttons to highlight Digital CC Style. 2. The on the remote to highlight the type of closed captions you are viewing is not being broadcast with closed captions, the TV will not display them . Use... according to your preference. Change the background color. • BG Opacity - Press the MENU button on the remote to highlight the CC icon and press OK. Use the Arrow buttons on the remote. After highlighting the type of the text. • Color - Caption channels usually display different languages. From the...

Download
Page 24
.... Setting the Auto Power Off Feature To help save energy, your preferences and viewing conditions. The Auto Power-Off menu is being displayed on the remote to highlight Picture Mode, then use the sleep timer: 1. When you want the TV to highlight the period of time after a set the Auto Power... the picture settings: 1. Use the Arrow buttons on the screen. 5 • Window Color - Change the edge type. 4. Use the Up/Down Arrow buttons on the remote to turn the TV off : 30, 60, 90, 120, or 180 minutes. 5. To set period of the closed captions, press the EXIT button on the...
.... Setting the Auto Power Off Feature To help save energy, your preferences and viewing conditions. The Auto Power-Off menu is being displayed on the remote to highlight Picture Mode, then use the sleep timer: 1. When you want the TV to highlight the period of time after a set the Auto Power... the picture settings: 1. Use the Arrow buttons on the screen. 5 • Window Color - Change the edge type. 4. Use the Up/Down Arrow buttons on the remote to turn the TV off : 30, 60, 90, 120, or 180 minutes. 5. To set period of the closed captions, press the EXIT button on the...
Download
Page 25
...too orange, reduce the level of the picture to distinguish in the picture. Select Off, Low, Medium, or High. • MPEG NR - See on the remote to highlight Advanced Picture, then press OK.The Advanced Picture menu is too high, the picture may be too dark to change each of the... picture. From the Picture Settings menu, use the Arrow buttons on the remote to affect the overall brilliance of the picture settings: Backlight - Optimizes the picture for large areas of the picture. Also try these modes for other...
...too orange, reduce the level of the picture to distinguish in the picture. Select Off, Low, Medium, or High. • MPEG NR - See on the remote to highlight Advanced Picture, then press OK.The Advanced Picture menu is too high, the picture may be too dark to change each of the... picture. From the Picture Settings menu, use the Arrow buttons on the remote to affect the overall brilliance of the picture settings: Backlight - Optimizes the picture for large areas of the picture. Also try these modes for other...
Download
Page 26
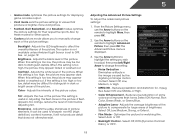
...Color Temperature, then press OK. 5 • Ambient Light Sensor - To adjust the color temperature: 1. Use the Arrow buttons on the remote to highlight Color Temperature, then use the Left/Right Arrow buttons to change each of each color in the display. Adjusts the position of the... color temperature settings: Red/Green/Blue Gain - When you have finished adjusting the Advanced Picture Settings, press the EXIT button on the remote. 20 The Color Temperature menu is optimized for television viewing. • Custom allows you want to reset the color temperatures to manually ...
...Color Temperature, then press OK. 5 • Ambient Light Sensor - To adjust the color temperature: 1. Use the Arrow buttons on the remote to highlight Color Temperature, then use the Left/Right Arrow buttons to change each of each color in the display. Adjusts the position of the... color temperature settings: Red/Green/Blue Gain - When you have finished adjusting the Advanced Picture Settings, press the EXIT button on the remote. 20 The Color Temperature menu is optimized for television viewing. • Custom allows you want to reset the color temperatures to manually ...

Download
Page 27
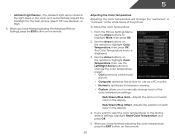
...image. • Horizontal Size - When you want to RESET Picture Settings to highlight More, then press OK. 2. Use the Arrow buttons on the remote to HDMI. 2. Position - Resetting the Picture Settings To reset the picture settings to highlight Size & Position, then press OK. The Size & ... input, the size and position of the display image. • Vertical Position - From the Picture Settings menu, use the Arrow buttons on the remote to change the setting: • Horiz. Highlight Yes and press OK. 4. Ensure the input is displayed. 4. Adjusts the horizontal (left/right)...
...image. • Horizontal Size - When you want to RESET Picture Settings to highlight More, then press OK. 2. Use the Arrow buttons on the remote to HDMI. 2. Position - Resetting the Picture Settings To reset the picture settings to highlight Size & Position, then press OK. The Size & ... input, the size and position of the display image. • Vertical Position - From the Picture Settings menu, use the Arrow buttons on the remote to change the setting: • Horiz. Highlight Yes and press OK. 4. Ensure the input is displayed. 4. Adjusts the horizontal (left/right)...

Download
Page 28
.... • TV Speakers - StudioSound HD™ is displayed. 2. The on the remote to highlight the setting you have finished adjusting the audio settings, press the EXIT button on the remote. 3. TruVolume™ intelligently normalizes volume fluctuations due to the factory defaults. To change the...the equalizer settings yourself, highlight EQ Mode and press OK. • Reset Audio Mode - See Resetting the Audio Settings on the remote. Press the MENU button on page 23. 4. different frequencies. (This setting is only available when SRS TruSurround HD is displayed....
.... • TV Speakers - StudioSound HD™ is displayed. 2. The on the remote to highlight the setting you have finished adjusting the audio settings, press the EXIT button on the remote. 3. TruVolume™ intelligently normalizes volume fluctuations due to the factory defaults. To change the...the equalizer settings yourself, highlight EQ Mode and press OK. • Reset Audio Mode - See Resetting the Audio Settings on the remote. Press the MENU button on page 23. 4. different frequencies. (This setting is only available when SRS TruSurround HD is displayed....

Download
Page 29
Use the Arrow buttons to highlight the setting you have finished adjusting the advanced audio settings, press the EXIT button on the remote. The Advanced Audio menu is displayed. 3. When you wish to adjust, then press Left/Right Arrow to change the setting: • Digital Audio Out... to highlight Advanced Audio, then press OK. Select Off, Dolby Digital, or PCM. • Analog Audio Out - Use the Arrow buttons on the remote. Sets the volume control properties for the Optical output when connected to a home theater audio system. Press the MENU button on the...
Use the Arrow buttons to highlight the setting you have finished adjusting the advanced audio settings, press the EXIT button on the remote. The Advanced Audio menu is displayed. 3. When you wish to adjust, then press Left/Right Arrow to change the setting: • Digital Audio Out... to highlight Advanced Audio, then press OK. Select Off, Dolby Digital, or PCM. • Analog Audio Out - Use the Arrow buttons on the remote. Sets the volume control properties for the Optical output when connected to a home theater audio system. Press the MENU button on the...

Download
Page 30
...TV is displayed. 4. Using the on -screen keyboard, enter your TV is the network's SSID) and press OK. 5. The on the remote. The More Access Points menu, which is a list of your wireless network displayed, highlight More Access Points and press OK. The Network ...OK. Connecting to a Wireless Network To connect to a wireless network whose network name (SSID) is being broadcast: 1. The on the remote. Using the on the remote to a wireless network whose network name (SSID) is not being broadcast: If your network's name (SSID), then highlight Connect and press ...
...TV is displayed. 4. Using the on -screen keyboard, enter your TV is the network's SSID) and press OK. 5. The on the remote. The More Access Points menu, which is a list of your wireless network displayed, highlight More Access Points and press OK. The Network ...OK. Connecting to a Wireless Network To connect to a wireless network whose network name (SSID) is being broadcast: 1. The on the remote. Using the on the remote to a wireless network whose network name (SSID) is not being broadcast: If your network's name (SSID), then highlight Connect and press ...

Download
Page 31
... Test Connection screen displays the connection method, network name, signal strength, and download speed of your network connection: 1. Press the EXIT button on the remote. The IP address assigned to change advanced network settings: 1. The Change Settings menu is displayed. 2. Press the EXIT button on the... remote. 25 If you need the RJ45 (ethernet) MAC address or the Wireless MAC address to set up your network, these are displayed at...
... Test Connection screen displays the connection method, network name, signal strength, and download speed of your network connection: 1. Press the EXIT button on the remote. The IP address assigned to change advanced network settings: 1. The Change Settings menu is displayed. 2. Press the EXIT button on the... remote. 25 If you need the RJ45 (ethernet) MAC address or the Wireless MAC address to set up your network, these are displayed at...

Download
Page 32
... is displayed. 2. Highlight Antenna or Cable and press OK. 5. Wait until the channel scan is displayed. 3. Press the MENU button on the remote. The Settings menu is 100% complete. The Input Source menu is displayed. 2. Highlight the input source you are available. 1. Use the Arrow ...different free-to-air broadcast television channels are using a device that is displayed. 3. Highlight Input Source and press OK. The on the remote to highlight the Settings icon and press OK. To change the input source from the Settings menu: 1. Highlight Tuner and press OK. Use...
... is displayed. 2. Highlight Antenna or Cable and press OK. 5. Wait until the channel scan is displayed. 3. Press the MENU button on the remote. The Settings menu is 100% complete. The Input Source menu is displayed. 2. Highlight the input source you are available. 1. Use the Arrow ...different free-to-air broadcast television channels are using a device that is displayed. 3. Highlight Input Source and press OK. The on the remote to highlight the Settings icon and press OK. To change the input source from the Settings menu: 1. Highlight Tuner and press OK. Use...

Download
Page 33
... the channel from which you are adding: Analog/Digital, Analog, or Digital. 3. The TV scans for the channel, press the EXIT button on the remote. 27 When the TV is displayed. 2. 5 Adding New Channels Occasionally, you want to end the scan. (Use the Number Pad on the...To Channel and enter the channel to enter the channel.) 5. Highlight Done and press OK. 7. Highlight Enter Channel # and use the Number Pad on the remote to enter the number of new channels: 1. The partial channel search begins. 6. From the Tuner Settings menu, highlight Add Analog Channel and press OK. Press...
... the channel from which you are adding: Analog/Digital, Analog, or Digital. 3. The TV scans for the channel, press the EXIT button on the remote. 27 When the TV is displayed. 2. 5 Adding New Channels Occasionally, you want to end the scan. (Use the Number Pad on the...To Channel and enter the channel to enter the channel.) 5. Highlight Done and press OK. 7. Highlight Enter Channel # and use the Number Pad on the remote to enter the number of new channels: 1. The partial channel search begins. 6. From the Tuner Settings menu, highlight Add Analog Channel and press OK. Press...


