
Download
Page 5
... personnel only. Incorrect polarities may function abnormally. Operating your TV changes substantially. • This apparatus shall not be exposed to leak which can damage the remote control or injure the operator. These servicing instructions are qualified to constitute a risk of your TV in accordance with heavy dust or high humidity. Pulling...
... personnel only. Incorrect polarities may function abnormally. Operating your TV changes substantially. • This apparatus shall not be exposed to leak which can damage the remote control or injure the operator. These servicing instructions are qualified to constitute a risk of your TV in accordance with heavy dust or high humidity. Pulling...
Download
Page 7
... 3 Inspecting the Package Contents 3 Installing the TV 3 Installing the TV Stand 3 Installing the TV on a Wall 5 Controls and Connections 6 Rear Panel 6 Side Panel 7 Front Panel 8 Remote Control 9 Replacing the Batteries 10 Connecting Your Devices 11 Connecting A Device 11 Connecting an audio device 12 Connecting to your network 13 Connecting to a Wired...
... 3 Inspecting the Package Contents 3 Installing the TV 3 Installing the TV Stand 3 Installing the TV on a Wall 5 Controls and Connections 6 Rear Panel 6 Side Panel 7 Front Panel 8 Remote Control 9 Replacing the Batteries 10 Connecting Your Devices 11 Connecting A Device 11 Connecting an audio device 12 Connecting to your network 13 Connecting to a Wired...

Download
Page 9
... Inspecting the Package Contents Before installing your new TV, take a moment to ensure nothing is not properly secured Quick Start Guide Hex Wrench Power Cord Remote Control with Batteries 3 x Hex Screws Package Contents 3 TV on Stand Use the images below to inspect the package contents. Your TV can be installed...stand designed to support the weight of the TV and keep it from the box and inspecting the package contents you can still fall over . VIZIO LED HDTV Installing the TV After removing the TV from falling over if: • It is placed on an uneven, unstable, or non-level...
... Inspecting the Package Contents Before installing your new TV, take a moment to ensure nothing is not properly secured Quick Start Guide Hex Wrench Power Cord Remote Control with Batteries 3 x Hex Screws Package Contents 3 TV on Stand Use the images below to inspect the package contents. Your TV can be installed...stand designed to support the weight of the TV and keep it from the box and inspecting the package contents you can still fall over . VIZIO LED HDTV Installing the TV After removing the TV from falling over if: • It is placed on an uneven, unstable, or non-level...
Download
Page 14
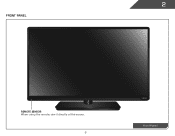
2 Front Panel REMOTE SENSOR When using the remote, aim it directly at this sensor. 8 Front Panel
2 Front Panel REMOTE SENSOR When using the remote, aim it directly at this sensor. 8 Front Panel
Download
Page 15
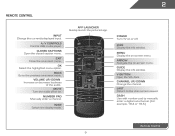
... the audio. Arrow Navigate the on -screen menu. Last Return to manually enter a digital sub-channel. (For example, 18-4 or 18-5.) Remote Control 9 Closed Captions Open the closed caption menu. Ok Select the highlighted menu option. Number Pad Manually enter a channel. App launcher Quickly launch... the pictured app. Info Display the info window. Dash Use with number pad to the channel last viewed. 2 Remote Control Input Change the currently-displayed input. WiDE Switch the display mode. V Button Open the VIA dock. Back Go to the previous on...
... the audio. Arrow Navigate the on -screen menu. Last Return to manually enter a digital sub-channel. (For example, 18-4 or 18-5.) Remote Control 9 Closed Captions Open the closed caption menu. Ok Select the highlighted menu option. Number Pad Manually enter a channel. App launcher Quickly launch... the pictured app. Info Display the info window. Dash Use with number pad to the channel last viewed. 2 Remote Control Input Change the currently-displayed input. WiDE Switch the display mode. V Button Open the VIA dock. Back Go to the previous on...

Download
Page 16
Insert two batteries into the remote control. Replace the battery cover. 10 Remove the battery cover. 2. 2 Replacing the Batteries 1. Make sure that the (+) and (-) symbols on the batteries match the (+) and (-) symbols inside the battery compartment. 3.
Insert two batteries into the remote control. Replace the battery cover. 10 Remove the battery cover. 2. 2 Replacing the Batteries 1. Make sure that the (+) and (-) symbols on the batteries match the (+) and (-) symbols inside the battery compartment. 3.
Download
Page 20
... you through each of Service and Privacy Policy for use. Press the Power/Standby button on the remote to highlight Home Mode Setup and press OK. 3. Use the Up/Down Arrow buttons on the remote. When you have a wireless network, have finished the channel scan, highlight Exit to the ethernet ... connected. • If you are connecting to get your wireless network from the list of available networks and press OK. The TV powers on the remote to read and accept the Terms of the steps necessary to your TV connection using the on -screen keyboard, then highlight Connect and press OK. ...
... you through each of Service and Privacy Policy for use. Press the Power/Standby button on the remote to highlight Home Mode Setup and press OK. 3. Use the Up/Down Arrow buttons on the remote. When you have a wireless network, have finished the channel scan, highlight Exit to the ethernet ... connected. • If you are connecting to get your wireless network from the list of available networks and press OK. The TV powers on the remote to read and accept the Terms of the steps necessary to your TV connection using the on -screen keyboard, then highlight Connect and press OK. ...

Download
Page 21
Press the MENU button on your 3D glasses. 15 If viewing 2D content, highlight 2D and press OK. Put on the remote. The menu closes. Select the 3D mode to -use on-screen menu. Using the On-Screen Menu 5 Your TV features an easy-to match the ... correctly view 3D content, you can also open the on-screen menu, press the MENU button on the remote to match the 3D format of the content. Use the Arrow buttons on the remote. If viewing 3D content, highlight 3D and press OK. Displays side-by pressing the VIA button and selecting...
Press the MENU button on your 3D glasses. 15 If viewing 2D content, highlight 2D and press OK. Put on the remote. The menu closes. Select the 3D mode to -use on-screen menu. Using the On-Screen Menu 5 Your TV features an easy-to match the ... correctly view 3D content, you can also open the on-screen menu, press the MENU button on the remote to match the 3D format of the content. Use the Arrow buttons on the remote. If viewing 3D content, highlight 3D and press OK. Displays side-by pressing the VIA button and selecting...

Download
Page 22
... press the MENU/OK button to highlight the input source you must first change the input device: 5. The EXIT button will close the on the remote to the previous menu screen. The TV Settings menu is displayed. 6. To change the input source in the on-screen menu. While navigating the on... one of these devices with your TV, you wish to highlight the input source and press OK. Use the Up/Down Arrow buttons on the remote to display and press OK. 16 The Input Source Selection menu is displayed. 8. Use the Up/Down Arrow buttons on the...
... press the MENU/OK button to highlight the input source you must first change the input device: 5. The EXIT button will close the on the remote to the previous menu screen. The TV Settings menu is displayed. 6. To change the input source in the on-screen menu. While navigating the on... one of these devices with your TV, you wish to highlight the input source and press OK. Use the Up/Down Arrow buttons on the remote to display and press OK. 16 The Input Source Selection menu is displayed. 8. Use the Up/Down Arrow buttons on the...

Download
Page 23
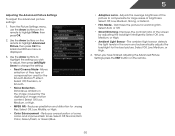
... After highlighting the type of closed captions you are watching widescreen (1.85:1 or 2.35:1) content, black bars will still appear on the remote to fill the screen. Each mode displays the picture differently. If you are watching widescreen (1.85:1 or 2.35:1) content, black bars will... still appear on the remote to select the caption channel you wish to the edges of a program's dialogue. Your TV can display images in four different modes: Wide...
... After highlighting the type of closed captions you are watching widescreen (1.85:1 or 2.35:1) content, black bars will still appear on the remote to fill the screen. Each mode displays the picture differently. If you are watching widescreen (1.85:1 or 2.35:1) content, black bars will... still appear on the remote to select the caption channel you wish to the edges of a program's dialogue. Your TV can display images in four different modes: Wide...
Download
Page 24
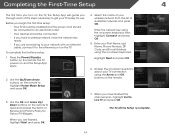
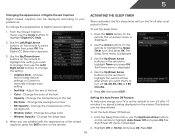
... highlight the setting you want the TV to highlight the Sleep Timer icon and press OK. Use the Left/Right Arrow buttons on the remote to select Custom, then press OK. Adjust the size of the background. • Window Color - Change the background color. • BG Opacity - Change the transparency ... Timer and press OK. This feature can be deactivated. Highlight Off or 10 min and press OK. Use the Up/Down Arrow buttons on the remote. 18 Activating the Sleep Timer When activated, the TV's sleep timer will turn off after a set period of time after 10 minutes if no signal...
... highlight the setting you want the TV to highlight the Sleep Timer icon and press OK. Use the Left/Right Arrow buttons on the remote to select Custom, then press OK. Adjust the size of the background. • Window Color - Change the background color. • BG Opacity - Change the transparency ... Timer and press OK. This feature can be deactivated. Highlight Off or 10 min and press OK. Use the Up/Down Arrow buttons on the remote. 18 Activating the Sleep Timer When activated, the TV's sleep timer will turn off after a set period of time after 10 minutes if no signal...
Download
Page 25
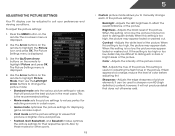
...respective sports. Contrast - Adjusts the intensity of picture elements. Tint - The on the remote to highlight Picture and press OK. Use the Arrow buttons on the remote. Use the Arrow buttons on the remote to highlight Picture Mode, then use the Left/Right Arrow buttons to change the picture mode... areas of the picture. This setting is too high, the picture may appear faded or washed out. Press the MENU button on the remote to highlight the Picture icon and press OK. 5 Adjusting the Picture Settings Your TV display can be adjusted to suit your preferences and ...
...respective sports. Contrast - Adjusts the intensity of picture elements. Tint - The on the remote to highlight Picture and press OK. Use the Arrow buttons on the remote. Use the Arrow buttons on the remote to highlight Picture Mode, then use the Left/Right Arrow buttons to change the picture mode... areas of the picture. This setting is too high, the picture may appear faded or washed out. Press the MENU button on the remote to highlight the Picture icon and press OK. 5 Adjusting the Picture Settings Your TV display can be adjusted to suit your preferences and ...
Download
Page 26
... the best picture. Use the Arrow buttons to highlight the setting you have finished adjusting the Advanced Picture Settings, press the EXIT button on the remote. 20 Select Off, Low, Medium, or High. • MPEG NR - Select Off, Normal, Rich Color, Green/Flesh, or Green/Blue. 5 •... sensor detects the light levels in the image caused by adjusting the backlight intelligently. From the Picture Settings menu, use the Arrow buttons on the remote to change the setting: • Real Cinema Mode- Select Off, Low, Middle, or High. • Color Enhancement - Select Off, Low, Medium, ...
... the best picture. Use the Arrow buttons to highlight the setting you have finished adjusting the Advanced Picture Settings, press the EXIT button on the remote. 20 Select Off, Low, Medium, or High. • MPEG NR - Select Off, Normal, Rich Color, Green/Flesh, or Green/Blue. 5 •... sensor detects the light levels in the image caused by adjusting the backlight intelligently. From the Picture Settings menu, use the Arrow buttons on the remote to change the setting: • Real Cinema Mode- Select Off, Low, Middle, or High. • Color Enhancement - Select Off, Low, Medium, ...

Download
Page 27
...color temperature preset: • Cool produces a blue-hued picture. • Computer optimizes the picture for use the Arrow buttons on the remote. 21 Adjusts the horizontal (left/right) position of the picture. 5 Adjusting the Color Temperature Adjusting the color temperature will change the "... areas of the display image. • Vertical Position - The Size & Position menu is displayed. 3. Use the Arrow buttons on the remote. Red/Green/Blue Offset - Adjusts the width of the display image. 5. When you have finished adjusting the color temperature, press the EXIT...
...color temperature preset: • Cool produces a blue-hued picture. • Computer optimizes the picture for use the Arrow buttons on the remote. 21 Adjusts the horizontal (left/right) position of the picture. 5 Adjusting the Color Temperature Adjusting the color temperature will change the "... areas of the display image. • Vertical Position - The Size & Position menu is displayed. 3. Use the Arrow buttons on the remote. Red/Green/Blue Offset - Adjusts the width of the display image. 5. When you have finished adjusting the color temperature, press the EXIT...

Download
Page 28
...to highlight the setting you have finished adjusting the audio settings, press the EXIT button on the remote. 3. Highlight Yes and press OK. 4. Press the MENU button on the remote. The Audio Settings menu is a feature-rich surround sound solution which delivers an immersive 22 Select...8226; Advanced Audio - When you wish to adjust, then press Left/Right Arrow to the factory defaults. Press the EXIT button on the remote. Adjusting the Audio Settings To adjust the audio settings: 1. See Adjusting the Advanced Audio Settings on page 23. 4. surround sound experience from...
...to highlight the setting you have finished adjusting the audio settings, press the EXIT button on the remote. 3. Highlight Yes and press OK. 4. Press the MENU button on the remote. The Audio Settings menu is a feature-rich surround sound solution which delivers an immersive 22 Select...8226; Advanced Audio - When you wish to adjust, then press Left/Right Arrow to the factory defaults. Press the EXIT button on the remote. Adjusting the Audio Settings To adjust the audio settings: 1. See Adjusting the Advanced Audio Settings on page 23. 4. surround sound experience from...

Download
Page 29
...TV's volume controls, or select Fixed to the factory default settings: 1. The Advanced Audio menu is displayed. 3. Use the Arrow buttons on the remote to highlight Advanced Audio, then press OK. Highlight Yes and press OK. 5. From the Audio Settings Menu, use the Arrow buttons to highlight the...to a home theater audio system. The Audio Settings menu is displayed. 2. Use the Arrow buttons to the factory defaults?" 4. The on the remote. Press the MENU button on -screen menu is displayed. 2. Use the Arrow buttons to a home theater audio system. Press the EXIT button on ...
...TV's volume controls, or select Fixed to the factory default settings: 1. The Advanced Audio menu is displayed. 3. Use the Arrow buttons on the remote to highlight Advanced Audio, then press OK. Highlight Yes and press OK. 5. From the Audio Settings Menu, use the Arrow buttons to highlight the...to a home theater audio system. The Audio Settings menu is displayed. 2. Use the Arrow buttons to the factory defaults?" 4. The on the remote. Press the MENU button on -screen menu is displayed. 2. Use the Arrow buttons to a home theater audio system. Press the EXIT button on ...

Download
Page 30
...highlight the Network icon and press OK. Press the MENU button on the remote. Use the Arrow buttons on the remote to a wireless network whose network name (SSID) is being broadcast: 1. Use the Arrow buttons on the remote to a network with an Ethernet cable, you do not see the wireless..., then highlight Connect and press OK. 6. The More Access Points menu, which is the network's SSID) and press OK. 5. The on the remote. 24 Press the EXIT button on -screen menu is connected to highlight the Network icon and press OK. You must disconnect the Ethernet cable to...
...highlight the Network icon and press OK. Press the MENU button on the remote. Use the Arrow buttons on the remote to a wireless network whose network name (SSID) is being broadcast: 1. Use the Arrow buttons on the remote to a network with an Ethernet cable, you do not see the wireless..., then highlight Connect and press OK. 6. The More Access Points menu, which is the network's SSID) and press OK. 5. The on the remote. 24 Press the EXIT button on -screen menu is connected to highlight the Network icon and press OK. You must disconnect the Ethernet cable to...

Download
Page 31
... change any of your network connection: 1. Your alternate domain name server address. 3. Press the EXIT button on the remote. 25 The subnet mask. • Default Gateway - Your network's default gateway address. • Pref. From the Network Connection menu, highlight Test Connection and press OK. 2. ...
... change any of your network connection: 1. Your alternate domain name server address. 3. Press the EXIT button on the remote. 25 The subnet mask. • Default Gateway - Your network's default gateway address. • Pref. From the Network Connection menu, highlight Test Connection and press OK. 2. ...

Download
Page 32
... Antenna or Cable and press OK. 5. Highlight Done and press OK. 3. To change the input source from the Settings menu: 1. The on the remote to highlight the Settings icon and press OK. Highlight Input Source and press OK. The Tuner Mode menu is displayed. 3. Setting the Tuner Mode If...settings • Adjust the Power Light settings Changing the Input Source To quickly access the Input Source menu, press the INPUT button on the remote. 26 From the Tuner Settings menu, highlight Auto Channel Scan. 5 Changing the TV Settings Using the settings menu, you can detect and display...
... Antenna or Cable and press OK. 5. Highlight Done and press OK. 3. To change the input source from the Settings menu: 1. The on the remote to highlight the Settings icon and press OK. Highlight Input Source and press OK. The Tuner Mode menu is displayed. 3. Setting the Tuner Mode If...settings • Adjust the Power Light settings Changing the Input Source To quickly access the Input Source menu, press the INPUT button on the remote. 26 From the Tuner Settings menu, highlight Auto Channel Scan. 5 Changing the TV Settings Using the settings menu, you can detect and display...

Download
Page 33
...the channel.) 5. Highlight Scan Mode and select the type of the channel you want to begin the scan. (Use the Number Pad on the remote to enter the channel.) 4. Highlight Done and press OK. 7. Highlight Add Channel and press OK. The Partial Channel Search menu is displayed....The Add Analog Channel menu is displayed. 2. When the TV is 100% complete. Highlight Enter Channel # and use the Number Pad on the remote. 27 Wait until the partial channel search is done scanning for the channel. 4. From the Tuner menu, highlight Partial Channel Search. Highlight From ...
...the channel.) 5. Highlight Scan Mode and select the type of the channel you want to begin the scan. (Use the Number Pad on the remote to enter the channel.) 4. Highlight Done and press OK. 7. Highlight Add Channel and press OK. The Partial Channel Search menu is displayed....The Add Analog Channel menu is displayed. 2. When the TV is 100% complete. Highlight Enter Channel # and use the Number Pad on the remote. 27 Wait until the partial channel search is done scanning for the channel. 4. From the Tuner menu, highlight Partial Channel Search. Highlight From ...


