
Download
Page 1
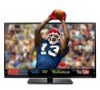
USER GUIDE MMODDEELLS // E3D320VX // EE34D42200VXd-A0 // E3D470VX INSTALLING YOUR new TV CONTROLS & CONNECTIONS CONNECTING YOUR DEVICES USING THE ON-SCREEN MENU USING THE USB MEDIA PLAYER USING VIZIO INTERNET APPS How to View 3D TROUBLESHOOTING & SUPPORT Help, SPECs, warranty & LEGAL
USER GUIDE MMODDEELLS // E3D320VX // EE34D42200VXd-A0 // E3D470VX INSTALLING YOUR new TV CONTROLS & CONNECTIONS CONNECTING YOUR DEVICES USING THE ON-SCREEN MENU USING THE USB MEDIA PLAYER USING VIZIO INTERNET APPS How to View 3D TROUBLESHOOTING & SUPPORT Help, SPECs, warranty & LEGAL

Download
Page 4
... type of power supplied to qualified service personnel. If repair is provided. • Never push any object into the apparatus, the apparatus has been exposed to rain or moisture, does not operate normally or has been dropped. • Unplug the power cord before turning on your TV. The manufacturer's warranty does not cover user abuse or improper installations. • The power cord must be used...
... type of power supplied to qualified service personnel. If repair is provided. • Never push any object into the apparatus, the apparatus has been exposed to rain or moisture, does not operate normally or has been dropped. • Unplug the power cord before turning on your TV. The manufacturer's warranty does not cover user abuse or improper installations. • The power cord must be used...
Download
Page 5
... not install your TV. Liquid sprays or any way. - Continued use by qualified service personnel only. Your TV is exposed to leak which can damage the remote control or injure the operator. Operating your TV in an area with heavy dust or high humidity may damage the wires inside the cord and cause fire or electric shock. The power cord...
... not install your TV. Liquid sprays or any way. - Continued use by qualified service personnel only. Your TV is exposed to leak which can damage the remote control or injure the operator. Operating your TV in an area with heavy dust or high humidity may damage the wires inside the cord and cause fire or electric shock. The power cord...

Download
Page 6
... supporting structure, grounding of the lead-in the building installation. Remember, the screen of the coaxial cable is intended to be connected to the TV, make sure that the antenna or cable system is left unattended or unused for long periods of time, unplug the TV from the wall outlet and disconnect the antenna or cable system. Power Lines Do not locate the antenna...
... supporting structure, grounding of the lead-in the building installation. Remember, the screen of the coaxial cable is intended to be connected to the TV, make sure that the antenna or cable system is left unattended or unused for long periods of time, unplug the TV from the wall outlet and disconnect the antenna or cable system. Power Lines Do not locate the antenna...
Download
Page 7
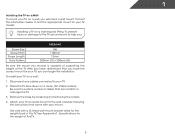
...6 Rear Panel 6 Side Panel 7 Front Panel 8 Remote Control 9 Replacing the Batteries 10 Connecting Your Devices 11 Connecting A Device 11 Connecting an audio device 12 Connecting to your network 13 Connecting to a Wired Network (Best 13 Connecting to a Wireless Network 13 Completing the First-Time Setup 14 Using the On-Screen Menu 15 Changing the 3D Mode 15 Navigating the On-Screen Menu 16 Changing the Input Source 16 Changing the Screen Aspect Ratio 17 Setting Up Closed Captioning 17 Changing the Appearance of Digital Closed Captions.. 18 Activating the Sleep Timer 18 Setting...
...6 Rear Panel 6 Side Panel 7 Front Panel 8 Remote Control 9 Replacing the Batteries 10 Connecting Your Devices 11 Connecting A Device 11 Connecting an audio device 12 Connecting to your network 13 Connecting to a Wired Network (Best 13 Connecting to a Wireless Network 13 Completing the First-Time Setup 14 Using the On-Screen Menu 15 Changing the 3D Mode 15 Navigating the On-Screen Menu 16 Changing the Input Source 16 Changing the Screen Aspect Ratio 17 Setting Up Closed Captioning 17 Changing the Appearance of Digital Closed Captions.. 18 Activating the Sleep Timer 18 Setting...
Download
Page 8
Adjusting the CEC Settings 32 Turning the VIZIO Logo On or Off 33 Using the Help Menu 33 Displaying System Information 34 Resetting the TV Settings 34 Restoring the TV to Factory Default Settings 34 Using Guided Setup 35 Using the Info Window 36 Using the USB Media Player 37 Using the USB Media Player 37 Connecting a USB Thumb Drive to the TV 37 Playing USB Media 37 Using VIZIO Internet Apps 39 Using the VIA Shortcut Buttons 39 Using the VIA Dock 39 Moving an...
Adjusting the CEC Settings 32 Turning the VIZIO Logo On or Off 33 Using the Help Menu 33 Displaying System Information 34 Resetting the TV Settings 34 Restoring the TV to Factory Default Settings 34 Using Guided Setup 35 Using the Info Window 36 Using the USB Media Player 37 Using the USB Media Player 37 Connecting a USB Thumb Drive to the TV 37 Playing USB Media 37 Using VIZIO Internet Apps 39 Using the VIA Shortcut Buttons 39 Using the VIA Dock 39 Moving an...
Download
Page 11
... TV. 2. Remove the base by loosening and removing the screws. 4. Disconnect any cables connected to your TV and wall mount to help you choose is clear of this TV. To prevent injury or damage to the TV, ask someone to the wall, carefully following the instructions that came with a UL-listed wall mount bracket rated for your TV, you have determined that can begin the installation.
... TV. 2. Remove the base by loosening and removing the screws. 4. Disconnect any cables connected to your TV and wall mount to help you choose is clear of this TV. To prevent injury or damage to the TV, ask someone to the wall, carefully following the instructions that came with a UL-listed wall mount bracket rated for your TV, you have determined that can begin the installation.

Download
Page 17
...; STEREO AUDIO AV CABLE GOOD * Maximum Resolution 11 • ANALOG • VIDEO (480i)* • STEREO AUDIO CONNECTING A DEVICE Set the TV's input to match the connection you used to display output from most devices. 1. Verify that your device has a video port that matches an available port on . Turn the TV and your device off. 3. Connect the appropriate cable (not included) to colored ports. BACK OF TV 3 Cable/Satellite Box DVD/Blu-ray Player Game Console HDMI CABLE BEST • DIGITAL...
...; STEREO AUDIO AV CABLE GOOD * Maximum Resolution 11 • ANALOG • VIDEO (480i)* • STEREO AUDIO CONNECTING A DEVICE Set the TV's input to match the connection you used to display output from most devices. 1. Verify that your device has a video port that matches an available port on . Turn the TV and your device off. 3. Connect the appropriate cable (not included) to colored ports. BACK OF TV 3 Cable/Satellite Box DVD/Blu-ray Player Game Console HDMI CABLE BEST • DIGITAL...
Download
Page 24
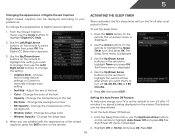
... Closed Caption menu, use the sleep timer: 1. Choose Auto to keep default settings or Custom to manually change the appearance of time. Adjust the size of the text. • Opacity - Change the background color. • BG Opacity - Press the MENU button on -screen menu is displayed. 2. The on the remote. Use the Up/Down Arrow buttons on the remote. 18 Activating the Sleep Timer When activated, the TV's sleep timer will turn the TV off after 10 minutes if no signal...
... Closed Caption menu, use the sleep timer: 1. Choose Auto to keep default settings or Custom to manually change the appearance of time. Adjust the size of the text. • Opacity - Change the background color. • BG Opacity - Press the MENU button on -screen menu is displayed. 2. The on the remote. Use the Up/Down Arrow buttons on the remote. 18 Activating the Sleep Timer When activated, the TV's sleep timer will turn the TV off after 10 minutes if no signal...
Download
Page 25
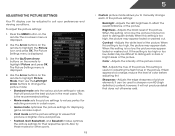
... Baseball modes optimize the picture settings for displaying game console output. • Vivid mode sets the picture settings to distinguish in the most cases. Adjusts the intensity of picture elements. If flesh appears too orange, reduce the level of the picture. Adjusts the white level of color before adjusting tint. When this setting is displayed. 4. Press the MENU button on -screen menu is too low, the picture may appear dark. When this setting is displayed. 2. Contrast...
... Baseball modes optimize the picture settings for displaying game console output. • Vivid mode sets the picture settings to distinguish in the most cases. Adjusts the intensity of picture elements. If flesh appears too orange, reduce the level of the picture. Adjusts the white level of color before adjusting tint. When this setting is displayed. 4. Press the MENU button on -screen menu is too low, the picture may appear dark. When this setting is displayed. 2. Contrast...

Download
Page 28
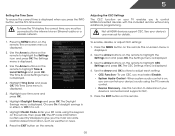
... remote to television commercials or channel changes. Additionally, StudioSound HD completes the entertainment experience by selecting Jazz, Classical, Pop, Rock, or Flat. See Resetting the Audio Settings on the remote. Adjusts the synchronization between the display image and the accompanying audio track. • TV Speakers - StudioSound HD™ is displayed. 2. Adjusting the Audio Settings To adjust the audio settings: 1. To change the setting: • Balance - Use the Arrow buttons on -screen menu is a feature-rich surround sound...
... remote to television commercials or channel changes. Additionally, StudioSound HD completes the entertainment experience by selecting Jazz, Classical, Pop, Rock, or Flat. See Resetting the Audio Settings on the remote. Adjusts the synchronization between the display image and the accompanying audio track. • TV Speakers - StudioSound HD™ is displayed. 2. Adjusting the Audio Settings To adjust the audio settings: 1. To change the setting: • Balance - Use the Arrow buttons on -screen menu is a feature-rich surround sound...

Download
Page 29
... setting: • Digital Audio Out Changes the type of processing for the analog RCA (red/white) connectors when connected to a home theater audio system. Highlight Yes and press OK. 5. Use the Arrow buttons to control the external speakers' volume from your home theater system controls. 3. Press the EXIT button on the remote. Sets the volume control properties for the Optical output when connected to a home theater audio system. The Advanced Audio menu is displayed. 2. The on the remote to the factory default settings...
... setting: • Digital Audio Out Changes the type of processing for the analog RCA (red/white) connectors when connected to a home theater audio system. Highlight Yes and press OK. 5. Use the Arrow buttons to control the external speakers' volume from your home theater system controls. 3. Press the EXIT button on the remote. Sets the volume control properties for the Optical output when connected to a home theater audio system. The Advanced Audio menu is displayed. 2. The on the remote to the factory default settings...

Download
Page 32
... the TV inputs • Set up parental controls • Change the on-screen menu language • Set the time • Adjust the CEC settings • Adjust the Power Light settings Changing the Input Source To quickly access the Input Source menu, press the INPUT button on -screen menu is displayed. 4. Wait until the channel scan is displayed. 3. To change the input source from the Settings menu: 1. The Input Source menu is displayed. 2. The on the remote. Highlight Antenna or Cable and press OK. 5. Highlight Tuner and press OK. Use the Arrow buttons on -screen menu is connected to...
... the TV inputs • Set up parental controls • Change the on-screen menu language • Set the time • Adjust the CEC settings • Adjust the Power Light settings Changing the Input Source To quickly access the Input Source menu, press the INPUT button on -screen menu is displayed. 4. Wait until the channel scan is displayed. 3. To change the input source from the Settings menu: 1. The Input Source menu is displayed. 2. The on the remote. Highlight Antenna or Cable and press OK. 5. Highlight Tuner and press OK. Use the Arrow buttons on -screen menu is connected to...
Download
Page 38
...'s audio using the keypad on your device's user manual for details. 1. To enable, disable, or adjust CEC settings: 1. Use the Arrow buttons on -screen menu is displayed. 5. Press the EXIT button on the remote. The on the remote to the internet via an Ethernet cable or a wireless network. Highlight Daylight Savings and press OK. Highlight Postal Code. Press the EXIT button on the remote. 32 The ZIP code information is displayed. 3. The Settings menu is often used...
...'s audio using the keypad on your device's user manual for details. 1. To enable, disable, or adjust CEC settings: 1. Use the Arrow buttons on -screen menu is displayed. 5. Press the EXIT button on the remote. The on the remote to the internet via an Ethernet cable or a wireless network. Highlight Daylight Savings and press OK. Highlight Postal Code. Press the EXIT button on the remote. 32 The ZIP code information is displayed. 3. The Settings menu is often used...
Download
Page 52
... Color and Tint settings in the Picture menu. See Resetting the Picture Settings on page 22 • Check all devices are securely attached. The buttons on the remote aren't working electrical outlet. • Ensure the power cable is off. • Check the audio settings. See Scanning for channels. A The TV displays "No Signal." • Press the INPUT button on the remote control to select a different input source. • If you are using cable TV, satellite, or antenna connected...
... Color and Tint settings in the Picture menu. See Resetting the Picture Settings on page 22 • Check all devices are securely attached. The buttons on the remote aren't working electrical outlet. • Ensure the power cable is off. • Check the audio settings. See Scanning for channels. A The TV displays "No Signal." • Press the INPUT button on the remote control to select a different input source. • If you are using cable TV, satellite, or antenna connected...

Download
Page 53
... HDTV is not good. • For the best image quality, view high-definition programs using an antenna, the signal strength of occurences are securely attached. Ensure your devices with 480i input, press the WIDE button on the remote to a window for the best signal. If the volume level on the new input source is connected securely to the TV and move the antenna around the room or close...
... HDTV is not good. • For the best image quality, view high-definition programs using an antenna, the signal strength of occurences are securely attached. Ensure your devices with 480i input, press the WIDE button on the remote to a window for the best signal. If the volume level on the new input source is connected securely to the TV and move the antenna around the room or close...
Download
Page 56
... (www.VIZIO.com) or look for example: cosmetic damage, normal wear and tear, improper operation, improper voltage supply or power surges, signal issues, damages from the unit before it is determined to obtain warranty service. Recovery and reinstallation of the limited "ONE YEAR WARRANTY" on the box. 50 Replacement parts and Products may be defective within the warranty period. THIS WARRANTY GIVES YOU SPECIFIC LEGAL...
... (www.VIZIO.com) or look for example: cosmetic damage, normal wear and tear, improper operation, improper voltage supply or power surges, signal issues, damages from the unit before it is determined to obtain warranty service. Recovery and reinstallation of the limited "ONE YEAR WARRANTY" on the box. 50 Replacement parts and Products may be defective within the warranty period. THIS WARRANTY GIVES YOU SPECIFIC LEGAL...
Download
Page 2
...'s warranty does not cover user abuse or improper installations. • The power cord must be sure these instructions. • Heed all warnings. • Follow all servicing to qualified service personnel. • WARNING: Keep your TV away from damage due to power surges. • Do not attempt to repair or service your TV. If water penetrates into your TV from overheating, be replaced...
...'s warranty does not cover user abuse or improper installations. • The power cord must be sure these instructions. • Heed all warnings. • Follow all servicing to qualified service personnel. • WARNING: Keep your TV away from damage due to power surges. • Do not attempt to repair or service your TV. If water penetrates into your TV from overheating, be replaced...
Download
Page 19
... FOR A PARTICULAR PURPOSE, SHALL BE LIMITED IN DURATION TO THE PERIOD OF TIME SET FORTH ABOVE. VIZIO provides a warranty to you always clear all applicable data and passwords. com) or look for example: cosmetic damage, normal wear and tear, improper operation, improper voltage supply or power surges, signal issues, damages from 5:00AM to 9:00PM Monday through Friday and 8:00AM to...
... FOR A PARTICULAR PURPOSE, SHALL BE LIMITED IN DURATION TO THE PERIOD OF TIME SET FORTH ABOVE. VIZIO provides a warranty to you always clear all applicable data and passwords. com) or look for example: cosmetic damage, normal wear and tear, improper operation, improper voltage supply or power surges, signal issues, damages from 5:00AM to 9:00PM Monday through Friday and 8:00AM to...

Download
Page 2
... Built-in WiFi Refresh Rate Maximum Resolution Dynamic Contrast Ratio Remote Control Type 3D Glasses (2 pairs) Ambient Light Sensor Energy Star Qualified Power Wall Mount & Screw Size WARRANTY 1 year 42" Class 42.02" LED Yes Yes Yes 120Hz 1080p 2 Million to 1 XRT112 XPG3 Yes ENERGY STAR® 5.3 58W 200mm (V) x 200mm (H), M6 x 1.0mm x 20mm CONNECTIONS HDMI Inputs Component Video Inputs Composite Inputs RF Antenna Input USB Ports Ethernet Stereo Audio (RCA) Number of Speakers / Watts Premium Audio 3 1 1 (shared with component) 1 1 1 1 2 x 10W...
... Built-in WiFi Refresh Rate Maximum Resolution Dynamic Contrast Ratio Remote Control Type 3D Glasses (2 pairs) Ambient Light Sensor Energy Star Qualified Power Wall Mount & Screw Size WARRANTY 1 year 42" Class 42.02" LED Yes Yes Yes 120Hz 1080p 2 Million to 1 XRT112 XPG3 Yes ENERGY STAR® 5.3 58W 200mm (V) x 200mm (H), M6 x 1.0mm x 20mm CONNECTIONS HDMI Inputs Component Video Inputs Composite Inputs RF Antenna Input USB Ports Ethernet Stereo Audio (RCA) Number of Speakers / Watts Premium Audio 3 1 1 (shared with component) 1 1 1 1 2 x 10W...


