E3D470VX Quick Start Guide
Page 2
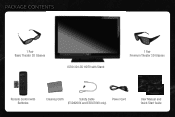
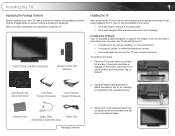
PACKAGE CONTENTS 1 Pair Basic Theater 3D Glasses VIZIO 3D LCD HDTV with Stand 1 Pair Premium Theater 3D Glasses 1 Remote Control with Batteries Cleaning Cloth Safety Cable Power Cord (E3D420VX and E3D470VX only) User Manual and Quick Start Guide
PACKAGE CONTENTS 1 Pair Basic Theater 3D Glasses VIZIO 3D LCD HDTV with Stand 1 Pair Premium Theater 3D Glasses 1 Remote Control with Batteries Cleaning Cloth Safety Cable Power Cord (E3D420VX and E3D470VX only) User Manual and Quick Start Guide
E3D470VX Quick Start Guide
Page 3
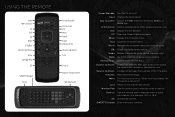
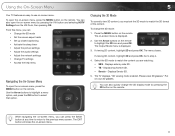
... channels only). Channel Up/Down: Change the channel. Mute: Turn the sound off or on -screen menu and episode guide. USING THE REMOTE Input App Launcher CC Exit OK Back V Button Volume Up/Down Mute Number Pad 3D QWERTY Keypad Arrow Power/Standby A/V Controls Info Menu Arrow... A/V Controls: Control external device (CEC-enabled devices only). Menu: Display the on -screen menu. Input: Change the input device. VIA Shortcuts: Control VIZIO Internet Apps. When mute is activated, the TV's audio is turned off . Exit: Close the on -screen menu. Volume Up/Down: Increase or ...
... channels only). Channel Up/Down: Change the channel. Mute: Turn the sound off or on -screen menu and episode guide. USING THE REMOTE Input App Launcher CC Exit OK Back V Button Volume Up/Down Mute Number Pad 3D QWERTY Keypad Arrow Power/Standby A/V Controls Info Menu Arrow... A/V Controls: Control external device (CEC-enabled devices only). Menu: Display the on -screen menu. Input: Change the input device. VIA Shortcuts: Control VIZIO Internet Apps. When mute is activated, the TV's audio is turned off . Exit: Close the on -screen menu. Volume Up/Down: Increase or ...

E3D470VX Quick Start Guide
Page 6
symbols on the batteries must correspond to the back of the TV. FIRST-TIME SETUP 1 2 Remove the battery cover by gently sliding it back into an electrical outlet. Connect the power cord to the + and - Plug the power cord into place. symbols inside the battery compartment. The + and - Replace the battery cover by pressing gently and sliding away from the remote. Insert the batteries.
symbols on the batteries must correspond to the back of the TV. FIRST-TIME SETUP 1 2 Remove the battery cover by gently sliding it back into an electrical outlet. Connect the power cord to the + and - Plug the power cord into place. symbols inside the battery compartment. The + and - Replace the battery cover by pressing gently and sliding away from the remote. Insert the batteries.

E3D470VX Quick Start Guide
Page 7
If you have a high-speed internet connection and would like to connect the TV with an RF/Coaxial cable. 3 4 If you have an external antenna or a cable connection that extends from a wall outlet, connect it to the TV with an ethernet cable, connect it to the back of the TV as shown. Use the Arrow buttons on the remote. The Setup App is displayed. Turn the TV on by pressing the Power/Standby button on the remote to highlight Home Mode Setup and press OK.
If you have a high-speed internet connection and would like to connect the TV with an RF/Coaxial cable. 3 4 If you have an external antenna or a cable connection that extends from a wall outlet, connect it to the TV with an ethernet cable, connect it to the back of the TV as shown. Use the Arrow buttons on the remote. The Setup App is displayed. Turn the TV on by pressing the Power/Standby button on the remote to highlight Home Mode Setup and press OK.

E3D470VX Quick Start Guide
Page 8
5 6 Use the OK and Arrow Up/Down buttons on the remote to your network key using the on-screen keyboard, then highlight Connect and press OK. TV Widgets. When you will not see this screen. Select the name of your wireless network from the list of Service and Privacy Policy for Yahoo! If the TV is connected to read and accept the Terms of available networks and press OK. Enter your network with an ethernet cable, you are finished, highlight Next and press OK.
5 6 Use the OK and Arrow Up/Down buttons on the remote to your network key using the on-screen keyboard, then highlight Connect and press OK. TV Widgets. When you will not see this screen. Select the name of your wireless network from the list of Service and Privacy Policy for Yahoo! If the TV is connected to read and accept the Terms of available networks and press OK. Enter your network with an ethernet cable, you are finished, highlight Next and press OK.
E3D470VX Quick Start Guide
Page 9
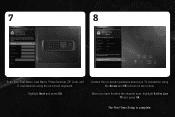
The First-Time Setup is complete. 7 8 Enter your TV connection using the on the remote. Answer the on-screen questions about your First Name, Last Name, Phone Number, ZIP Code, and E-mail Address using the Arrow and OK buttons on -screen keyboard. Highlight Next and press OK. When you have finished the channel scan, highlight Exit to Live TV and press OK.
The First-Time Setup is complete. 7 8 Enter your TV connection using the on the remote. Answer the on-screen questions about your First Name, Last Name, Phone Number, ZIP Code, and E-mail Address using the Arrow and OK buttons on -screen keyboard. Highlight Next and press OK. When you have finished the channel scan, highlight Exit to Live TV and press OK.
E3D470VX Quick Start Guide
Page 14
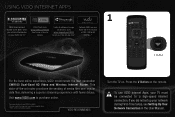
... 1080p HD RENTAL.** 1 V Button For the best online experience, VIZIO recommends the next-generation XWR100 Dual-Band HD Video and Wireless Internet Router. VIZIO RECOMMENDS Turn the TV on the remote. Press the V Button on . USING VIZIO INTERNET APPS FREE Entertainment Bundle worth $25+ when you did not... set up your VIZIO VIA TV.† FREE Trial! If you activate Blockbuster...
... 1080p HD RENTAL.** 1 V Button For the best online experience, VIZIO recommends the next-generation XWR100 Dual-Band HD Video and Wireless Internet Router. VIZIO RECOMMENDS Turn the TV on the remote. Press the V Button on . USING VIZIO INTERNET APPS FREE Entertainment Bundle worth $25+ when you did not... set up your VIZIO VIA TV.† FREE Trial! If you activate Blockbuster...

E3D470VX Quick Start Guide
Page 15
Change Screen Size (when VIA Sidebar is in the lower left corner of the screen. 2 3 View Settings for Active App Exit App/Exit VIA Dock Highlighted App To start an App, use the Arrow, OK, and VIA Shortcut buttons on the remote to highlight an App from the App Bar and press OK. The highlighted App is open) Move/Delete App from VIA Dock Once you have started an App, use the Left/Right Arrow buttons to control the App.
Change Screen Size (when VIA Sidebar is in the lower left corner of the screen. 2 3 View Settings for Active App Exit App/Exit VIA Dock Highlighted App To start an App, use the Arrow, OK, and VIA Shortcut buttons on the remote to highlight an App from the App Bar and press OK. The highlighted App is open) Move/Delete App from VIA Dock Once you have started an App, use the Left/Right Arrow buttons to control the App.

E3D470VX Quick Start Guide
Page 18
...TV Speakers is securely connected to the AC socket on the TV and a working electrical outlet. • Press the Power/Standby button on the remote or on warranty service or repair, after the warranty period, please contact our Support Department at the number below. Sunday: 8 am to 9 pm... (PST) Saturday - Phone: (877) 698-4946 Fax: (949) 585-9563 Email: techsupport@vizio.com Web: www.vizio.com Hours of VIZIO's commitment to service excellence. HELP TOPICS Products are often returned due to a technical problem rather than a defective product that may be low...
...TV Speakers is securely connected to the AC socket on the TV and a working electrical outlet. • Press the Power/Standby button on the remote or on warranty service or repair, after the warranty period, please contact our Support Department at the number below. Sunday: 8 am to 9 pm... (PST) Saturday - Phone: (877) 698-4946 Fax: (949) 585-9563 Email: techsupport@vizio.com Web: www.vizio.com Hours of VIZIO's commitment to service excellence. HELP TOPICS Products are often returned due to a technical problem rather than a defective product that may be low...
E3D470VX Quick Start Guide
Page 19
... The TV displays "No Signal" • Ensure your connected devices are using the RGB (computer) input, ensure you have a 3D Blu-ray™ player, VIZIO Theater 3D glasses, and a Blu-ray 3D™ disc. • Turn your 3D HDTV and 3D Blu-ray player off. There are securely attached. See... Adjusting the Picture Settings in the user manual. • Check all cables to ensure they are black/gray bars on the remote and select the input to which your device is 0000). I cannot view 3D content. • Ensure you are turned on. • Press the ...
... The TV displays "No Signal" • Ensure your connected devices are using the RGB (computer) input, ensure you have a 3D Blu-ray™ player, VIZIO Theater 3D glasses, and a Blu-ray 3D™ disc. • Turn your 3D HDTV and 3D Blu-ray player off. There are securely attached. See... Adjusting the Picture Settings in the user manual. • Check all cables to ensure they are black/gray bars on the remote and select the input to which your device is 0000). I cannot view 3D content. • Ensure you are turned on. • Press the ...
E3D420VX User Manual
Page 5
...or any other than the specified voltage may function abnormally. Do not try to repair your TV to rain or other hazards. E3D320VX / E3D420VX / E3D470VX • Do not overload power strips and extension cords. Overloading can result in any abnormality occurs. Opening or removing the back cover may damage ... shock. • Do not install your TV in fire or electric shock. • Do not use of the marked voltage can damage the remote control or injure the operator. Ensure that the power cord and any object drops into your TV, unplug the power cord and contact your dealer...
...or any other than the specified voltage may function abnormally. Do not try to repair your TV to rain or other hazards. E3D320VX / E3D420VX / E3D470VX • Do not overload power strips and extension cords. Overloading can result in any abnormality occurs. Opening or removing the back cover may damage ... shock. • Do not install your TV in fire or electric shock. • Do not use of the marked voltage can damage the remote control or injure the operator. Ensure that the power cord and any object drops into your TV, unplug the power cord and contact your dealer...
E3D420VX User Manual
Page 8
... Your TV for 3D Viewing 3 Incorrect 3D Viewing Distance and Angle 3 Correct 3D Viewing Distance and Angle 3 Controls and Connections 4 Rear Panel 4 Left Side Panel 4 Remote Control 5 VIA Shortcut Buttons 6 Replacing the Batteries 6 Front Panel 6 Connecting Your Devices 7 Before You Begin 7 Connecting Your Devices 7 Setting Up Your Network Connection 9 Connecting to... the Names of the Inputs 26 Changing the On-Screen Menu Language 26 Setting the Time Zone 27 Adjusting the CEC Settings 27 Turning the VIZIO Logo On or Off 28
... Your TV for 3D Viewing 3 Incorrect 3D Viewing Distance and Angle 3 Correct 3D Viewing Distance and Angle 3 Controls and Connections 4 Rear Panel 4 Left Side Panel 4 Remote Control 5 VIA Shortcut Buttons 6 Replacing the Batteries 6 Front Panel 6 Connecting Your Devices 7 Before You Begin 7 Connecting Your Devices 7 Setting Up Your Network Connection 9 Connecting to... the Names of the Inputs 26 Changing the On-Screen Menu Language 26 Setting the Time Zone 27 Adjusting the CEC Settings 27 Turning the VIZIO Logo On or Off 28
E3D420VX User Manual
Page 9
E3D320VX / E3D420VX / E3D470VX Using the Help Menu 28 Displaying System Information 28 Resetting the TV Settings 28 Restoring the TV to ...Media Player 31 Using the USB Media Player 31 Connecting a USB Thumb Drive to the TV 31 Playing USB Media 31 Using VIZIO Internet Apps 34 Using the VIA Shortcut Buttons 34 Using the VIA Dock 34 Moving an App on the VIA Dock 34 ...on the screen 40 There is no sound 40 The colors on the TV don't look right 40 The buttons on the remote aren't working 40 The image quality is not good 40 The picture is distorted 41 The display image does not cover the...
E3D320VX / E3D420VX / E3D470VX Using the Help Menu 28 Displaying System Information 28 Resetting the TV Settings 28 Restoring the TV to ...Media Player 31 Using the USB Media Player 31 Connecting a USB Thumb Drive to the TV 31 Playing USB Media 31 Using VIZIO Internet Apps 34 Using the VIA Shortcut Buttons 34 Using the VIA Dock 34 Moving an App on the VIA Dock 34 ...on the screen 40 There is no sound 40 The colors on the TV don't look right 40 The buttons on the remote aren't working 40 The image quality is not good 40 The picture is distorted 41 The display image does not cover the...
E3D420VX User Manual
Page 10
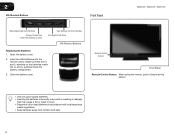
VIZIO 3D LED LCD HDTV with Stand Remote Control with attached stand into an upright position and place on an uneven, unstable, or non-level surface • It is pushed, pulled, or otherwise ... the TV on a clean, flat surface. Installing the TV 1 Inspecting the Package Contents Before installing your inspection, install the TV. Cleaning Cloth Safety Cable (E3D420VX & E3D470VX only) Power Cord 3. Your TV can still fall over . Use the images below to the TV by inserting and tightening the included screws. When you...
VIZIO 3D LED LCD HDTV with Stand Remote Control with attached stand into an upright position and place on an uneven, unstable, or non-level surface • It is pushed, pulled, or otherwise ... the TV on a clean, flat surface. Installing the TV 1 Inspecting the Package Contents Before installing your inspection, install the TV. Cleaning Cloth Safety Cable (E3D420VX & E3D470VX only) Power Cord 3. Your TV can still fall over . Use the images below to the TV by inserting and tightening the included screws. When you...

E3D420VX User Manual
Page 14
...numbers. CC: Open the Closed Captioning menu. Menu: Display the on -screen menu. Number Pad: Use the number pad to the channel last viewed. Remote Control 5 Info: Display the Info Window. Channel Up/Down: Change the channel. When mute is activated, the TV's audio is turned off . Input:...content. Dash (-): Use with number pad to the previous on . App Launcher: Launch the VOD (VIZIO On-Demand), Netflix, or VUDU App. With each press of the TV's audio. E3D320VX / E3D420VX / E3D470VX Remote Control Input App Launcher CC Exit OK Back V Button Volume Up/Down Mute Number Pad 3D QWERTY ...
...numbers. CC: Open the Closed Captioning menu. Menu: Display the on -screen menu. Number Pad: Use the number pad to the channel last viewed. Remote Control 5 Info: Display the Info Window. Channel Up/Down: Change the channel. When mute is activated, the TV's audio is turned off . Input:...content. Dash (-): Use with number pad to the previous on . App Launcher: Launch the VOD (VIZIO On-Demand), Netflix, or VUDU App. With each press of the TV's audio. E3D320VX / E3D420VX / E3D470VX Remote Control Input App Launcher CC Exit OK Back V Button Volume Up/Down Mute Number Pad 3D QWERTY ...
E3D420VX User Manual
Page 15
Close the battery cover. Insert two AAA batteries into the remote control. Remote Control Sensor Front Panel Remote Control Sensor: When using the remote, point it directly at this sensor. • Use only good quality batteries. • Inserting the batteries incorrectly may result in accordance...Settings for Active VIA App Exit App/Exit VIA Dock VIA Shortcut Buttons Replacing the Batteries 1. 2 VIA Shortcut Buttons Front Panel E3D320VX / E3D420VX / E3D470VX Move/Delete App from children and pets. 6 Make sure that may cause a fire or result in injury. • Dispose of old or dead ...
Close the battery cover. Insert two AAA batteries into the remote control. Remote Control Sensor Front Panel Remote Control Sensor: When using the remote, point it directly at this sensor. • Use only good quality batteries. • Inserting the batteries incorrectly may result in accordance...Settings for Active VIA App Exit App/Exit VIA Dock VIA Shortcut Buttons Replacing the Batteries 1. 2 VIA Shortcut Buttons Front Panel E3D320VX / E3D420VX / E3D470VX Move/Delete App from children and pets. 6 Make sure that may cause a fire or result in injury. • Dispose of old or dead ...

E3D420VX User Manual
Page 16
...connection type on both the TV and your device on. 5. For example, if you have the corresponding cable. See the Device Connection Chart on the remote. 4. Press OK. 6. Turn your device are off. 2. Ensure you are ready to use your device and the TV, ensure you are connecting a... TV (without cable box/directly from the on the PC is securely connected. 3. Ensure both your newly connected device, press the INPUT button on the remote and select the connection type (HDMI, RGB, etc) from wall) Perform a channel scan. • RGB Make sure the desktop resolution on -screen ...
...connection type on both the TV and your device on. 5. For example, if you have the corresponding cable. See the Device Connection Chart on the remote. 4. Press OK. 6. Turn your device are off. 2. Ensure you are ready to use your device and the TV, ensure you are connecting a... TV (without cable box/directly from the on the PC is securely connected. 3. Ensure both your newly connected device, press the INPUT button on the remote and select the connection type (HDMI, RGB, etc) from wall) Perform a channel scan. • RGB Make sure the desktop resolution on -screen ...

E3D420VX User Manual
Page 19
... OK. When you have the network key ready. • If you are connecting to your TV connection using the Arrow and OK buttons on the remote. 3. Select the name of your network automatically. If you are finished, highlight Next and press OK. 10 7. Use the OK and Arrow Up/Down... on page 7. • If you have a wireless network, have finished the channel scan, highlight Exit to an electrical outlet. The TV powers on the remote. If the TV is complete. TV Widgets. Press the Power/Standby button on and the Setup App starts. 4. Answer the on-screen questions about your...
... OK. When you have the network key ready. • If you are connecting to your TV connection using the Arrow and OK buttons on the remote. 3. Select the name of your network automatically. If you are finished, highlight Next and press OK. 10 7. Use the OK and Arrow Up/Down... on page 7. • If you have a wireless network, have finished the channel scan, highlight Exit to an electrical outlet. The TV powers on the remote. If the TV is complete. TV Widgets. Press the Power/Standby button on and the Setup App starts. 4. Answer the on-screen questions about your...
E3D420VX User Manual
Page 20
... the 3D mode to match the 3D format of the content. Displays side-by pressing the 3D button on the remote. Displays top/bottom 3D. • Sensio - Please wear 3D glasses." Press the MENU button on -screen menu is displayed. 3. The Output Mode menu is displayed. 2. ... content, you must set the 3D mode to match the content you can also quickly change the 3D mode: 1. Use the Arrow buttons on the remote. If viewing 3D content, highlight 3D and press OK. From this menu, you are watching: • SBS - You can : • Change the 3D mode •...
... the 3D mode to match the 3D format of the content. Displays side-by pressing the 3D button on the remote. Displays top/bottom 3D. • Sensio - Please wear 3D glasses." Press the MENU button on -screen menu is displayed. 3. The Output Mode menu is displayed. 2. ... content, you must set the 3D mode to match the content you can also quickly change the 3D mode: 1. Use the Arrow buttons on the remote. If viewing 3D content, highlight 3D and press OK. From this menu, you are watching: • SBS - You can : • Change the 3D mode •...

E3D420VX User Manual
Page 22
...can display images in four different modes: Wide, Zoom, Normal, and Stretch. Caption channels usually display different languages. E3D320VX / E3D420VX / E3D470VX 5 Changing the Screen Aspect Ratio The TV can display closed captions for programs that include them . Since the 4:3 aspect ratio is ...expands the display image to fit the screen. • Normal preserves the content's original aspect ratio. Press the MENU button on the remote to select the caption channel you are viewing is already formatted for digital (ATSC) TV channels. 4. After highlighting the type of a...
...can display images in four different modes: Wide, Zoom, Normal, and Stretch. Caption channels usually display different languages. E3D320VX / E3D420VX / E3D470VX 5 Changing the Screen Aspect Ratio The TV can display closed captions for programs that include them . Since the 4:3 aspect ratio is ...expands the display image to fit the screen. • Normal preserves the content's original aspect ratio. Press the MENU button on the remote to select the caption channel you are viewing is already formatted for digital (ATSC) TV channels. 4. After highlighting the type of a...


