

E3D470VX Quick Start Guide
Page 18
... power cord is connected securely to the TV and move the antenna around the room or close to On. Customer support and quality service are integral parts of the channel may result in unnecessary shipping charges billed to you are using an antenna, the signal strength of VIZIO's commitment to ensure Mute is set to a window for the best signal. Ensure TV Speakers is off. • Press MENU...
... power cord is connected securely to the TV and move the antenna around the room or close to On. Customer support and quality service are integral parts of the channel may result in unnecessary shipping charges billed to you are using an antenna, the signal strength of VIZIO's commitment to ensure Mute is set to a window for the best signal. Ensure TV Speakers is off. • Press MENU...
E3D470VX Quick Start Guide
Page 19
...-ray player off. See Resetting the Picture Settings in the user manual. • Check all cables to ensure they are using the RGB (computer) input, ensure you have a 3D Blu-ray™ player, VIZIO Theater 3D glasses, and a Blu-ray 3D™ disc. • Turn your external device (Blu-ray™ or DVD player). • If using a supported desktop resolution. • Some television channels add black bars to Wide or Zoom Mode...
...-ray player off. See Resetting the Picture Settings in the user manual. • Check all cables to ensure they are using the RGB (computer) input, ensure you have a 3D Blu-ray™ player, VIZIO Theater 3D glasses, and a Blu-ray 3D™ disc. • Turn your external device (Blu-ray™ or DVD player). • If using a supported desktop resolution. • Some television channels add black bars to Wide or Zoom Mode...
E3D420VX User Manual
Page 5
... cause the batteries to repair or service your TV. Operating your TV away from damage due to power surges. • Do not attempt to leak which can damage the remote control or injure the operator. Pulling on the apparatus. • The mains plug or appliance coupler is intended to alert the user to persons. To reduce the risk...
... cause the batteries to repair or service your TV. Operating your TV away from damage due to power surges. • Do not attempt to leak which can damage the remote control or injure the operator. Pulling on the apparatus. • The mains plug or appliance coupler is intended to alert the user to persons. To reduce the risk...
E3D420VX User Manual
Page 6
... the parties listed below, as before to receive low power, Class A or translator television stations and with cable and satellite TV services, gaming consoles, VCRs, DVD players, and similar products. Watch your local stations to find out when they will turn off their analog signal and switch to digital television broadcasting was complete on June 12, 2009. No extra converter box is needed. E3D320VX / E3D420VX / E3D470VX Television Antenna Connection Protection...
... the parties listed below, as before to receive low power, Class A or translator television stations and with cable and satellite TV services, gaming consoles, VCRs, DVD players, and similar products. Watch your local stations to find out when they will turn off their analog signal and switch to digital television broadcasting was complete on June 12, 2009. No extra converter box is needed. E3D320VX / E3D420VX / E3D470VX Television Antenna Connection Protection...
E3D420VX User Manual
Page 8
... Tuner Mode 21 Scanning for Channels 22 Adding New Channels 22 Skipping Channels 23 Changing the Audio Language 23 Using the Parental Controls 24 Accessing the Parental Controls Menu 24 Enabling or Disabling Program Ratings 24 Locking and Unlocking Channels 24 Blocking and Unblocking Content by Rating 25 Changing the Parental Control Passcode 25 Resetting the Content Locks 25 Changing the Names of the Inputs 26 Changing the On-Screen Menu Language 26 Setting the Time Zone 27 Adjusting the CEC Settings 27 Turning the VIZIO...
... Tuner Mode 21 Scanning for Channels 22 Adding New Channels 22 Skipping Channels 23 Changing the Audio Language 23 Using the Parental Controls 24 Accessing the Parental Controls Menu 24 Enabling or Disabling Program Ratings 24 Locking and Unlocking Channels 24 Blocking and Unblocking Content by Rating 25 Changing the Parental Control Passcode 25 Resetting the Content Locks 25 Changing the Names of the Inputs 26 Changing the On-Screen Menu Language 26 Setting the Time Zone 27 Adjusting the CEC Settings 27 Turning the VIZIO...
E3D420VX User Manual
Page 9
E3D320VX / E3D420VX / E3D470VX Using the Help Menu 28 Displaying System Information 28 Resetting the TV Settings 28 Restoring the TV to Factory Default Settings 29 Using Guided Setup 29 Using the Digital Episode Guide 30 Using the Info Window 30 Using the USB Media Player 31 Using the USB Media Player 31 Connecting a USB Thumb Drive to the TV 31 Playing USB Media 31 Using VIZIO Internet Apps 34 Using the VIA Shortcut Buttons 34 Using the VIA Dock 34 Moving an App on the VIA Dock...
E3D320VX / E3D420VX / E3D470VX Using the Help Menu 28 Displaying System Information 28 Resetting the TV Settings 28 Restoring the TV to Factory Default Settings 29 Using Guided Setup 29 Using the Digital Episode Guide 30 Using the Info Window 30 Using the USB Media Player 31 Using the USB Media Player 31 Connecting a USB Thumb Drive to the TV 31 Playing USB Media 31 Using VIZIO Internet Apps 34 Using the VIA Shortcut Buttons 34 Using the VIA Dock 34 Moving an App on the VIA Dock...
E3D420VX User Manual
Page 13
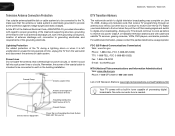
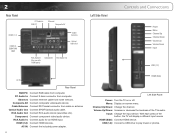
...the button, the TV will display a different input source HDMI (Side): Connect HDMI device. 2 Rear Panel HDMI (1, 2) HDMI (3) E3D470VX ONLY PC Audio In RGB PC Ethernet Composite AV Cable/ Antenna Optical Audio Out RCA Audio In (For use with HDMI ports) Component RCA Audio Out Left Side Panel Controls and Connections Power Menu Channel Up Channel Down Volume Up Volume Down Input USB (1,2) AC IN Rear Panel RGB PC: Connect RGB cable from home network. AC IN: Connect the included power adapter. 4 HDMI (Side) Left Side Panel Power: Turn the TV on -screen menu. Channel Up/Down: Change...
...the button, the TV will display a different input source HDMI (Side): Connect HDMI device. 2 Rear Panel HDMI (1, 2) HDMI (3) E3D470VX ONLY PC Audio In RGB PC Ethernet Composite AV Cable/ Antenna Optical Audio Out RCA Audio In (For use with HDMI ports) Component RCA Audio Out Left Side Panel Controls and Connections Power Menu Channel Up Channel Down Volume Up Volume Down Input USB (1,2) AC IN Rear Panel RGB PC: Connect RGB cable from home network. AC IN: Connect the included power adapter. 4 HDMI (Side) Left Side Panel Power: Turn the TV on -screen menu. Channel Up/Down: Change...

E3D420VX User Manual
Page 14
...: Control VIZIO Internet Apps. E3D320VX / E3D420VX / E3D470VX Remote Control Input App Launcher CC Exit OK Back V Button Volume Up/Down Mute Number Pad 3D QWERTY Keypad Arrow Power/Standby A/V Controls Info Menu Arrow Guide VIA Shortcuts Channel Up/Down Last Dash (-) Battery Compartment VIA Shortcuts 2 Power/Standby: Turn the TV on -screen menu and episode guide. Number Pad: Use the number pad to the channel last viewed. With each press of the TV's audio. Last: Return to manually enter a channel...
...: Control VIZIO Internet Apps. E3D320VX / E3D420VX / E3D470VX Remote Control Input App Launcher CC Exit OK Back V Button Volume Up/Down Mute Number Pad 3D QWERTY Keypad Arrow Power/Standby A/V Controls Info Menu Arrow Guide VIA Shortcuts Channel Up/Down Last Dash (-) Battery Compartment VIA Shortcuts 2 Power/Standby: Turn the TV on -screen menu and episode guide. Number Pad: Use the number pad to the channel last viewed. With each press of the TV's audio. Last: Return to manually enter a channel...
E3D420VX User Manual
Page 24
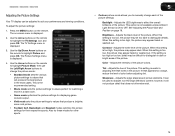
... the remote to highlight Picture Mode, then use the Left/Right Arrow buttons to change each of the picture settings: Backlight - Adjusts the LED brightness to highlight Picture and press OK. See Adjusting the Picture Size and Position on the remote. Tint - Adjusts the edge sharpness of color before adjusting tint. Use the Up/Down Arrow buttons on -screen menu is too low, the picture may be used to manually change the picture mode: • Standard mode sets the various picture settings...
... the remote to highlight Picture Mode, then use the Left/Right Arrow buttons to change each of the picture settings: Backlight - Adjusts the LED brightness to highlight Picture and press OK. See Adjusting the Picture Size and Position on the remote. Tint - Adjusts the edge sharpness of color before adjusting tint. Use the Up/Down Arrow buttons on -screen menu is too low, the picture may be used to manually change the picture mode: • Standard mode sets the various picture settings...
E3D420VX User Manual
Page 27
...; Analog Audio Out - When you have finished adjusting the advanced audio settings, press the EXIT button on the remote. 18 E3D320VX / E3D420VX / E3D470VX Adjusting the Advanced Audio Settings To adjust the advanced audio settings: 1. Turns the built-in speakers on page 19. 4. The Advanced Audio menu is displayed. 2. Additionally, StudioSound HD completes the entertainment experience by selecting Flat, Rock, Pop, Classical, or Jazz. Sets the volume control properties for the Optical output when connected to Standard.) Change...
...; Analog Audio Out - When you have finished adjusting the advanced audio settings, press the EXIT button on the remote. 18 E3D320VX / E3D420VX / E3D470VX Adjusting the Advanced Audio Settings To adjust the advanced audio settings: 1. Turns the built-in speakers on page 19. 4. The Advanced Audio menu is displayed. 2. Additionally, StudioSound HD completes the entertainment experience by selecting Flat, Rock, Pop, Classical, or Jazz. Sets the volume control properties for the Optical output when connected to Standard.) Change...

E3D420VX User Manual
Page 30
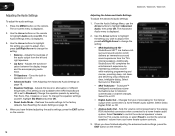
... parental controls • Change the on-screen menu language • Set the time • Adjust the CEC settings • Turn the VIZIO logo on the remote. 21 The on the remote to highlight the Input icon and press OK. The TV Settings menu is displayed. 5. E3D320VX / E3D420VX / E3D470VX 5 Changing the TV Settings Using the TV settings menu, you can be connected to your TV, you must set the tuner mode. 1. Press the EXIT button on or off Changing the Input Source External...
... parental controls • Change the on-screen menu language • Set the time • Adjust the CEC settings • Turn the VIZIO logo on the remote. 21 The on the remote to highlight the Input icon and press OK. The TV Settings menu is displayed. 5. E3D320VX / E3D420VX / E3D470VX 5 Changing the TV Settings Using the TV settings menu, you can be connected to your TV, you must set the tuner mode. 1. Press the EXIT button on or off Changing the Input Source External...
E3D420VX User Manual
Page 49
... buttons on the remote aren't working electrical outlet. • Ensure the power cable is not good. • For the best image quality, view high-definition programs using an antenna, the signal strength of VIZIO's commitment to 9 pm (PST) Saturday - Friday: 6 am to 4pm (PST) The TV displays "No Signal." • Press the INPUT button on the remote to fix the issue using this troubleshooting guide, you are using digital sources. see your device's user manual for the best signal...
... buttons on the remote aren't working electrical outlet. • Ensure the power cable is not good. • For the best image quality, view high-definition programs using an antenna, the signal strength of VIZIO's commitment to 9 pm (PST) Saturday - Friday: 6 am to 4pm (PST) The TV displays "No Signal." • Press the INPUT button on the remote to fix the issue using this troubleshooting guide, you are using digital sources. see your device's user manual for the best signal...
E3D420VX User Manual
Page 50
... the antenna around the room or close to a window for the best signal. E3D320VX / E3D420VX / E3D470VX The picture is distorted. • Nearby electrical devices may be interfering with 480i input, press the WIDE button on the remote to change the screen mode. Ensure your TV's display capabilities. Separate the TV from electrical appliances, cars, or flourescent lights. • Ensure all cables are inherent to this type...
... the antenna around the room or close to a window for the best signal. E3D320VX / E3D420VX / E3D470VX The picture is distorted. • Nearby electrical devices may be interfering with 480i input, press the WIDE button on the remote to change the screen mode. Ensure your TV's display capabilities. Separate the TV from electrical appliances, cars, or flourescent lights. • Ensure all cables are inherent to this type...
E3D420VX User Manual
Page 53
... you always clear all applicable data and passwords. C ON PARTS AND LABOR Covers units purchased as installation and set-up issues or any type of customer misuse, modifications or adjustments, as well as new in United States and Puerto Rico Only. VIZIO provides a warranty to show that a Product is determined to obtain warranty service. PRE-AUTHORIZATION MUST BE OBTAINED BEFORE SENDING...
... you always clear all applicable data and passwords. C ON PARTS AND LABOR Covers units purchased as installation and set-up issues or any type of customer misuse, modifications or adjustments, as well as new in United States and Puerto Rico Only. VIZIO provides a warranty to show that a Product is determined to obtain warranty service. PRE-AUTHORIZATION MUST BE OBTAINED BEFORE SENDING...
User Guide
Page 5
...unplugging your dealer immediately. The power cord fails or frays. - Your TV is required, contact your dealer and refer all servicing to leak which can damage the remote control or injure the operator. If any other hazards....operating instructions unless you to high voltages, electric shock, and other cables are for an extended period of time, unplug the power cord. • To reduce risk of your TV may cause the batteries to qualified service personnel. • WARNING: Keep your dealer. Pulling on the apparatus. • The mains plug or appliance coupler is used for use...
...unplugging your dealer immediately. The power cord fails or frays. - Your TV is required, contact your dealer and refer all servicing to leak which can damage the remote control or injure the operator. If any other hazards....operating instructions unless you to high voltages, electric shock, and other cables are for an extended period of time, unplug the power cord. • To reduce risk of your TV may cause the batteries to qualified service personnel. • WARNING: Keep your dealer. Pulling on the apparatus. • The mains plug or appliance coupler is used for use...
User Guide
Page 8
... Your Network Connection 28 Changing the TV Settings 29 Changing the Input Source 29 Setting the Tuner Mode 30 Scanning for Channels 30 Adding New Channels 30 Skipping Channels 31 Changing the Audio Language 32 Using the Parental Controls 32 Accessing the Parental Controls Menu 32 Enabling or Disabling Program Ratings 33 Locking and Unlocking Channels 33 Blocking and Unblocking Content by Rating 33 Changing the Parental Control Passcode 34 1 Table of Digital Closed Captions.. 21 Activating the Sleep Timer 21 Setting the Auto Power Off Feature 21 Adjusting the Picture Settings...
... Your Network Connection 28 Changing the TV Settings 29 Changing the Input Source 29 Setting the Tuner Mode 30 Scanning for Channels 30 Adding New Channels 30 Skipping Channels 31 Changing the Audio Language 32 Using the Parental Controls 32 Accessing the Parental Controls Menu 32 Enabling or Disabling Program Ratings 33 Locking and Unlocking Channels 33 Blocking and Unblocking Content by Rating 33 Changing the Parental Control Passcode 34 1 Table of Digital Closed Captions.. 21 Activating the Sleep Timer 21 Setting the Auto Power Off Feature 21 Adjusting the Picture Settings...

User Guide
Page 33
... audio settings, press the EXIT button on the remote. 26 Use the Arrow buttons to change the setting: • SRS StudioSound HD StudioSound HD™ is displayed. 2. Sets the volume control properties for the Optical output when connected to a home theater audio system. TruVolume™ intelligently normalizes volume fluctuations due to highlight Advanced Audio, then press OK. 5 Adjusting the Advanced Audio Settings To adjust the advanced audio settings: 1. Changes the type of processing for the analog RCA (red/white...
... audio settings, press the EXIT button on the remote. 26 Use the Arrow buttons to change the setting: • SRS StudioSound HD StudioSound HD™ is displayed. 2. Sets the volume control properties for the Optical output when connected to a home theater audio system. TruVolume™ intelligently normalizes volume fluctuations due to highlight Advanced Audio, then press OK. 5 Adjusting the Advanced Audio Settings To adjust the advanced audio settings: 1. Changes the type of processing for the analog RCA (red/white...
User Guide
Page 57
... power cable is off. • Check the audio settings. See Replacing the Batteries on the TV don't look right. • Adust the Color and Tint settings in the Picture menu. The colors on page 12 50 A The TV displays "No Signal." • Press the INPUT button on the remote control to select a different input source. • If you are using an antenna, the signal strength of the channel may be low. See Scanning...
... power cable is off. • Check the audio settings. See Replacing the Batteries on the TV don't look right. • Adust the Color and Tint settings in the Picture menu. The colors on page 12 50 A The TV displays "No Signal." • Press the INPUT button on the remote control to select a different input source. • If you are using an antenna, the signal strength of the channel may be low. See Scanning...

User Guide
Page 58
... the best image quality, view high-definition programs using an extremely high level of technology. I change input source, the display image changes size. • The TV remembers the viewing mode on the remote to adjust the volume. The display image does not cover the entire screen. • If you are in RGB mode (computer), ensure that are using an antenna, the signal strength of the channel may be noticable. • See Changing the Screen...
... the best image quality, view high-definition programs using an extremely high level of technology. I change input source, the display image changes size. • The TV remembers the viewing mode on the remote to adjust the volume. The display image does not cover the entire screen. • If you are in RGB mode (computer), ensure that are using an antenna, the signal strength of the channel may be noticable. • See Changing the Screen...
User Guide
Page 61
... TO A VIZIO SERVICE CENTER. Type of Service Defective Products must utilize either repair or replace the Product at VIZIO's option and sole discretion. This warranty does not cover, for example: cosmetic damage, normal wear and tear, improper operation, improper voltage supply or power surges, signal issues, damages from the unit before it is serviced, regardless of the servicer. ANY IMPLIED WARRANTIES, INCLUDING ANY IMPLIED WARRANTY OF MERCHANTABILITY...
... TO A VIZIO SERVICE CENTER. Type of Service Defective Products must utilize either repair or replace the Product at VIZIO's option and sole discretion. This warranty does not cover, for example: cosmetic damage, normal wear and tear, improper operation, improper voltage supply or power surges, signal issues, damages from the unit before it is serviced, regardless of the servicer. ANY IMPLIED WARRANTIES, INCLUDING ANY IMPLIED WARRANTY OF MERCHANTABILITY...


