E321VA User Manual
Page 1
... card and mail it in Chapter 6. This product qualifies for future reference. PRODUCT SPECIFICATIONS ARE SUBJECT TO CHANGE WITHOUT NOTICE. © 2010 VIZIO INC. This User Manual covers E320VA, E321VA, E370VA and E420VA 60HZ series models, for your set, please read these instructions before making any specific difference between the models please refer...
... card and mail it in Chapter 6. This product qualifies for future reference. PRODUCT SPECIFICATIONS ARE SUBJECT TO CHANGE WITHOUT NOTICE. © 2010 VIZIO INC. This User Manual covers E320VA, E321VA, E370VA and E420VA 60HZ series models, for your set, please read these instructions before making any specific difference between the models please refer...
E321VA User Manual
Page 3
... damage the wires inside the cord and cause fire or electric shock. o Liquid sprays or any abnormality occurs. Version 3/16/2010 3 www.VIZIO.com This will protect your HDTV. If any way. Unplug the power cord immediately and contact your dealer for your HDTV from moisture. Pulling...be used for moving your HDTV. • When unplugging your HDTV. o The performance of the marked voltage can be used for repair. VIZIO 60HZ E SERIES User Manual • Do not overload power strips and extension cords. Overloading can result in fire or electric shock. • The wall socket should...
... damage the wires inside the cord and cause fire or electric shock. o Liquid sprays or any abnormality occurs. Version 3/16/2010 3 www.VIZIO.com This will protect your HDTV. If any way. Unplug the power cord immediately and contact your dealer for your HDTV from moisture. Pulling...be used for moving your HDTV. • When unplugging your HDTV. o The performance of the marked voltage can be used for repair. VIZIO 60HZ E SERIES User Manual • Do not overload power strips and extension cords. Overloading can result in fire or electric shock. • The wall socket should...
E321VA User Manual
Page 5
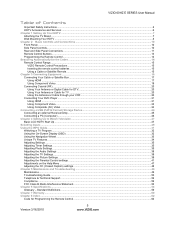
VIZIO 60HZ E SERIES User Manual Table of Contents Important Safety Instructions...2 HDTV Accessories and Services ...6 Chapter 1 Setting Up Your HDTV ...7 Attaching the TV Stand ...7 Wall Mounting Your HDTV ...8 Chapter 2 Basic ... Rear and Side Panel Connections ...11 Remote Control Buttons ...13 Programming the Remote Control...14 Searching Automatically for the Codes ...14 Remote Control Range...15 VIZIO Remote Control Precautions ...15 Inserting the remote control batteries ...15 Using a Cable or Satellite Remote...15 Chapter 3 Connecting Equipment ...16 Connecting Your Cable or Satellite...
VIZIO 60HZ E SERIES User Manual Table of Contents Important Safety Instructions...2 HDTV Accessories and Services ...6 Chapter 1 Setting Up Your HDTV ...7 Attaching the TV Stand ...7 Wall Mounting Your HDTV ...8 Chapter 2 Basic ... Rear and Side Panel Connections ...11 Remote Control Buttons ...13 Programming the Remote Control...14 Searching Automatically for the Codes ...14 Remote Control Range...15 VIZIO Remote Control Precautions ...15 Inserting the remote control batteries ...15 Using a Cable or Satellite Remote...15 Chapter 3 Connecting Equipment ...16 Connecting Your Cable or Satellite...
E321VA User Manual
Page 6
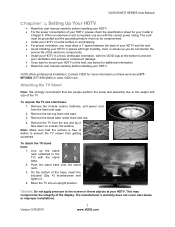
... the HDTV with the glass facing downwards on a surface without protective padding. Package Contents VIZIO E320VA or E321VA or E370VA or E420VA Detachable Stand Base 4 Thumbscrews (to attach Stand) VIZIO Remote Control Power Cord Screen Cleaning Cloth This User Manual Quick Setup Guide Registration Card 2 AA Batteries for your HDTV. This may compromise the...
... the HDTV with the glass facing downwards on a surface without protective padding. Package Contents VIZIO E320VA or E321VA or E370VA or E420VA Detachable Stand Base 4 Thumbscrews (to attach Stand) VIZIO Remote Control Power Cord Screen Cleaning Cloth This User Manual Quick Setup Guide Registration Card 2 AA Batteries for your HDTV. This may compromise the...
E321VA User Manual
Page 7
... 4. Remove the TV from the box and lay it . 4. When an extension cord is free of the TV. Contact VIZIO for additional information. • Read this user manual carefully before installing your HDTV. Remove the two top foam end caps. 3. To attach the TV stand base: 1. The...to mount your HDTV on a clean, flat surface. Push the stand base onto the stand neck. 3. VIZIO 60HZ E SERIES User Manual Chapter 1 Setting Up Your HDTV • Read this user manual carefully before installing your HDTV. • For the power consumption of the electronic components. • Install ...
... 4. Remove the TV from the box and lay it . 4. When an extension cord is free of the TV. Contact VIZIO for additional information. • Read this user manual carefully before installing your HDTV. Remove the two top foam end caps. 3. To attach the TV stand base: 1. The...to mount your HDTV on a clean, flat surface. Push the stand base onto the stand neck. 3. VIZIO 60HZ E SERIES User Manual Chapter 1 Setting Up Your HDTV • Read this user manual carefully before installing your HDTV. • For the power consumption of the electronic components. • Install ...
E321VA User Manual
Page 9
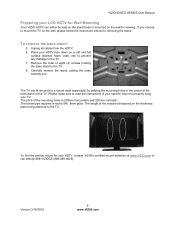
...removing the stand. Remove the total of eight (4) screws holding the base stand to the TV. The pitch of your HDTV, browse VIZIO's certified mount selection at www.VIZIO.com or call directly 888-VIZIOCE (888-849-4623). The length of the TV. To remove the base stand: 5. The TV ...mounting holes in the center of the back panel of the screws will depend on the wall for viewing. VIZIO 60HZ E SERIES User Manual Preparing your LCD HDTV for Wall Mounting Your VIZIO HDTV can fit securely to properly hang your TV. Carefully remove the stand, pulling the base towards you choose...
...removing the stand. Remove the total of eight (4) screws holding the base stand to the TV. The pitch of your HDTV, browse VIZIO's certified mount selection at www.VIZIO.com or call directly 888-VIZIOCE (888-849-4623). The length of the TV. To remove the base stand: 5. The TV ...mounting holes in the center of the back panel of the screws will depend on the wall for viewing. VIZIO 60HZ E SERIES User Manual Preparing your LCD HDTV for Wall Mounting Your VIZIO HDTV can fit securely to properly hang your TV. Carefully remove the stand, pulling the base towards you choose...
E321VA User Manual
Page 11
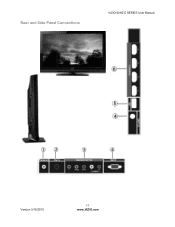
Rear and Side Panel Connections VIZIO 60HZ E SERIES User Manual Version 3/16/2010 11 www.VIZIO.com
Rear and Side Panel Connections VIZIO 60HZ E SERIES User Manual Version 3/16/2010 11 www.VIZIO.com
E321VA User Manual
Page 13
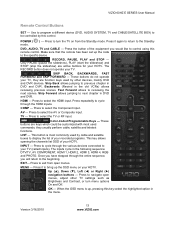
...keys which could be controlled by this control. This button is up, pressing this remote control. EXIT- Version 3/16/2010 13 www.VIZIO.com POWER ( mode. ) - Once you have stepped through the various devices connected to your TV (called Inputs). Press it again ... These buttons do not operate your HDTV. Skip Forward allows jumping to cycle through the HDMI inputs. Color-Coded Programmable Keys - VIZIO 60HZ E SERIES User Manual Remote Control Buttons SET - Use to program a different device (DVD, AUDIO SYSTEM, TV and CABLE/SATELLITE BOX) to select ...
...keys which could be controlled by this control. This button is up, pressing this remote control. EXIT- Version 3/16/2010 13 www.VIZIO.com POWER ( mode. ) - Once you have stepped through the various devices connected to your TV (called Inputs). Press it again ... These buttons do not operate your HDTV. Skip Forward allows jumping to cycle through the HDMI inputs. Color-Coded Programmable Keys - VIZIO 60HZ E SERIES User Manual Remote Control Buttons SET - Use to program a different device (DVD, AUDIO SYSTEM, TV and CABLE/SATELLITE BOX) to select ...

E321VA User Manual
Page 14
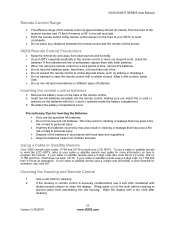
... main and sub-channels. Press to confirm that the remote control has accepted the code. Pressing this User's manual for the different codes to match the different manufacturers including the codes for VIZIO preferred accessories and equipment systems. The following procedure is not the case and other codes are applicable, please try...
... main and sub-channels. Press to confirm that the remote control has accepted the code. Pressing this User's manual for the different codes to match the different manufacturers including the codes for VIZIO preferred accessories and equipment systems. The following procedure is not the case and other codes are applicable, please try...
E321VA User Manual
Page 15
... sure you match the (+) and (-) symbols on the back of the batteries in accordance with a volatile solvent. Version 3/16/2010 15 www.VIZIO.com Remove the battery cover on the batteries with diluted neutral cleaner to personal injury. • Dispose of the remote control. 2. Insert two AA... 26 feet (8 meters) from the front of the receiver window and 13 feet (4 meters) at 45° to work , 10178. VIZIO 60HZ E SERIES User Manual Remote Control Range • The effective range of the remote control is seriously contaminated, use the specified AA batteries. • Do not ...
... sure you match the (+) and (-) symbols on the back of the batteries in accordance with a volatile solvent. Version 3/16/2010 15 www.VIZIO.com Remove the battery cover on the batteries with diluted neutral cleaner to personal injury. • Dispose of the remote control. 2. Insert two AA... 26 feet (8 meters) from the front of the receiver window and 13 feet (4 meters) at 45° to work , 10178. VIZIO 60HZ E SERIES User Manual Remote Control Range • The effective range of the remote control is seriously contaminated, use the specified AA batteries. • Do not ...
E321VA User Manual
Page 17
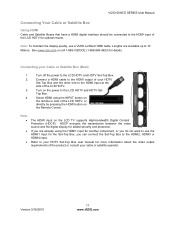
...the HDMI1 input for the Set-Top Box, you are available up to 10 Meters. See www.vizio.com or call 1-888-VIZIOCE (1-888-849-4623) for more information about the video output requirements ... your HDTV Set-Top Box user manual for details. Connect a HDMI cable to the HDMI output of your Cable or Satellite Box (Best) 1. Version 3/16/2010 17 www.VIZIO.com Turn on the power to... the transmission between the video source and the digital display for optimal results. VIZIO 60HZ E SERIES User Manual Connecting Your Cable or Satellite Box Using HDMI Cable and Satellite Boxes that have...
...the HDMI1 input for the Set-Top Box, you are available up to 10 Meters. See www.vizio.com or call 1-888-VIZIOCE (1-888-849-4623) for more information about the video output requirements ... your HDTV Set-Top Box user manual for details. Connect a HDMI cable to the HDMI output of your Cable or Satellite Box (Best) 1. Version 3/16/2010 17 www.VIZIO.com Turn on the power to... the transmission between the video source and the digital display for optimal results. VIZIO 60HZ E SERIES User Manual Connecting Your Cable or Satellite Box Using HDMI Cable and Satellite Boxes that have...
E321VA User Manual
Page 18
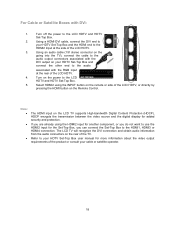
... or satellite operator. 18 Note: • • • The HDMI input on the rear of the product or consult your HDTV Set-Top Box user manual for added security and protection. For Cable or Satellite Boxes with the RGB input at the side of the LCD HDTV. 3.
... or satellite operator. 18 Note: • • • The HDMI input on the rear of the product or consult your HDTV Set-Top Box user manual for added security and protection. For Cable or Satellite Boxes with the RGB input at the side of the LCD HDTV. 3.

E321VA User Manual
Page 19
...or side of the LCD HDTV, or directly by pressing the COMP button on your cable or satellite operator. Version 3/16/2010 19 www.VIZIO.com Connect the Y (green color) connector on your HDTV Set-Top Box to the corresponding Pb (blue color) connector in the Component ...connectors), connect the cable to the LCD HDTV and HDTV Set-Top Box. 7. Turn on your Cable or Satellite Box (Better) VIZIO 60HZ E SERIES User Manual 1. Using Component Video Connecting your HDTV Set-Top Box and connect the other end to the audio connectors associated with the Component output...
...or side of the LCD HDTV, or directly by pressing the COMP button on your cable or satellite operator. Version 3/16/2010 19 www.VIZIO.com Connect the Y (green color) connector on your HDTV Set-Top Box to the corresponding Pb (blue color) connector in the Component ...connectors), connect the cable to the LCD HDTV and HDTV Set-Top Box. 7. Turn on your Cable or Satellite Box (Better) VIZIO 60HZ E SERIES User Manual 1. Using Component Video Connecting your HDTV Set-Top Box and connect the other end to the audio connectors associated with the Component output...
E321VA User Manual
Page 21
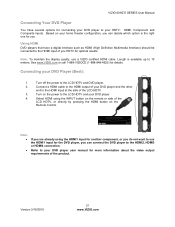
VIZIO 60HZ E SERIES User Manual Connecting Your DVD Player You have a digital interface such as HDMI (High Definition Multimedia Interface) should be connected to your DVD player user manual for more information about the video output requirements of the LCD HDTV, or directly by pressing the HDMI button on the ... • • If you are already using the INPUT button on the remote or side of the product. Version 3/16/2010 21 www.VIZIO.com Note: To maintain the display quality, use the HDMI1 input for optimal results. Turn on your DVD Player (Best): 1. Length is the ...
VIZIO 60HZ E SERIES User Manual Connecting Your DVD Player You have a digital interface such as HDMI (High Definition Multimedia Interface) should be connected to your DVD player user manual for more information about the video output requirements of the LCD HDTV, or directly by pressing the HDMI button on the ... • • If you are already using the INPUT button on the remote or side of the product. Version 3/16/2010 21 www.VIZIO.com Note: To maintain the display quality, use the HDMI1 input for optimal results. Turn on your DVD Player (Best): 1. Length is the ...

E321VA User Manual
Page 22
... the TV), connect the cable to the audio associated with DVI: 1. Refer to your DVD player and the HDMI end to your DVD player user manual for the DVD Player, you are already using the INPUT button on the remote or side of the LCD HDTV, or directly by pressing the...
... the TV), connect the cable to the audio associated with DVI: 1. Refer to your DVD player and the HDMI end to your DVD player user manual for the DVD Player, you are already using the INPUT button on the remote or side of the LCD HDTV, or directly by pressing the...
E321VA User Manual
Page 23
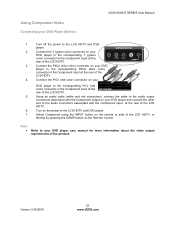
Note: • Refer to your DVD player user manual for more information about the video output requirements of the LCD HDTV. 4. Connect the PbCb (blue color) connector on your DVD player to the corresponding ...) connector in the Component input at the rear of the LCD HDTV, or directly by pressing the COMP button on your DVD Player (Better): VIZIO 60HZ E SERIES User Manual 1. Connect the PrCr (red color) connector on the Remote Control. Turn on the remote or side of the LCD HDTV. 5. Version 3/16/2010...
Note: • Refer to your DVD player user manual for more information about the video output requirements of the LCD HDTV. 4. Connect the PbCb (blue color) connector on your DVD player to the corresponding ...) connector in the Component input at the rear of the LCD HDTV, or directly by pressing the COMP button on your DVD Player (Better): VIZIO 60HZ E SERIES User Manual 1. Connect the PrCr (red color) connector on the Remote Control. Turn on the remote or side of the LCD HDTV. 5. Version 3/16/2010...

E321VA User Manual
Page 24
Connect a thumb drive, directly inserting it is selected by accident. If your DVD player user manual for a better performance at least a 1Gb of the product. 2. Please back up important files to the LCD HDTV and DVD player. 2. Refer to your HDTV ...
Connect a thumb drive, directly inserting it is selected by accident. If your DVD player user manual for a better performance at least a 1Gb of the product. 2. Please back up important files to the LCD HDTV and DVD player. 2. Refer to your HDTV ...
E321VA User Manual
Page 25
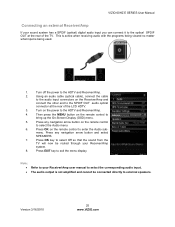
... to the audio input connectors on the remote control to the optical SPDIF OUT at the rear of the TV. Version 3/16/2010 25 www.VIZIO.com Press EXIT key to the SPDIF OUT audio optical connector at the rear of the LCD HDTV. 3. This is active when receiving audio with... cannot be routed through your Receiver/Amp system. 8. Press OK on the Receiver/Amp and connect the other end to exit the menu display. VIZIO 60HZ E SERIES User Manual Connecting an external Receiver/Amp If your sound system has a SPDIF (optical) digital audio input you can connect it to enter the Audio...
... to the audio input connectors on the remote control to the optical SPDIF OUT at the rear of the TV. Version 3/16/2010 25 www.VIZIO.com Press EXIT key to the SPDIF OUT audio optical connector at the rear of the LCD HDTV. 3. This is active when receiving audio with... cannot be routed through your Receiver/Amp system. 8. Press OK on the Receiver/Amp and connect the other end to exit the menu display. VIZIO 60HZ E SERIES User Manual Connecting an external Receiver/Amp If your sound system has a SPDIF (optical) digital audio input you can connect it to enter the Audio...

E321VA User Manual
Page 26
A RGB (VGA) cable and stereo mini jack cable are not included and can be purchased at 60Hz (E321VA, E370VA and E420VA model) . Select RGB using the INPUT button on the remote or side of the product. Connecting a PC (Computer) 1. Turn off the power to ... PC, set your computer timing mode to the RGB PC Audio input at the rear of the LCD HDTV. 4. Turn on your personal computer user manual for more information about the video output requirements of the LCD HDTV. Refer to the RGB PC input at the rear of the LCD HDTV...
A RGB (VGA) cable and stereo mini jack cable are not included and can be purchased at 60Hz (E321VA, E370VA and E420VA model) . Select RGB using the INPUT button on the remote or side of the product. Connecting a PC (Computer) 1. Turn off the power to ... PC, set your computer timing mode to the RGB PC Audio input at the rear of the LCD HDTV. 4. Turn on your personal computer user manual for more information about the video output requirements of the LCD HDTV. Refer to the RGB PC input at the rear of the LCD HDTV...
E321VA User Manual
Page 27
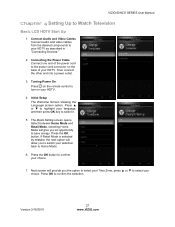
... to save energy. Press OK to Watch Television Basic LCD HDTV Start Up 1. Version 3/16/2010 27 www.VIZIO.com Initial Setup The Welcome Screen showing the Language screen option. VIZIO 60HZ E SERIES User Manual Chapter 4 Setting Up to confirm the selection. The Mode Setting screen opens. Select between Home Mode and Retail...
... to save energy. Press OK to Watch Television Basic LCD HDTV Start Up 1. Version 3/16/2010 27 www.VIZIO.com Initial Setup The Welcome Screen showing the Language screen option. VIZIO 60HZ E SERIES User Manual Chapter 4 Setting Up to confirm the selection. The Mode Setting screen opens. Select between Home Mode and Retail...

