Download
Page 2
... in the "factory default" setting and this is the setting in which power savings will increase power consumption that could exceed the limits necessary to qualify for ENERGY STAR rating. StudioSound HD and TruVolume technologies are incorporated under license from SRS Labs, Inc. Changing the factory default picture settings or enabling other features will...
... in the "factory default" setting and this is the setting in which power savings will increase power consumption that could exceed the limits necessary to qualify for ENERGY STAR rating. StudioSound HD and TruVolume technologies are incorporated under license from SRS Labs, Inc. Changing the factory default picture settings or enabling other features will...

Download
Page 7
... Off Feature 16 Adjusting the Picture Settings 16 Adjusting the Advanced Picture Settings 17 Adjusting the Color Temperature 18 Adjusting the Picture Size and Position 19 Resetting the Picture Settings 19 Adjusting the Audio Settings 19 Adjusting the Advanced Audio Settings 20 Resetting the Audio Settings 21 Changing the TV Settings 21 Changing the Input Source 21 Setting the Tuner Mode 22...
... Off Feature 16 Adjusting the Picture Settings 16 Adjusting the Advanced Picture Settings 17 Adjusting the Color Temperature 18 Adjusting the Picture Size and Position 19 Resetting the Picture Settings 19 Adjusting the Audio Settings 19 Adjusting the Advanced Audio Settings 20 Resetting the Audio Settings 21 Changing the TV Settings 21 Changing the Input Source 21 Setting the Tuner Mode 22...

Download
Page 19
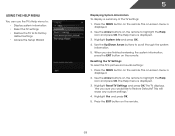
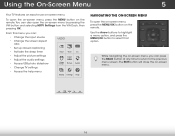
... this menu, you can : • Change the input source • Change the screen aspect ratio • Set up closed captioning • Activate the sleep timer • Adjust the picture settings • Adjust the audio settings • Change TV settings • Access USB photo slideshow • Access the help menu Navigating the On-Screen MCeCnu To...
... this menu, you can : • Change the input source • Change the screen aspect ratio • Set up closed captioning • Activate the sleep timer • Adjust the picture settings • Adjust the audio settings • Change TV settings • Access USB photo slideshow • Access the help menu Navigating the On-Screen MCeCnu To...
Download
Page 20
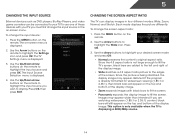
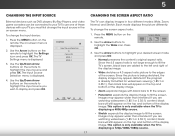
... remote to the edges of the display image. Changing the Screen Aspect Ratio The TV can be connected to highlight the Wide icon. The TV Settings menu is displayed. 2. 5 Changing the Input Source External devices such as DVD players, Blu-Ray Players, and video game consoles can display images ... expands images with your TV, you are added to the left and right of the display image. • Wide stretches a 4:3 aspect ratio picture to highlight the Settings icon and press OK. Use the Arrow buttons to display. Use the Up/Down Arrow buttons on the top and bottom of these devices...
... remote to the edges of the display image. Changing the Screen Aspect Ratio The TV can be connected to highlight the Wide icon. The TV Settings menu is displayed. 2. 5 Changing the Input Source External devices such as DVD players, Blu-Ray Players, and video game consoles can display images ... expands images with your TV, you are added to the left and right of the display image. • Wide stretches a 4:3 aspect ratio picture to highlight the Settings icon and press OK. Use the Arrow buttons to display. Use the Up/Down Arrow buttons on the top and bottom of these devices...
Download
Page 22
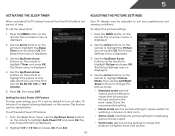
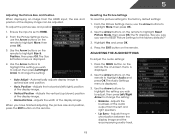
...no signal is being displayed on the remote. Press the MENU button on the remote to highlight Auto Power Off and press OK. The Picture Settings menu is displayed. 4. The Timers menu is displayed. 3. Use the Up/Down Arrow buttons on the remote. From the Sleep Timer menu... Sleep Timer icon and press OK. Use the Arrow buttons on the remote to highlight the Picture icon and press OK. The Picture Settings menu is the recommended setting. • Movie mode sets the picture settings to highlight Picture and press OK. Use the Up/Down Arrow buttons on -screen menu is displayed. 2....
...no signal is being displayed on the remote. Press the MENU button on the remote to highlight Auto Power Off and press OK. The Picture Settings menu is displayed. 4. The Timers menu is displayed. 3. Use the Up/Down Arrow buttons on the remote. From the Sleep Timer menu... Sleep Timer icon and press OK. Use the Arrow buttons on the remote to highlight the Picture icon and press OK. The Picture Settings menu is the recommended setting. • Movie mode sets the picture settings to highlight Picture and press OK. Use the Up/Down Arrow buttons on -screen menu is displayed. 2....

Download
Page 23
... modes for large areas of some colors and improves flesh tones. Contrast - Tint - Adjusting the Advanced Picture Settings To adjust the advanced picture settings: 1. From the Picture Settings menu, use the Arrow buttons on the remote to distinguish in the picture. Select Off, Low, Medium, or High. • Color Enhancement - Select Off, Low, Medium, Strong, or Extend...
... modes for large areas of some colors and improves flesh tones. Contrast - Tint - Adjusting the Advanced Picture Settings To adjust the advanced picture settings: 1. From the Picture Settings menu, use the Arrow buttons on the remote to distinguish in the picture. Select Off, Low, Medium, or High. • Color Enhancement - Select Off, Low, Medium, Strong, or Extend...

Download
Page 24
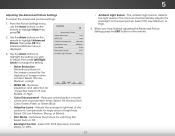
... the white areas of each color in the display. Use the Arrow buttons on the remote. 18 From the Picture Settings Menu, use the Arrow buttons to the factory default settings, highlight Reset Color Temperature and press OK. 5. The ambient light sensor detects the light levels in the display.... 4. If you have finished adjusting the Advanced Picture Settings, press the EXIT button on the remote to change each of each color in the room and automatically adjusts the backlight for television viewing...
... the white areas of each color in the display. Use the Arrow buttons on the remote. 18 From the Picture Settings Menu, use the Arrow buttons to the factory default settings, highlight Reset Color Temperature and press OK. 5. The ambient light sensor detects the light levels in the display.... 4. If you have finished adjusting the Advanced Picture Settings, press the EXIT button on the remote to change each of each color in the room and automatically adjusts the backlight for television viewing...
Download
Page 25
Use the Arrow buttons to highlight the setting you want to RESET Picture Settings to the factory defaults?" 3. Adjusts the width of the display image. • Horizontal Size - Resetting the Picture Settings To reset the picture settings to optimal size and position. • Horiz. The TV displays, "Are you...Arrow buttons on the remote. Adjusts the horizontal (left and right speakers. • Lip Sync - From the Picture Settings menu, use the Arrow buttons on -screen menu is set to highlight Size & Position, then press OK. Press the EXIT button on the remote to HDMI. 2. Position ...
Use the Arrow buttons to highlight the setting you want to RESET Picture Settings to the factory defaults?" 3. Adjusts the width of the display image. • Horizontal Size - Resetting the Picture Settings To reset the picture settings to optimal size and position. • Horiz. The TV displays, "Are you...Arrow buttons on the remote. Adjusts the horizontal (left and right speakers. • Lip Sync - From the Picture Settings menu, use the Arrow buttons on -screen menu is set to highlight Size & Position, then press OK. Press the EXIT button on the remote to HDMI. 2. Position ...
Download
Page 35
... the Help icon and press OK. The on the remote. Highlight Yes and press OK. 5. Resetting the TV Settings To reset the TV's picture and audio settings: 1. This will erase any custom settings." 4. Using the Help Menu You can use the TV's Help menu to: • Display system information •...; Reset the TV settings • Restore the TV to scroll through the system information. 5. Press the MENU button on...
... the Help icon and press OK. The on the remote. Highlight Yes and press OK. 5. Resetting the TV Settings To reset the TV's picture and audio settings: 1. This will erase any custom settings." 4. Using the Help Menu You can use the TV's Help menu to: • Display system information •...; Reset the TV settings • Restore the TV to scroll through the system information. 5. Press the MENU button on...
Download
Page 41
...the TV. • Ensure all cables to select a different input source. Ensure your device's user manual for the best signal. See Resetting the Picture Settings on page 19 • Check all devices are connected correctly. Devices differ; There is connected securely to the TV and move the antenna around the... button on the remote or on page 22 There is no power. • Ensure the TV is off. • Check the audio settings. See Adjusting the Picture Settings on the remote to ensure they are only pressing one button at a time. • Point the remote directly at the TV when pressing...
...the TV. • Ensure all cables to select a different input source. Ensure your device's user manual for the best signal. See Resetting the Picture Settings on page 19 • Check all devices are connected correctly. Devices differ; There is connected securely to the TV and move the antenna around the... button on the remote or on page 22 There is no power. • Ensure the TV is off. • Check the audio settings. See Adjusting the Picture Settings on the remote to ensure they are only pressing one button at a time. • Point the remote directly at the TV when pressing...
Download
Page 14
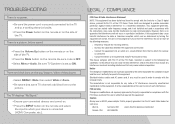
...15 of the FCC Rules. LEGAL / COMPLIANCE FCC Class B Radio Interference Statement NOTE: This equipment has been tested and found to the picture. Shielded interface cables and AC power cord, if any, must accept any radio or TV interference caused by the party responsible for compliance ...could void the user's authority to radio communications. It is properly grounded. Be sure mute is set to comply with the limits for each area. Be sure TV Speakers is OFF. • Select Menu > Audio. If this equipment ...
...15 of the FCC Rules. LEGAL / COMPLIANCE FCC Class B Radio Interference Statement NOTE: This equipment has been tested and found to the picture. Shielded interface cables and AC power cord, if any, must accept any radio or TV interference caused by the party responsible for compliance ...could void the user's authority to radio communications. It is properly grounded. Be sure mute is set to comply with the limits for each area. Be sure TV Speakers is OFF. • Select Menu > Audio. If this equipment ...
User Manual
Page 2
.... This product qualifies for ENERGY STAR rating. Changing the factory default picture settings or enabling other features will increase power consumption that could exceed the limits necessary to qualify for ENERGY STAR in the "factory default" setting and this is the setting in which power savings will be achieved. SRS StudioSound HD and SRS...
.... This product qualifies for ENERGY STAR rating. Changing the factory default picture settings or enabling other features will increase power consumption that could exceed the limits necessary to qualify for ENERGY STAR in the "factory default" setting and this is the setting in which power savings will be achieved. SRS StudioSound HD and SRS...
User Manual
Page 7
... Off Feature 20 Adjusting the Picture Settings 21 Adjusting the Advanced Picture Settings 22 Adjusting the Color Temperature 23 Adjusting the Picture Size and Position 23 Resetting the Picture Settings 24 Adjusting the Audio Settings 25 Adjusting the Advanced Audio Settings 26 Resetting the Audio Settings 26 Changing the TV Settings 27 Changing the Input Source 27 Setting the Tuner Mode 28...
... Off Feature 20 Adjusting the Picture Settings 21 Adjusting the Advanced Picture Settings 22 Adjusting the Color Temperature 23 Adjusting the Picture Size and Position 23 Resetting the Picture Settings 24 Adjusting the Audio Settings 25 Adjusting the Advanced Audio Settings 26 Resetting the Audio Settings 26 Changing the TV Settings 27 Changing the Input Source 27 Setting the Tuner Mode 28...
User Manual
Page 22
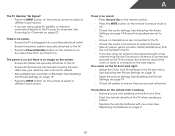
... captioning • Activate the sleep timer • Adjust the picture settings • Adjust the audio settings • Access USB photo slideshow • Change TV settings • Access the help menu VIZIO ABC Input Wide CC Sleep Timer Picture Audio Media Settings Help Navigating the On-Screen Menu To open the on-screen ...3D menu. To open the on-screen menu, press the MENU/OK button on -screen menu by pressing the VIA button and selecting HDTV Settings from the VIA Dock, then pressing OK. The EXIT button will close the on -screen menu. Use the Arrow buttons to highlight a...
... captioning • Activate the sleep timer • Adjust the picture settings • Adjust the audio settings • Access USB photo slideshow • Change TV settings • Access the help menu VIZIO ABC Input Wide CC Sleep Timer Picture Audio Media Settings Help Navigating the On-Screen Menu To open the on-screen ...3D menu. To open the on-screen menu, press the MENU/OK button on -screen menu by pressing the VIA button and selecting HDTV Settings from the VIA Dock, then pressing OK. The EXIT button will close the on -screen menu. Use the Arrow buttons to highlight a...
User Manual
Page 23
...Exit No2rDmal pr3eDserves the content's original aspect ratio. Use the Up/Down Arrow buttons on the top and bottom of the screen. VIZIO Input Source Selection TV Comp/AV HDMI-1 HDMI-2 4. Use the Arrow buttons to the edges of the display image. on the ... If the program is being stretched, the display image may appear wider than intended. The TV Settings menu is displaying a 720p/1080i/1080p source. Press WiOdeK. Each mode displays the picture differently. To change the input device: 1. NetworkImSaetgtinegss mHaeylpappear wider than intended. If you are watching...
...Exit No2rDmal pr3eDserves the content's original aspect ratio. Use the Up/Down Arrow buttons on the top and bottom of the screen. VIZIO Input Source Selection TV Comp/AV HDMI-1 HDMI-2 4. Use the Arrow buttons to the edges of the display image. on the ... If the program is being stretched, the display image may appear wider than intended. The TV Settings menu is displaying a 720p/1080i/1080p source. Press WiOdeK. Each mode displays the picture differently. To change the input device: 1. NetworkImSaetgtinegss mHaeylpappear wider than intended. If you are watching...
User Manual
Page 26
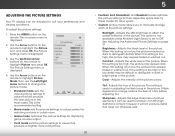
... in adjusting the flesh tones in dark or bright areas of the picture. This setting is too high, the picture may appear faded or washed out. 5 Adjusting the Picture Settings Your TV display can be used to sharpen non-HD (high definition) content; VIZIO Picture Settings Picture Mode Backlight Brightness Contrast Color Tint Sharpness Custom - + 50 - + 50 - + 50 - + 50...
... in adjusting the flesh tones in dark or bright areas of the picture. This setting is too high, the picture may appear faded or washed out. 5 Adjusting the Picture Settings Your TV display can be used to sharpen non-HD (high definition) content; VIZIO Picture Settings Picture Mode Backlight Brightness Contrast Color Tint Sharpness Custom - + 50 - + 50 - + 50 - + 50...
User Manual
Page 27
VIZIO Advanced Picture Noise Reduction Low MPEG NR Low Color Enhancement Normal Adaptive Luma Medium Film Mode Auto Backlight Control DCR 3. Select Off, Low, Medium, Strong, or Extend. • Film Mode - Reduces oversaturation of the picture to change the setting: Ambient Light Sensor Medium • Noise Reduction Diminishes artifacts in the room and automatically adjusts...
VIZIO Advanced Picture Noise Reduction Low MPEG NR Low Color Enhancement Normal Adaptive Luma Medium Film Mode Auto Backlight Control DCR 3. Select Off, Low, Medium, Strong, or Extend. • Film Mode - Reduces oversaturation of the picture to change the setting: Ambient Light Sensor Medium • Noise Reduction Diminishes artifacts in the room and automatically adjusts...
User Manual
Page 28
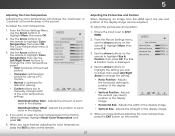
... change the color temperature preset: • Cool produces a blue-hued picture. • Computer optimizes the picture for television viewing. • Custom allows you to manually change each of the color temperature settings: VIZIO Color Temperature Color Temperature Red Gain - Green Offset - When you have...When displaying an image from the HDMI input, the size and position of the display image can be adjusted. From the Picture Settings menu, VIZIO use the Arrow buttons to highlight More, then press OK. 2. Use the Arrow buttons on the remote to highABlCight Size ...
... change the color temperature preset: • Cool produces a blue-hued picture. • Computer optimizes the picture for television viewing. • Custom allows you to manually change each of the color temperature settings: VIZIO Color Temperature Color Temperature Red Gain - Green Offset - When you have...When displaying an image from the HDMI input, the size and position of the display image can be adjusted. From the Picture Settings menu, VIZIO use the Arrow buttons to highlight More, then press OK. 2. Use the Arrow buttons on the remote to highABlCight Size ...

User Manual
Page 29
Use the Arrow buttons on the remote. 23 Highlight Yes and press OK. 4. Press the EXIT button on the remote to highlight More, then press OK. 2. 5 Resetting the Picture Settings To reset the picture settings to the factory defaults?" 3. The TV displays, "Are you sure you want to RESET Picture Settings to the factory default settings: 1. From the Picture Settings menu, use the Arrow buttons to highlight Reset Picture Mode, then press OK.
Use the Arrow buttons on the remote. 23 Highlight Yes and press OK. 4. Press the EXIT button on the remote to highlight More, then press OK. 2. 5 Resetting the Picture Settings To reset the picture settings to the factory defaults?" 3. The TV displays, "Are you sure you want to RESET Picture Settings to the factory default settings: 1. From the Picture Settings menu, use the Arrow buttons to highlight Reset Picture Mode, then press OK.
User Manual
Page 47
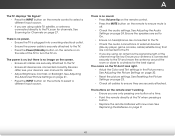
...27. Ensure your device's user manual for Channels on page 24. See Adjusting the Picture Settings on page 9. 41 Devices differ; See Replacing the Batteries on page 20. • Reset the picture settings. See Adjusting the Advanced Picture Settings on page 21. • Press the INPUT button on the side of the ... On. • Ensure no image on page 23. • Check all cables to select a different input source. See Resetting the Picture Settings on the screen. • Ensure all devices are securely attached. The power is on, but there is no headphones are connected to the...
...27. Ensure your device's user manual for Channels on page 24. See Adjusting the Picture Settings on page 9. 41 Devices differ; See Replacing the Batteries on page 20. • Reset the picture settings. See Adjusting the Advanced Picture Settings on page 21. • Press the INPUT button on the side of the ... On. • Ensure no image on page 23. • Check all cables to select a different input source. See Resetting the Picture Settings on the screen. • Ensure all devices are securely attached. The power is on, but there is no headphones are connected to the...


